Looking for a refreshing dish that’s easy to make? You’ve found it! My Zesty Italian Pasta Salad combines vibrant veggies and tangy dressing for a fun twist on your usual sides. Perfect for picnics, potlucks, or just a family meal, this salad is packed with flavor and color. Dive into this guide, where I’ll share step-by-step instructions, tips, and variations to elevate your culinary game! Let’s get cooking!
Ingredients
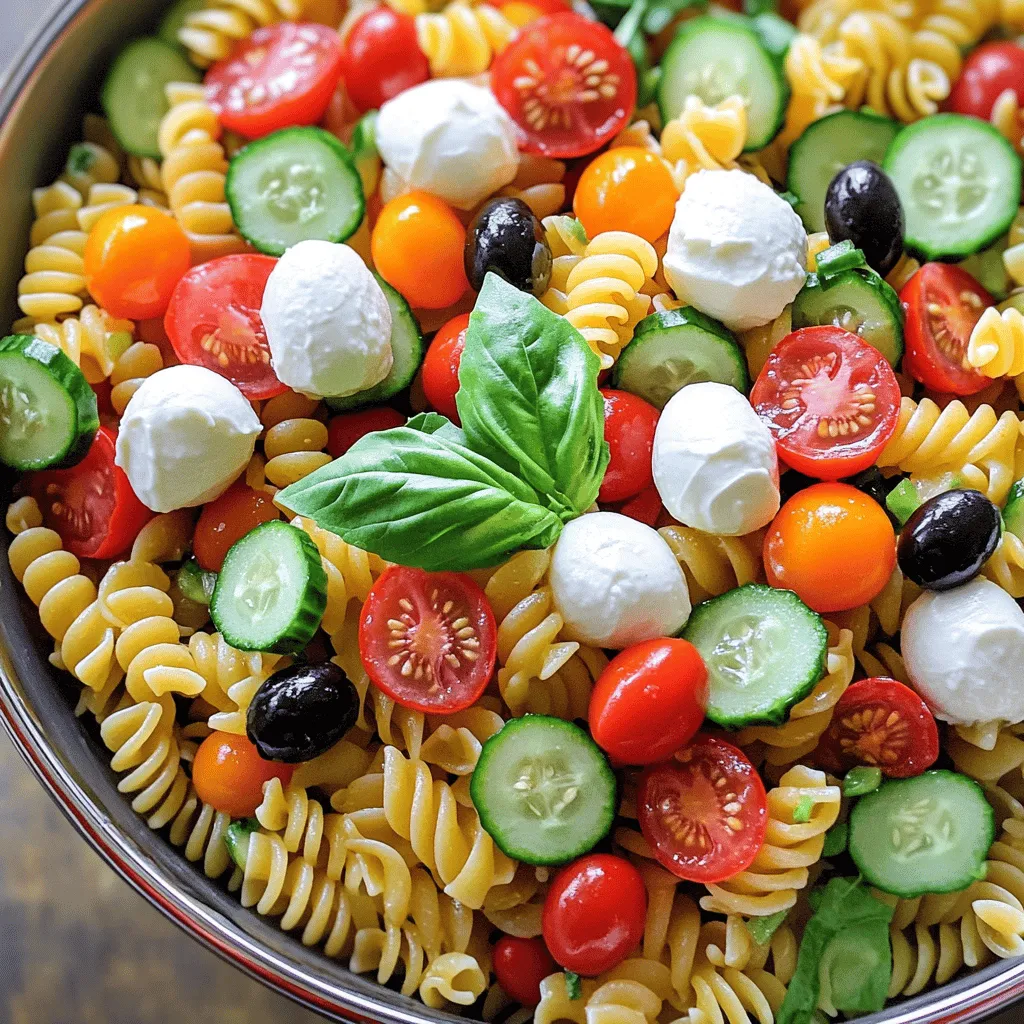
To make a Zesty Italian Pasta Salad, you need fresh and colorful ingredients. Here’s the complete list of ingredients you will need:
– 2 cups rotini pasta
– 1 cup cherry tomatoes, halved
– 1 cup cucumber, diced
– 1/2 cup black olives, sliced
– 1/2 cup red bell pepper, chopped
– 1/4 cup red onion, finely chopped
– 1/2 cup mozzarella balls, halved
– 1/3 cup Italian dressing
– 1 tablespoon fresh basil, chopped
– 1 teaspoon dried oregano
– Salt and pepper to taste
Each ingredient brings its own flavor and texture. The rotini pasta is fun and holds dressings well. Cherry tomatoes add sweetness, while cucumbers give a nice crunch. Black olives bring a salty bite, and bell peppers add color and freshness. Red onions add a bit of sharpness, while mozzarella balls provide creaminess.
For the dressing, you can use store-bought or make your own. I love using fresh basil and oregano for a burst of flavor. Finally, season with salt and pepper to balance everything.Enjoy your cooking adventure!
Step-by-Step Instructions
Cooking the Pasta
– Bring salted water to a boil.
– Cook rotini pasta until al dente.
– Drain and cool under cold water.
Cooking the pasta is the first step. Use a large pot and fill it with water. Add a good amount of salt to the water. This step adds flavor to the pasta. Once the water boils, add the rotini pasta. Follow the package directions for cooking time until it is al dente. This means the pasta should be firm but cooked. After cooking, drain the pasta and rinse it under cold water. This stops the cooking process and cools the pasta quickly.
Preparing the Vegetables
– Combine cherry tomatoes, cucumber, olives, bell pepper, and onion.
– Stir gently to mix.
While the pasta cools, you can prepare the vegetables. Take a large bowl and add the halved cherry tomatoes, diced cucumber, sliced black olives, chopped red bell pepper, and finely chopped red onion. Each vegetable brings its own flavor and texture to the salad. Stir gently to mix them without squishing the tomatoes. This colorful mix will make your salad bright and fun!
Assembling the Salad
– Add cooled pasta to the vegetable mix.
– Incorporate mozzarella balls.
– Drizzle with dressing and seasonings.
Once the pasta is cool, add it to the bowl with the mixed vegetables. Next, add halved mozzarella balls. These little cheese bites add creaminess. Now, drizzle the Italian dressing over the pasta and vegetables. Don’t forget to sprinkle the fresh basil, dried oregano, salt, and pepper. These seasonings will enhance the flavors.
Tossing and Chilling
– Toss ingredients to combine.
– Refrigerate for at least 30 minutes.
Now, it is time to mix everything. Toss all the ingredients together carefully. You want every part to be coated with dressing. Cover the bowl with a lid or plastic wrap. Place it in the fridge for at least 30 minutes. Chilling the salad helps the flavors blend well. Trust me, the wait is worth it!
Tips & Tricks
Perfecting the Flavor
To get the best taste from your Zesty Italian Pasta Salad, choose a good Italian dressing. Brands like Annie’s or Ken’s work well. Don’t use too much dressing at first; you can always add more later. Always taste as you go. A little salt and pepper can boost the flavor. Remember, it’s easy to add, but hard to take away.
Presentation Ideas
Serving your pasta salad is just as fun as making it! You can use a large bowl for a family-style meal. This makes it easy for everyone to help themselves. For a more stylish look, you can serve it in small bowls. This way, each guest gets their own. A sprinkle of fresh basil on top adds a nice touch. It makes the dish look bright and tasty!
Common Mistakes to Avoid
One common mistake is overcooking the pasta. Make sure to cook it just until it’s al dente. This keeps your pasta from getting mushy. Another mistake is not chilling the salad. Chilling helps the flavors blend well. If you skip this step, your salad may not taste as good. Aim to chill it for at least 30 minutes before serving.
Variations
Dietary Substitutions
You can easily adapt this salad to fit different diets. For a gluten-free option, use gluten-free rotini pasta. It cooks just like regular pasta. Many brands make great options now. For a vegan twist, swap the mozzarella cheese with vegan cheese or even avocado. Both add creaminess and flavor to your dish.
Adding Protein
Want to make this salad more filling? Add some protein! Grilled chicken works great. Just chop it into bite-sized pieces. Shrimp is another tasty choice. Cook it until pink and toss it in. For a plant-based option, chickpeas are perfect. They add a nice texture. When you add protein, taste your salad again. You may need to adjust the seasoning. Just add a pinch of salt or a dash of dressing.
Seasonal Variations
Using seasonal veggies can elevate your pasta salad. In summer, add fresh zucchini or bell peppers. They bring a nice crunch and color. In fall, roasted butternut squash can add sweet notes. You can also switch up the dressing. Try a balsamic vinaigrette for a tangy twist. This keeps your salad exciting and fresh year-round.
Storage Info
How to Store Leftovers
To store your zesty Italian pasta salad, use airtight containers. Glass or plastic containers work well. Make sure the lid seals tightly to keep air out. This helps maintain freshness. For best results, store the salad in the fridge within two hours of serving.
Freezing Options
You can freeze pasta salad, but it might change texture. To freeze, place it in a freezer-safe container. Label the container with the date. When ready to eat, thaw it in the fridge overnight. Reheat gently on the stove or in the microwave. Be careful not to overcook it again.
Shelf Life
In the fridge, your pasta salad lasts about three to five days. Keep an eye out for signs of spoilage. If it has an off smell, or if the vegetables look mushy, it’s best to toss it. Trust your senses; they guide you well in the kitchen.
FAQs
How can I make Zesty Italian Pasta Salad ahead of time?
You can make Zesty Italian Pasta Salad a day before serving. Cook the pasta, mix it with the veggies, and add the dressing. Store it in the fridge. Chilling helps the flavors blend well. Just give it a good toss before serving. This makes it a great option for parties.
Can I customize the ingredients?
Yes, you can customize the ingredients to fit your taste. Try adding different vegetables like bell peppers or zucchini. You can also swap out mozzarella for feta or add beans for protein. Get creative! Make it your own.
What should I serve with Italian Pasta Salad?
Italian Pasta Salad pairs well with grilled meats, like chicken or steak. It also goes nicely with crusty bread or a fresh green salad. For a fun twist, serve it with garlic bread for a complete meal.
Is it safe to leave pasta salad out at room temperature?
No, it’s not safe to leave pasta salad out for long. The safe time is about two hours. After that, bacteria can grow, making it unsafe to eat. Keep it chilled if you are not serving it right away.
Can I use homemade Italian dressing?
Absolutely! Homemade Italian dressing adds a personal touch. You can control the flavors and ingredients. Mix olive oil, vinegar, herbs, and spices to create your blend. This makes the salad even more special.It combines fresh veggies, pasta, and cheese. Each bite is full of flavor. Here’s a quick look at what you need and how to make it.
Ingredients:
– 2 cups rotini pasta
– 1 cup cherry tomatoes, halved
– 1 cup cucumber, diced
– 1/2 cup black olives, sliced
– 1/2 cup red bell pepper, chopped
– 1/4 cup red onion, finely chopped
– 1/2 cup mozzarella balls, halved
– 1/3 cup Italian dressing (store-bought or homemade)
– 1 tablespoon fresh basil, chopped
– 1 teaspoon dried oregano
– Salt and pepper to taste
Method:
First, cook the rotini pasta in salted boiling water. Follow the package instructions for best results. Drain and cool the pasta under cold water. This stops the cooking and keeps it firm.
While the pasta cools, chop the veggies. Use a large bowl for the cherry tomatoes, cucumber, black olives, red bell pepper, and red onion. Stir them gently to mix.
Next, add the cooled pasta to the veggies. Toss in the mozzarella balls, making sure they spread evenly.
Now, drizzle the Italian dressing over the mix. Add the chopped basil, dried oregano, and a sprinkle of salt and pepper. Toss everything together until well coated.
Finally, cover the bowl and chill in the fridge for at least 30 minutes. This step helps all the flavors blend nicely.
Serve the pasta salad in a large bowl. You can also use individual bowls for a fun touch. Garnish with extra basil leaves for color. Enjoy this tasty dish at picnics or family meals!
This blog post detailed how to make a zesty Italian pasta salad. We reviewed all the ingredients, cooking steps, and tips for the best flavor. You learned how to store leftovers and variations to suit your diet. Remember to chill the salad and avoid overcooking the pasta. With these tips, you can impress friends and family with this easy dish. Enjoy creating your own version of this refreshing salad!


