Witch’s Potion Halloween Punch Festive and Fun Drink

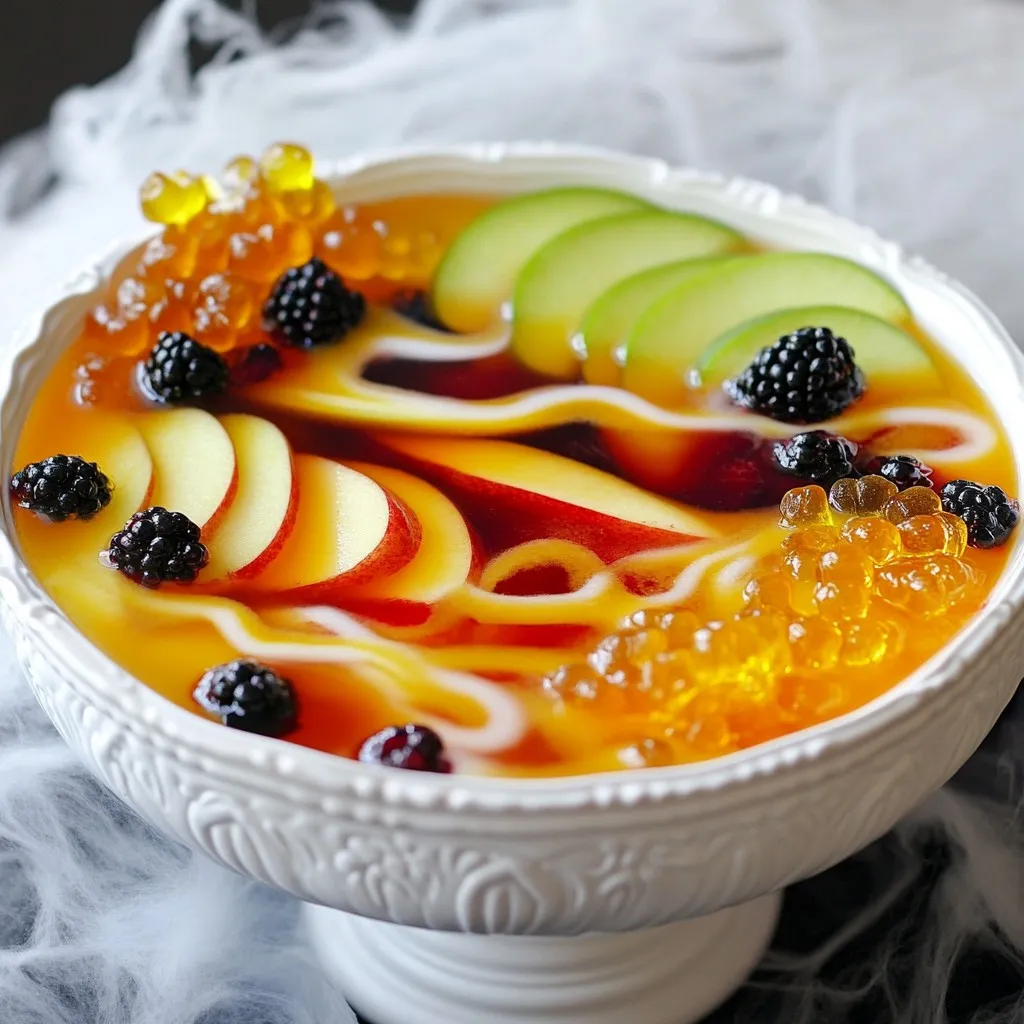
Get ready to brew up some magic this Halloween with my Witch’s Potion Halloween Punch! This festive drink is a fun blend of apple cider, fresh juices, and spooky garnishes, perfect for your Halloween party. With its vibrant colors and bubbling effects, it’s sure to delight guests of all ages. Let’s dive into the ingredients and create a thrilling beverage that will charm everyone!
Why I Love This Recipe
- Festive Flavor Explosion: This punch combines the delightful flavors of apple cider, orange juice, and cranberry juice, creating a deliciously refreshing drink that’s perfect for Halloween festivities.
- Spooky Presentation: The addition of floating apple wedges and blackberries gives the punch a magical and whimsical look, making it a centerpiece for any Halloween gathering.
- Effervescent Delight: Adding sparkling water or lemon-lime soda not only enhances the flavor but also creates a fizzy effect that adds excitement to each sip.
- Interactive Garnish: Gummy worms provide a fun and playful garnish that will surely entertain guests, especially kids, making it a hit at any Halloween party.
Ingredients
When making Witch’s Potion Halloween Punch, you need the right mix of flavors. Here’s what you will need:
– 4 cups apple cider
– 2 cups freshly squeezed orange juice
– 1 cup cranberry juice
– 1 tablespoon fresh ginger, finely grated
– 1/2 teaspoon ground cinnamon
– 1/2 teaspoon ground nutmeg
– 1 cup sparkling water or lemon-lime soda
– 1 green apple, cored and sliced into thin wedges
– 1 cup fresh blackberries
– 1 cup gummy worms, for a fun touch
– 1-2 cups dry ice, handle with caution
Gather these ingredients to create a sweet and fun drink. The apple cider gives it that cozy fall flavor. Fresh orange juice adds brightness, while cranberry juice brings a nice tartness. Ginger adds a spicy kick.
The spices, cinnamon and nutmeg, warm up the punch even more. The sparkling water or soda adds fizz, making it lively. The green apple and blackberries provide visual appeal, floating in the punch. Gummy worms add a playful feel, perfect for Halloween.
Lastly, dry ice creates an enchanting fog. But remember, handle it carefully! With these ingredients, you will craft a potion that delights both kids and adults.

Step-by-Step Instructions
Preparation of the Juice Mixture
To start, find a large punch bowl. Pour in 4 cups of apple cider. Next, add 2 cups of freshly squeezed orange juice. Then, include 1 cup of cranberry juice. Stir the mixture gently to blend the juices evenly. This mix gives a fruity base that everyone will love.
Adding Spices for Flavor
Now, we need to add some spice! Grate 1 tablespoon of fresh ginger and add it to the punch. Sprinkle in 1/2 teaspoon of ground cinnamon and 1/2 teaspoon of ground nutmeg. Stir thoroughly. This step makes the drink smell wonderful and boosts the flavor.
Creating Fizz and Presentation
Just before serving, it’s time to add some fizz. Pour in 1 cup of sparkling water or lemon-lime soda. Do this slowly to create a nice bubble effect. Next, add sliced green apple wedges and fresh blackberries to the punch. They float and look amazing! For a magical touch, carefully add 1-2 cups of dry ice. This creates a fun bubbling effect. Remember to wear gloves when handling dry ice. Keep it away from your skin and any food. Serve the punch right away to enjoy its fizzy and fruity charm!
Tips & Tricks
Ensuring the Best Flavor Combination
– Always use fresh juices instead of bottled. Fresh juice makes the punch taste bright and lively.
– Adjust spice levels to fit your taste. If you love ginger, add more!
Safe Handling of Dry Ice
– Always wear gloves when handling dry ice. This keeps your skin safe from burns.
– Never let dry ice touch your skin or drinks. Serve it in the punch bowl for fun fog. Dispose of dry ice safely in a well-ventilated area.
Serving Suggestions
– Use clear glassware to show off the colorful punch. It looks stunning in a big bowl.
– Get creative with garnishes! Use fresh mint leaves or orange slices. They add flair beyond gummy worms.
Pro Tips
- Use Fresh Juices: For the best flavor, always use freshly squeezed juices. It enhances the taste of the punch and makes it more vibrant.
- Chill Ingredients: Pre-chill the juices and add ice cubes to keep the punch cold without diluting the flavors.
- Garnish Creatively: Experiment with different fruits like raspberries or slices of citrus for added color and flavor.
- Safety First with Dry Ice: Always handle dry ice with gloves and never consume it directly. Use it solely for visual effects in your punch.

Variations
Kid-Friendly Version
To make a kid-friendly version, swap the sparkling water for soda. This keeps the drink bubbly and fun for children. You can also add fun, non-alcoholic items like colorful fruit slices or fun drink stirrers. Try adding a splash of lemon juice for extra zing.
Alcoholic Twist
For adults, add a little spirit to the punch. You can mix in vodka or rum for a nice kick. Flavored liqueurs, like orange or berry, work well too. They enhance the fruity flavors of the punch. Just remember to adjust the amount so it stays tasty.
Seasonal Variants
Try changing the fruits based on what’s fresh. Apples and blackberries are great, but pears or pomegranates can be fun too. You can also add pumpkin spice or cloves for a fall twist. This makes each batch unique while keeping the spirit of the season alive.
Storage Info
Best Practices for Refrigeration
To store leftovers safely, pour the punch into an airtight container. Seal it well to keep out air. You can store it in the fridge for up to three days. This keeps the flavors fresh and vibrant. Always check for any changes in smell or appearance before drinking.
Freezing Options
Can the punch be frozen? Yes, you can freeze it! Pour the punch into ice cube trays for easy use later. This way, you can add a fun twist to other drinks. When thawing, place the cubes in the fridge overnight or let them sit at room temperature. Avoid using a microwave, as it may change the flavor. Enjoy the punch’s fruity taste even after freezing!
FAQs
How do I make Witch’s Potion Halloween Punch ahead of time?
You can make this punch a few hours before your party. Mix the juices and spices in a bowl. Chill it in the fridge. Just before serving, add the sparkling water and fruit. This keeps the fizz nice and fresh.
Can I use different fruits in this punch?
Yes! You can swap in fruits like strawberries or raspberries. You might try peaches or even orange slices. Get creative with what you like. Just remember to keep the colors bright for that spooky look!
Is it safe to consume dry ice in the punch?
Dry ice can create a spooky effect, but it is not for eating. Always use gloves when handling it. Place it in the punch just before serving. Make sure it does not touch the drink. Wait until it fully dissolves before serving.
How long will the punch last once prepared?
Once made, the punch tastes best within 2 hours. After that, the fizz may go flat. You can store leftovers in the fridge for up to a day. Just remember to add more fizz if you plan to serve it again!
Creating the perfect Witch’s Potion Halloween Punch is easy and fun. We combined apple cider, orange juice, and cranberry juice to make a tasty base. Adding ginger and spices gives it a flavorful twist. Don’t forget the sparkling water for fizz and the dry ice for a spooky effect.
Remember to be safe when using dry ice, and customize the recipe to fit your taste. Whether for kids or adults, this punch will impress your guests. Enjoy serving a drink that is not only delicious but also eye-catching. Make your Halloween special with this fun recip

Witch’s Potion Halloween Punch
Ingredients
- 4 cups apple cider
- 2 cups freshly squeezed orange juice
- 1 cup cranberry juice
- 1 tablespoon fresh ginger, finely grated
- 0.5 teaspoon ground cinnamon
- 0.5 teaspoon ground nutmeg
- 1 cup sparkling water or lemon-lime soda
- 1 green apple cored and sliced into thin wedges
- 1 cup fresh blackberries
- 1-2 cups dry ice (for an enchanting effect, handle with caution)
- 1 cup gummy worms (for whimsical garnish)
Instructions
- Begin by selecting a large punch bowl, then pour in the apple cider, freshly squeezed orange juice, and cranberry juice. Gently stir the mixture to blend all the juices together evenly.
- Next, introduce the grated fresh ginger along with the ground cinnamon and nutmeg. Stir thoroughly to incorporate these flavors into the punch, ensuring an aromatic blend.
- Just before you are ready to serve your potion, add the sparkling water or lemon-lime soda. Pour it slowly into the base mixture to create a delightful fizz and enhance the punch's effervescence.
- To create a fun and spooky visual, add the sliced green apple wedges and fresh blackberries to the punch. They will float enticingly and contribute to the magical aesthetic of your potion.
- For a striking presentation, carefully and safely add dry ice to the punch bowl. This will create a captivating bubbling effect. Remember to wear gloves while handling dry ice, and do not allow it to come into direct contact with any consumable ingredients or skin.
- Serve the Witch’s Potion immediately to delight your guests with its mesmerizing fizz and deliciously fruity flavors! Garnish each glass with a gummy worm for an additional spooky touch.


![- Dried hibiscus flowers - Water - Honey or agave syrup - Freshly squeezed lime juice - Sparkling water - Fresh mint leaves - Lime slices To create a hibiscus mocktail, you need simple ingredients. Dried hibiscus flowers are the star of the drink. They give a deep red color and a tart flavor. You will also need water to steep the flowers. Honey or agave syrup adds sweetness, so choose what you prefer. Freshly squeezed lime juice brings in a zesty kick. Sparkling water gives it a bubbly touch that makes it refreshing. For garnishing, fresh mint leaves and lime slices add a nice look and extra flavor. This recipe is easy to follow, and you can find the full recipe above for more details. Each ingredient plays a role in making the mocktail vibrant and tasty. Enjoy crafting this delightful drink! 1. Boiling the water Start by boiling 4 cups of water in a medium pot. This gets the process rolling and ensures you have hot water for steeping. 2. Steeping the hibiscus flowers Once the water boils, add 2 cups of dried hibiscus flowers. Reduce the heat to a simmer. Let these flowers steep for about 15 minutes. This step is key to getting that rich color and flavor. 3. Straining the mixture After steeping, remove the pot from the heat. Use a fine mesh sieve to strain the tea into a large bowl. Discard the used flowers. You’ll be left with a beautiful, deep red liquid. 4. Sweetening the tea While the tea is warm, add in 1/2 cup of honey or agave syrup. Stir until it fully dissolves. Adjust the sweetness to fit your taste. 5. Chilling the mocktail Let the sweetened tea cool to room temperature. For a refreshing drink, chill it in the fridge for at least 30 minutes. This helps all the flavors blend nicely. 6. Serving suggestions To serve, fill glasses with ice. Pour the chilled hibiscus mixture until it’s about 3/4 full. Add 1-2 cups of sparkling water on top. This adds a fun fizz! Garnish Finish off with fresh mint leaves and a slice of lime. This adds a pop of color and a zesty aroma. This recipe is a fun way to make a delicious drink at home. Check out the Full Recipe for a detailed guide. Enjoy your refreshing hibiscus mocktail! - Adjusting sweetness levels The key to a great hibiscus mocktail is balance. You can tweak the sweetness to your taste. Start with half a cup of honey or agave syrup. Taste it after mixing in the lime juice. If it’s too tart, add more sweetener slowly. Mix well after each addition. Remember, everyone has different preferences! - Choosing the right garnish Garnishes can elevate your drink. Fresh mint leaves add a pop of green and a lovely aroma. Lime slices make it bright and colorful. You can also use edible flowers for a stunning look. Choose what you love and what fits your vibe. A well-garnished mocktail looks as good as it tastes! - Serving suggestions for gatherings When serving at a party, think about presentation. Use tall glasses filled with ice for a cool effect. A pitcher of the hibiscus mix makes it easy to serve. Guests can add their own sparkling water to taste. This way, everyone can enjoy a refreshing drink made just for them. Plus, it’s a fun way to get people involved! You can find the full recipe to make this refreshing drink in the earlier sections. Enjoy crafting your perfect hibiscus mocktail! {{image_4}} You can make the hibiscus mocktail even more exciting. Adding different flavors can create fun twists. Here are some great ideas. - Adding fruit blends: You can mix in berries like strawberries or blueberries. Orange juice also works well and adds a sweet touch. Just blend these fruits into the hibiscus tea. They will give your drink a fruity punch and vibrant color. - Herbal modifications: Herbs can add a unique taste. Try including fresh basil or rosemary. Add a few leaves to your glass before pouring the drink. The aroma from the herbs will enhance your experience. - Using flavored sparkling water: Instead of plain sparkling water, try flavored versions. Options like lime, lemon, or berry-flavored sparkling water can boost the flavor. This small change can make your mocktail stand out. Feel free to mix and match these ideas. Experimenting can lead to your new favorite drink! For an easy start, check out the Full Recipe. Storing your hibiscus mocktail properly keeps it fresh and tasty. Here’s how to do it: - Refrigeration tips: First, pour any leftover mocktail into a clean glass jar. Seal it tightly with a lid. You can store it in the fridge for up to three days. The cold will help maintain its bright flavor. - Freezing options for hibiscus tea: If you want to keep it longer, freeze the hibiscus tea. Pour the tea into ice cube trays. Once frozen, transfer the cubes to a freezer bag. This way, you can add them to drinks later. - Best practices for maintaining freshness: Always keep your mocktail in an airtight container. Avoid direct sunlight and heat. This helps prevent spoilage and keeps the flavor bright. You can find the [Full Recipe] to make this delightful drink at any time! What is a hibiscus mocktail? A hibiscus mocktail is a non-alcoholic drink made with hibiscus tea. It is bright red and has a tart, fruity flavor. You can enjoy it on hot days or at parties. This drink is refreshing and easy to make. What are the health benefits of hibiscus? Hibiscus is rich in vitamins and minerals. It can help lower blood pressure and improve heart health. It also has antioxidants that support overall wellness. Plus, it is low in calories, making it a great choice for a healthy drink. Can I make hibiscus tea ahead of time? Yes, you can make hibiscus tea ahead of time. Prepare it, cool it, and store it in the fridge. It will stay fresh for about three to five days. This way, you can have it ready for your mocktail anytime. Is there a caffeine content in hibiscus? No, hibiscus is caffeine-free. This makes it a perfect choice for anyone avoiding caffeine. You can enjoy a hibiscus mocktail at any time of day without worrying about keeping you awake. For the complete recipe, check out the Full Recipe section. This blog post covered how to make a refreshing hibiscus mocktail. We discussed the key ingredients and steps to create it, from boiling water to sweetening and chilling. I shared tips to adjust sweetness and serve the perfect drink at gatherings. You also learned some fun variations to mix up flavors. Finally, I offered storage advice to keep leftovers fresh. Enjoy making this fun drink and experimenting with your own twists! It's a great way to stay cool and healthy.](https://fastmealmate.com/wp-content/uploads/2025/07/6370854b-b453-4acd-b9ab-c5472d702266-768x768.webp)
![- 1 cup freshly squeezed lemon juice - 3/4 cup granulated sugar - 4 cups cold water - 1/2 cup cranberry juice - Ice cubes - Fresh mint leaves - Lemon slices Pink lemonade is a fun and tasty drink. It packs a punch of flavor, but it's good to know what’s in it. - Calories: A serving has about 100 calories. - Sugars: Each glass has around 24 grams of sugar. - Vitamins: It provides vitamin C from the lemon juice. Using fresh ingredients is key. Fresh lemon juice gives bright flavor and important nutrients. Plus, it has no added preservatives. The cranberry juice adds a nice touch of sweetness and color. This drink not only refreshes but nourishes your body too. Make it with care, and you’ll taste the difference. For the full recipe, check out [Full Recipe]. To make simple syrup, start by cooking sugar in water. In a medium saucepan, mix 1 cup of water with 3/4 cup of granulated sugar. Set the heat to medium. Stir the mixture as it heats up. Keep stirring until the sugar fully dissolves and the liquid looks clear. This means your syrup is ready! Once done, remove it from the heat and let it cool completely. Now for the fun part! Grab a large pitcher. Pour in 1 cup of freshly squeezed lemon juice. This juice gives your pink lemonade its bright flavor. Next, add 1/2 cup of cranberry juice. This juice adds a lovely pink color and a hint of sweetness. Stir gently to blend both juices. Once your simple syrup has cooled, it's time to combine. Pour the syrup into the pitcher with the juices. Stir well to mix everything together. Next, add 3 cups of cold water to the pitcher. Stir again until everything is fully combined. Now, it's time to taste your lemonade. Take a sip! If you want it sweeter, add more sugar slowly. Stir until it dissolves. If it’s too strong, add a bit more water. To make your drink extra refreshing, chill it in the fridge for at least 30 minutes. This step is key! When ready to serve, fill glasses with ice cubes. Pour the chilled lemonade over the ice. Garnish each glass with a lemon slice and a sprig of fresh mint. Your refreshing pink lemonade is ready to enjoy! For the full recipe, check out the [Full Recipe]. To get the right taste, you can adjust the sweetness and tartness of your pink lemonade. Start with the basic recipe, but feel free to tweak it. If you want it sweeter, add more sugar slowly and stir. If it tastes too sweet, squeeze in more lemon juice. This balance makes a drink that everyone enjoys. Using fresh lemon juice is key to good flavor. When you squeeze lemons, use a citrus juicer to get the most juice. Choose ripe lemons that feel heavy for their size. This means they are juicy and full of flavor. Avoid using bottled lemon juice, as it lacks the fresh taste that makes pink lemonade special. Garnishing adds fun and flair to your pink lemonade. A simple slice of lemon on the glass rim looks nice. You can also add fresh mint leaves on top. This not only makes your drink pretty but gives it a burst of fresh aroma. For serving, consider the occasion. Use clear glasses to show off the lovely pink color. At a picnic, add ice to keep it cool. For parties, consider a large pitcher with a ladle for easy serving. Each guest can fill their glass and enjoy this refreshing drink. {{image_4}} You can make pink lemonade even more fun by adding different fruit juices. For example, try mixing in fresh raspberry or strawberry juice. These fruits add a bold taste and deep color. You can also mix in other juices like peach or watermelon for unique flavors. Sweeteners are another area to explore. Instead of regular sugar, try honey or agave syrup. These options can give your drink a distinct taste. Adjust the sweetness to fit your own preference. Play around until you find the perfect mix for you! If you want a cool treat, make a frozen pink lemonade slush. Here’s what you need: - 1 batch of pink lemonade (from the Full Recipe) - 2 cups ice cubes To prepare, start by blending the pink lemonade and ice in a blender. Blend until the ice is finely crushed and the mixture is smooth. You may need to add more ice or lemonade to reach your desired consistency. Serve it in a tall glass with a straw for a fun twist on this classic drink. Enjoy the refreshing chill! To keep your leftover pink lemonade fresh, use an airtight container. Glass jars or plastic pitchers work well. Make sure to seal it tightly to avoid any odors from your fridge. You can store it for up to five days in the refrigerator. Always check for signs of spoilage before you drink it. If you want to save pink lemonade for later, freezing is a great choice. Pour the lemonade into ice cube trays or freezer-safe bags. Leave some space in the containers for expansion. When you’re ready to enjoy your drink, take out the lemonade and thaw it in the fridge overnight. For a fun twist, serve the thawed lemonade over ice. You can also blend it with fresh fruit for a slushy treat. You can sweeten pink lemonade with sugar, honey, or agave. Each sweetener has its perks. Sugar is the most common choice. It dissolves easily in water. Honey adds a floral taste. It also provides some health benefits. Agave syrup is sweeter than sugar. You use less of it, making it a smart choice for those cutting calories. Remember, you can mix and match sweeteners to find your perfect balance. Yes, you can use bottled lemon juice. However, fresh lemon juice tastes better. Fresh juice has a bright flavor. Bottled juice often lacks that vibrant taste. It may also have preservatives. These can change the flavor a bit. If you have time, always go for fresh lemons. They make your pink lemonade taste just right. Pink lemonade can stay fresh for about 5 to 7 days in the fridge. Make sure to keep it in a sealed container. This helps to lock in the flavor. Always check for signs of spoilage. If it smells off or shows changes in color, toss it out. Enjoy your pink lemonade fresh for the best taste! You learned how to make a tasty pink lemonade from fresh ingredients. We covered the key steps, from making simple syrup to mixing flavors. You now know how to customize it for any event. Remember to taste and adjust for the right sweetness. Store leftovers properly and enjoy them later. With this guide, you can create a delightful drink everyone will love. Have fun experimenting with different flavors and serving ideas!](https://fastmealmate.com/wp-content/uploads/2025/07/2b3f39fc-3ccf-4ffd-a241-1286b33a74a3-768x768.webp)