Watermelon Mint Agua Fresca Refreshing Summer Drink

Beat the heat this summer with a refreshing Watermelon Mint Agua Fresca! This vibrant drink blends juicy watermelon, fresh mint, and a splash of lime for a light and zesty sip. Whether you’re hosting a party or craving a cool treat, this agua fresca ticks all the boxes. In this post, I’ll guide you through the simple steps and tips to make this delicious drink at home. Let’s dive in!
Ingredients
List of Ingredients
– 4 cups ripe watermelon, peeled and cubed
– 1/4 cup fresh mint leaves, loosely packed
– 2 tablespoons freshly squeezed lime juice
– 2 to 4 tablespoons honey or agave syrup
– 2 cups cold water
– Ice cubes
– Fresh mint sprigs and lime slices for garnish
When I make Watermelon Mint Agua Fresca, I always start with ripe watermelon. Look for bright red flesh and a uniform shape. This ensures a sweet and juicy base. I use fresh mint leaves for a cool taste. They add a refreshing twist that pairs perfectly with the watermelon.
Lime juice brings a zesty kick. I squeeze fresh limes instead of using bottled juice. This makes a big difference in flavor. Sweetness is key, so I add honey or agave syrup. Adjust the amount to match your taste. You want a balance between sweet and refreshing.
I use cold water to dilute the mix. This keeps the drink light and easy to sip. Ice cubes are a must for serving. They keep it chilled and refreshing on hot days.
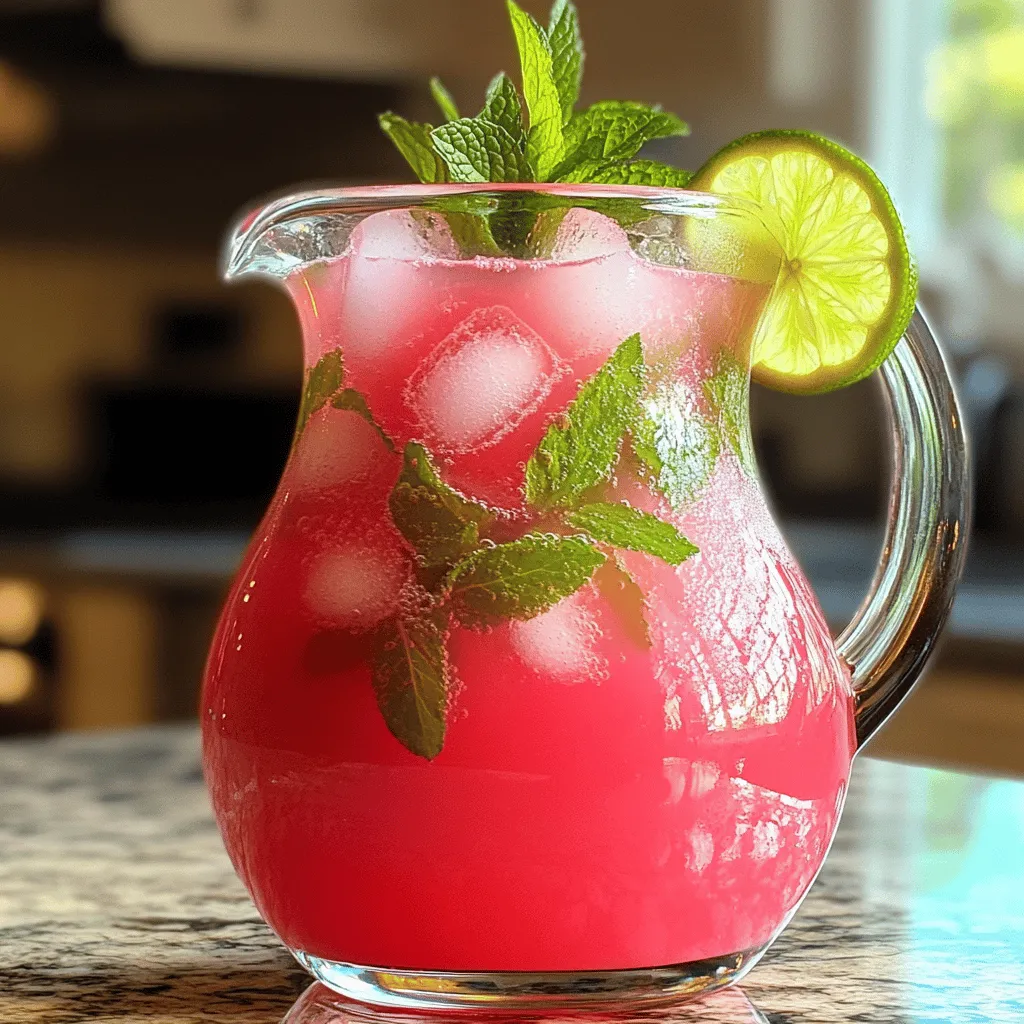
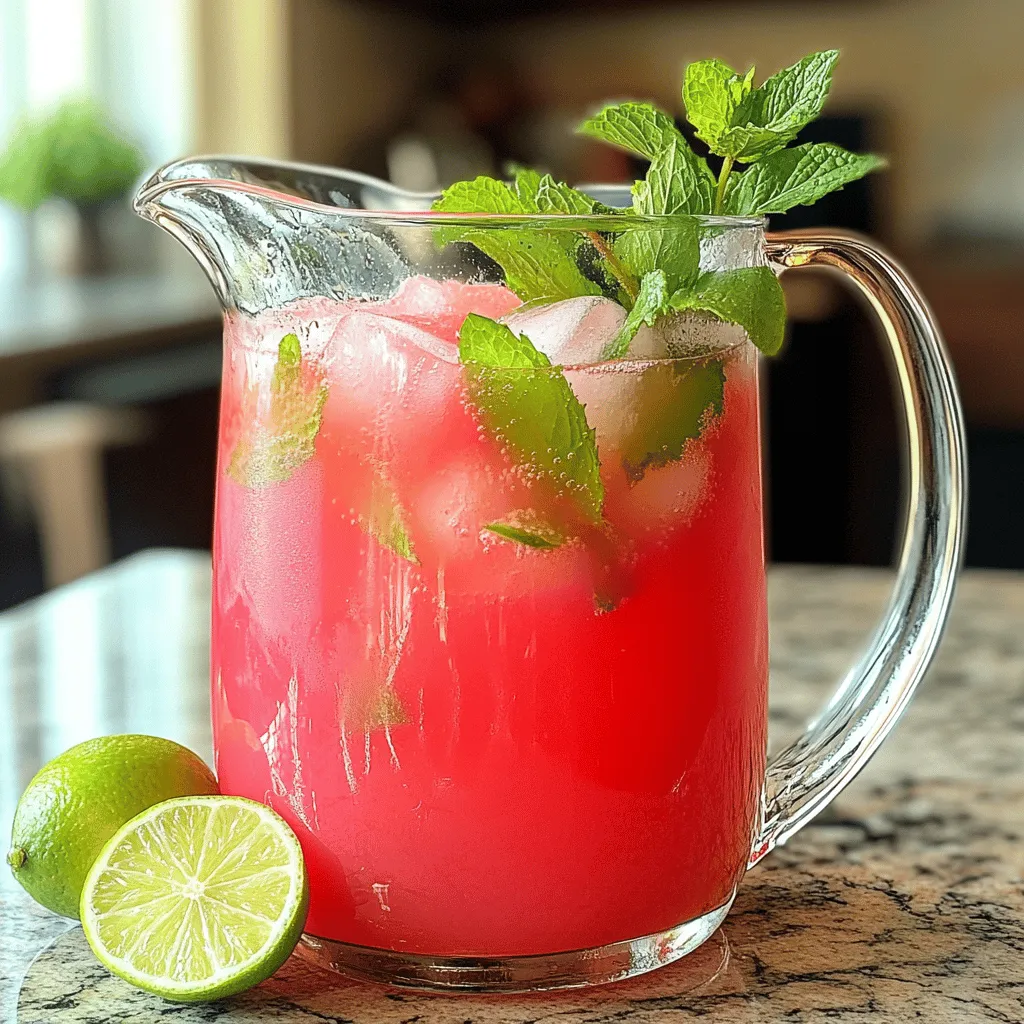
For garnish, I add fresh mint sprigs and lime slices. They make the drink look pretty and inviting. This simple blend of ingredients creates a summer drink that is hard to resist.
Step-by-Step Instructions
Blend the Base
To start, cut the watermelon into cubes. I use about 4 cups. Make sure to remove any seeds. Add the watermelon cubes and 1/4 cup of fresh mint leaves into a blender. Blend on high for 30 to 60 seconds. You want it to be smooth, with no chunks left. The mint should mix well with the watermelon.
Strain for Purity
Next, grab a fine sieve or some cheesecloth. This helps to strain the mixture. Pour the blended mix into the sieve over a large pitcher. Use the back of a spoon to push the juice through. This step is key to getting rid of any pulp or seeds. You want a clear, refreshing juice.
Sweeten to Taste
Now it’s time to add some sweetness. I usually start with 2 tablespoons of honey or agave syrup. Pour this in, along with 2 tablespoons of freshly squeezed lime juice. Stir it well. Make sure the sweetener dissolves completely. You can always add more if you like it sweeter.
Dilute and Adjust
Slowly add 2 cups of cold water to the pitcher. Stir gently while you pour. After mixing, take a sip. This is your chance to adjust the taste. If it’s too strong, add more water. If you want it sweeter, add more honey or agave.
Chill for Flavor
Don’t skip this step! Place the pitcher in the fridge for at least 30 minutes. Chilling helps the flavors blend. It makes the drink even more refreshing. Trust me, it’s worth the wait.
Serve and Garnish
When ready to enjoy, grab some glasses and fill them with ice cubes. Pour the chilled Agua Fresca over the ice. For a beautiful finish, garnish each glass with fresh mint sprigs and lime slices. Your friends and family will love the look and taste!
Tips & Tricks
Choosing the Right Watermelon
To pick a ripe watermelon, look for a few key signs:
– Shape: It should be symmetrical, not lopsided.
– Field Spot: Check for a creamy yellow spot. This shows it ripened on the ground.
– Sound: Tap the watermelon. A deep sound means it’s juicy.
– Weight: It should feel heavy for its size, indicating water content.
Adjusting Sweetness
If you want to switch up the sweetness, you have many options. You can try:
– Maple Syrup: A tasty alternative that adds a unique flavor.
– Coconut Sugar: This gives a hint of caramel and is less processed.
– Stevia: A zero-calorie sweetener that works well in drinks.
Enhancing Flavors
You can easily add fun ingredients to your Agua Fresca. Consider these:
– Cucumber: This adds a refreshing taste and extra hydration.
– Basil or Thyme: These herbs offer a lovely twist and depth.
– Ginger: A small amount can add a spicy kick.
Experimenting with these additions keeps the drink exciting.

Variations
Cucumber Mint Agua Fresca
To make a cucumber mint agua fresca, swap some watermelon for cucumber. Here’s how:
– Use 3 cups watermelon, peeled, and cubed.
– Add 1 cup cucumber, peeled, and diced.
This twist adds a fresh crunch. The cucumber lightens the drink and keeps it cool. It’s perfect for hot days.
Strawberry Watermelon Mint
To combine strawberries with the original flavor, simply add fresh strawberries. Here’s the change:
– Use 3 cups watermelon, peeled, and cubed.
– Add 1 cup strawberries, hulled and sliced.
This fruity mix gives a sweet and tangy taste. It brightens the drink, making it even more refreshing.
Sparkling Watermelon Agua Fresca
For a fizzy drink, use sparkling water instead of regular water.
– After sweetening, add 2 cups of chilled sparkling water.
This bubbly version adds a fun twist. It makes the drink lively and fun for gatherings. Enjoy the extra bubbles!
Storage Info
Best Practices for Storing Agua Fresca
To keep your Watermelon Mint Agua Fresca fresh, place it in a sealed pitcher. This helps prevent it from absorbing other smells in your fridge. Always store it in the coldest part of the fridge, not the door. It’s best to enjoy it within three days for the best flavor.
Shelf Life
For the best taste, drink your Agua Fresca within 24 hours. After that, it may lose some flavor and freshness. If you keep it in the fridge, it can last up to three days. However, try to finish it sooner for the best experience.
Freezing Options
If you want to freeze Agua Fresca, pour it into ice cube trays. This lets you use just the right amount later. When you’re ready to drink, thaw the cubes in the fridge or at room temperature. Avoid using a microwave, as it can change the flavor. Enjoy your frozen treat as a refreshing summer drink!
FAQs
What is Agua Fresca?
Agua Fresca means “fresh water” in Spanish. This drink comes from Mexico. It mixes water with fruits, herbs, and sugar. People enjoy it for its cool taste. You can find many types, like hibiscus or tamarind. Watermelon Mint Agua Fresca is a favorite for summer. It’s light, sweet, and hydrating.
Can I use watermelon juice instead?
Yes, you can use watermelon juice. Look for 100% juice with no added sugar. This makes the drink faster to prepare. Just skip the blending step. Pour the juice into a pitcher, add mint, lime, and sweetener. Stir well and enjoy your refreshing drink!
How long can Watermelon Mint Agua Fresca last?
Watermelon Mint Agua Fresca lasts for about three days in the fridge. Store it in a sealed pitcher to keep it fresh. Give it a gentle stir before serving again. If it separates, that’s normal. Just mix well, and it will be ready to enjoy!
Is Agua Fresca healthy?
Agua Fresca is a healthy choice. It’s low in calories and hydrating. Watermelon is rich in vitamins A and C. Mint adds fresh flavor without calories. Using honey or agave adds some natural sweetness. This drink is a great alternative to soda or sugary drinks. Enjoy it guilt-free!
This blog post explored how to make a refreshing Watermelon Mint Agua Fresca. We listed the fun ingredients and shared easy step-by-step instructions. I shared tips for choosing ripe watermelon and adjusting sweetness. You can also try variations like Cucumber Mint or Strawberry Watermelon. Remember, storing your Agua Fresca is key to keeping it fresh. Enjoy this tasty drink, and feel free to make it your own with the tips provided. Cheers to a cool, homemade treat!


![- Smooth natural peanut butter - Pure maple syrup or honey - Coconut oil (melted) - Rolled oats - Dark or semi-sweet chocolate chips - Unsweetened cocoa powder - Pure vanilla extract - Fine sea salt To make delicious chocolate peanut butter bars, you need these key ingredients. First, smooth natural peanut butter gives a creamy base. I love using peanut butter that has no added sugar or oils. It keeps the bars rich and healthy. Next, pure maple syrup or honey sweetens the bars. Both options work well, but maple syrup has a unique flavor. Coconut oil adds a silky texture. Make sure it’s melted for easy mixing. Rolled oats provide fiber and a chewy texture. They help hold everything together. Choose certified gluten-free oats if needed. Dark or semi-sweet chocolate chips add a sweet touch. They melt beautifully into the mixture. Unsweetened cocoa powder brings a rich chocolate flavor. I recommend high-quality cocoa for the best taste. Pure vanilla extract enhances the overall flavor, while fine sea salt balances the sweetness. When making these bars, accurate measurements are key. If you measure wrong, the texture may change. I suggest using a kitchen scale for best results. A scale gives exact amounts, which is very helpful. Use measuring cups for dry ingredients and liquid measuring cups for liquids. Make sure to level off dry ingredients for accuracy. This helps achieve the perfect consistency in your bars. You can customize these bars easily. For sweeteners, try agave syrup or brown rice syrup. Both options work well if you want to change things up. If you prefer a different nut butter, almond or cashew butter are great choices. Just remember that these may alter the taste a bit. For gluten-free options, use certified gluten-free oats. This way, everyone can enjoy these tasty treats without worry. You can find many useful substitutions to fit your needs. Check out the Full Recipe for detailed steps to create your own chocolate peanut butter bars! Start by lining an 8x8 inch baking dish with parchment paper. This helps with easy removal later. Leave some paper overhang on two sides. It makes lifting the bars out simple. Next, grab a large mixing bowl. Combine 1 cup of smooth peanut butter, 1/2 cup of pure maple syrup, and 1/4 cup of melted coconut oil. Use a whisk or spatula to mix until you see a smooth blend. Now it's time to add the dry ingredients. Toss in 1 cup of rolled oats, 1/2 cup of unsweetened cocoa powder, 1 teaspoon of pure vanilla extract, and 1/4 teaspoon of fine sea salt. Mix everything well until you get a thick batter. Now, gently fold in 1/2 cup of dark or semi-sweet chocolate chips. Make sure they spread evenly through the mix. Transfer this mixture into your lined baking dish. Use a spatula or your hands to press it down firmly. You want a compact, even layer. Once done, place the dish in the fridge. Chill it for at least 1 to 2 hours until the mixture feels firm. For the complete recipe, check the Full Recipe section. To make the best chocolate peanut butter bars, focus on texture. You want a smooth, firm bar that holds together well. Use natural peanut butter for creaminess. If your bars turn out dry or crumbly, it often means too many dry ingredients. Stick to the recipe and measure carefully. Mixing well helps combine all the ingredients and avoids clumps. You can boost flavor with simple add-ins. A splash of pure vanilla extract adds depth. A sprinkle of fine sea salt can enhance sweetness too. Consider adding a bit of cinnamon for warmth or even a few tablespoons of crushed nuts for crunch. Each small change can make your bars even better. Presentation matters when serving these bars. Cut them into neat squares or rectangles. Arrange them on a colorful plate for a pop. Drizzling melted chocolate over the top makes them look fancy. You can also sprinkle some crushed peanuts or a pinch of sea salt on top for a rustic touch. These small efforts make your treat feel special. For the full recipe, check out the [Full Recipe]. {{image_4}} If you want to make these bars healthier, you have options. You can use less sweetener. Try using only 1/4 cup of pure maple syrup. You can also replace coconut oil with unsweetened applesauce. This swap cuts calories and adds moisture. Another great idea is to use a sugar substitute. Look for options like stevia or monk fruit. These can help you cut sugar without losing sweetness. Want to switch up the flavor? Add fruits like mashed bananas or shredded coconut. Bananas give a creamy texture, while coconut adds a tropical twist. You can even mix in some almond extract for a nutty flavor boost. Experiment with different nut butters too! Almond butter or cashew butter can change the taste. Each nut butter brings a unique flavor. It’s fun to find your favorite blend. Toppings can make your bars even better. Try sprinkling crushed nuts on top. Walnuts or pecans add a nice crunch. You can also use coconut flakes for a chewy texture. For a sweet finish, drizzle melted chocolate over the top. You can use dark, milk, or even white chocolate. This extra layer makes the bars look fancy and taste amazing. For the full recipe, check out the detailed instructions above. To keep your chocolate peanut butter bars fresh, use an airtight container. This helps prevent moisture and keeps them from drying out. You can store them in the refrigerator or freezer, depending on how long you want to keep them. If you plan to eat them within a week, the fridge is perfect. For longer storage, the freezer is your best option. In the fridge, these bars can last about one week. If you notice any changes in color or smell, it's best to throw them away. Signs of spoilage include a dry texture or a strange odor. Always inspect your bars before enjoying them. You can freeze the bars either one by one or as a whole batch. If you freeze them individually, wrap each bar in plastic wrap or foil. This way, you can grab one whenever you want a treat. If you prefer to freeze the whole batch, just place the container in the freezer. When you're ready to eat, let them thaw in the fridge for a few hours. For the full recipe, check the earlier section. Yes, you can use crunchy peanut butter! It adds a fun texture. The bars will have a nice bite from the peanut pieces. Keep in mind, the flavor may be more intense with crunchy peanut butter. If you enjoy that nutty crunch, go for it! To check if the bars are set, gently press the top with your finger. If it feels firm and springs back, they are ready. You can also look for a slight sheen on the surface. If it’s still soft, give it more time in the fridge. Patience makes perfect bars! For clean cuts, use a sharp knife. Run the knife under hot water, then dry it off. This helps the knife glide through the bars easily. Cut them into squares or rectangles, depending on your preference. If they crumble, try chilling them longer before cutting. Absolutely! To make these bars vegan, use maple syrup instead of honey. Ensure your chocolate chips are dairy-free. Check that your peanut butter has no added ingredients. With these swaps, you can enjoy a tasty vegan treat! In summary, this guide covered how to make delicious no-bake bars. You learned about the key ingredients, measurement tips, and how to mix everything smoothly. We shared storage techniques to keep your bars fresh and variations to suit your taste. Remember, small changes can lead to big flavor. Experiment with different add-ins and toppings to make these bars your own. By following these tips, you’ll enjoy tasty treats that fit your needs. Enjoy making your no-bake bars!](https://fastmealmate.com/wp-content/uploads/2025/06/11f9b23d-ca49-49dd-b442-fa08a6216cde-768x768.webp)

