Are you ready to spice up your dinner routine? Thai Drunken Noodles are a quick, tasty option that packs a flavorful punch. In this guide, I’ll share simple step-by-step instructions, handy tips, and fun variations. Whether you’re new to cooking or an expert in the kitchen, you’ll find everything you need to create this satisfying dish. Let’s dive in and make your meal memorable!
Why I Love This Recipe
- Bold Flavors: This dish is packed with vibrant flavors from fresh vegetables and aromatic Thai basil, making each bite exciting and delicious.
- Quick and Easy: With a preparation time of just 15 minutes, you can whip up this satisfying meal in no time, perfect for busy weeknights.
- Customizable Heat: The chili paste allows you to adjust the spice level according to your preference, making it suitable for everyone.
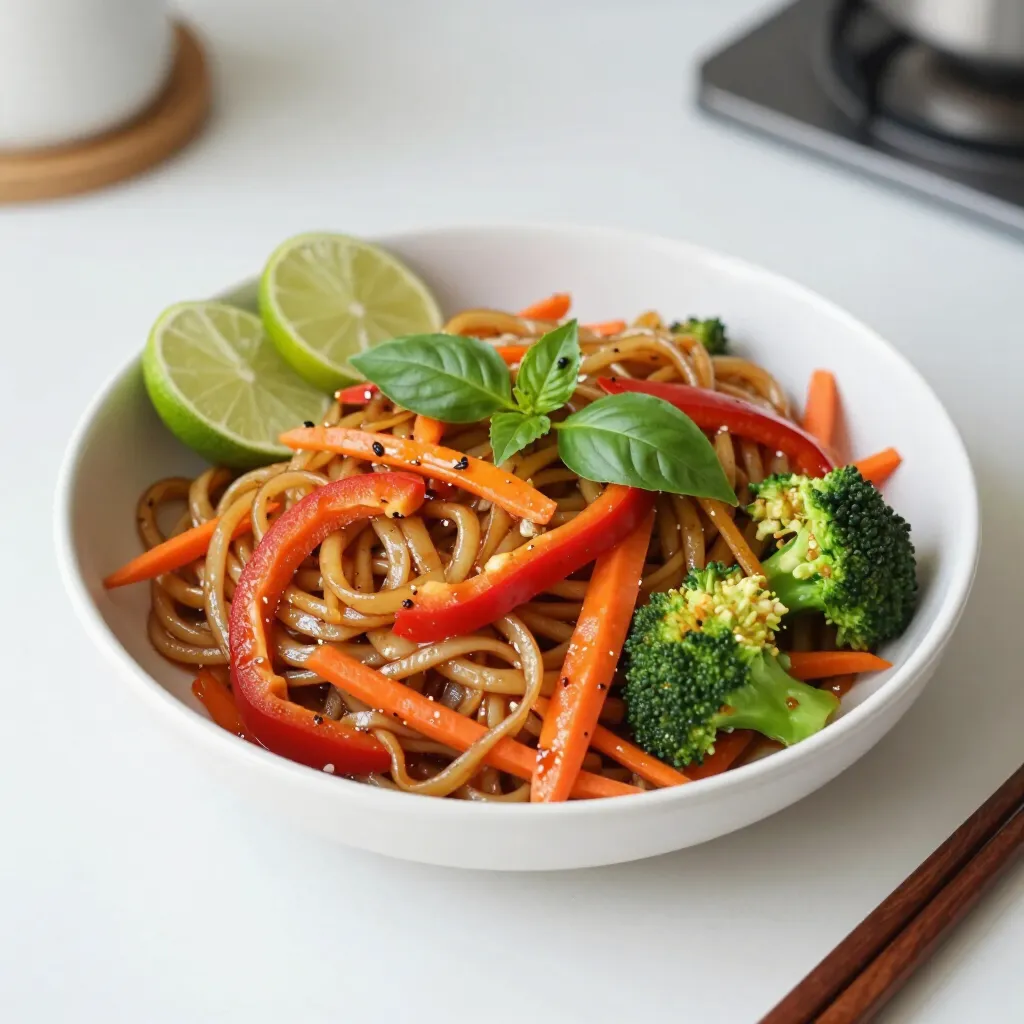
- Authentic Experience: Serving it with lime wedges and enjoying it with chopsticks enhances the overall dining experience, making it feel truly authentic.
Ingredients
Main Ingredients
For Thai Drunken Noodles, you need the following main ingredients:
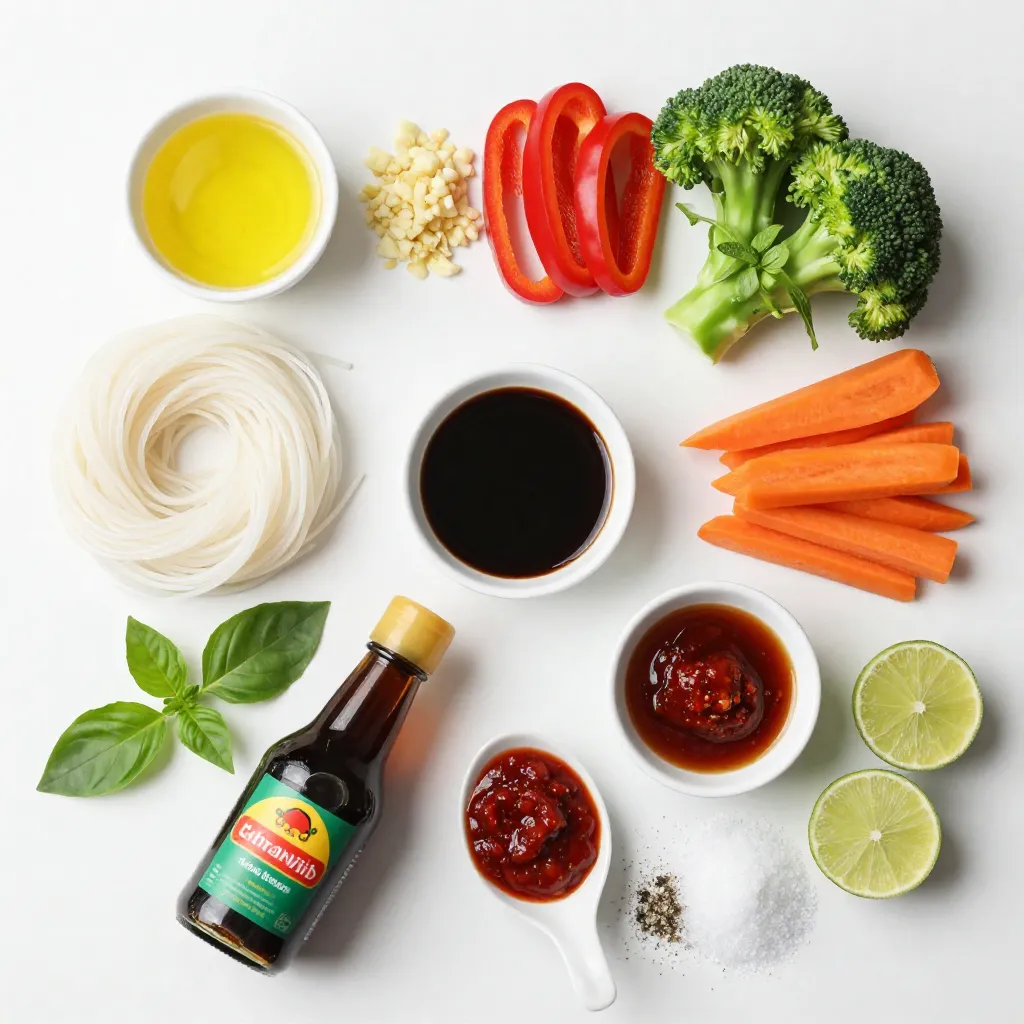
– 8 oz wide rice noodles
– 2 tablespoons vegetable oil
– 3 cloves garlic, minced
These noodles form the base of the dish. The oil helps cook the garlic and adds flavor. Garlic gives a strong taste that makes the dish special.
Essential Sauces
The flavors come from these essential sauces:
– 1 tablespoon soy sauce
– 1 tablespoon oyster sauce
– 1 teaspoon fish sauce
– 1 tablespoon chili paste (adjust to your spice preference)
– 1 teaspoon sugar
These sauces add depth and balance. Soy sauce brings saltiness, while oyster sauce adds sweetness. Fish sauce gives a savory kick, and chili paste adds heat. Sugar balances all these flavors.
Fresh Produce
Fresh produce makes this dish vibrant and healthy:
– 1 red bell pepper, sliced into thin strips
– 1 cup broccoli florets
– 1 medium carrot, julienned
– 1 cup fresh Thai basil leaves
The bell pepper adds crunch and color. Broccoli provides texture, and carrots bring sweetness. Thai basil gives a unique flavor that ties everything together.
Step-by-Step Instructions
Cooking the Noodles
To start, boil water in a pot. Add 8 oz of wide rice noodles. Cook them according to the package instructions. This usually takes about 5 to 7 minutes. Once they are soft, drain them in a colander. Rinse the noodles with cold water to stop cooking. This also helps prevent sticking. Set the noodles aside for later.
Stir-Frying the Vegetables
Next, grab a large wok or skillet. Heat 2 tablespoons of vegetable oil over medium-high heat. When the oil is hot, add 3 minced garlic cloves. Stir-fry for 30 seconds until it smells good. Be careful not to let the garlic brown. Now, add 1 sliced red bell pepper, 1 cup of broccoli florets, and 1 julienned carrot. Stir-fry these for 3 to 4 minutes. You want them to be tender but still crisp.
Mixing and Serving
Push the veggies to one side of the pan. This makes room for the noodles. Add your drained noodles to the cleared space. Drizzle in 1 tablespoon of soy sauce, 1 tablespoon of oyster sauce, and 1 teaspoon of fish sauce. Add 1 tablespoon of chili paste and 1 teaspoon of sugar. Mix everything well with tongs or a spatula. Make sure the noodles are coated in the sauces.
Toss in 1 cup of fresh Thai basil leaves. Stir until the basil wilts a bit. This releases its lovely scent. Taste your dish and add salt and pepper as needed. Remove from heat. Serve the noodles hot, with lime wedges on the side. Squeeze the lime over the dish for a fresh kick! Enjoy your meal!
Tips & Tricks
Perfecting Your Noodles
To make the best Thai drunken noodles, start with wide rice noodles. Cook them just right. Follow the package instructions closely. Rinse the cooked noodles under cold water. This stops cooking and helps keep them from sticking. Toss them with a little oil to keep them loose. Perfect noodles are key for a great dish.
Adjusting Spice Levels
You can control the spice in your noodles. Use chili paste for heat. Start with a small amount, like one tablespoon. You can always add more later. If you want less heat, skip the chili paste. Taste your dish before serving. This way, you can adjust it to your liking.
Enhancing Flavor with Fresh Ingredients
Fresh ingredients make your dish pop with flavor. Use fresh Thai basil leaves; they have a unique taste. Add red bell peppers and broccoli for color and crunch. Carrots bring sweetness and texture. Don’t forget lime wedges! They add a zesty kick when squeezed over your noodles. Freshness truly elevates this meal.
Pro Tips
- Choose the Right Noodles: Use wide rice noodles for the best texture and to hold the sauce well. If you can’t find them, you can substitute with pad see ew noodles or even fettuccine as a last resort.
- Customize Your Heat: Adjust the amount of chili paste according to your spice preference. You can always start with less and add more as needed to avoid overpowering the dish.
- Fresh Ingredients Matter: For the best flavor, use fresh vegetables and Thai basil. Dried basil won’t provide the same aromatic qualities that fresh basil does.
- Don’t Overcook the Vegetables: Stir-fry the vegetables until they are tender-crisp. This ensures they retain their vibrant color and nutritional value while adding a nice crunch to the dish.
Variations
Protein Substitutes
You can use chicken, shrimp, or beef in your Drunken Noodles. Each protein adds its own flavor. For chicken, use thin slices and cook them until golden. For shrimp, add them just before the noodles, cooking until pink. Beef works well too; just slice it thin and stir-fry quickly. These choices keep the dish exciting and tasty.
Vegetarian Options
If you want a vegetarian version, skip the meat and load up on veggies. You can add tofu for protein. Firm tofu works best. Just cube it and fry until golden. Other great veggies include bell peppers, snap peas, or mushrooms. This keeps your dish colorful and full of crunch.
Gluten-Free Alternatives
To make this dish gluten-free, swap regular soy sauce for tamari. Tamari gives the same savory kick without gluten. You can also use rice noodles, which are naturally gluten-free. This way, everyone can enjoy the great flavors of Drunken Noodles without worry.
Storage Info
Storing Leftovers
After enjoying your Thai Drunken Noodles, you may have some left. Store them in an airtight container. Keep the container in the fridge. These noodles stay good for up to three days. If you want to keep them longer, consider freezing.
Reheating Instructions
To reheat, use a skillet over medium heat. Add a splash of water or oil to help. Stir the noodles until they are hot. You can also use a microwave. Heat in short bursts, stirring in between. This keeps the noodles moist and tasty.
Freezing Tips
If you freeze your Thai Drunken Noodles, they last for about a month. Let them cool completely before freezing. Use a freezer-safe container or bag. When you’re ready to eat, thaw in the fridge overnight. Reheat as mentioned above for the best taste.
FAQs
What are Thai Drunken Noodles?
Thai Drunken Noodles, or Pad Kee Mao, are a stir-fried noodle dish. They feature wide rice noodles, fresh veggies, and aromatic basil. The dish gets its name from its bold flavors, which pair well with drinks. The spicy chili paste gives it a kick, while the sauces add depth. You can adjust the spice level to fit your taste.
Can I make Thai Drunken Noodles ahead of time?
Yes, you can prepare Thai Drunken Noodles ahead of time. Cook the noodles and store them in the fridge. Keep the veggies and sauces separate. When you’re ready to eat, stir-fry them together. This method helps keep the noodles from getting mushy. Just remember, fresh ingredients make the dish taste best.
What can I serve with Thai Drunken Noodles?
You can serve Thai Drunken Noodles with many sides. I recommend a light salad or spring rolls. These add a nice crunch and freshness. You could also offer some lime wedges for a zesty kick. If you enjoy protein, grilled chicken or shrimp pairs well, too. Each option will elevate your meal and make it even more satisfying.
You now know how to make Thai Drunken Noodles, using the right ingredients and steps. We covered main ingredients, essential sauces, and fresh produce. You learned how to cook noodles, stir-fry veggies, and mix them together. Plus, I shared tips to perfect your dish and variations for all diets. Keep your leftovers fresh with proper storage methods. Armed with this knowledge, you can enjoy this dish with ease. Try it now, and make it your ow


