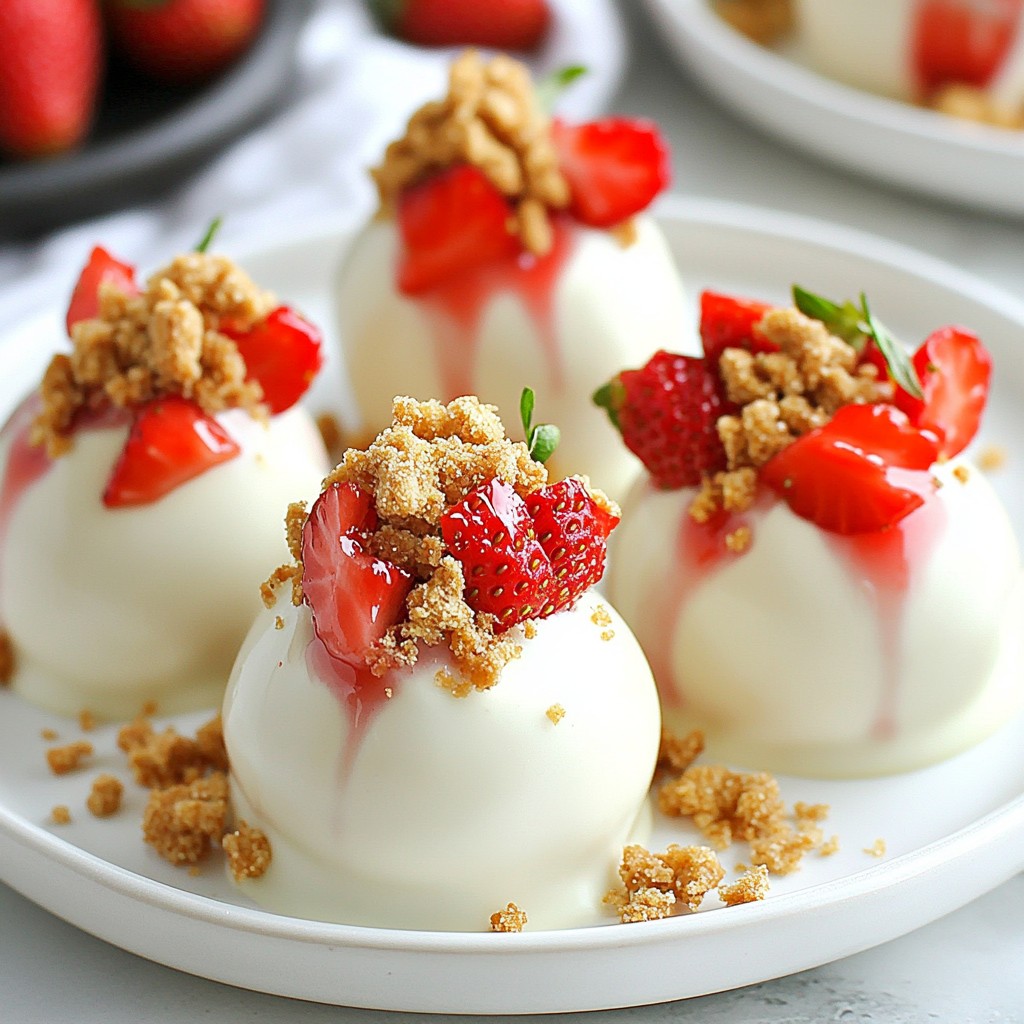
Ready to elevate your dessert game? These Strawberry Shortcake Truffles are rich, decadent, and so easy to make! With fresh strawberries and creamy white chocolate, they bring a burst of joy in every bite. Whether you’re a novice or a pro in the kitchen, this guide will walk you through each step. Get ready to impress friends and family with these delightful treats that everyone will love!
Why I Love This Recipe
- Delicious Flavor Combination: The mix of fresh strawberries and creamy filling creates a delightful explosion of flavors that reminds you of summer.
- Easy to Make: These truffles require minimal ingredients and simple steps, making them perfect for both beginner and experienced bakers.
- Perfect for Any Occasion: Whether it's a party, a picnic, or just a treat for yourself, these truffles are always a hit with friends and family.
- Stunning Presentation: The beautiful design and vibrant colors of these truffles make them an eye-catching dessert to impress your guests.
Ingredients
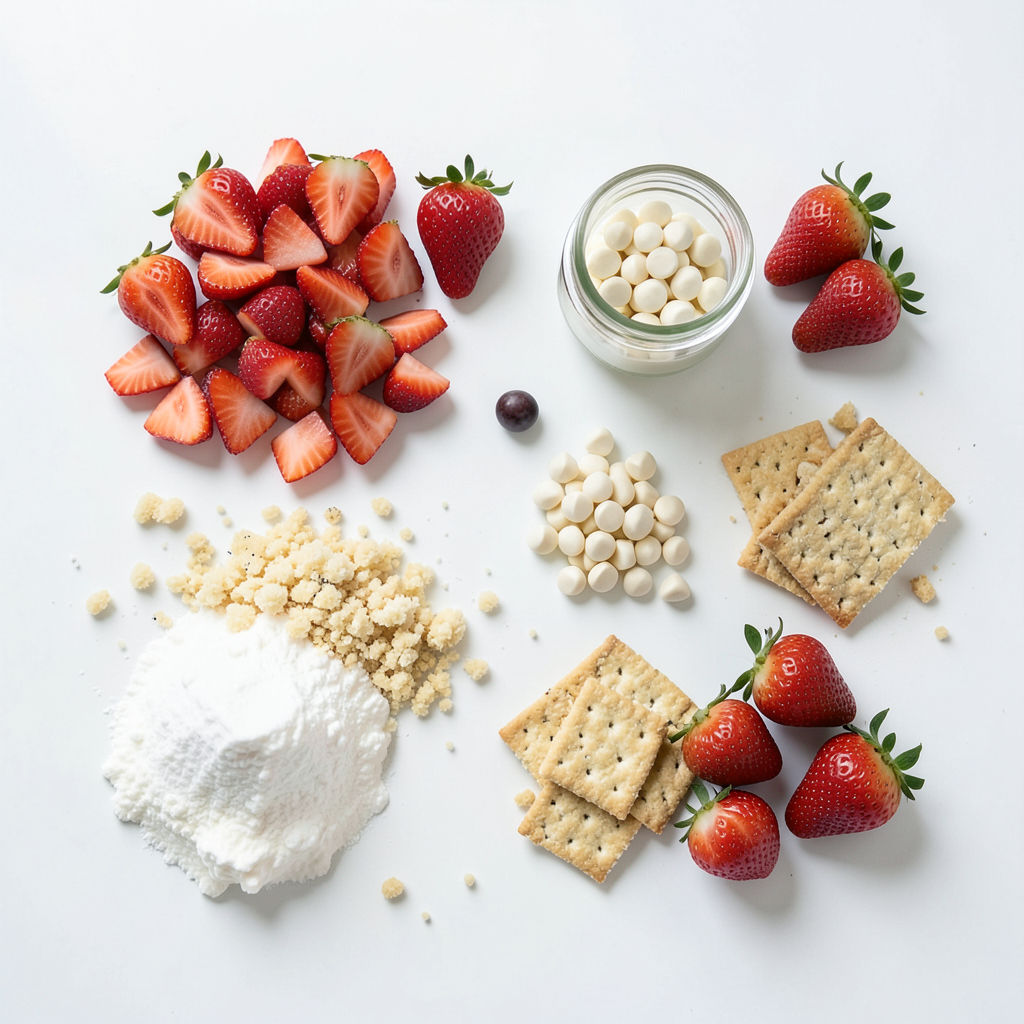
Fresh Strawberries
You need 1 cup of fresh strawberries. Start by hulling and finely chopping them. This step is key since fresh strawberries add a burst of flavor. They also give your truffles a nice, fruity texture.
Basic Components
Here are the basic items you will use:
- 1 cup vanilla cake crumbs (use store-bought or homemade)
- 1/2 cup cream cheese, softened
- 1/4 cup powdered sugar
- 1 teaspoon pure vanilla extract
- 1 cup white chocolate chips
- 1 tablespoon coconut oil
The vanilla cake crumbs bring sweetness and a soft feel. Cream cheese gives a rich taste. The powdered sugar adds just the right amount of sweetness. Vanilla extract enhances all the flavors.
Optional Garnishes
To make your truffles special, consider these garnishes:
- 1/4 cup crushed Graham crackers (for coating)
- Additional fresh strawberries for garnishing
Crushed Graham crackers add crunch and a nice finish. Fresh strawberries on top make the truffles look extra pretty. You can mix and match these garnishes to fit your vibe!
Step-by-Step Instructions
Preparation of the Truffle Mixture
Start by hulling and finely chopping the fresh strawberries. You need 1 cup of strawberries. Then, take a mixing bowl. Add the chopped strawberries, 1 cup of vanilla cake crumbs, and 1/2 cup of softened cream cheese. Also, include 1/4 cup of powdered sugar and 1 teaspoon of pure vanilla extract. Mix everything well until it gets smooth and even. This mixture is the heart of your truffles.
Forming the Truffles
Next, wash your hands thoroughly. Scoop out small portions of the mixture. Roll each portion into a ball about 1 inch in size. Place these balls on a parchment-lined baking sheet. The parchment helps prevent sticking. After forming all the balls, put the baking sheet in the refrigerator. Chill them for 30 minutes. This will help the truffles firm up nicely.
Melting the White Chocolate
While the truffles chill, it's time to melt the white chocolate. In a microwave-safe bowl, combine 1 cup of white chocolate chips and 1 tablespoon of coconut oil. Heat this mixture in the microwave. Do it in 30-second intervals. Stir after each interval until the chocolate is smooth and melted. Once melted, take the chilled truffles out. Dip each one into the melted chocolate using a fork. Let any extra chocolate drip back into the bowl. After that, roll each truffle in crushed Graham crackers until fully coated. Place them back on the baking sheet. Finally, chill the truffles again for 30 minutes. This ensures the chocolate sets well.
Tips & Tricks
Best Practices for Consistency
To make your truffles smooth and tasty, mix your ingredients well. Start with finely chopped strawberries. If they are too chunky, your truffles may not hold together. Mix the strawberries with cake crumbs, cream cheese, and sugar until smooth. This helps create a uniform texture.
How to Melt Chocolate Smoothly
Melt white chocolate carefully. Use a microwave-safe bowl for this task. Microwave the chocolate and coconut oil in 30-second bursts. Stir well between each burst. This keeps the chocolate from burning. When smooth, it will coat your truffles evenly.
Chilling Times for Optimal Texture
Chilling the truffles is key. After rolling them into balls, chill for 30 minutes. This helps them firm up. After dipping them in chocolate, chill again for another 30 minutes. This sets the chocolate and gives a nice bite. The right chilling times ensure your truffles are perfect every time.
Pro Tips
- Fresh Strawberries: Use ripe, sweet strawberries for the best flavor. If they're not in season, consider using frozen strawberries, but make sure to thaw and drain them well before use.
- Chilling Time: Don’t skip the chilling steps! Chilling the truffle mixture and the dipped truffles helps them set properly, ensuring a firmer, more enjoyable texture.
- Melting Chocolate: When melting white chocolate, be careful not to overheat it. Stir frequently and use low power settings in the microwave to prevent burning.
- Coating Alternatives: Get creative with your coatings! Instead of Graham crackers, try crushed nuts, sprinkles, or toasted coconut for a different flavor and texture.
Variations
Incorporating Different Flavors
You can change the taste of your strawberry shortcake truffles easily. Try adding lemon zest for a fresh twist. The bright flavor of lemon enhances the sweetness of strawberries. You can also use almond extract instead of vanilla. This gives a nutty flavor that pairs well with the cake crumbs. For a richer taste, consider adding cocoa powder to the mixture. It creates a chocolatey layer that complements the strawberries.
Using Dark or Milk Chocolate
While white chocolate is a classic choice, dark or milk chocolate works great too. Dark chocolate gives a bold taste that contrasts with the sweet filling. Melt it with a little coconut oil, just like the white chocolate. Milk chocolate adds creaminess and a sweeter flavor. Experiment with different types to find your favorite. Each chocolate brings a unique character to the truffles.
Vegan or Gluten-Free Options
You can make these truffles vegan or gluten-free with a few tweaks. For vegan truffles, use dairy-free cream cheese and vegan chocolate. You can substitute the cake crumbs with gluten-free options, like almond flour or gluten-free cake. This way, everyone can enjoy these treats. With these changes, you still get the same rich and decadent taste.
Storage Info
Best Storage Practices for Freshness
To keep your strawberry shortcake truffles fresh, store them in an airtight container. Line the container with parchment paper to prevent sticking. Place the truffles in a single layer if you can. This method helps them stay firm and tasty. Keep the container in the fridge to maintain the best texture and flavor.
How Long Can You Keep Truffles?
You can enjoy your truffles for about 5 to 7 days when stored properly. After that, they may lose their taste and texture. If they look or smell off, it’s best to toss them. Always check for freshness before indulging!
Freezing Truffles for Later Use
You can freeze the truffles for up to 3 months. To do this, place them on a baking sheet and freeze until solid. Then, transfer them to a freezer-safe bag or container. Remove as much air as possible to prevent freezer burn. When ready to enjoy, thaw them in the fridge overnight. This keeps them creamy and delicious!
FAQs
Can I use frozen strawberries?
Yes, you can use frozen strawberries. Thaw them first and drain any extra liquid. This keeps the truffles from being too wet. Fresh berries give the best flavor, but frozen ones work well too.
What can I substitute for cream cheese?
You can use Greek yogurt or mascarpone cheese. Both options give a creamy texture. Greek yogurt brings a tangy taste. Mascarpone is rich and sweet, making it a great choice.
How do I ensure my chocolate doesn't seize?
To keep your chocolate smooth, use low heat. Melt it in short bursts, stirring often. Adding a little coconut oil helps too. If it does seize, you can try adding a tiny bit of warm milk to rescue it.
You learned how to make delightful strawberry truffles. We covered fresh strawberries, key ingredients, and some fun garnishes. You now know the steps to prepare, form, and dip your truffles in white chocolate. I shared tips for smooth chocolate and proper chilling times. We also explored flavor variations and smart storage methods.
Now, it’s time to enjoy your sweet treats. Simple steps lead to tasty results. Make these truffles your own, and share them with friends!