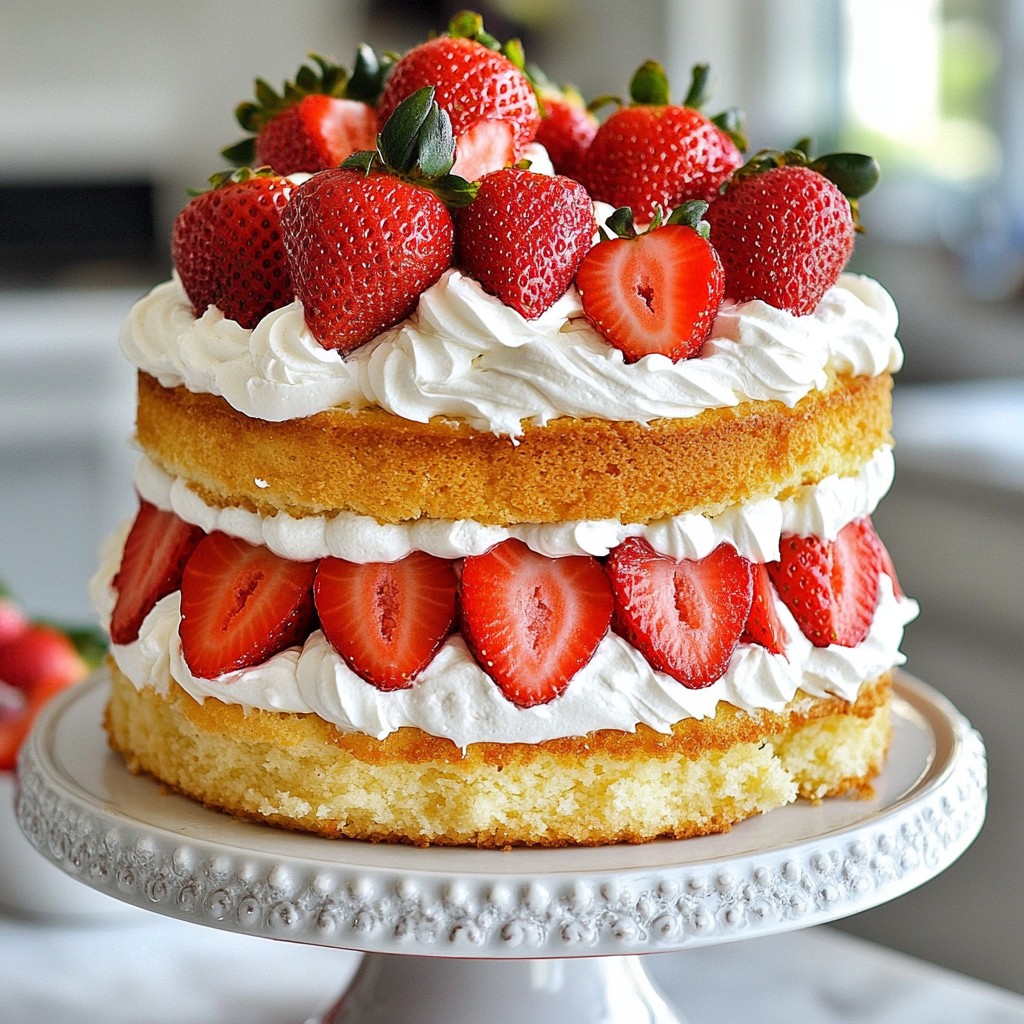
Are you ready to impress your friends and family with a stunning dessert? In this post, I’ll show you how to make a Strawberry Shortcake Layer Cake that is simple and delightful. With fresh strawberries, fluffy cream, and soft cake layers, this treat is perfect for any occasion. Let’s dive into the essential ingredients and easy steps to create your new favorite dessert!
Why I Love This Recipe
- Delicious Layers: This cake features layers of fluffy vanilla cake, fresh strawberries, and whipped cream, creating a delightful combination of flavors and textures.
- Perfect for Any Occasion: Whether it's a birthday, picnic, or just a sweet treat, this Strawberry Shortcake Layer Cake is suitable for any celebration.
- Visual Appeal: With its vibrant strawberries and creamy layers, this cake is as beautiful as it is tasty, making it a showstopper on any dessert table.
- Easy to Make: Despite its impressive appearance, this recipe is straightforward and can be accomplished with simple ingredients and tools.
Ingredients
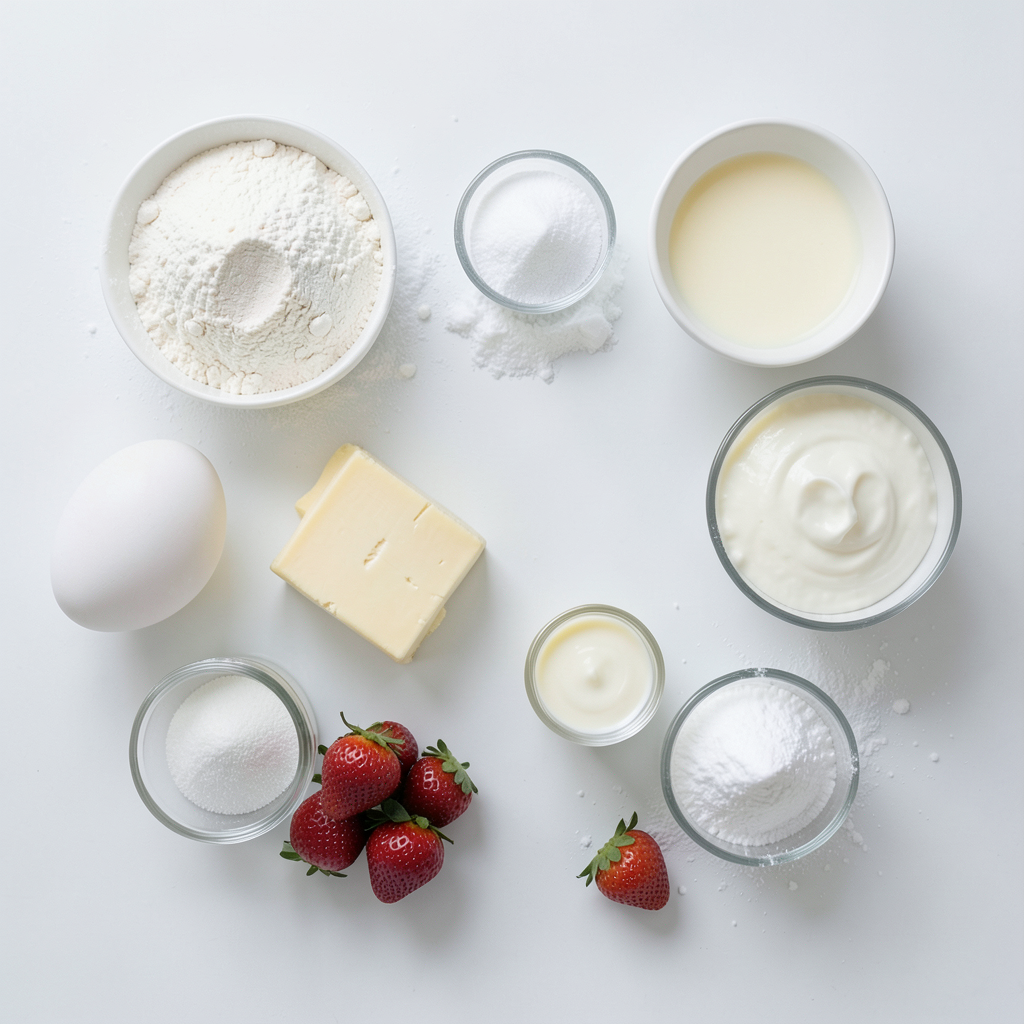
Essential Ingredients for Strawberry Shortcake Layer Cake
To make your Strawberry Shortcake Layer Cake, you need these key ingredients:
- 2 cups all-purpose flour
- 1 cup granulated sugar
- 1 tablespoon baking powder
- ½ teaspoon salt
- ½ cup unsalted butter, softened
- 1 cup whole milk, at room temperature
- 2 large eggs, at room temperature
- 1 teaspoon vanilla extract
- 3 cups fresh strawberries, hulled and sliced
- 1 cup heavy whipping cream, chilled
- 2 tablespoons powdered sugar
- 1 teaspoon vanilla extract (for the whipped cream)
These items form the base of a light and fluffy cake, perfect for any celebration.
Optional Ingredients for Customization
You can add a twist to your cake with these optional ingredients:
- Citrus zest (like lemon or orange) for a fresh flavor
- Almond extract for a nutty hint
- Different fruits, like raspberries or blueberries, to mix in with the strawberries
These choices let you make the cake your own.
Recommended Tools and Equipment
Here are some tools you’ll need for this recipe:
- Two 9-inch round cake pans
- Electric mixer for easy whipping and mixing
- Mixing bowls for combining ingredients
- Spatula for smoothing batter and whipped cream
- Wire racks for cooling the cakes
Using the right tools helps make the process smooth and enjoyable.
Step-by-Step Instructions
Preparing the Cake Batter
Start by preheating your oven to 350°F (175°C). Grease two 9-inch round cake pans with butter. Dust them with flour to keep the cakes from sticking. In a large bowl, sift together 2 cups of all-purpose flour, 1 cup of granulated sugar, 1 tablespoon of baking powder, and ½ teaspoon of salt. Mix these dry ingredients well. Next, add ½ cup of softened unsalted butter, 1 cup of whole milk, 2 large eggs, and 1 teaspoon of vanilla extract. Use an electric mixer on medium speed for about 2 minutes. You want the batter to be smooth and well blended.
Baking the Cake Layers
Now, divide the batter evenly between the two prepared pans. Use a spatula to smooth the tops. Bake in the preheated oven for 25-30 minutes. To check if they are done, insert a toothpick into the center. If it comes out clean, they are ready. Let the cakes cool in the pans for about 10 minutes. After that, transfer them to wire racks to cool completely.
Whipping the Cream and Preparing Strawberries
While the cakes cool, prepare the strawberries. Take 3 cups of fresh strawberries, hull, and slice them. Toss the strawberries with 1 tablespoon of granulated sugar. Let them sit for about 15 minutes. This helps them release their juices. In another bowl, beat 1 cup of chilled heavy whipping cream with 2 tablespoons of powdered sugar and 1 teaspoon of vanilla extract. Use an electric mixer until you see stiff peaks form. This means your whipped cream is ready.
Assembling the Layer Cake
Once the cakes are cool, place one layer on a serving plate. Spread a generous layer of whipped cream on top. Spoon half of the macerated strawberries along with their juices over the whipped cream. Carefully add the second layer of cake on top. Repeat by spreading the remaining whipped cream and adding the rest of the strawberries. For a lovely finish, decorate the top with whipped cream swirls and whole strawberries. This makes your cake look beautiful and inviting. Enjoy your delightful strawberry shortcake layer cake!
Tips & Tricks
Achieving the Perfect Cake Texture
To get a soft and fluffy cake, use room-temperature ingredients. This includes eggs, butter, and milk. When you mix the batter, do not overbeat it. Mix just until smooth. This prevents the cake from becoming tough. Baking time is key. Check for doneness at 25 minutes. A toothpick should come out clean. Let the cakes cool completely before assembling.
Best Practices for Whipping Cream
For the best whipped cream, start with chilled cream. It whips faster and holds its shape better. Use a clean bowl and beaters to avoid any residue. Add powdered sugar for sweetness and vanilla for flavor. Beat on medium speed until stiff peaks form. Don’t overwhip, or it will turn grainy.
Decorating Techniques for Presentation
When decorating, keep it simple yet beautiful. Use a serrated knife to slice the cake evenly. For the top, spread whipped cream smoothly and add whole strawberries. You can also create swirls with a piping bag. Place fresh strawberry slices around the base for a pop of color. A well-decorated cake makes each slice inviting!
Pro Tips
- Use Room Temperature Ingredients: Ensure your eggs and milk are at room temperature for a smoother batter and better rise during baking.
- Don’t Overmix the Batter: Mix just until combined to keep your cake light and fluffy. Overmixing can lead to a dense texture.
- Macerate Your Strawberries: Allowing the strawberries to sit with sugar helps to enhance their flavor and creates a delicious syrup that adds moisture to the cake layers.
Variations
Alternative Fruits to Use
You can swap strawberries for other fruits. Try using raspberries, blueberries, or peaches. Each fruit brings its own flavor and style. For a tropical twist, use mango or pineapple. Mix and match your favorite fruits for a fun spin.
Gluten-Free and Vegan Substitutes
To make this cake gluten-free, use a 1:1 gluten-free flour mix. This helps keep the cake light. For a vegan version, replace eggs with flaxseed meal or applesauce. Use coconut milk instead of regular milk and a vegan butter substitute. Choose a plant-based cream for the whipped topping.
Flavor Variations for the Cake Batter
You can change the cake batter flavor easily. Add lemon zest for a fresh taste. Almond extract adds a nice touch too. For chocolate lovers, mix in cocoa powder. Just remember to adjust the sugar if you add cocoa. These little changes can make a big difference!
Storage Info
How to Store Leftover Cake
To keep your leftover strawberry shortcake layer cake fresh, wrap it tightly in plastic wrap. This helps keep the moisture in and the cake soft. If the cake has fruit or whipped cream on top, store it in the fridge. Place it in a cake box if you have one. This protects the cake from other odors in the fridge.
Best Practices for Freezing Cakes
Freezing is a great way to save your cake for later. First, let the cake layers cool completely. Wrap each layer in plastic wrap, then in aluminum foil. This prevents freezer burn. You can freeze the layers for up to three months. For best results, freeze them without the whipped cream or strawberries. Assemble the cake after thawing to enjoy the best texture.
Reheating Tips for Leftovers
If you want to enjoy your leftover cake warm, you can reheat it. Preheat your oven to 350°F (175°C). Place the cake slice on a baking sheet. Heat it for about 10 minutes. This warms it without making it dry. For a quick fix, you can use the microwave. Heat it in short bursts of 10 seconds. Check it often to avoid overheating. Enjoy your delicious cake!
FAQs
How do I prevent the cake from sticking to the pan?
To keep your cake from sticking, grease the pans well with butter. After greasing, dust them with flour. Make sure to cover all surfaces inside the pan. This simple step helps the cake slide out easily.
Can I make this cake in advance?
Yes, you can make this cake ahead of time. Bake the cake layers and let them cool completely. Wrap each layer in plastic wrap and store them in the fridge for up to three days. You can also freeze the layers for up to a month. Just thaw them before you assemble the cake.
What can I substitute for heavy whipping cream?
If you don’t have heavy whipping cream, you can use coconut cream. Chill a can of coconut milk overnight, then scoop out the solid part. You can also use a non-dairy whipped topping for a lighter option.
How do I make a smaller or larger cake?
To adjust the size, change the amount of batter. For a smaller cake, use a 6-inch pan and cut the recipe in half. For a larger cake, double the ingredients and use three 9-inch pans. Bake longer for larger cakes and check with a toothpick.
In this post, we explored how to make a delicious strawberry shortcake layer cake. We covered essential and optional ingredients, tools needed, and step-by-step baking instructions. I shared tips for perfecting texture and decorating your cake. Variants include different fruits and dietary adjustments. Lastly, proper storage methods help keep your cake fresh. With these points, you can bake with confidence and impress anyone with your skills. Enjoy creating your cake masterpiece!