Smothered Chicken & Rice Flavorful and Hearty Meal

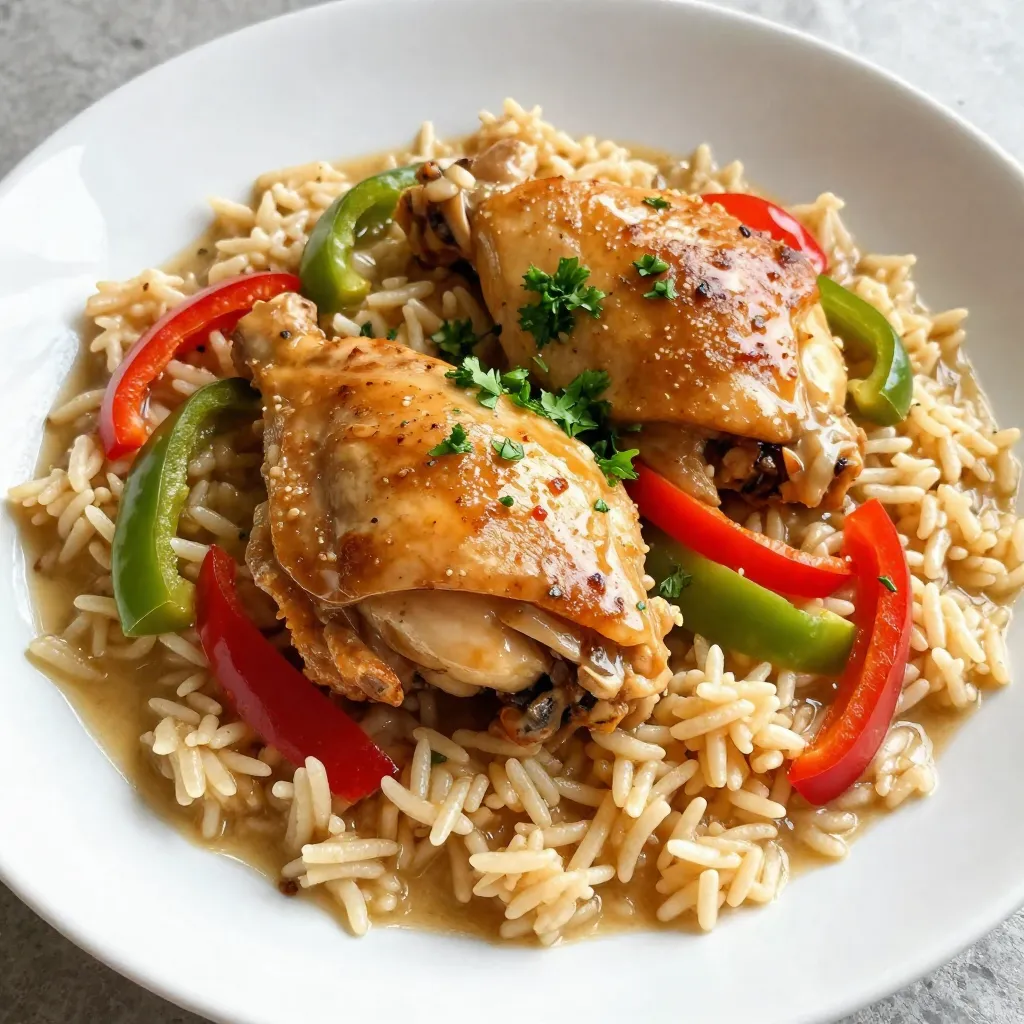
If you’re looking for a warm, filling meal that impresses, Smothered Chicken & Rice is the answer! This one-pan dish packs a punch with juicy chicken thighs, tender rice, and vibrant veggies, all simmered in a flavorful broth. In this post, I’ll guide you through every step, from picking your ingredients to serving up a plate that warms the soul. Let’s dive into this hearty recipe that’s sure to become a family favorite!
Why I Love This Recipe
- Comforting Flavor: This dish combines tender chicken thighs with perfectly cooked rice, creating a warm and satisfying meal ideal for any occasion.
- One-Pan Wonder: Cooking everything in one skillet means easy cleanup, making this recipe perfect for busy weeknights.
- Customizable Ingredients: You can easily adjust the vegetables and spices to suit your taste, making it a versatile recipe for everyone.
- Impressive Presentation: Serve it garnished with fresh parsley for a beautiful and colorful dish that looks as good as it tastes.
Ingredients
Main Ingredients for Smothered Chicken & Rice
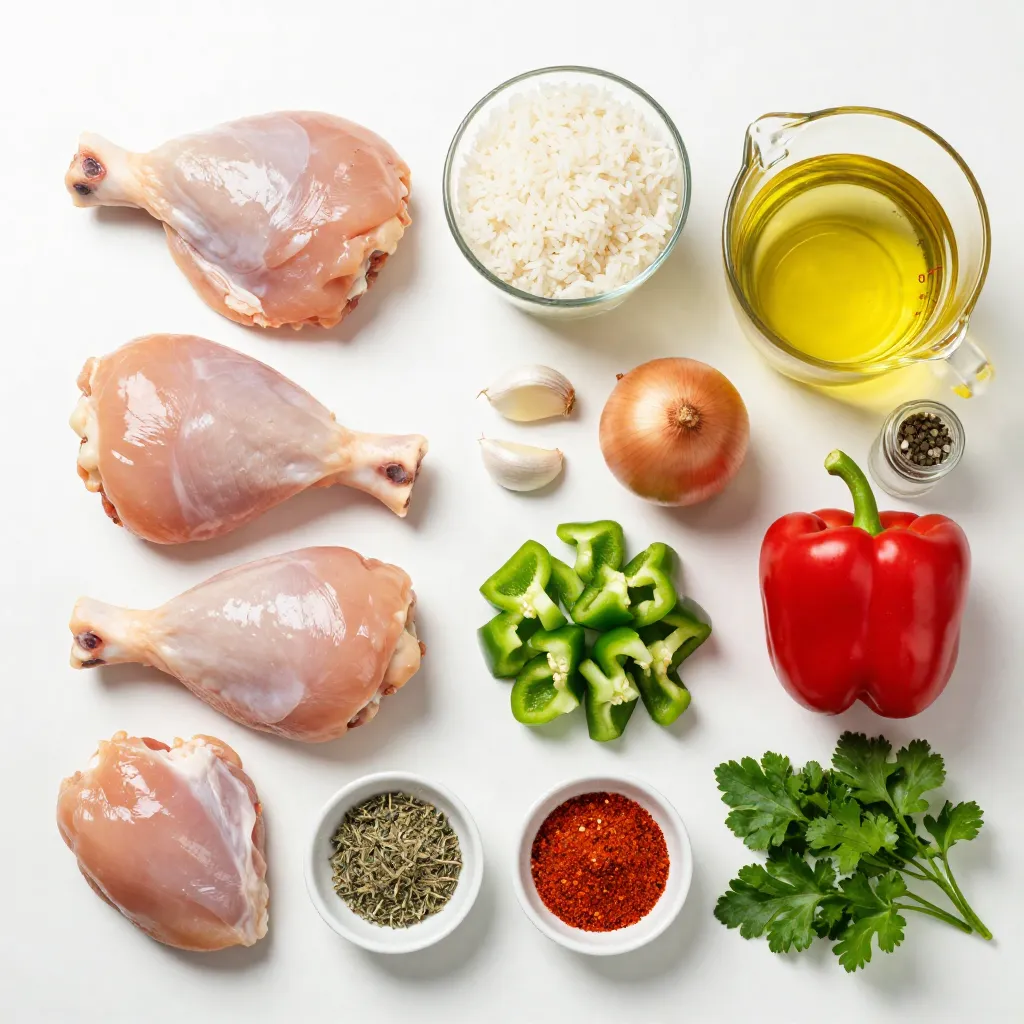
– 4 boneless, skinless chicken thighs
– 1 cup long-grain white rice
– 2 cups low-sodium chicken broth
The chicken thighs form the heart of this dish. They stay juicy and tender. Long-grain white rice absorbs all the yummy flavors. Low-sodium chicken broth adds depth without too much salt.
Vegetable Ingredients
– 1 medium onion, finely chopped
– 2 garlic cloves, minced
– 1 green bell pepper, diced
– 1 red bell pepper, diced
Onions and garlic bring a sweet and savory base. The bell peppers add color and crunch. They make the dish look and taste fresh. Using both green and red peppers gives a nice balance.
Seasoning Ingredients
– 1 teaspoon smoked paprika
– 1 teaspoon dried thyme
– 1 teaspoon ground cumin
– Optional: 1/2 teaspoon cayenne pepper
Smoked paprika adds a deep, rich flavor. Thyme provides a hint of earthiness. Cumin brings warmth and depth. If you like heat, cayenne gives a nice kick. Adjust the spices to fit your taste.

Step-by-Step Instructions
Preparing the Chicken
Start by heating 2 tablespoons of olive oil in a large skillet over medium heat. While the oil warms, season both sides of the chicken thighs with salt, pepper, smoked paprika, and cumin. Make sure the chicken is well coated.
Once the oil shimmers, place the seasoned chicken thighs in the skillet. Sear them for 5 to 6 minutes on each side until they turn golden brown. After cooking, remove the chicken from the skillet and set it aside on a plate.
Cooking the Vegetables
Next, in the same skillet, add the finely chopped onion, minced garlic, and diced green and red bell peppers. Sauté these for about 4 to 5 minutes, stirring often. You want the vegetables to soften and release their fragrant aroma.
Now, add the dried thyme and cayenne pepper if you like heat. Cook this mixture for one more minute. This step helps the flavors blend together nicely.
Combining Rice and Broth
Add 1 cup of uncooked long-grain white rice to the skillet. Stir it well to coat the rice with the vegetable mixture. Gradually pour in 2 cups of low-sodium chicken broth, mixing until everything combines.
Increase the heat slightly to bring the mixture to a gentle boil. Once boiling, carefully nestle the seared chicken thighs back into the skillet. Make sure they are partly submerged in the broth and rice.
Cover the skillet with a lid and reduce the heat to low. Let it simmer for 20 to 25 minutes or until the rice is tender and absorbs most of the liquid. After the time is up, turn off the heat and let it sit for another 5 minutes, covered. This resting time lets the flavors settle.
Finally, use a fork to fluff the rice and chicken. Taste and adjust seasoning with more salt and pepper if needed.
Tips & Tricks
Best Practices for Juicy Chicken
To get juicy chicken, start with good searing. Heat your skillet well before adding oil. The oil should shimmer but not smoke. Place the chicken in the hot skillet and don’t touch it for a few minutes. This helps create a nice crust.
For even cooking, choose chicken thighs. They have more fat, keeping them moist. Make sure the thighs are similar in size. This ensures they cook at the same rate.
Flavor Enhancements
Herbs and spices can elevate your dish. Try adding fresh thyme or rosemary for a brighter taste. A squeeze of lemon juice can also bring out the flavors.
If you like heat, use cayenne pepper. Start with a small amount, then taste. You can always add more if needed.
Cooking Equipment Recommendations
A large skillet is best for this dish. It allows enough space for chicken and rice to cook evenly. A heavy skillet helps maintain heat, giving you better searing.
Don’t forget the lid! Covering the skillet lets the rice steam and absorb flavors. This step is key for making the dish tender and delicious.
Pro Tips
- Perfectly Sear the Chicken: Ensure the skillet is hot enough before adding the chicken; this will create a nice golden crust and lock in the juices.
- Flavorful Rice: Toast the uncooked rice in the skillet for a couple of minutes before adding the broth to enhance its nutty flavor.
- Adjusting Spice Levels: If you prefer a milder dish, reduce the cayenne pepper or omit it entirely. You can always add hot sauce at the table for those who like it spicy!
- Rest Before Serving: Let the dish sit covered for a few minutes after cooking. This resting time helps the flavors meld and allows the rice to finish absorbing any remaining liquid.
Variations
Alternative Ingredients
You can switch up the rice. Long-grain white rice works great, but try brown rice or jasmine rice. Each type brings a unique taste and texture.
If you want to change the protein, consider using pork or turkey. Both options cook well and absorb flavors nicely. You can also use tofu for a meatless dish.
Regional Variations
Smothered chicken has its roots in Southern cooking. However, many regions have their own twist. In the Southwest, you might add corn and black beans. These ingredients can add a fun flavor and texture.
In the Midwest, try using local vegetables like mushrooms or squash. They can bring a fresh taste to your meal.
Dietary Adjustments
Want to make it gluten-free? Use gluten-free broth and check your spices. Most spices are safe, but always read the labels.
If you prefer vegetarian or vegan meals, swap the chicken for chickpeas or tempeh. Use vegetable broth and add more veggies to keep it hearty. This way, you still get a filling meal without meat.
Storage Info
How to Store Leftovers
To store your Smothered Chicken & Rice, first, let it cool down. Place the leftovers in a clean, airtight container. This helps keep the flavors intact. Store it in the fridge for up to three days. Make sure to reheat it thoroughly before eating.
Freezing Instructions
If you want to freeze this dish, portion it into smaller containers. Let it cool completely before sealing. Use freezer-safe containers or bags to avoid freezer burn. When you want to eat it, thaw it in the fridge overnight. Reheat it on the stove or in the microwave until hot.
Shelf Life
In the fridge, Smothered Chicken & Rice lasts about three days. When frozen, it can last up to three months. For best taste, try to eat it within this time frame. Always check for signs of spoilage before eating.
FAQs
How long does it take to make Smothered Chicken & Rice?
Making Smothered Chicken & Rice takes about 50 minutes in total. The prep time is just 15 minutes. During this time, you will season the chicken and chop the veggies. The cooking part takes around 35 minutes. First, you sear the chicken for about 12 minutes. Then, you will simmer the rice and chicken together for about 25 minutes. This dish is quick and perfect for a weeknight meal.
Can I make this dish ahead of time?
Yes, you can make this dish ahead of time. To prep, cook the rice and chicken, and let them cool. Store them in airtight containers in the fridge. You can keep Smothered Chicken & Rice for up to three days. When you are ready to eat, just reheat it on the stove or in the microwave. Adding a splash of broth can help keep it moist.
What can I serve with Smothered Chicken & Rice?
You can serve many tasty side dishes with Smothered Chicken & Rice. Here are a few good options:
– Steamed broccoli
– Roasted green beans
– A fresh garden salad
– Cornbread
– Collard greens
Each of these sides adds extra flavor and texture to your meal. They also balance the richness of the chicken and rice.
Smothered chicken and rice combines basic ingredients and simple steps for a hearty meal. You start with juicy chicken thighs, rice, and flavorful broth. By sautéing fresh vegetables and spices, you build taste. Good techniques ensure the chicken stays juicy.
Remember, you can customize this dish with different proteins or flavors. Store leftovers properly to keep them tasty. With all these tips, you can make this dish your own. Enjoy creating and sharing this comforting mea

Savory Smothered Chicken & Rice
Ingredients
- 4 pieces boneless, skinless chicken thighs
- 1 cup long-grain white rice
- 2 cups low-sodium chicken broth
- 1 medium onion, finely chopped
- 2 cloves garlic, minced
- 1 piece green bell pepper, diced
- 1 piece red bell pepper, diced
- 1 teaspoon smoked paprika
- 1 teaspoon dried thyme
- 1 teaspoon ground cumin
- 0.5 teaspoon cayenne pepper (optional for heat)
- 2 tablespoons olive oil
- to taste salt and freshly ground black pepper
- for garnish fresh parsley, chopped
Instructions
- Begin by heating 2 tablespoons of olive oil in a large skillet over medium heat.
- While the oil heats, season both sides of the chicken thighs with salt, pepper, smoked paprika, and cumin, ensuring they are well coated.
- Once the oil is shimmering, place the seasoned chicken thighs into the skillet. Sear them for 5-6 minutes on each side, until they are golden brown and cooked through. Remove the chicken from the skillet and set aside on a plate.
- In the same skillet, add the finely chopped onion, minced garlic, and diced green and red bell peppers. Sauté for about 4-5 minutes, stirring frequently until the vegetables are softened and fragrant.
- Next, stir in the dried thyme and cayenne pepper (if using) and cook the mixture for an additional minute, allowing the flavors to meld.
- Now, add the uncooked rice to the skillet, stirring thoroughly to ensure it is evenly coated with the vegetable and spice mixture.
- Gradually pour in the 2 cups of low-sodium chicken broth, mixing until combined. Increase the heat slightly to bring the mixture to a gentle boil.
- Once boiling, carefully nestle the seared chicken thighs back into the skillet, ensuring they are partly submerged in the broth and rice mixture.
- Cover the skillet with a lid and reduce the heat to low. Allow it to simmer for about 20-25 minutes, or until the rice is tender and has absorbed most of the liquid.
- After the cooking time has elapsed, turn off the heat and let the skillet sit, covered, for an additional 5 minutes to allow the flavors to settle.
- Using a fork, gently fluff the rice and chicken while adjusting the seasoning with more salt and pepper if necessary.


 to explore more about making this dish. For dressings, try balsamic vinaigrette or yogurt-based dressings. Pair this salad with grilled chicken or fish for a complete meal. Cucumber salads are easy to make and fun to enjoy. We covered the key ingredients, preparation steps, and tips to make your salad shine. From classic recipes to global twists, there are many ways to enjoy cucumbers. They offer great health benefits, too, and fit into various diets. Remember to choose fresh cucumbers for the best taste. With helpful serving ideas, you can impress at any meal. Explore, experiment, and taste, and soon you'll make a salad everyone loves.](https://fastmealmate.com/wp-content/uploads/2025/07/f486dd4d-c258-4f41-b39b-ef28058aa0c9-768x768.webp)

![- 2 ripe mangoes, peeled and diced - 1 cup freshly squeezed lemon juice (approximately 4-5 lemons) - 4 cups cold water - 1/2 cup honey or agave syrup (adjust for sweetness) - 1/4 teaspoon sea salt - Ice cubes - Fresh mint leaves and lemon slices for garnish In this recipe, ripe mangoes are key. They give the drink a rich, sweet flavor. Fresh lemon juice adds a tangy twist that balances the sweetness. I recommend using cold water for a refreshing drink. Honey or agave syrup allows you to control the sweetness level. Adding a pinch of sea salt enhances the taste and brings out the flavors. Don't forget the ice cubes! They keep your drink cool and refreshing. Lastly, fresh mint leaves and lemon slices make a beautiful garnish. They add a nice touch to your glass and make it look appetizing. For the complete recipe, check out the [Full Recipe]. To start, you need ripe mangoes. Peel and dice two mangoes. Place the diced mangoes in a blender. Add 1 cup of cold water. Blend on high until smooth and creamy. This mango puree gives your drink a rich flavor. Next, grab a large pitcher. Pour in 1 cup of freshly squeezed lemon juice. Use about 4-5 lemons for this. Add 3 cups of cold water. Mix in 1/2 cup of honey or agave syrup. Stir until everything is well combined. This mixture will be your refreshing lemonade base. Now, it’s time to combine. Gently pour the mango puree into the pitcher with the lemonade. Stir carefully until everything is mixed. You want the mango and lemonade to blend perfectly for a smooth taste. Take a moment to taste your mixture. If it’s too sweet, add more lemon juice. If you want it sweeter, mix in more honey or agave. Don't forget the salt! Stir in 1/4 teaspoon of sea salt to balance the flavors. Adjust until it tastes just right for you. It’s almost time to serve! Fill your glasses with ice cubes. Carefully pour the mango lemonade over the ice. Each glass should be full of that bright, fruity goodness. For a nice touch, garnish with fresh mint leaves and a lemon slice on the rim. This makes your drink look inviting and fresh. For the full recipe, check out the detailed steps above! To make your mango lemonade sweet, you can adjust the honey or agave syrup. Start with the half cup stated in the recipe. After mixing, taste it. If it’s not sweet enough, add more sweetener a little at a time. This way, you control the flavor. Remember, mangoes also add some natural sweetness. So, your lemonade may not need much more. Want to add some extra flavor? Fresh herbs like mint or basil work great. Just chop them up finely and mix them into the lemonade. You can also try adding a pinch of ginger or a dash of cinnamon. These spices bring a new twist to your drink. They can brighten the mango's flavor and make it even more refreshing. Mango lemonade pairs well with light snacks. Think about serving it with fresh fruit or a light salad. It also goes perfectly with grilled chicken or fish. For a fun twist, try it with spicy tacos. The sweet and tangy lemonade cools down the heat. Serve it over ice for a refreshing treat. Enjoy the colorful look with mint and lemon slices on top, making your table even more inviting. {{image_4}} You can make mango lemonade even better by adding other fruits. Try mixing in fresh berries like strawberries or blueberries. Pineapple also works great. These fruits add extra color and fun flavors. To do this, simply blend the fruits with the mango before mixing with the lemonade. Each fruit brings its own unique taste, making your drink more exciting. Want to spice things up? You can turn mango lemonade into a fun adult drink. Add rum or vodka for a spiked version. Use about 1 to 2 ounces of your favorite spirit per glass. This addition gives the drink a kick, perfect for parties or summer gatherings. Just remember to drink responsibly! Get creative by using flavored teas or herbal infusions in your mango lemonade. You can brew a light green tea or a refreshing mint tea. Once it cools, mix it into your lemonade base. This adds a whole new layer of flavor. You can even try herbal infusions like chamomile for a soothing twist. Explore these options to find your favorite mix. The full recipe will guide you through making this delightful drink. To keep your mango lemonade fresh, store it in an airtight container. A glass jar or a pitcher works well. Make sure to seal it tightly to prevent any odors from the fridge from mixing in. Always place it in the coldest part of the fridge, usually towards the back. This helps keep it cool and refreshing. Your mango lemonade will stay fresh for about 3 to 5 days. After that, the flavors may start to fade. If it starts to taste less vibrant, you might want to add a little more lemon juice or honey to revive it. Always check for any changes in smell or color before drinking. If you want to save some for later, freezing is a great option. Pour the mango lemonade into ice cube trays or freezer-safe bags. Leave a little space at the top, as liquids expand when frozen. When you want to enjoy it again, just thaw it in the fridge overnight. You can also blend the frozen cubes into smoothies for an instant fruity treat. For the full recipe, check out the [Full Recipe]. Mango lemonade is packed with vitamins. Mangoes are rich in vitamin C, which helps boost your immune system. They also contain vitamin A, good for your eyes and skin. The lemon juice adds more vitamin C and antioxidants. Together, they help you stay hydrated and healthy. Drinking mango lemonade can also support digestion due to its natural enzymes. Yes, you can use frozen mangoes! They make a great substitute. When you use frozen mango, it still blends well into a smooth puree. You do not need to thaw them first. Just add them to the blender with some water and blend until smooth. This makes it easy for you to enjoy mango lemonade anytime, even when fresh mangoes aren't available. To make your mango lemonade less tart, add more sweetness. You can increase the honey or agave syrup. Start with a little, then taste and add more if needed. If it’s still too sour, you can add more mango puree. A pinch of salt can also help balance the flavors. This way, you will enjoy a sweeter, more balanced drink. This mango lemonade recipe is sure to refresh you. We covered the ingredients, step-by-step instructions, and variations to try. Don't forget to adjust sweetness and explore fun combos. You can enjoy this drink fresh or store it for later. Whether you sip it by itself or with snacks, it's a bright treat. I hope you’re excited to make this delicious drink and share it with others!](https://fastmealmate.com/wp-content/uploads/2025/07/c517a603-1516-4e83-8a0a-b9bae852f1a0-768x768.webp)


