Smoky Chipotle Beef Chili Slow Cooker Comfort Meal

If you love a hearty meal that warms your soul, you’ll adore this Smoky Chipotle Beef Chili! This slow cooker recipe creates a rich and savory dish with just the right kick. In this post, I’ll guide you through all the easy steps to make this comfort meal, from ingredients to storage tips. Get ready to impress your family with a bowl of chili that’s packed with flavor and warmth!
Ingredients
List of Main Ingredients
– 1.5 lbs ground beef
– 1 can (15 oz) black beans, drained and rinsed
– 1 can (15 oz) kidney beans, drained and rinsed
– 1 can (28 oz) crushed tomatoes
– 1 onion, finely chopped
– 3 cloves garlic, minced
– 2 chipotle peppers in adobo sauce, finely chopped
– 1 tablespoon adobo sauce (from chipotle can)
– 1 tablespoon smoked paprika
– 2 teaspoons ground cumin
– 1 teaspoon dried oregano
– 1 bell pepper (red or green), chopped
– 1 cup beef broth
– 2 tablespoons olive oil
– Salt and black pepper to taste
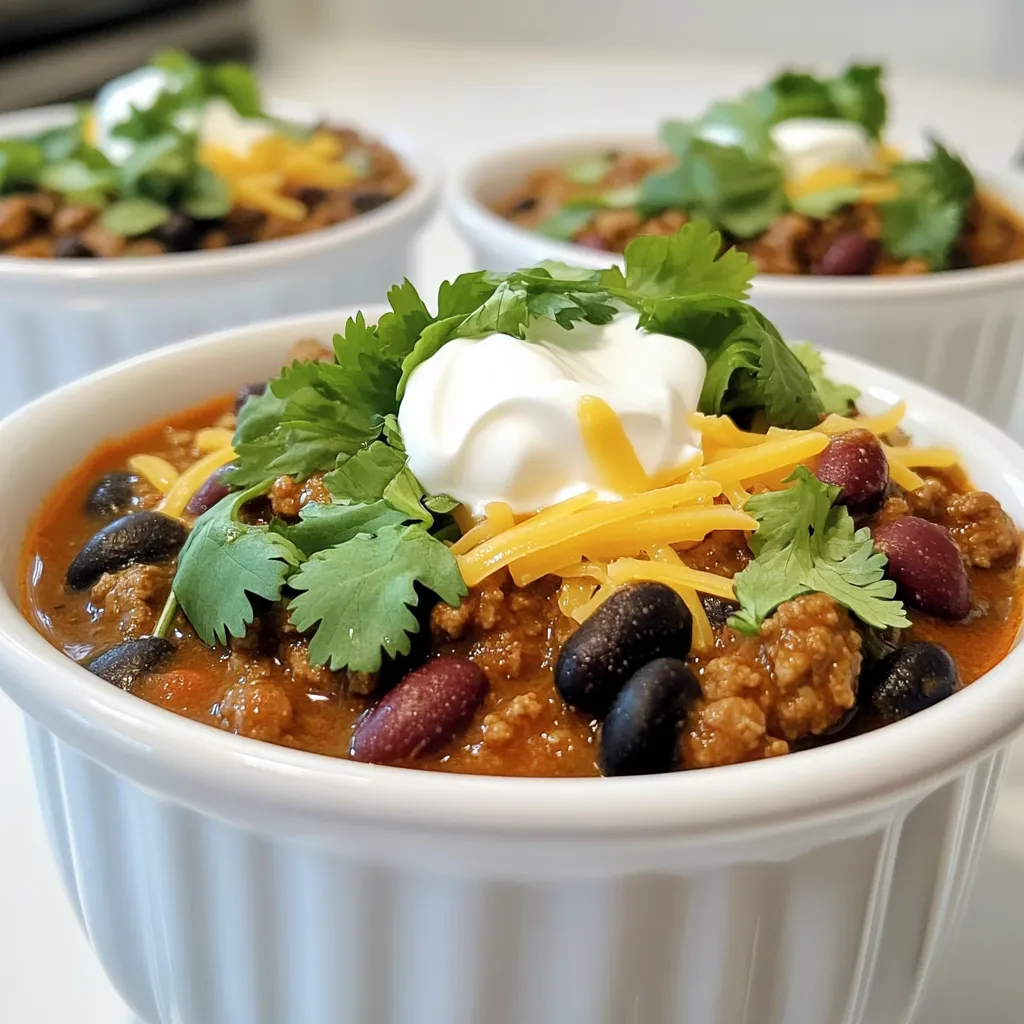
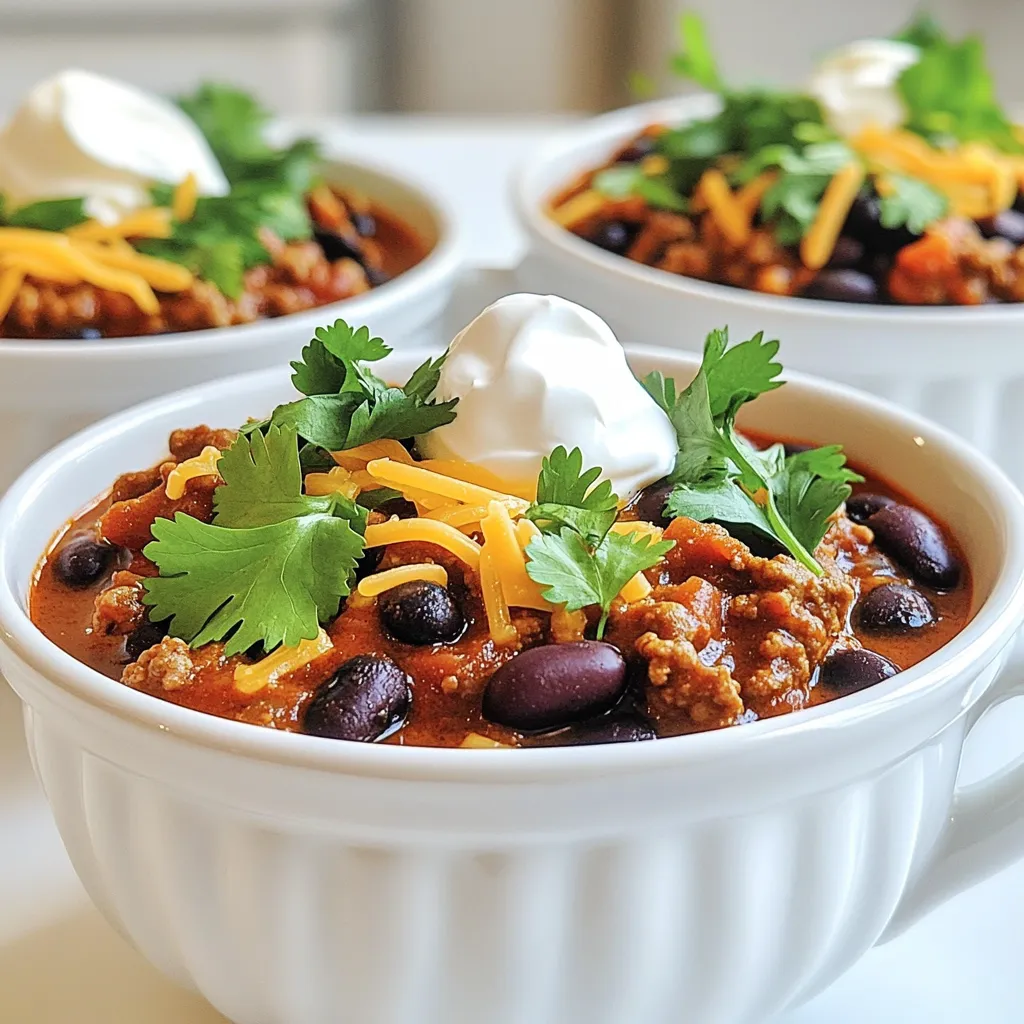
Optional Garnishes
– Fresh cilantro, chopped
– Sour cream
– Shredded cheese
Ingredient Substitutions
If you want to swap some items, try these ideas:
– Use ground turkey instead of beef for a lighter option.
– Replace black beans with pinto beans if you prefer.
– Use vegetable broth for a vegetarian touch.
– Swap chipotle peppers with jalapeños for a milder heat.
– If you don’t have smoked paprika, regular paprika works too.
Step-by-Step Instructions
Preparation Steps
– Sautéing onion and garlic
First, heat 2 tablespoons of olive oil in a large skillet over medium heat. Add 1 finely chopped onion and cook it for about 5 minutes. The onion should turn soft and translucent. Next, add 3 minced garlic cloves. Cook this for another minute. You want the garlic to smell great but not burn.
– Browning the ground beef
Now, increase the heat a bit. Add 1.5 lbs of ground beef to the skillet. Break it apart with a spatula as it cooks. Brown the beef well. Make sure to drain any extra grease after cooking. This step adds rich flavor and texture to your chili.
Transferring to the Slow Cooker
Once the beef is browned, transfer the beef, onion, and garlic mix to the slow cooker. This is where the magic happens. Add the chopped chipotle peppers, 1 tablespoon of adobo sauce, 1 tablespoon of smoked paprika, 2 teaspoons of ground cumin, and 1 teaspoon of dried oregano. Toss in the chopped bell pepper, 1 can of black beans, 1 can of kidney beans, 1 can of crushed tomatoes, and 1 cup of beef broth. Gently stir all these ingredients together until they mix well. Don’t forget to season with salt and black pepper to taste.
Cooking Times and Temperature Settings
Cover the slow cooker with its lid. You can set it on low heat for 6-8 hours or on high heat for 4-6 hours. The longer you cook, the more the flavors blend. After cooking, taste your chili and adjust the seasoning if needed. This dish gets better as it simmers, so enjoy the wait!
Tips & Tricks
How to Enhance Flavor
To boost the flavor of your Smoky Chipotle Beef Chili, use fresh herbs. Fresh cilantro adds brightness. A squeeze of lime juice gives a nice kick. You can also add a dash of hot sauce for extra heat. If you want more depth, try adding a tablespoon of brown sugar. This balances the spice from the chipotle peppers.
Cooking Techniques for the Perfect Chili
Start by browning the beef well. This caramelizes the meat and adds a rich taste. Use a large skillet to sauté your onions and garlic until soft. This step builds a strong base for your chili. When transferring to the slow cooker, mix all ingredients well. Stirring ensures that every bite is packed with flavor.
Common Mistakes to Avoid
One common mistake is not browning the meat enough. This can lead to a flat taste. Avoid adding too much liquid at the start. The beans and tomatoes release moisture as they cook. Always taste your chili before serving. Adjust the salt and pepper as needed. Lastly, don’t skip the garnishes. They add color and flavor to your dish.

Variations
Vegetarian or Vegan Options
To make a vegetarian or vegan version of this chili, swap the beef for plant-based ground meat or lentils. Lentils give great texture and soak up flavors well. Use vegetable broth instead of beef broth. Keep the rest of the ingredients the same. You can also add more veggies like zucchini or mushrooms for extra flavor.
Spicy Adjustments
If you like your chili hot, add more chipotle peppers or a dash of cayenne pepper. A little goes a long way! Try adding jalapeños for a fresh kick. You can also serve sliced fresh peppers on the side for those who want to add heat to their bowl.
Bean Variations
Feel free to mix up the beans in your chili. You can use pinto beans or navy beans instead of black and kidney beans. Each type brings its own flavor and texture. You can also add chickpeas for a unique twist. This keeps the chili interesting and allows you to use what you have on hand.
Storage Info
Proper Cooling and Storage Techniques
To store your smoky chipotle beef chili, let it cool first. Place it in a large bowl and let it sit at room temperature. This should not take more than two hours. After it cools, transfer it to airtight containers. Divide it into smaller portions for easy use later. Make sure to label your containers with the date.
Reheating Instructions
When ready to eat, you can reheat the chili in a few ways. The easiest method is in the microwave. Pour some chili into a microwave-safe bowl and heat it for 2-3 minutes. Stir halfway through to ensure even heating. You can also reheat it on the stove. Pour the chili into a pot and warm it on medium heat, stirring often. Cook until it is hot all the way through.
Freezing Tips for Leftovers
If you want to save some chili for later, freezing is a great option. Use freezer-safe containers or heavy-duty bags. Make sure to leave some space at the top. This allows room for the chili to expand as it freezes. Label the bags or containers with the date. Chili can last in the freezer for up to 3 months. When you’re ready to enjoy it, thaw it in the fridge overnight. Then, reheat it as mentioned above.
FAQs
Can I make Smoky Chipotle Beef Chili ahead of time?
Yes, you can make Smoky Chipotle Beef Chili ahead of time. Cooking the chili a day in advance lets the flavors mix better. Just store it in a sealed container in the fridge. When you are ready to eat, reheat it on the stove or in the microwave. This chili also tastes great after freezing. Just thaw it overnight in the fridge before reheating.
What are the best toppings for chili?
Some great toppings for chili include:
– Fresh cilantro
– Sour cream
– Shredded cheese
– Avocado slices
– Green onions
– Crushed tortilla chips
These toppings can add different flavors and textures. Try a mix to see what you like best!
How long does chili last in the fridge?
Chili can last in the fridge for about 3 to 5 days. Make sure to store it in a sealed container. If you want to keep it longer, consider freezing it. Frozen chili can last for up to 3 months without losing flavor. Just remember to label it with the date!
In this post, we covered how to make Smoky Chipotle Beef Chili. We discussed the main ingredients and garnishes, offered substitution options, and provided step-by-step cooking instructions. I shared tips for flavor and common mistakes to avoid. You learned about variations, storage tips, and answered key FAQs.
Chili is fun to make and share. Try different ingredients and find your favorite mix. Enjoy a bowl today!


![- 1 tablespoon olive oil - 1 medium onion, finely diced - 2 cloves garlic, minced - 2 medium carrots, peeled and diced - 1 medium zucchini, diced - 1 cup green peas (fresh or frozen) - 1 cup cauliflower florets, chopped - 4 cups vegetable broth - 1 cup coconut milk To make a creamy vegetable soup, start with olive oil, onion, and garlic. The olive oil adds a nice richness. The onion gives a sweet base flavor. Garlic brings a warm, aromatic touch. Next, choose fresh vegetables like carrots, zucchini, and cauliflower. Carrots add sweetness and color. Zucchini brings a mild flavor and a tender texture. Cauliflower gives the soup a creamy feel when blended. For the broth and creaminess, use vegetable broth and coconut milk. Vegetable broth adds depth. Coconut milk makes the soup rich and smooth. Together, these ingredients create a lovely balance of flavors. - 1 teaspoon dried thyme - ½ teaspoon smoked paprika - Salt and freshly ground black pepper to taste - Fresh parsley, chopped (for garnish) Now, season your soup with dried thyme and smoked paprika. Thyme adds a warm herbal note. Smoked paprika gives a hint of smokiness. Use salt and pepper to taste, adjusting as you go. Finally, top your soup with fresh parsley. It adds a pop of color and a fresh taste. This simple garnish makes the soup look inviting and bright. For the complete recipe, check the [Full Recipe]. Start by heating 1 tablespoon of olive oil in a large pot over medium heat. Once the oil is hot, add 1 medium onion, finely diced, and 2 cloves of minced garlic. Sauté these for about 3-4 minutes. Keep stirring until the onion is soft and clear. This step builds a strong flavor base for your soup. Next, add 2 medium carrots, peeled and diced, along with 1 medium zucchini, diced, and 1 cup of chopped cauliflower florets. Cook these vegetables for an additional 5 minutes. Stir often until they begin to soften. This mix of veggies adds color and nutrition to your dish. Now, pour in 4 cups of vegetable broth. This broth acts as the heart of the soup. Add 1 cup of green peas, 1 teaspoon of dried thyme, and ½ teaspoon of smoked paprika. Bring this mixture to a boil. After it boils, lower the heat and let it simmer uncovered for about 15 minutes. The goal is to cook until all the vegetables are tender and full of flavor. Once the soup has simmered, remove it from the heat. Use an immersion blender to carefully purée the soup until it is smooth and creamy. If you prefer, you can also transfer the soup in batches to a countertop blender. Blend until the mixture is silky. This step is key for achieving that creamy texture we all love. Return the pot to low heat. Now, stir in 1 cup of coconut milk. This ingredient adds a rich creaminess and a hint of sweetness. Season the soup with salt and freshly ground black pepper to taste. Gently warm the soup for about 5 minutes. This will make sure everything is hot without boiling. Serve the soup hot in bowls. Garnish with fresh chopped parsley for a pop of color. Enjoy your creamy vegetable soup, made with love and fresh ingredients! For the complete recipe, check out the Full Recipe section. Choosing the right vegetables is key to great flavor. I love using fresh carrots, zucchini, and cauliflower. Each adds a unique taste. You can also add sweet potatoes or bell peppers for a twist. Always pick vegetables that are in season. They taste better and have more nutrients. Adjusting the creaminess level is easy. For a lighter soup, use less coconut milk. If you like it rich, add more. You can also blend in some white beans for extra creaminess without extra calories. Garnishing the soup makes it look stunning. I like to sprinkle fresh parsley on top. It adds a pop of color and fresh taste. You can also drizzle a bit of coconut milk for a fancy touch. Serving suggestions are just as important. A slice of crusty bread pairs well with the soup. You can also serve it with a side salad. This makes for a filling meal. For the full recipe, check out the complete guide! {{image_4}} You can change your creamy vegetable soup by using different veggies. Try seasonal vegetables for fresh flavors. For spring, add asparagus or green beans. In summer, use ripe tomatoes and corn. In fall, butternut squash and sweet potatoes shine. You can also experiment with bases. Instead of coconut milk, try almond milk for a nutty twist. This gives the soup a different taste and texture. Each change brings a new layer of flavor to your soup. Adding protein can make your soup heartier. Beans and lentils are great options. They add fiber and keep you full. For example, black beans or chickpeas blend well with the soup. You can add them when you simmer the broth. Another option is chicken or sausage. Cooked chicken pieces are tasty and satisfying. If you like sausage, slice it and sauté it with the onions. This adds a savory kick to the soup. Enjoy making it your own! Check out the Full Recipe for more ideas. To keep your creamy vegetable soup fresh, allow it to cool before storing. Place it in airtight containers to avoid air exposure. This helps maintain its flavor and texture. Store the soup in the fridge for up to three days. If you want to keep it longer, freezing is a great option. For freezing, use freezer-safe containers or bags. Make sure to leave some space for expansion. The soup can last up to three months in the freezer. When reheating the soup, you want to keep it creamy. The best method is to use the stove over low heat. Stir it gently to avoid burning. If you want to use the microwave, do so in short bursts. Stir the soup in between each burst to ensure even heating. To prevent separation, add a splash of water or vegetable broth if it thickens too much. This keeps the texture smooth and enjoyable. Can I make creamy vegetable soup vegan? Yes, you can easily make this soup vegan. Just use vegetable broth and coconut milk. Skip any dairy products. How do I make the soup spicier? To add heat, sprinkle in red pepper flakes or cayenne pepper. You can also add fresh jalapeños for a kick. What are the best side dishes to serve with the soup? Serve the soup with crusty bread, a fresh salad, or grilled cheese. These pair well and add more flavor. What to do if the soup is too thick? If your soup is too thick, add more vegetable broth. Stir well to combine and adjust until you reach your desired texture. How can I add more flavor? For extra flavor, try adding herbs like basil or dill. A splash of lemon juice can also brighten the taste. If you want, use the Full Recipe to explore more options. This blog post covered how to make a creamy vegetable soup from scratch. We explored essential ingredients like olive oil, fresh veggies, and broth. You learned step-by-step instructions, from sautéing to blending the soup. Tips for perfecting flavor and presentation will enhance your dish. Remember, you can change the recipe to suit your taste and store leftovers for later. With this knowledge, you can create a warm, comforting dish that you and others will enjoy. Happy cooking!](https://fastmealmate.com/wp-content/uploads/2025/07/74153262-6d82-4db7-a8c8-a4016c29ccdc-768x768.webp)

![- Fettuccine or Linguine: I love using fettuccine or linguine for this dish. These pastas hold the creamy sauce well. Their flat shape allows for a perfect bite every time. - Fresh Seafood: When choosing shrimp, look for firm, pink, and shiny ones. For scallops, they should be plump and slightly translucent. Fresh seafood makes all the difference in flavor. - Aromatics and Seasoning: Garlic and onion add depth to the dish. Use three cloves of garlic for a bold flavor. A small onion gives a nice sweetness. Fresh lemon juice and zest brighten the entire meal. - Fresh Basil Leaves: Adding fresh basil leaves boosts flavor and looks great. Tear them by hand for a rustic touch. Scatter them on top just before serving. - Grated Parmesan Cheese: Choose a good-quality Parmesan cheese for the best taste. Grate it fresh for a rich, nutty finish. It melts nicely into the pasta and adds creaminess. For the full recipe, visit the details above and enjoy the process! Start by boiling a large pot of salted water. Add the fettuccine or linguine. Cook it until it's al dente. This means it should be firm but cooked through. This step is key because overcooked pasta becomes mushy. After cooking, drain the pasta but save about ½ cup of the pasta water. This water can help thicken your sauce later. Next, heat 2 tablespoons of olive oil in a large skillet over medium heat. Wait until the oil shimmers before adding minced garlic and chopped onion. Sauté for about 3-4 minutes. You want the onion to become clear and fragrant. This step builds a great flavor base for your dish. Now it’s time to add the seafood. Place the shrimp and scallops in the skillet. Cook for about 4-5 minutes, stirring gently. The shrimp will turn pink, and the scallops will look opaque when done. Avoid overcooking them, or they will become rubbery. After the seafood is cooked, pour in a cup of heavy cream. Stir well to mix all the ingredients. Then, add the lemon zest, lemon juice, and red pepper flakes if you want some heat. Season with salt and black pepper. Let this sauce simmer for about 2-3 minutes. This time lets all the flavors blend together nicely. Finally, add the cooked pasta to the skillet. Toss everything gently to coat the noodles in the creamy sauce. If the sauce is too thick, add the reserved pasta water a little at a time. This helps reach the perfect consistency. Let it rest for a minute before serving to deepen the flavors. For the complete recipe, check the [Full Recipe]. To make the best seafood pasta, pay attention to the seafood. Always use fresh shrimp and scallops. Look for firm shrimp and plump scallops. Avoid overcooking seafood; it should be cooked just until it turns opaque. A common mistake is cooking seafood too long. This can make it tough and chewy. Spices and herbs bring your dish to life. Use fresh herbs like basil or parsley. Lemon zest adds brightness. A pinch of red pepper flakes adds heat. Try adding a dash of white wine for depth. These flavors work well with the creamy sauce and seafood. Plating is key to a great meal. Use large, shallow bowls for serving. Twirl the pasta for an elegant look. Garnish with fresh basil leaves and a sprinkle of Parmesan cheese. Drizzle a little extra olive oil on top for shine. This makes your dish appealing and appetizing. For a fun touch, consider adding a lemon wedge on the side. It gives a pop of color and flavor. These small details can impress your guests. For the complete recipe, check out the [Full Recipe]. {{image_4}} If you want to change up the seafood in this dish, there are great options. You can substitute shrimp and scallops with: - Crab meat - Lobster - Mussels - Clams These options can add unique flavors to your pasta. For example, crab meat gives a sweet taste, while mussels add a briny touch. Just make sure to adjust the cooking time, as some seafood cooks faster than others. You can switch up the pasta type for different health goals. Consider using: - Whole wheat pasta - Gluten-free pasta Whole wheat pasta has more fiber and nutrients than standard pasta. Gluten-free pasta is great for those with wheat allergies. Both options work well with the sauce and seafood. Just cook them according to package directions for the best texture. Want to try something new? You can play with the sauce for your dish. Here are some ideas: - Use marinara sauce for a classic Italian touch. - Try a basil pesto for a fresh and herbal flavor. Marinara sauce adds a rich tomato taste. Pesto brings in bright flavors and a creamy texture. Feel free to mix and match these sauces with your seafood for fun twists. You can find the full recipe to guide you through all these ideas. After enjoying your seafood pasta, store leftovers right away. Let the dish cool for about 30 minutes. Then, place it in an airtight container. This keeps it fresh for up to three days. Make sure to check for any signs of spoilage before eating. When reheating seafood pasta, keep the texture and flavor in mind. Use a skillet over low heat. Add a splash of water or broth to help with moisture. Stir gently to avoid breaking the seafood. Heat until it’s warm, about 5-7 minutes. You can also use the microwave. Just cover the dish loosely with a lid or wrap to keep it moist. To freeze your seafood pasta, let it cool completely first. Place it in a freezer-safe container. It can last up to two months in the freezer. To defrost, move the container to the fridge overnight. Reheat gently in a skillet or microwave, adding a splash of cream or broth to restore creaminess. Enjoy your delicious seafood pasta anytime! For the full recipe, check out the earlier section. You can tell shrimp and scallops are cooked when they change color. Shrimp should turn pink, and scallops should become opaque. For shrimp, look for a tight curl. For scallops, they should have a firm texture. If you cut into them, they should be white inside with no translucent areas. This means they are safe to eat. Yes, you can prepare this recipe ahead of time. Cook the pasta and seafood separately. Store them in airtight containers in the fridge. When you are ready to eat, simply reheat the seafood and mix it with the pasta and sauce. This makes it easy for busy weeknights or special occasions. A crisp white wine works best with seafood pasta. Look for a Sauvignon Blanc or Pinot Grigio. These wines have bright flavors that complement the seafood. If you prefer red, a light Pinot Noir can also be a good choice. The key is to avoid heavy wines that might overpower the dish. Yes, frozen seafood is a great option. Thaw your shrimp and scallops in the fridge overnight or under cold water. Avoid using hot water, as it can start to cook the seafood. Once thawed, pat them dry with a paper towel before cooking. This helps achieve a nice sear and prevents excess moisture in your dish. For the best flavor, try to use high-quality frozen seafood. You can find the full recipe [here](#). You've learned key ingredients for seafood pasta and how to cook it perfectly. Fettuccine or linguine, fresh seafood, and the right spices are essential. Remember to cook your pasta al dente and reserve some water. Proper techniques for sautéing and combining everything create a delicious cream sauce. Try different seafood, pasta types, and sauces for variety. Store and reheat your leftovers properly to keep the flavor. Now, you have what you need to make amazing seafood pasta at home. Enjoy your cooking adventure!](https://fastmealmate.com/wp-content/uploads/2025/06/7c1ca401-a8ff-43d0-aae3-34555c9d3a34-768x768.webp)

![- 2 cups grated zucchini or yellow squash - 1 cup breadcrumbs (preferably seasoned) - 1/2 cup grated parmesan cheese - 1/4 cup finely chopped onion - 2 cloves garlic, minced - 2 large eggs - 1 teaspoon dried oregano - 1/2 teaspoon salt - 1/4 teaspoon black pepper - 1/4 cup fresh parsley, chopped (optional) - Skillet - Cooking oil - Mixing bowl - Kitchen towel Mom's squash patties use simple ingredients. The main ones are zucchini or yellow squash. You need seasoned breadcrumbs to add flavor. Parmesan cheese gives a nice touch. Onions and garlic boost the taste. Eggs help bind everything together. Spices like oregano, salt, and pepper add extra flavor. Fresh parsley adds color and freshness to the mix. For cooking, you will need a skillet and some oil. A mixing bowl helps combine all ingredients. A kitchen towel is handy for squeezing out squash moisture. This is part of the [Full Recipe]. Start by grating the zucchini or yellow squash. I use a box grater for this. Then, take the grated squash and put it in a clean kitchen towel or cheesecloth. Squeeze it hard to drain as much moisture as you can. This step is key. If there is too much moisture, the patties will be soggy. We want them crispy and delicious. In a large bowl, combine the drained squash with the other ingredients. Add breadcrumbs, grated parmesan cheese, chopped onion, minced garlic, eggs, dried oregano, salt, and black pepper. If you like, toss in some chopped parsley too. Mix everything well using your hands or a spoon. The mixture should feel a bit sticky and hold together well. This texture helps the patties stay intact while cooking. Next, heat a large skillet on medium heat. Pour in enough olive oil to cover the bottom of the pan. Wait until the oil shimmers, but don’t let it smoke. This shows it’s hot enough for frying. Scoop about 1/4 cup of the squash mix and shape it into a patty. Gently place it in the hot skillet. Don’t overcrowd the pan. Leave space between each patty for even cooking. Cook the patties for about 4 to 5 minutes on each side. They should turn golden brown and crispy. Keep an eye on the heat. Adjust it as needed to prevent burning. You might need to fry in batches, depending on your skillet size. Once cooked, take them out and place them on a plate lined with paper towels. This will soak up any extra oil and keep the patties crispy. Follow these steps, and you'll have lovely, golden squash patties ready to enjoy! For the full recipe, check out the earlier section. To get the best texture, you want your patties crispy, not soggy. Start by squeezing out moisture from the grated squash. Use a clean kitchen towel for this. If you skip this step, your patties may fall apart or become mushy. Keep the right ratio of ingredients. Too much squash can lead to sogginess. Aim for two cups of squash to one cup of breadcrumbs. This balance helps create a sturdy patty. Cooking time is key. Heat your skillet to medium. This temperature helps the patties cook evenly. If the heat is too low, they won’t crisp up. If it’s too high, they may burn. Fry each side for 4-5 minutes. Check for a golden brown color. Don’t rush this process. Undercooked patties can be mushy, while overcooked ones can taste dry. For serving, add tasty condiments. A dollop of yogurt or sour cream works great. Fresh herbs like parsley add color and flavor. You can also pair these patties with a salad or roasted veggies. They make a lovely side for grilled meats too. Explore different sauces like tzatziki or spicy ketchup for extra flavor. Enjoy making these patties your own! {{image_4}} You can change the squash for variety. Try using butternut squash or pattypan squash. Each type gives a unique taste and texture. You can also add more veggies. Grated carrots or bell peppers mix well. Fresh herbs, like basil or thyme, add a fresh kick. You can bake these patties instead of frying them. Just place them on a baking sheet and drizzle with olive oil. Bake at 400°F for 20 minutes, flipping halfway through. This method makes them a bit healthier. An air fryer is another option. It cooks them fast and gives a nice crisp without much oil. Set the air fryer to 375°F and cook for about 12-15 minutes. Adding cheese can elevate the flavor. Try feta, cheddar, or even goat cheese. Each brings a different taste. You can also play with spices. Add a pinch of cumin for warmth or smoked paprika for depth. Experimenting with flavors can lead to your perfect batch of patties. Check out the Full Recipe for more ideas! To store leftovers, let the patties cool first. Place them in an airtight container. This helps to keep them fresh. You can store them in the fridge for up to three days. To extend freshness, reheat only what you will eat. This avoids sogginess in the remaining patties. For freezing, make sure the patties are fully cooled. Arrange them in a single layer on a baking sheet. Place the sheet in the freezer until they are solid. Then transfer them to a freezer bag. This method helps prevent them from sticking together. When ready to eat, reheat frozen patties in the oven. Bake them at 350°F for about 15 minutes or until hot. The expected freshness duration is about three days in the fridge. Frozen patties can last up to three months. Signs of spoilage include a sour smell or a change in color. If you notice any of these, it’s best to discard them. Fry the patties for about 4 to 5 minutes on each side. This cooking time gives them a nice golden color and crispy texture. Make sure to keep an eye on them. If the heat is too high, they may burn. Adjust the heat as needed for even cooking. Yes, you can make these patties gluten-free. Instead of breadcrumbs, use gluten-free breadcrumbs or crushed gluten-free crackers. You can also use ground oats as a substitute. Just check the labels to ensure they're gluten-free. These patties pair well with many side dishes and sauces. Here are some great options: - A fresh salad with lemon vinaigrette - Creamy yogurt or sour cream for dipping - Applesauce for a sweet contrast - Grilled vegetables or a medley of roasted root veggies - A slice of lemon to brighten the dish For the full recipe, check out Mom's Heavenly Squash Patties. Enjoy! This blog post covered how to make delicious squash patties. We looked at key ingredients, preparation steps, and cooking tips. I shared ways to adjust the recipe and storage methods for leftovers. Making these patties can be fun and simple. You can explore new flavors and textures that suit your taste. Enjoy these tips, and I hope you create something tasty. Experimenting in the kitchen leads to great meals!](https://fastmealmate.com/wp-content/uploads/2025/06/c31883a2-1cc5-40ff-adb3-b1ed6b0d87a1-768x768.webp)