Smashburger Quesadillas Flavorful Crunchy Delight

Welcome to your next favorite meal: Smashburger Quesadillas! Imagine a crunchy, cheesy bite filled with seasoned beef, fresh veggies, and zesty flavors. I’ll guide you through every step to recreate this tasty dish at home. From choosing the right ground beef to expert tips for perfect crispness, you’ll impress friends and family alike. Ready to spice up your dinner? Let’s dive into this flavorful adventure together!
Why I Love This Recipe
- Delicious Flavor Combination: The blend of seasoned ground beef, melted cheese, and fresh veggies creates an irresistible taste that everyone will love.
- Quick and Easy to Prepare: This recipe can be made in just 30 minutes, making it a perfect weeknight dinner option.
- Customizable Ingredients: Feel free to add your favorite toppings or swap out ingredients to suit your tastes, making it a versatile dish.
- Perfect for Sharing: These quesadilla wedges are great for parties or gatherings, allowing everyone to enjoy a fun and tasty meal together.
Ingredients
Main Ingredients
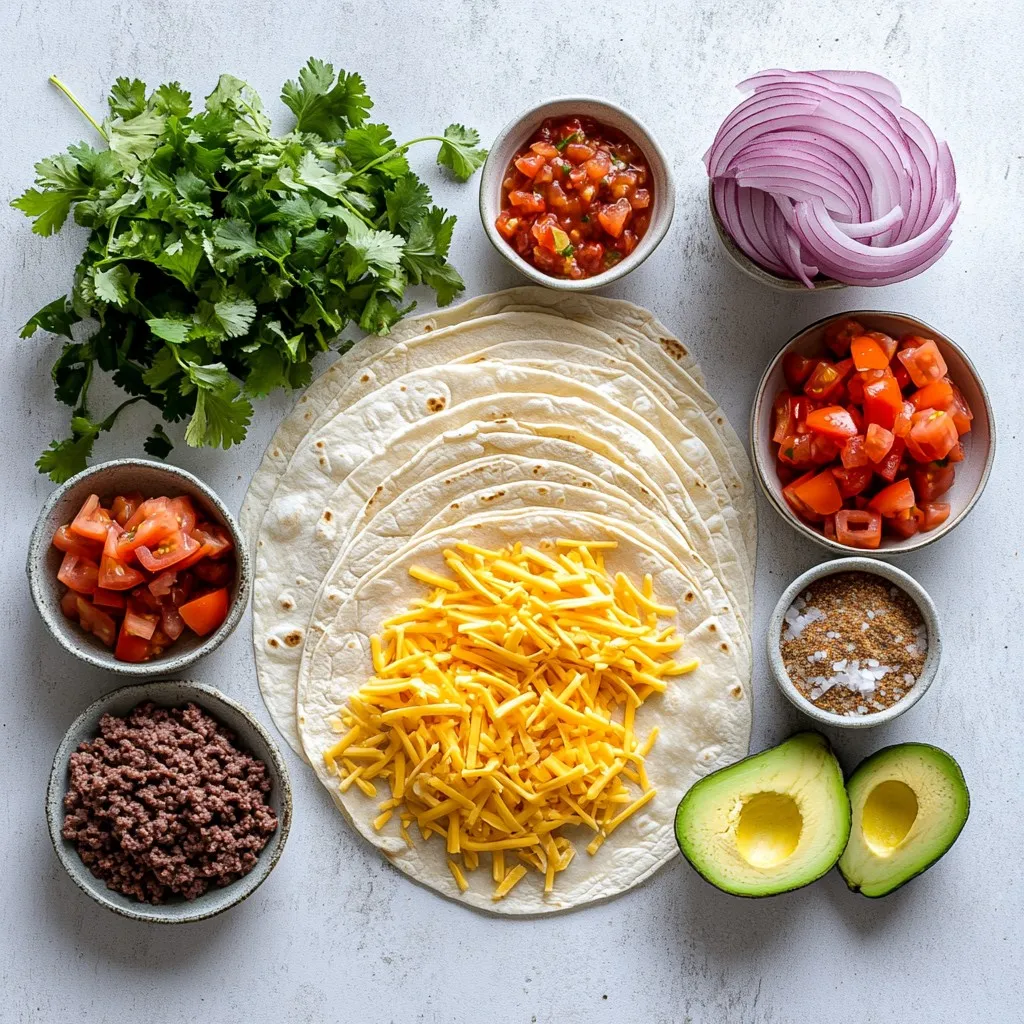
– 1 pound ground beef (80/20 blend)
– 4 large flour tortillas
– 2 cups shredded cheddar cheese
– 1 cup shredded Monterey Jack cheese
Seasoning and Vegetables
– 1 teaspoon garlic powder
– 1 teaspoon onion powder
– 1 teaspoon smoked paprika
– Salt and pepper, to taste
– 1 cup diced tomatoes
– 1/2 cup diced red onion
– 1/4 cup fresh cilantro, chopped
– 1 avocado, sliced
Serving Suggestions
– Salsa and sour cream
– Optional garnishes (lime, additional cilantro)
The main ingredients list is simple but full of flavor. The ground beef provides a juicy base. The tortillas hold everything together while adding crunch. Cheese brings gooey richness that you will love.
For seasoning, garlic powder, onion powder, and smoked paprika add depth to the beef. Salt and pepper enhance the flavor. Fresh vegetables like tomatoes and onions add brightness. Cilantro and avocado give a fresh twist.
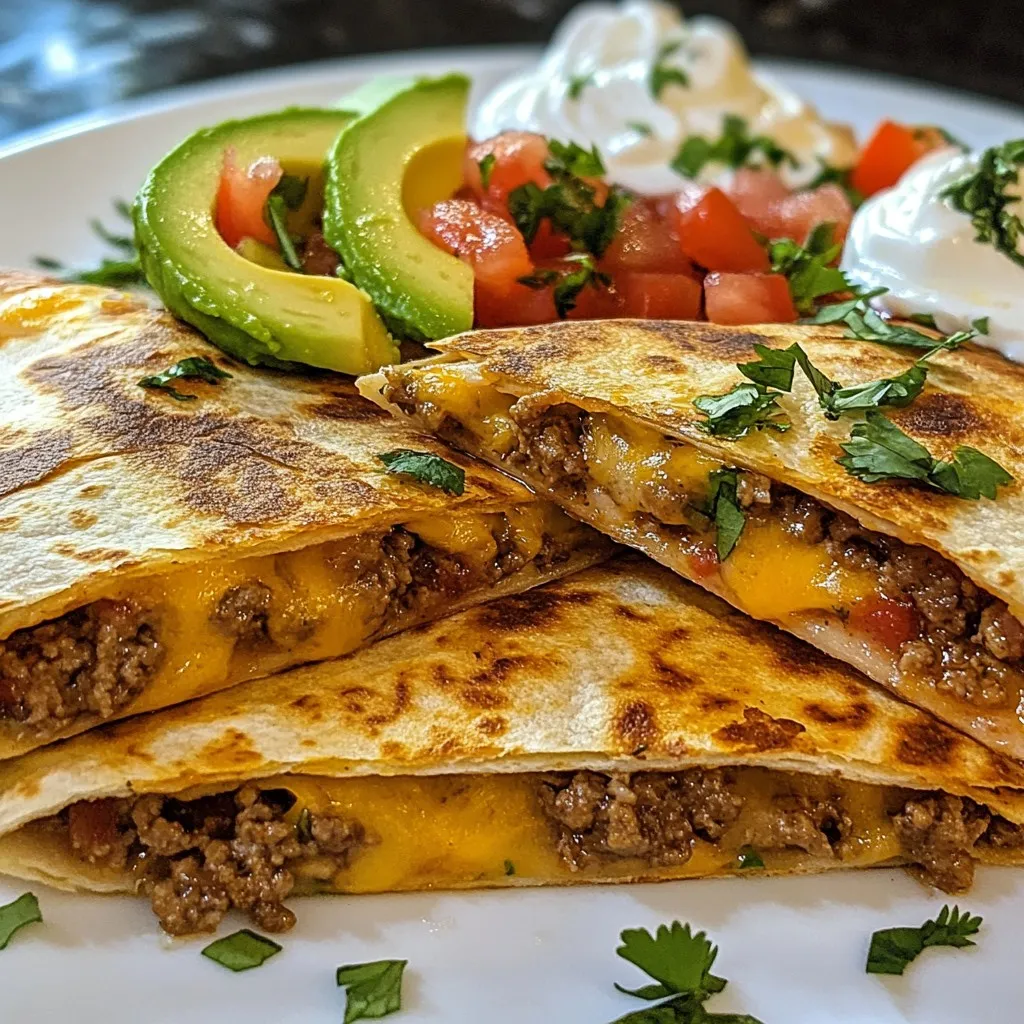
Finally, serving with salsa and sour cream makes each bite even better. Lime and extra cilantro are great for garnish. These ingredients create a delicious experience you won’t forget. Enjoy the flavorful crunch of your Smashburger quesadillas!

Step-by-Step Instructions
Preparing the Beef
To make the beef, heat a large skillet over medium-high heat. Add one pound of ground beef. I like to use an 80/20 blend for the best flavor and juiciness. Sprinkle in one teaspoon of garlic powder, one teaspoon of onion powder, one teaspoon of smoked paprika, and some salt and pepper. Cook for about 6 to 8 minutes. Break up the beef with a spatula as it cooks. Form it into flat patties. This step helps create crispy edges.
Making the Quesadilla Filling
Once the beef is browned and cooked, take it off the heat. Stir in one cup of diced tomatoes, half a cup of diced red onion, and half of the chopped cilantro. Mixing these ingredients adds great flavor to your filling. Seasoning is key! You want every bite to burst with taste.
Assembling and Cooking the Quesadilla
Now it’s time to assemble the quesadilla. Preheat a large skillet or griddle over medium heat. Place one large flour tortilla on the skillet. On one half of the tortilla, add a layer of shredded cheddar and Monterey Jack cheese. Then, scoop a generous amount of the beef mixture on top. Add a little more cheese for extra gooeyness. Carefully fold the tortilla in half. Cook the quesadilla for about 3 to 4 minutes on each side. It should turn golden brown and crispy. Press down gently with a spatula while cooking to help it brown evenly.
After cooking, transfer the quesadilla to a cutting board and cut it into wedges. Repeat with the remaining tortillas and filling until you have a plate full of delicious quesadillas.
Tips & Tricks
Perfecting the Quesadilla
To ensure even cooking, always preheat your skillet. Use medium heat for the best results. Place one tortilla on the hot skillet. Add cheese and filling on one half. Fold the tortilla over to cover the filling. This method helps it cook evenly.
For spatula techniques, use a wide spatula. It makes flipping easier. Gently press down while cooking. This promotes even browning and crispy edges. Flip carefully to avoid spills.
Flavor Enhancements
You can spice things up with different seasonings. Try adding cumin or chili powder for extra kick. You can also mix in some smoked paprika. It adds a rich flavor that pairs well with beef.
Adding more vegetables boosts taste and nutrition. Consider bell peppers, spinach, or corn. These add color and crunch. You can also include proteins like chicken or turkey for a twist.
Presentation Tips
For gatherings, serve quesadillas on a bright platter. Cutting them into wedges makes for easy sharing. Arrange them in a circle with dips in the center. It looks appealing and is fun to enjoy.
Best garnishes include fresh cilantro and avocado slices. They add color and freshness to the plate. A sprinkle of lime juice brightens the dish. It enhances the flavors and makes it look even better.
Pro Tips
- Use High-Quality Beef: Opt for a good quality ground beef with a higher fat content for juicier and more flavorful quesadillas.
- Don’t Overfill: While it’s tempting to add lots of filling, keep it moderate to ensure the quesadilla cooks evenly and holds together.
- Experiment with Cheeses: Feel free to mix different types of cheese like pepper jack or gouda for a unique flavor twist!
- Keep It Warm: If making multiple quesadillas, keep them warm in a low oven (around 200°F) while you cook the rest to serve them hot.

Variations
Different Meat Options
You can switch up the meat in your quesadillas. Try using chicken or turkey for a leaner choice. Ground turkey works well. You can even make a veggie version. Use black beans or mushrooms for a tasty twist. Each option brings a unique flavor and texture.
Cheese Combinations
While cheddar and Monterey Jack are great, feel free to mix it up. Pepper Jack adds some spice and zing. For a creamier taste, try using cream cheese or goat cheese. You can also use a blend of different cheeses for a rich flavor. Experiment until you find your favorite mix.
Salsa and Dipping Sauce Ideas
Salsas can really change the game for your quesadillas. Try fresh pico de gallo for a bright touch. Mango salsa gives a sweet twist. If you want something bolder, opt for chipotle salsa. You can also explore different dipping sauces. Ranch dressing or guacamole are tasty choices too. Each sauce offers a new flavor adventure.
Storage Information
Storing Leftovers
To keep your Smashburger quesadillas fresh, follow these tips:
– Refrigeration: Place leftover quesadillas in an airtight container. They stay good for up to 3 days in the fridge.
– Freezing: For longer storage, wrap each quesadilla in plastic wrap, then place them in a freezer bag. They can last for up to 2 months.
Reheating Instructions
When you’re ready to enjoy your quesadillas again, here’s how to reheat them:
– Methods: Use a skillet over medium heat for best results. This keeps the quesadilla crispy. You can also use an oven at 350°F (175°C) for about 10-15 minutes.
– Time and Temperature: If using the skillet, heat each side for about 3-4 minutes. Check to ensure the cheese melts and the outside turns golden brown.
Meal Prepping Suggestions
Want to make your week easier? Meal prep your quesadillas:
– Preparing in Advance: Cook the beef and prepare the filling in advance. Store it in the fridge for quick assembly.
– Suggested Storage Containers: Use clear, airtight containers for the filling. This way, you can see what you have ready to go! For quesadillas, wrap them in foil or store in a container to keep them fresh.
FAQs
How do I make Smashburger-style quesadillas at home?
To make Smashburger-style quesadillas, you need a few key ingredients. First, use ground beef, ideally an 80/20 blend. This mix provides the right fat for flavor. You will also need garlic powder, onion powder, and smoked paprika for seasoning. Fresh ingredients like diced tomatoes, red onion, and cilantro add freshness. For the cheesy goodness, grab shredded cheddar and Monterey Jack cheese. Large flour tortillas hold it all together.
Can I customize my quesadilla fillings?
Absolutely! You can personalize fillings to suit your taste. Try adding black beans for extra protein. Chopped bell peppers or jalapeños offer a nice kick. You could also swap the beef for grilled chicken or turkey. For a vegetarian option, use mushrooms or zucchini. Just remember to keep the cheese, as it melts beautifully and brings all the flavors together.
What are the nutritional facts for Smashburger quesadillas?
A typical Smashburger quesadilla has around 600 calories per serving. This includes about 30 grams of fat and 40 grams of protein. The cheese and beef contribute to the fat content. If you add veggies, the fiber content increases, making them a bit healthier. Always check specific brands for exact nutritional values, as they can vary.
Where can I find Smashburger quesadillas?
You can find Smashburger quesadillas at any Smashburger location. They are part of their menu and offer a great taste. If you want to enjoy them at home, you can easily make them using the recipe provided above. This way, you can enjoy Smashburger-style quesadillas anytime.
In this article, we explored how to make delicious quesadillas. We covered key ingredients like ground beef and cheese, then shared tips for cooking and assembling them. I highlighted variations, storage methods, and even answered common questions.
Feel free to experiment with flavors and fillings. Customize your quesadillas to fit your taste. With these steps, you can create a dish that delights everyone. Enjoy your cooking adventure

Smashburger Quesadillas
Ingredients
- 1 pound ground beef (80/20 blend)
- 1 teaspoon garlic powder
- 1 teaspoon onion powder
- 1 teaspoon smoked paprika
- to taste salt and pepper
- 4 large flour tortillas
- 2 cups shredded cheddar cheese
- 1 cup shredded Monterey Jack cheese
- 1 cup diced tomatoes
- 1/2 cup diced red onion
- 1/4 cup fresh cilantro, chopped
- 1 avocado, sliced
- to serve salsa and sour cream
Instructions
- In a large skillet, heat over medium-high. Add the ground beef, seasoning it with garlic powder, onion powder, smoked paprika, salt, and pepper. Cook for about 6-8 minutes, breaking up the beef and using a spatula to form it into flat patties.
- Once the beef is nicely browned and fully cooked, remove it from the heat. Stir in the diced tomatoes, diced red onion, and half of the chopped cilantro.
- Preheat a large skillet or griddle over medium heat. Place one tortilla on the hot skillet. On one half of the tortilla, sprinkle a generous layer of both cheddar and Monterey Jack cheeses. Add a hearty scoop of the beef mixture over the cheese, and top with a bit more cheese. Carefully fold the tortilla over the filling.
- Cook the quesadilla for approximately 3-4 minutes on each side, or until it turns golden brown and crispy, and the cheese is perfectly melted.
- Once the quesadilla is cooked, transfer it to a cutting board and cut into wedges. Return the skillet to the heat and repeat with the remaining tortillas and filling until all quesadillas are made.
- Arrange the quesadilla wedges on a serving platter. Garnish with the sliced avocado, remaining cilantro, and serve alongside salsa and sour cream.


. To make your salad shine, use bright bowls. Serve it in individual portions for a fancy touch. Add a sprinkle of extra feta on top. A few fresh basil leaves also make a great garnish. For a special look, drizzle balsamic reduction over each serving. This adds both flavor and visual appeal. You can boost the flavor in many ways. Try adding nuts like walnuts or almonds for crunch. You might also include fruits, such as sliced strawberries or juicy peaches. Fresh herbs like cilantro or mint can add a new twist. For a bit of spice, sprinkle in some red pepper flakes. Just remember, balance is key! One common mistake is over-dressing the salad. Too much dressing can drown the fresh flavors. Start with a little, and add more if needed. Another mistake is cutting veggies too small. Larger pieces keep the crunch and texture. Finally, don’t forget to taste before serving. Adjust seasoning to suit your taste buds. {{image_4}} You can easily adjust this salad for special diets. For a vegan version, skip the feta cheese. Instead, use tofu or nuts for a protein boost. If you want a gluten-free option, all ingredients are already safe. Just be sure to check any packaged items for hidden gluten. You can swap ingredients based on the season. In summer, use ripe peaches instead of tomatoes. In fall, try roasted squash in place of corn. These swaps keep the salad fresh and exciting all year. Feel free to mix and match what’s in your garden or local market. Want to make your salad more fun? Add sliced radishes for a peppery crunch. Nuts like almonds or walnuts add a great texture. You could also toss in herbs like dill or cilantro for a different flavor. Don't shy away from experimenting. Each add-on can change the taste and feel of your dish. Check out the Full Recipe for more ideas and inspiration! To keep your garden fresh summer salad tasty, store it right. Use an airtight container. This helps avoid moisture loss. You can keep it in the fridge for up to three days. If you plan to enjoy it later, store the dressing separately. This keeps the greens crisp and fresh. Wash your vegetables before storage. After washing, dry them well to avoid sogginess. You can wrap herbs like basil in a damp paper towel. This helps keep them fresh for longer. For tomatoes, store them at room temperature. This keeps their taste and texture just right. This salad is best enjoyed cold. If you want to warm it up, just use a quick microwave blast. Heat for only a few seconds to avoid mushy greens. When serving, toss the salad gently to mix the flavors. You can add more feta or basil for a fresh touch. For the full recipe, check out the detailed steps above. The best summer vegetables for salad include tomatoes, cucumbers, and bell peppers. You can also use zucchini, radishes, and corn. They add color and crunch. Fresh herbs like basil and cilantro enhance the flavor. Choose veggies that are in season for the best taste. Yes, you can make this salad ahead of time. Prepare the salad without the dressing. Store it in the fridge for up to a day. When you are ready to eat, add the dressing. This keeps the salad fresh and crisp. A light vinaigrette works well with summer salad. You can use olive oil and balsamic vinegar. Lemon juice also adds a nice touch. For a creamier option, try a yogurt-based dressing. These dressings bring out the flavors of the fresh vegetables. For the full recipe, check out the Garden Fresh Summer Salad Delight. In this blog post, we explored how to make a fresh summer salad. We started with the best ingredients and optional add-ins. Then, we covered easy steps to prepare the base and mix in tasty veggies. I shared tips for great presentation and flavor boosts. We also discussed how to adapt this salad for diets and seasons. Lastly, we highlighted storage tips to keep everything fresh. Enjoy experimenting with your salad to make it your own. You have all the tools for success!](https://fastmealmate.com/wp-content/uploads/2025/07/1438f769-be73-4858-be33-2952a8dc2b24-768x768.webp)

![- 2 ripe peaches, cut into wedges - 1 cup cherry tomatoes, rinsed and dried - 1 cup fresh basil leaves, gently washed and dried - 8 oz fresh mozzarella balls (bocconcini), drained - 3 tablespoons balsamic glaze - 2 tablespoons extra-virgin olive oil - Salt and freshly ground black pepper, to taste - 12-15 (6-inch) wooden skewers Peach Caprese skewers blend sweet and savory flavors. The ripe peaches add natural sweetness. Use firm yet soft peaches for the best taste. Cherry tomatoes bring a burst of juiciness. Fresh basil adds aromatic freshness that complements the fruit. For the creamy element, fresh mozzarella balls are ideal. They provide a soft texture and mild flavor. Drizzle balsamic glaze for sweetness and tang. Extra-virgin olive oil enhances all the flavors. You’ll need salt and black pepper to season. They add depth to your dish. Finally, grab some wooden skewers to assemble your tasty bites. For the complete list of ingredients and measurements, refer to the Full Recipe. 1. Cutting peaches into wedges: Start with two ripe peaches. Cut them into even wedges. Make sure they are sweet and juicy for the best flavor. 2. Rinsing cherry tomatoes and drying: Take one cup of cherry tomatoes. Rinse them well under cool water. After rinsing, use a clean towel to dry them gently. This helps keep the skewers from getting soggy. 3. Draining mozzarella balls: Use eight ounces of fresh mozzarella balls. Drain them to remove excess liquid. This keeps the skewers light and fresh. 1. Step-by-step threading process: Grab a six-inch wooden skewer. Start by threading a fresh basil leaf onto the skewer. Then, add a peach wedge. Next, slide on a cherry tomato, followed by a mozzarella ball. 2. Layering pattern for vibrant colors: Repeat the pattern: basil, peach, tomato, mozzarella. This layering creates a colorful and appealing look. Aim for a mix of colors on each skewer. 3. Tips for an appealing presentation: Leave some space at the end of each skewer. This makes them easy to handle. Arrange the finished skewers on a platter or in a jar for a fun touch. 1. Drizzling olive oil: Once your skewers are ready, drizzle them lightly with extra-virgin olive oil. This adds richness and enhances the flavors of the fresh ingredients. 2. Adding seasoning: Sprinkle a little salt and freshly cracked black pepper over the skewers. This adds a nice kick and brings out the taste of each ingredient. 3. Applying balsamic glaze: Finally, drizzle balsamic glaze over the skewers. This sweet and tangy glaze adds a wonderful finish to the dish. For the full recipe, check out the instructions I shared earlier. When making Peach Caprese Skewers, the first step is choosing ripe peaches. Look for peaches that feel slightly soft when you press them. Their color should be vibrant and rich. Ripe peaches add natural sweetness, making your skewers delicious. Next, consider the mozzarella and basil. You want fresh mozzarella balls, called bocconcini. They should be firm and moist. Fresh basil leaves should be bright green and fragrant. If they look wilted, they won't taste good. Using fresh ingredients elevates your dish. For easy skewering, start with a wooden skewer. Grab a fresh basil leaf and thread it onto the skewer first. This helps anchor the other ingredients. Next, add a peach wedge, then a cherry tomato, and finish with a mozzarella ball. Repeat this pattern to create a colorful skewer. To make your skewers visually appealing, mix up the colors. Alternate between peach, tomato, and mozzarella. This creates a beautiful display. You can also arrange the skewers in a jar for a fun presentation. When serving, think about your platter. A large, decorative platter can be eye-catching. You can also arrange the skewers in a tall vase. This adds a unique touch to your table. Pair your Peach Caprese Skewers with drinks like lemonade or sparkling water. They also go well with other appetizers, like bruschetta. This way, you create a delightful spread for your guests. For the full recipe, check out the detailed instructions to help you on your cooking adventure! {{image_4}} You can switch out the peaches for other fruits. Strawberries add sweetness, while figs bring a rich taste. Both work well with the cheese. For cheese, try feta or goat cheese instead of mozzarella. Feta adds a salty kick, while goat cheese offers creaminess. To boost flavors, add spices or herbs. A sprinkle of black pepper can elevate taste. Fresh mint or thyme can also add a nice twist. Experiment with different glazes too. A honey glaze can add sweetness, while a spicy chili glaze can bring heat. You can easily make these skewers vegan. Use tofu or avocado in place of cheese. For low-carb or keto options, skip the fruit and focus on cheese and herbs. Cherry tomatoes still fit well in this version. This allows everyone to enjoy the dish, no matter their diet. To keep your Peach Caprese Skewers fresh, store them in the fridge. Use an airtight container to avoid drying out. Place a damp paper towel inside the container. This helps keep the ingredients moist. Try to eat leftovers within two days for the best taste. Reheat your skewers in a pan on low heat. This warms them gently without losing flavor. Avoid using a microwave, as it can make the cheese rubbery. Heat just until the cheese is warm, about 2-3 minutes. Freezing these skewers is tricky. I do not recommend it because the peaches and mozzarella lose texture. If you must freeze, assemble them without the balsamic glaze. Wrap the skewers tightly in plastic wrap. Store them in a freezer-safe bag. Use within a month for best results. Yes, you can prepare these skewers a few hours in advance. Keep them in the fridge until serving. This helps the flavors blend. - Storage timelines: Store them for up to 4 hours. After that, the peaches may get mushy. - Ingredients that keep well: Mozzarella and cherry tomatoes hold up nicely. Fresh basil gets a bit wilty but will still taste great. For this dish, use yellow or white peaches. Both are sweet and juicy. Yellow peaches have a nice tang, while white peaches are sweeter. - Recommended varieties for sweetness and texture: Look for Freestone peaches. They come off the pit easily and have great flavor. Absolutely! You can mix and match ingredients to fit your taste. Try using different fruits or cheeses. - Suggestions for personalizing flavors and textures: Substitute peaches with strawberries or figs. You can also use feta or goat cheese instead of mozzarella. These skewers are perfect for gatherings. You can set them up on a big platter for guests to grab. - Ideas for large gatherings and events: Arrange them in a tall vase for fun. Add a small bowl of balsamic glaze for dipping. This will impress your guests! For the complete recipe, check out the [Full Recipe]. Peach Caprese skewers bring together fresh produce, creamy mozzarella, and bold flavors. Using ripe peaches, cherry tomatoes, and basil makes them a vibrant choice. Adding olive oil, balsamic glaze, and a touch of seasoning elevates every bite. You can easily swap ingredients for different tastes or dietary needs. Remember, these skewers are fun and simple to make. They are perfect for summer gatherings or a light snack. Enjoy crafting your own skewers, and let your creativity shine!](https://fastmealmate.com/wp-content/uploads/2025/07/b9012ea0-d5e7-459d-b2ed-b5a660c32588-768x768.webp)

