
Are you craving a tasty and easy meal? Look no further! Slow Cooker Queso Chicken Tacos bring big flavor with minimal effort. With just a few simple ingredients like chicken, queso sauce, and black beans, you can create a dish that the whole family will love. Whether you’re new to cooking or a seasoned pro, I’ve got simple steps and tips to make this delicious meal. Let’s dive into this flavor-packed journey!
Why I Love This Recipe
- Easy Preparation: This recipe requires minimal effort, making it perfect for busy weeknights when you want a delicious meal without the fuss.
- Flavorful Ingredients: The combination of queso sauce, black beans, and fresh vegetables creates a rich and satisfying flavor that everyone will love.
- Versatile Serving: You can serve these tacos with soft or hard shells, allowing everyone to customize their meal to their liking.
- Crowd-Pleaser: With its cheesy goodness and vibrant toppings, this dish is sure to be a hit at any gathering or family dinner.
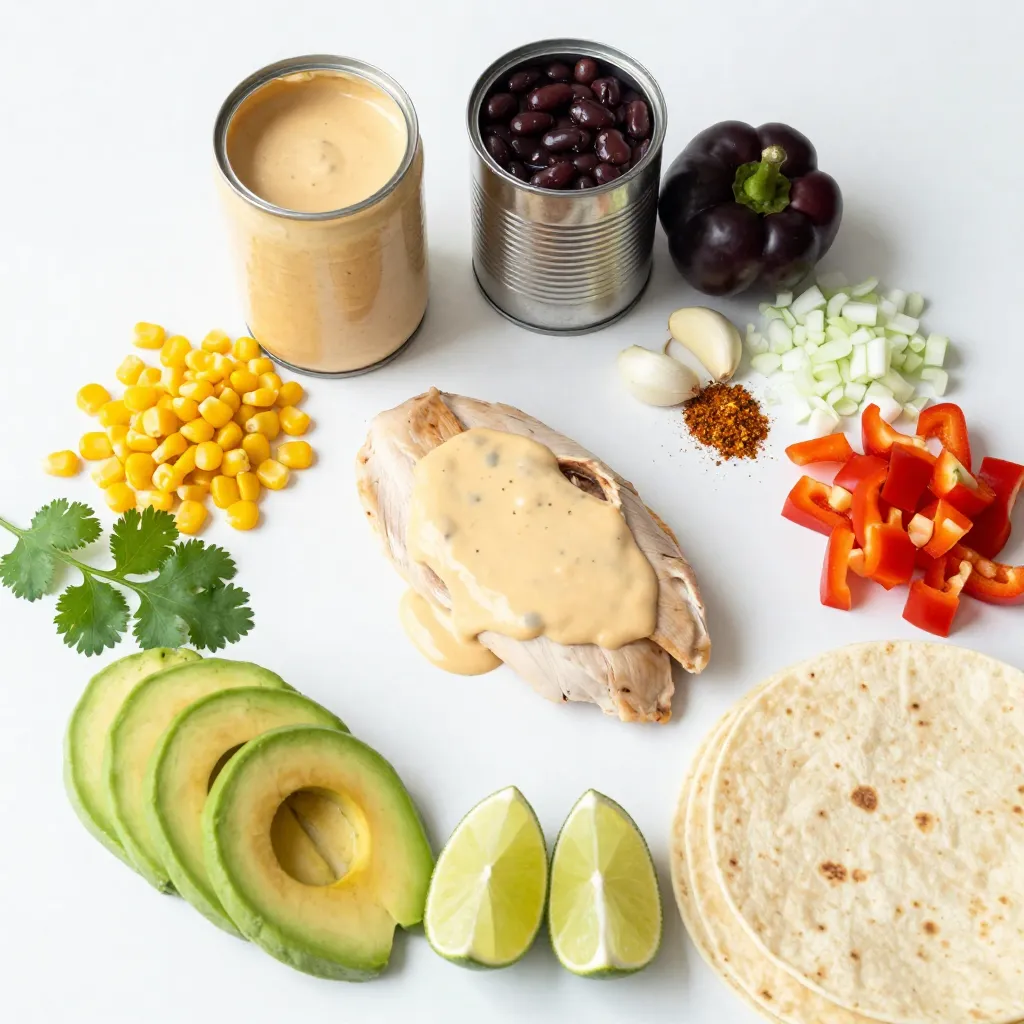
Ingredients
Main Ingredients
– 2 pounds boneless, skinless chicken breasts
– 1 cup of your favorite jarred queso sauce
– 1 can (15 oz) black beans, drained and rinsed
– 1 cup corn kernels (fresh or frozen)
Seasoning and Garnishes
– 1 tablespoon taco seasoning
– 1 medium onion, finely diced
– 2 cloves garlic, minced
– 1 bell pepper (any color), diced
– Salt and pepper to taste
Serving Suggestions
– Tortillas (choose soft or hard shell for serving)
– Optional toppings: fresh cilantro, avocado slices, lime wedges
This dish is a true delight. You start with chicken breasts, which are a great protein source. The queso sauce adds a creamy touch that everyone loves. I like to use black beans for extra fiber and texture. Corn kernels add sweetness and crunch, making each bite fun.
Don’t forget the seasonings! Taco seasoning brings bold flavors. Onion and garlic add depth. Bell pepper gives a nice color and taste. Salt and pepper round out the dish perfectly.
When serving, choose your favorite tortillas. I recommend soft ones for a cozy bite. Top with fresh cilantro for color and flavor. Ripe avocado slices add creaminess. A squeeze of lime juice brightens everything.
This meal is easy to prepare and full of flavor. It’s a hit for taco night or any gathering!
Step-by-Step Instructions
Preparation Steps
1. Layering chicken in the slow cooker
Start by placing the boneless, skinless chicken breasts at the bottom of your slow cooker. This helps them cook evenly. Lay them flat to ensure they cook well.
2. Mixing the sauce and vegetable ingredients
In a bowl, combine the onion, garlic, bell pepper, black beans, corn, taco seasoning, and queso sauce. Mix everything together. Ensure the ingredients are well blended for the best flavor.
Cooking Process
1. Setting the slow cooker
Once the chicken and mixture are ready, pour the vibrant mix over the chicken. Season with salt and pepper to your taste. Cover the slow cooker and set it to cook on low for 6-8 hours or high for 3-4 hours.
2. Tips for timing and checking doneness
Check the chicken at around 3 hours on high or 6 hours on low. The chicken should be fully cooked and shred easily with a fork. If it is not, give it more time.
Final Touches
1. Shredding the chicken
When the cooking time is up, use two forks to shred the chicken in the slow cooker. Stir it into the queso mixture. This helps the chicken soak up all the tasty flavors.
2. Letting the flavors blend before serving
After shredding, let the mixture sit for 10 minutes with the lid on. This step allows the flavors to blend. Now, you are ready to serve your warm, cheesy queso chicken in tortillas. Enjoy!
Tips & Tricks
Perfecting the Dish
To make your slow cooker queso chicken tacos the best, you need even cooking. Lay the chicken breasts flat in the slow cooker. This helps them cook evenly. Use a meat thermometer to check the chicken. It should reach 165°F for safety.
Adjusting seasoning is key. Taste the mixture before serving. If it needs more flavor, add salt or taco seasoning. You want the spices to shine through.
Safety Tips
Food safety is very important. Always wash your hands before handling raw chicken. Store chicken in the fridge until you’re ready to cook. After cooking, do not leave it out for more than two hours.
Make sure to cook the chicken long enough. If you undercook it, it won’t shred well. Follow the cooking times: 6-8 hours on low or 3-4 hours on high.
Presentation Tips
For a great look, serve the tacos on a colorful platter. Use soft or hard tortillas, depending on your guests’ preferences. Add lime wedges and avocado slices around the tacos for color.
Garnish with fresh cilantro. It not only looks good but also adds fresh flavor. Make the dish inviting and fun for everyone to enjoy!
Pro Tips
- Use Fresh Ingredients: Opt for fresh vegetables and herbs to enhance the flavor of your tacos. Fresh cilantro and ripe avocados will elevate the taste and presentation.
- Customize Your Queso: Feel free to mix different queso sauces or add spices to the queso for a unique flavor profile. Experimenting can lead to delightful surprises!
- Shred the Chicken While Hot: Shredding the chicken immediately after cooking keeps it moist and allows it to soak up more of the queso sauce, enhancing flavor.
- Serve with a Variety of Toppings: Provide a range of toppings like diced tomatoes, jalapeños, and sour cream for guests to customize their tacos to their liking.
Variations
Ingredient Swaps
You can use many kinds of queso sauce. Try spicy queso for a kick or a creamy white queso for a milder taste. If you want to switch the black beans, use pinto beans or even kidney beans. For corn, fresh corn is great, but frozen corn works well too.
Spice Level Adjustments
Want some heat? Add diced jalapeños to the mix. They pack flavor and spice. If the family prefers milder tacos, skip the jalapeños. You can also use sweet bell peppers for a touch of sweetness instead.
Dietary Modifications
For a vegetarian option, swap the chicken for mushrooms or jackfruit. Both absorb flavor well. If you’re gluten-free, choose corn tortillas. They are tasty and fit right in with the theme. Enjoy making this meal your own!
Storage Info
Leftover Storage
To store your leftover slow cooker queso chicken tacos, place them in an airtight container. Make sure to let them cool first. Store the container in the fridge for up to four days. When reheating, use the microwave or stovetop. Add a splash of water or broth to keep it moist. Cover the dish while reheating to trap steam. This helps avoid drying out the chicken.
Freezing Instructions
If you want to freeze the dish, pack it in a freezer-safe container. Use a container that seals tightly to avoid air exposure. You can also use freezer bags for more space-saving. Write the date on the bag or container. This helps you remember when to use it. The dish can last up to three months in the freezer.
Shelf Life
You can eat the chicken tacos within four days when stored in the fridge. If frozen, aim to consume them within three months for the best taste. Always check for signs of spoilage. If you see mold or an off smell, throw it away. Make sure to enjoy your tacos before they go bad!
FAQs
How long does it take to cook slow cooker queso chicken tacos?
Cooking time depends on your slow cooker settings. If you cook on low, it takes about 6 to 8 hours. On high, it cooks in 3 to 4 hours. The chicken should be fully cooked and easy to shred when done.
Can I use frozen chicken breasts?
Yes, you can use frozen chicken breasts. Just make sure to adjust the cooking time. If cooking on low, it may take an extra hour. If on high, it could take an extra 30 minutes. Always check that the chicken reaches a safe internal temperature of 165°F.
What can I serve with queso chicken tacos?
You can serve many tasty sides with your tacos. Here are some great options:
– Mexican rice
– Refried beans
– Fresh salsa
– Guacamole
– Chips and queso
– A simple salad
These sides add color and flavor to your meal, making it even more enjoyable.
This blog post shared how to make tasty slow cooker queso chicken tacos. You learned about the main ingredients, cooking steps, and serving tips. I also covered storage methods and answered common questions. With easy swaps and adjustments, you can customize this dish to fit your taste. Enjoy your cooking journey and savor the delicious result


