Savory Beef & Barley Soup Hearty Comfort Meal

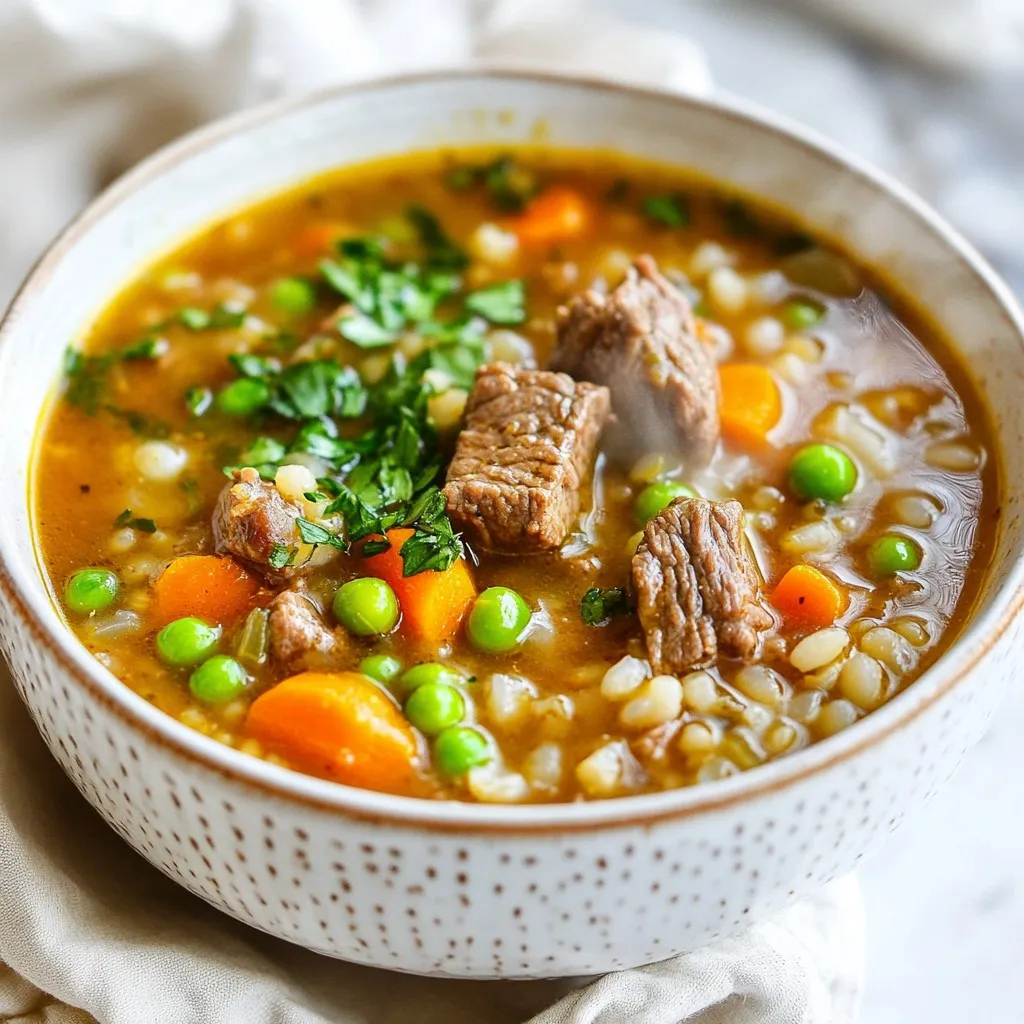
Are you craving a warm and filling meal? Look no further! This Savory Beef & Barley Soup is the perfect dish for chilly days or cozy dinners. Packed with tender beef, fresh vegetables, and hearty pearl barley, it hits all the right spots. Get ready to warm your heart and fill your belly with this easy recipe. Let’s dive into the ingredients and cook up some comfort!
Why I Love This Recipe
- Hearty and Filling: This soup is not just a meal; it’s a warm hug in a bowl. The combination of beef and barley makes it incredibly satisfying.
- Rich Flavor: The slow simmering of beef and vegetables in a rich broth allows all the flavors to meld beautifully, creating a comforting and delicious experience.
- Versatile Ingredients: With simple ingredients that you probably already have in your pantry, this recipe is easy to customize with your favorite vegetables or grains.
- Perfect for Meal Prep: This soup keeps well in the fridge and even tastes better the next day, making it ideal for meal prep or leftovers.
Ingredients
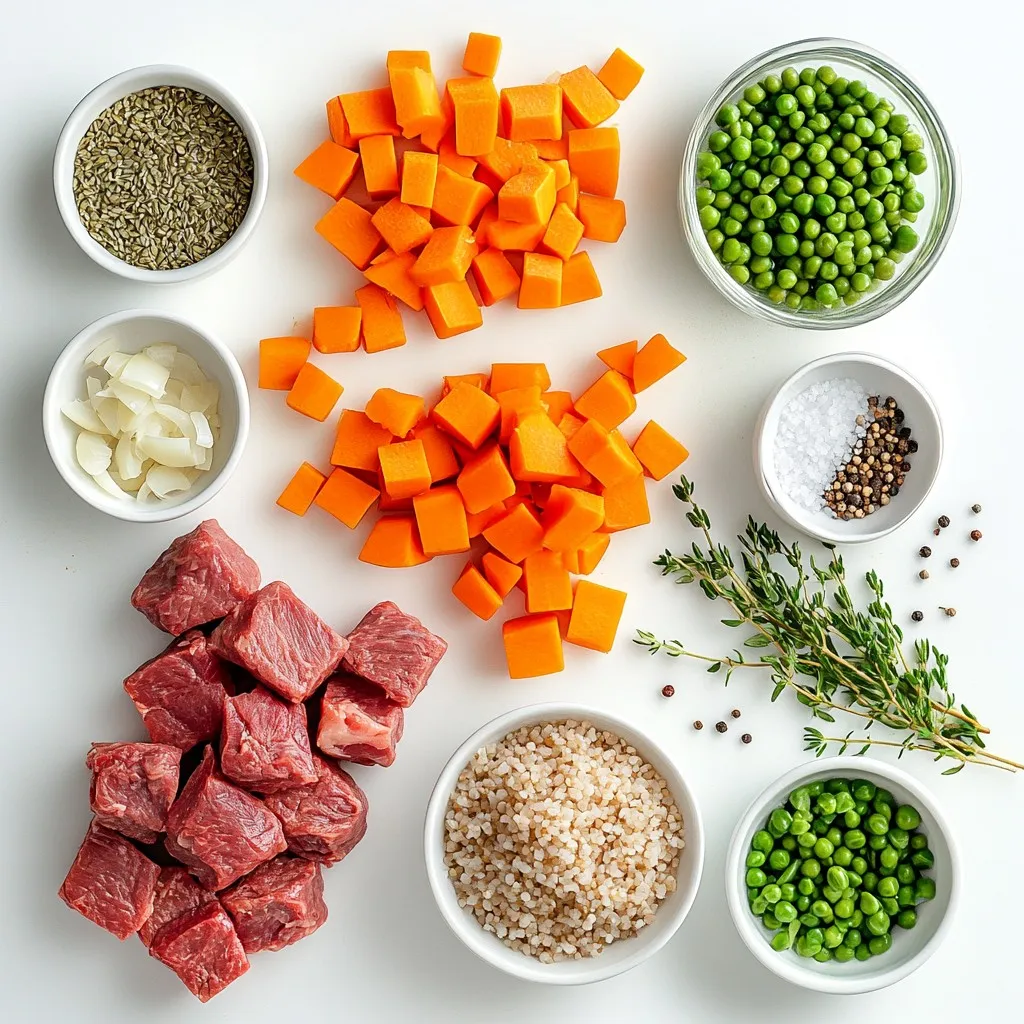
To make a tasty beef and barley soup, you need the right ingredients. Here’s what you will need:
– 1 pound beef chuck, cut into 1-inch cubes
– 1 tablespoon extra virgin olive oil
– 1 medium onion, finely chopped
– 2 cloves garlic, minced
– 2 medium carrots, diced
– 2 celery stalks, diced
– 1 cup pearl barley, rinsed
– 8 cups rich beef broth
– 1 teaspoon dried thyme
– 1 bay leaf
– Salt and freshly ground black pepper to taste
– 1 cup green peas, fresh or frozen
– 2 tablespoons fresh parsley, chopped (for garnish)
Each ingredient plays a key role. The beef chuck provides a rich flavor and tender meat. Olive oil helps in searing the beef, adding depth. The vegetables add sweetness and texture. Pearl barley thickens the soup and adds a chewy bite. Beef broth serves as the soup’s base, making it hearty. Thyme and bay leaf give it a warm, earthy taste. Salt and pepper enhance all the flavors. Green peas bring a pop of color and sweetness. Finally, parsley adds freshness when you serve the soup.
Gather these ingredients, and let’s cook a bowl of comfort!

Step-by-Step Instructions
Searing the Beef
First, heat a large pot over medium-high heat. Add one tablespoon of olive oil. When the oil is hot, add one pound of beef chuck cut into cubes. Season it well with salt and pepper. Sear the beef for about 5-7 minutes. Turn the cubes to brown all sides. Once browned, remove the beef from the pot and set it aside.
Cooking the Vegetables
Next, in the same pot, add one medium chopped onion, two minced garlic cloves, two diced carrots, and two diced celery stalks. Sauté this mix for 4-5 minutes. You want the vegetables to soften and the onions to turn clear. This step builds great flavor.
Combining Ingredients
Now, stir in one cup of rinsed pearl barley. Cook it for 1-2 minutes. Toasting the barley helps it soak up more flavor. Then, return the browned beef to the pot. Pour in eight cups of beef broth and add one teaspoon of dried thyme and one bay leaf. Bring this mixture to a boil, then reduce the heat to low. Simmer the soup gently for about one hour.
Final Steps
In the last ten minutes of cooking, stir in one cup of green peas. They can be fresh or frozen. Before serving, remove the bay leaf. Taste the soup and adjust the seasoning with salt and pepper as needed. Serve the soup hot in deep bowls. Add a sprinkle of fresh chopped parsley on top for a nice touch.
Tips & Tricks
Cooking Tips for Tender Meat
– Importance of searing: Searing the beef is key. This step locks in flavors. It also gives the meat a nice brown color. Use high heat to get that perfect crust.
– Optimal simmering techniques: After browning, simmer slowly. This helps the beef become tender. Keep the heat low and be patient. It takes about an hour for the best results.
Enhancing Flavor
– Suggestions for additional herbs and spices: You can add bay leaf and thyme for rich taste. Consider adding rosemary or a touch of paprika. These will give your soup extra depth.
– Choosing quality broth: Use a rich beef broth. A good broth adds flavor to the soup. Look for low-sodium options for better control of salt. Homemade broth can elevate your dish even more.
Presentation Tips
– Best ways to serve and garnish: Serve the soup in deep bowls. Add a sprinkle of fresh parsley for color. A dash of black pepper can enhance the look too.
– Accompaniments for a complete meal: Pair the soup with crusty bread. This adds a nice texture. A simple side salad can also balance your meal well.
Pro Tips
- Choose Quality Beef: Opt for grass-fed, organic beef chuck for richer flavor and better texture in your soup.
- Soak the Barley: For a creamier texture, soak the pearl barley in water for a few hours before cooking.
- Add Fresh Herbs: Experiment with other fresh herbs like thyme or rosemary for an aromatic boost just before serving.
- Make it Ahead: This soup tastes even better the next day! Make a batch and store it in the fridge for an easy meal.

Variations
Different Meat Options
You can switch up the beef in this soup. Instead of using beef chuck, try using brisket or round. These cuts can add different flavors and textures to your soup.
If you want a lighter option, use chicken or turkey. Just make sure to adjust the cooking time. Poultry cooks faster than beef, so keep an eye on it to not overcook.
Adding Vegetables
Adding more vegetables can make your soup even better. You can use seasonal veggies like zucchini, spinach, or kale. These will change the taste and add some color.
You can also add beans or corn for extra texture. Just make sure to cook them long enough to soften.
Dietary Modifications
If you need a gluten-free version, use gluten-free barley or quinoa. Both will work well and keep your soup hearty.
For a vegetarian or vegan option, skip the meat and broth. Use vegetable broth instead. Toss in lentils or chickpeas for protein, and enjoy a warm, comforting meal.
Storage Info
Refrigeration Guidelines
You can store beef and barley soup in the fridge for up to three days. Make sure to place it in an airtight container. This helps keep the flavors fresh. When you’re ready to eat, gently reheat the soup on the stove. Use low to medium heat for best results. Stir often to warm it evenly. You could also use a microwave, but be sure to cover the bowl to avoid spills.
Freezing the Soup
If you want to keep the soup longer, freezing is a great option. First, let the soup cool completely. Then, pour it into freezer-safe bags or containers. Leave some space at the top, as the soup will expand when frozen. Label your containers with the date for easy tracking.
When you’re ready to enjoy it again, thaw the soup in the fridge overnight. For reheating, you can use the stove or microwave. If using the stove, heat it slowly to avoid burning. Stir well to mix the flavors back together. Freezing and thawing preserve the hearty taste of this comfort meal.
FAQs
Can I use frozen beef for this recipe?
Yes, you can use frozen beef. Just thaw it first. Frozen beef may not brown as well. Browning adds flavor. If you skip this step, the soup may taste less rich.
How long does Beef & Barley Soup last after cooking?
Beef & Barley Soup lasts about 3 to 4 days in the fridge. Store it in an airtight container. Make sure it cools before putting it in the fridge. For best taste, eat it within a few days.
Can I make this soup in a slow cooker?
Yes, you can use a slow cooker. Sear the beef first for flavor. Add all the other ingredients. Cook on low for about 6 to 8 hours. Stir occasionally if you can. The soup will be ready when the beef is tender.
What can I serve with Beef & Barley Soup?
Pair this soup with crusty bread or a fresh salad. For a nice touch, serve it with a sprinkle of cheese. You could also add crackers for crunch. These sides make your meal more satisfying.
Beef and barley soup is a hearty dish that combines rich flavor and healthy ingredients. We explored how to prepare it, from searing the beef to enhancing the taste with fresh herbs. I shared tips for making the meat tender and boosting flavor with quality broth. You learned how to store leftovers and even vary the recipe for different diets. My final thought is this: cooking can be fun and rewarding. Don’t hesitate to experiment and make this soup your ow

Hearty Beef & Barley Soup
Ingredients
- 1 pound beef chuck, cut into 1-inch cubes
- 1 tablespoon extra virgin olive oil
- 1 medium onion, finely chopped
- 2 cloves garlic, minced
- 2 medium carrots, diced
- 2 stalks celery, diced
- 1 cup pearl barley, rinsed
- 8 cups rich beef broth
- 1 teaspoon dried thyme
- 1 leaf bay leaf
- to taste Salt and freshly ground black pepper
- 1 cup green peas, fresh or frozen
- 2 tablespoons fresh parsley, chopped (for garnish)
Instructions
- Heat the olive oil in a large heavy-bottomed pot over medium-high heat. Once the oil is shimmering, add the diced beef and season generously with salt and pepper. Sear the beef cubes for about 5-7 minutes, turning occasionally, until they are browned on all sides. Once browned, remove the beef from the pot and set aside.
- In the same pot, add the chopped onion, minced garlic, diced carrots, and diced celery. Sauté the mixture for about 4-5 minutes until the vegetables soften and the onions become translucent.
- Stir in the rinsed pearl barley and cook for an additional 1-2 minutes, allowing the barley to toast lightly and absorb some flavors.
- Return the browned beef to the pot and pour in the beef broth. Add the dried thyme and bay leaf, then bring the mixture to a rolling boil. After it reaches a boil, reduce the heat to low and let the soup simmer gently.
- Cover the pot and allow the soup to simmer for approximately 1 hour, stirring occasionally. The beef should become tender and the barley nicely cooked through.
- In the final 10 minutes of cooking, incorporate the green peas to warm them through. Before serving, be sure to remove the bay leaf from the soup.
- Taste the soup and adjust seasoning by adding more salt and pepper if desired.
- Serve the soup hot by ladling it into deep bowls, and finish with a sprinkle of fresh parsley for a burst of color and flavor.


![To make a classic Italian zucchini pasta casserole, you will need the following ingredients: - 3 medium zucchinis, sliced into thin, even rounds - 2 cups cooked pasta (choose your favorite like penne or fusilli) - 1 cup marinara sauce (preferably homemade or high-quality store-bought) - 1 cup creamy ricotta cheese - 1 cup shredded mozzarella cheese, plus extra for topping - 1/2 cup grated Parmesan cheese - 1 large egg, lightly beaten - 2 cloves garlic, minced - 1 teaspoon dried oregano - 1 teaspoon dried basil - Sea salt and freshly cracked black pepper, to taste - Olive oil, for drizzling and greasing - Fresh basil leaves, for garnish Each ingredient plays a key role in building flavor and texture. The zucchini adds a fresh crunch, while the pasta provides a hearty base. The cheeses bring creaminess and richness. Marinara sauce ties everything together with its robust flavor. When I make this dish, I focus on using fresh ingredients. It makes a big difference. Quality marinara or homemade sauce enhances the taste. I also love to mix different cheeses for added depth. You can switch up the cheeses based on your preference. Using good olive oil is essential for greasing the dish and drizzling on top. It adds a lovely finish. As for herbs, oregano and basil deliver classic Italian flavor. Feel free to personalize this recipe. Adjust the seasonings to suit your taste. This dish is forgiving, making it easy to put your spin on it. For the full recipe, check out the complete instructions. 1. Preheating the Oven and Sautéing Zucchini - First, set your oven to 375°F (190°C). This temperature works well for baking. - Next, grab a skillet and drizzle some olive oil into it. Heat it over medium heat. - Add the sliced zucchinis and minced garlic to the skillet. Sauté them for about 5-7 minutes. - Keep stirring until the zucchinis become soft and slightly golden. - Season with sea salt, black pepper, oregano, and basil. This adds a punch of flavor. - Once done, remove the skillet from the heat and let it cool for a few moments. 2. Mixing Ingredients for the Casserole - While the zucchini cools, take a large mixing bowl and combine the cooked pasta, marinara sauce, ricotta cheese, and the lightly beaten egg. - Add half of the mozzarella and half of the Parmesan cheese to the bowl. - Stir everything together until well mixed. This will create a creamy base. - Now, gently fold the sautéed zucchini into the pasta mixture. Make sure it blends without mashing the veggies. 1. Assembling the Casserole - Grease a 9x13 inch baking dish with olive oil. This keeps the casserole from sticking. - Pour the pasta and zucchini mixture into the greased dish. Spread it out evenly with a spatula. - To finish, sprinkle the remaining mozzarella and Parmesan on top. This creates a cheesy crust. 2. Baking and Best Practices - Cover the dish tightly with aluminum foil and place it in the preheated oven. - Bake for 20 minutes. This helps all the flavors mix well. - After 20 minutes, carefully take off the foil. Bake for another 10-15 minutes. Watch for the cheese to melt and turn golden brown. - Once it’s done, remove the casserole from the oven. Let it cool for a few minutes before serving. - For a lovely touch, garnish with fresh basil leaves. This adds color and flavor to your dish. For the complete recipe, refer to [Full Recipe]. - Seasoning Suggestions: I love using fresh herbs. Basil and oregano add a lovely taste. Don’t forget to season with sea salt and black pepper. These simple touches make a big difference. Consider adding a pinch of red pepper flakes for a bit of heat. - Achieving the Perfect Cheese Crust: To get that golden crust, use a mix of mozzarella and Parmesan on top. When you bake the casserole, keep it covered for the first part of cooking. This helps the cheese melt nicely. Uncover it towards the end to allow browning. - Sautéing Tips: When sautéing zucchini, cut it into thin, even rounds. This ensures even cooking. Don’t overcrowd the pan; this can lead to steaming instead of browning. Give them enough space to caramelize. - Alternative Pasta Cooking Methods: You can use different pasta shapes, like penne or fusilli. You don’t need to cook it all the way. Make it al dente, as it will cook more in the oven. This keeps the pasta from getting mushy in the casserole. Make sure to check out the Full Recipe for all the steps and details! {{image_4}} Different Cheese Options Cheese makes this dish rich and creamy. You can swap ricotta for cottage cheese if you like. For a sharper taste, use aged provolone or gouda. If you want a bit of tang, try feta cheese. Each cheese brings its unique flavor to the casserole. Meat Additions and Alternatives For meat lovers, ground beef or turkey can add protein. Cook the meat first and mix it with the pasta. If you prefer a lighter option, add cooked chicken or sausage. You can also use plant-based meats for a tasty, hearty dish. Gluten-Free Options To make this casserole gluten-free, choose gluten-free pasta. Many brands offer great options that hold up well in baking. Just check the package for cooking times to ensure perfect texture. Vegan Adaptations For a vegan version, swap all cheeses for cashew cream or tofu ricotta. You can also use a flax egg instead of the beaten egg for binding. Use your favorite marinara sauce that is dairy-free, and you’ll have a delicious vegan casserole. Experimenting with these swaps and modifications can make the Classic Italian Zucchini Pasta Casserole fit any diet or taste. For the full recipe, check out the details above. After enjoying your Classic Italian Zucchini Pasta Casserole, let’s talk storage. First, cool the casserole completely. This helps prevent condensation, which can make it soggy. Once cool, place leftovers in an airtight container. Store them in the fridge for up to three days. If you want to save it for longer, freezing works too. Cut the casserole into portions. Wrap each slice tightly in plastic wrap, then place them in a freezer-safe bag. This way, you can enjoy it for up to three months. When ready to enjoy your casserole again, reheating is key. The best method is using an oven. Preheat it to 350°F (175°C). Place the casserole in a baking dish and cover it with foil. Heat for 20-25 minutes. This helps keep the texture nice and creamy. If you’re in a hurry, a microwave works too. Use a microwave-safe plate and cover it with a damp paper towel. Heat in short bursts, stirring in between, until hot. This method may not keep the texture as good as the oven. For the best flavor and texture, always let it cool slightly before serving. Enjoy! Can I use other vegetables? Yes, you can use other veggies. Try bell peppers, spinach, or mushrooms. Just chop them small so they cook well. Mixing different vegetables adds flavor and color to your dish. How to make it ahead of time? You can make this casserole a day ahead. Just prepare it like normal, but do not bake it. Cover it and store it in the fridge. When ready, bake it as instructed, adding a few extra minutes if needed. What types of pasta work best? I love using penne or fusilli for this dish. Both types hold sauce well and stay firm while baking. You can also use gluten-free pasta if you prefer. How long can it be stored in the fridge? You can keep leftovers in the fridge for about three days. Make sure to cover it well. To reheat, just warm it in the oven or microwave until hot. Recommended Side Dishes Serve this casserole with a fresh salad or garlic bread. A simple mixed greens salad adds a crisp touch. Garlic bread brings a nice crunch and flavor. Pairing Wine with Casserole A light red wine like Chianti pairs well with this dish. It balances the flavors of the zucchini and cheese. If you prefer white, try a crisp Pinot Grigio. How to Garnish and Serve Garnish with fresh basil leaves for a pop of color. You can also sprinkle extra Parmesan on top before serving. This adds flavor and looks great on the table. For the full recipe, check the details above. Enjoy your cooking! In this blog post, we explored a delicious zucchini pasta casserole. We covered ingredients like zucchini, pasta, marinara, and various cheeses. You learned step-by-step instructions for preparation and baking. We included helpful tips for flavor and texture enhancement. You also discovered variations to suit different diets and preferences. In closing, this casserole is versatile and easy to make. Enjoy the cooking process and share it with loved ones.](https://fastmealmate.com/wp-content/uploads/2025/07/1e9eddde-dee0-4a9c-92bd-9b0350c13af8-768x768.webp)


