Savory African Peanut Chicken Stew Easy and Flavorful

If you crave comfort food that bursts with flavor, you’re in for a treat! My Savory African Peanut Chicken Stew is easy to make and will wow your taste buds. Packed with rich peanut flavor and tender chicken, this dish is perfect for any day. I’ll guide you through simple steps, ingredient tips, and variations so you can customize it just the way you like. Let’s dive into this delicious recipe together!
Why I Love This Recipe
- Bold Flavors: This stew combines rich peanut butter with aromatic spices, creating a depth of flavor that is both comforting and exciting.
- Nutrient-Packed: With chicken, vegetables, and optional greens, this dish is loaded with protein, vitamins, and minerals, making it a wholesome choice for any meal.
- Easy to Make: This recipe comes together in just 40 minutes, making it perfect for weeknight dinners without compromising on taste.
- Versatile Pairings: Serve it with rice or flatbread to soak up the delicious sauce, or enjoy it on its own for a hearty meal.
Ingredients
List of Ingredients
To make this savory African peanut chicken stew, you will need:
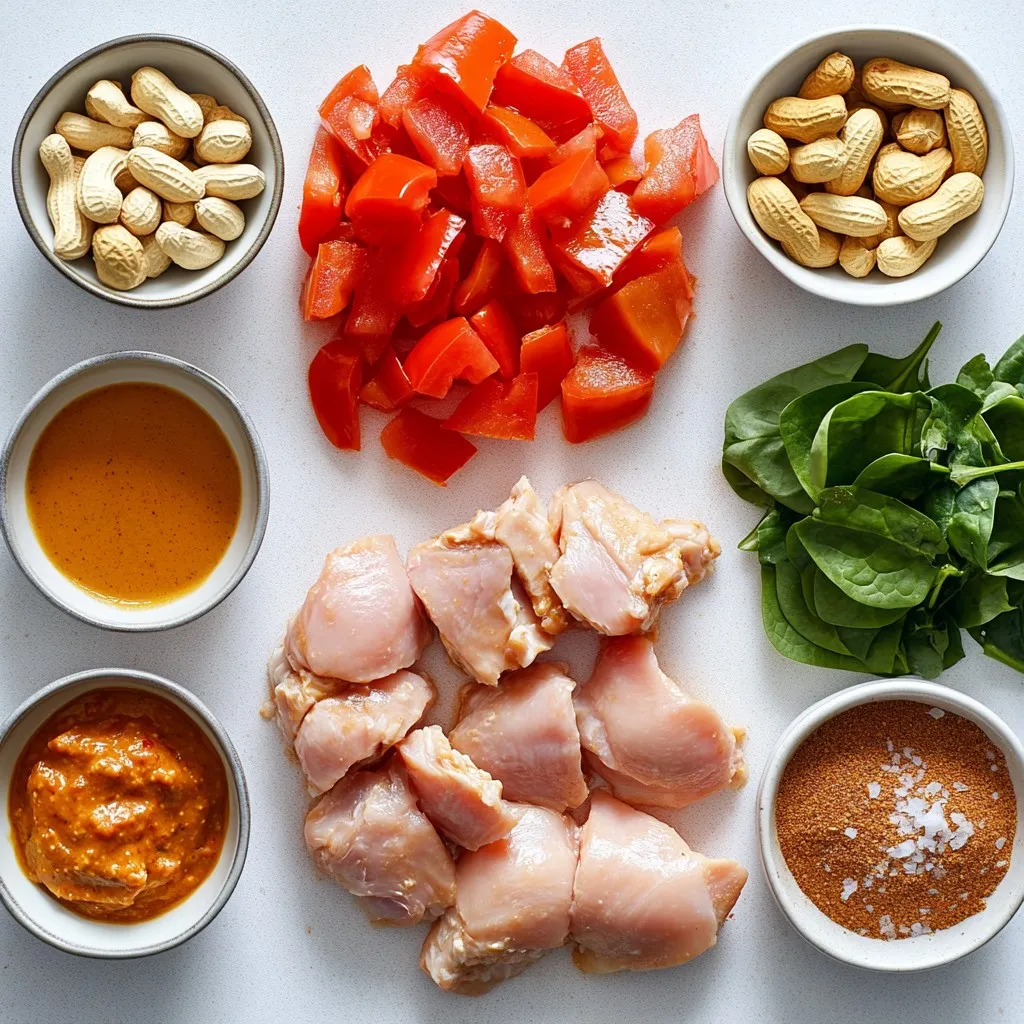
– 1 lb (450g) boneless, skinless chicken thighs, cut into bite-sized pieces
– 1 medium onion, finely chopped
– 3 garlic cloves, minced
– 1 tablespoon fresh ginger, grated
– 1 red bell pepper, diced
– 1 can (14 oz) diced tomatoes, including their juice
– 1 cup chicken broth
– 1 cup creamy peanut butter
– 2 tablespoons vegetable oil
– 1 tablespoon curry powder
– 1 teaspoon ground cumin
– 1 teaspoon smoked paprika
– Salt and pepper to taste
– Optional: 1 cup baby spinach or kale, roughly chopped
– For garnish: Chopped roasted peanuts and fresh cilantro
Preparation of Fresh Ingredients
Start by gathering all your fresh ingredients. Chop the onion finely, mince the garlic, and grate the ginger. Dice the red bell pepper into small pieces. This prep work ensures even cooking and flavor blending. Make sure to cut the chicken thighs into bite-sized pieces, so they cook evenly and mix well with the other flavors.
Ingredient Substitutions
If you lack some ingredients, don’t worry! Here are a few easy swaps:
– Instead of chicken thighs, use chicken breast or even tofu for a vegetarian twist.
– If you don’t have red bell pepper, any color bell pepper will work.
– For a different flavor, substitute the chicken broth with vegetable broth.
– If you need a nut-free option, try sunflower seed butter instead of peanut butter.
– You can skip the spinach or kale if you prefer a simpler stew.
These substitutions keep the dish tasty while catering to your kitchen needs.

Step-by-Step Instructions
Preparation Steps
Gather all your ingredients first. You will need:
– 1 lb boneless, skinless chicken thighs, cut into bite-sized pieces
– 1 medium onion, finely chopped
– 3 garlic cloves, minced
– 1 tablespoon fresh ginger, grated
– 1 red bell pepper, diced
– 1 can (14 oz) diced tomatoes, including their juice
– 1 cup chicken broth
– 1 cup creamy peanut butter
– 2 tablespoons vegetable oil
– 1 tablespoon curry powder
– 1 teaspoon ground cumin
– 1 teaspoon smoked paprika
– Salt and pepper to taste
– Optional: 1 cup baby spinach or kale, roughly chopped
– For garnish: Chopped roasted peanuts and fresh cilantro
Chop the onion, garlic, ginger, and red bell pepper. Cut the chicken into small pieces. This helps them cook evenly.
Cooking Process
1. Heat the vegetable oil in a large pot over medium heat. Once it shimmers, add the onion. Sauté for about 5 minutes until the onion turns soft and fragrant.
2. Add the minced garlic and grated ginger. Stir for 1-2 minutes until you smell the aroma. Be careful not to burn the garlic.
3. Add the chicken pieces to the pot. Sprinkle with salt, pepper, curry powder, ground cumin, and smoked paprika. Cook for about 5-7 minutes, stirring often, until the chicken is brown on all sides.
4. Add the diced red bell pepper and sauté for 3 more minutes. This helps blend the flavors.
5. Pour in the diced tomatoes and chicken broth. Stir well and let it come to a gentle simmer.
6. Gradually add the creamy peanut butter. Keep stirring until it mixes well into the stew. Reduce the heat to low and let it simmer for 20 minutes. Stir occasionally to prevent sticking.
7. If using, add the chopped spinach or kale during the last 5 minutes of cooking. This keeps the greens bright and fresh.
8. Taste the stew and adjust the seasoning, adding more salt or pepper if needed.
Final Touches
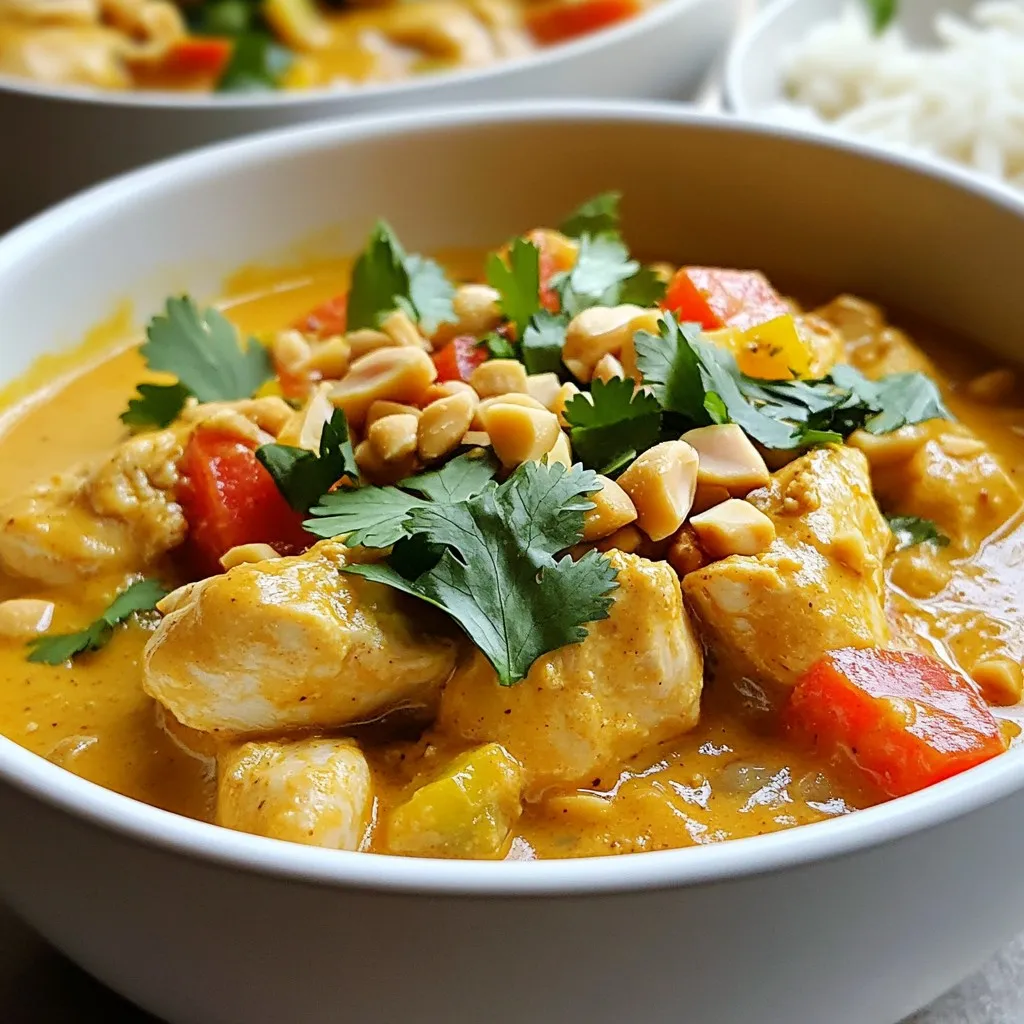
To serve, ladle the stew into deep bowls. Sprinkle chopped roasted peanuts and fresh cilantro on top for a nice finish. This stew goes great with fluffy rice or warm flatbread. Enjoy your meal!
Tips & Tricks
Cooking Techniques for Perfect Stew
To make a great African peanut chicken stew, the cooking method matters. Start by heating the oil in a large pot. Once it shimmers, add the onion. Sauté it until it turns clear and fragrant. This step brings out the sweet flavors in the onion. Next, add the garlic and ginger. Stir them in quickly so they do not burn. The chicken thighs should go in next. Cook them until they are brown on all sides. This browning adds depth to your stew.
Always remember to mix in your spices with the chicken. This ensures the flavors blend well. Lastly, let the stew simmer slowly. This gives all the ingredients time to marry together, creating a rich and savory taste.
Flavor Enhancement Tips
To boost the flavors in your stew, consider a few simple tricks. First, use fresh spices whenever possible. They pack more flavor than old ones. Also, adding a touch of acidity can brighten the dish. A squeeze of lemon or lime juice just before serving works wonders.
If you want more depth, try adding a bit of brown sugar. This balances the richness of the peanut butter. You can also fold in chopped greens like spinach or kale towards the end. They add color and nutrition without overpowering the dish.
Serving Suggestions
Presentation makes a difference in how a dish is enjoyed. Serve the stew in deep bowls to showcase its rich color. Top each bowl with chopped roasted peanuts and fresh cilantro for a nice crunch and aroma. This dish pairs perfectly with fluffy rice or warm flatbread. These sides soak up the delicious sauce and complement the stew’s flavors. Enjoying this meal with family or friends makes it even better!
Pro Tips
- Use Fresh Ingredients: Opt for fresh garlic, ginger, and spices to enhance the flavor profile of your stew. Fresh ingredients make a significant difference in taste.
- Adjust Spice Levels: Tailor the heat of the stew by adjusting the amount of curry powder and smoked paprika according to your preference. Start with less and add more as needed.
- Texture Variation: For a heartier stew, consider adding chopped sweet potatoes or carrots along with the bell pepper. This adds both texture and a hint of sweetness.
- Garnish Wisely: Elevate the presentation by garnishing with not only chopped roasted peanuts and cilantro but also a squeeze of lime juice for a refreshing finish.

Variations
Vegetarian Option
To make a vegetarian version of African Peanut Chicken Stew, swap the chicken for chickpeas or tofu. Chickpeas add a nice texture and protein. Tofu absorbs the rich flavors in the stew. Use the same spices and add extra veggies like carrots or sweet potatoes for more taste. This way, you keep the heartiness while making it plant-based.
Spicy Version
If you love heat, add sliced jalapeños or a teaspoon of cayenne pepper. Stir these in when you sauté the onions. You can also serve the stew with hot sauce on the side. This will let each person control their spice level. The heat pairs well with the creamy peanut butter, creating a delightful contrast.
Custom Ingredient Options
Feel free to get creative with your ingredients. You can add a cup of diced butternut squash for sweetness. Consider using coconut milk instead of chicken broth for a creamy twist. If you want a tangy kick, a splash of lime juice works wonders. Chopped greens like spinach or kale not only boost nutrition but also add color. Customize this stew to fit your taste and pantry!
Storage Info
Storing Leftover Stew
After enjoying your savory African peanut chicken stew, let it cool to room temp. Once cooled, pour it into a clean, airtight container. Make sure to leave some space at the top for expansion. Store your stew in the fridge for up to four days. This keeps the flavors fresh and ready for your next meal.
Freezing Tips
You can also freeze the stew for later use. First, let it cool completely. Then, place it in a freezer-safe container or bag. Remove as much air as possible to prevent freezer burn. Label the container with the date. The stew can last in the freezer for up to three months. This way, you can enjoy this dish any time you want!
Reheating Instructions
When you’re ready to eat the stew, take it out of the fridge or freezer. If it’s frozen, let it defrost in the fridge overnight. To reheat, pour the stew into a pot over medium heat. Stir it occasionally until it is warmed through. If it seems too thick, add a splash of chicken broth or water to loosen it up. For a quick option, use the microwave. Heat it in a microwave-safe bowl, stirring every minute until hot. Enjoy your meal!
FAQs
What is the origin of African Peanut Chicken Stew?
African Peanut Chicken Stew comes from West Africa. This dish reflects the rich flavors of the region. Peanuts are a staple here, often used in many meals. They add creaminess and depth to the stew. The blend of spices, like curry and cumin, brings warmth and color. Each family may have their own twist, making it unique. This stew shows how local ingredients create something truly special.
Can I make this dish in advance?
Yes, you can make this dish in advance. It tastes even better the next day! The flavors mingle and deepen when it sits. Just store it in an airtight container in the fridge. Reheat it on the stove or in the microwave when ready to eat. If you want to make it even easier, you can prepare the ingredients a day ahead. Chop the veggies and measure the spices to save time.
How can I adjust the spice level?
To adjust the spice level, start with less curry powder. You can always add more later. If you like it spicy, try adding a pinch of cayenne pepper or red pepper flakes. For a milder taste, skip the spices or use sweet paprika. Remember to taste as you cook. This way, you’ll find the perfect balance for your palate.
This blog post covered how to make African Peanut Chicken Stew. We shared a list of fresh ingredients and how to prepare them. You learned cooking steps, tips for the best flavor, and serving ideas. We explored variations, like vegetarian and spicy options. Finally, we discussed storage tips and answered common questions.
Enjoy making this stew your own and share it with loved one

African Peanut Chicken Stew
Ingredients
- 1 lb boneless, skinless chicken thighs, cut into bite-sized pieces
- 1 medium onion, finely chopped
- 3 cloves garlic, minced
- 1 tablespoon fresh ginger, grated
- 1 red bell pepper diced
- 1 can (14 oz) diced tomatoes, including their juice
- 1 cup chicken broth
- 1 cup creamy peanut butter
- 2 tablespoons vegetable oil
- 1 tablespoon curry powder
- 1 teaspoon ground cumin
- 1 teaspoon smoked paprika
- to taste salt and pepper
- 1 cup baby spinach or kale, roughly chopped (optional)
- for garnish chopped roasted peanuts and fresh cilantro
Instructions
- Heat the vegetable oil in a large pot over medium heat. Once shimmering, add the finely chopped onion. Sauté for approximately 5 minutes, or until the onion becomes translucent and fragrant.
- Add the minced garlic and grated ginger to the pot. Stir continuously for about 1-2 minutes until aromatic, ensuring the garlic doesn’t burn.
- Introduce the bite-sized chicken thighs to the pot, seasoning them with salt, pepper, curry powder, ground cumin, and smoked paprika. Sauté for 5-7 minutes, stirring occasionally, until the chicken is browned on all sides.
- Incorporate the diced red bell pepper and continue to sauté for an extra 3 minutes, allowing the flavors to meld.
- Pour in the canned diced tomatoes (along with their juice) and chicken broth. Stir the mixture until well combined, then bring it to a gentle simmer.
- Gradually add the creamy peanut butter, stirring continuously until it is fully incorporated into the stew. Reduce the heat to low and let the stew simmer for about 20 minutes, stirring occasionally to prevent sticking.
- If using, fold in the roughly chopped spinach or kale during the last 5 minutes of cooking to retain its vibrant color and nutritional value.
- Taste the stew and adjust the seasoning with additional salt and pepper if needed.


. To store leftover stuffed shells, let them cool first. Place them in an airtight container. Make sure to separate layers with parchment paper to avoid sticking. You can keep them in the fridge for up to three days. You can freeze these stuffed shells for later enjoyment. Follow these steps: - Cool Completely: Allow the cooked shells to cool fully. - Wrap Well: Use plastic wrap or aluminum foil to wrap the shells tightly. - Use a Freezer Bag: Place the wrapped shells in a freezer-safe bag. Remove as much air as possible. - Label and Date: Write the date on the bag. This helps you track how long they’ve been frozen. To thaw, move the shells from the freezer to the fridge. Let them thaw overnight. For quicker thawing, place them in cold water for about two hours. Reheating stuffed shells is easy. Here are a few methods: - Oven: Preheat your oven to 350°F (175°C). Place the shells in a baking dish, cover with foil, and heat for 20 minutes. Remove the foil for the last five minutes to crisp the cheese. - Microwave: Place a few shells on a microwave-safe plate. Cover them with a damp paper towel. Heat in short bursts of 30 seconds until warm. - Skillet: Heat a skillet over medium heat. Add a splash of water and place the shells in the skillet. Cover with a lid and steam for about 5 minutes. These methods keep the flavors strong and the cheese melty. Enjoy your tasty leftovers! You can serve Philly Cheesesteak Stuffed Shells with a crisp salad. A simple green salad works well. You can also add a side of garlic bread. Garlic bread pairs nicely with the rich flavors of the shells. Marinara sauce makes a tasty dip for the shells too. Try adding pickles or roasted vegetables for a crunchy side. Yes, you can make these stuffed shells ahead of time. Prepare them fully and store in the fridge. Cover the baking dish tightly with plastic wrap. You can also freeze them before baking. Just thaw them in the fridge overnight before baking. This saves time and is great for busy days. The stuffed shells are done when the cheese is bubbly. You should see a golden brown color on top. Use a food thermometer; the center should reach 165°F. If you want to be sure, cut one open. The filling should be hot and melted. Keep an eye on them during the last 10 minutes of baking. In this blog post, I shared how to make Philly Cheesesteak Stuffed Shells. We covered the ingredients, cooking steps, and tips for perfect results. I also included storage info and answered common questions. Making these stuffed shells is easy and fun. You can tweak the recipe to fit your taste. Don’t be afraid to try new flavors. Enjoy your delicious creation and share it with others!](https://fastmealmate.com/wp-content/uploads/2025/06/11767e89-6c0f-469f-be11-885f6dce3423-768x768.webp)

![To make a hearty Instant Pot beef stew, you need fresh and tasty ingredients. Here’s what you will need: - 2 pounds beef chuck, cut into 1-inch cubes - 1 tablespoon olive oil - 1 large onion, finely chopped - 2 cloves garlic, minced - 4 medium carrots, sliced into rounds - 3 medium potatoes, peeled and diced into 1-inch cubes - 2 cups beef broth - 1 tablespoon tomato paste - 1 teaspoon dried thyme - 1 teaspoon dried rosemary - 1 bay leaf - Salt and freshly ground black pepper to taste - 2 tablespoons cornstarch (optional, for thickening) - Fresh parsley, chopped (for garnish) These ingredients bring great flavor and comfort to your dish. Each one plays a key role. For example, beef chuck gives the stew a rich taste. Onions and garlic add depth. Carrots and potatoes give it heartiness. Don’t skip the herbs; they add wonderful notes to every bite. You will find that using quality ingredients makes a big difference. Fresh veggies and good beef will elevate your stew. Remember, you can always adjust the seasonings to fit your taste. If you want to explore more, check out the Full Recipe for step-by-step instructions. - Prep time: 15 minutes - Cook time: 35 minutes - Total time: 1 hour - Servings: 6 With just an hour, you can create a warm and filling meal for your family or friends. Enjoy the process! Set your Instant Pot to “Sauté” and pour in the olive oil. Let it heat until it shimmers. Add the beef cubes in a single layer. Sear them until browned, about 5-7 minutes. This step seals in flavor. Once browned, remove the beef and set it aside on a plate. In the same pot, add the finely chopped onion and minced garlic. Cook them for 2-3 minutes until the onion is soft. You will smell a rich aroma that adds depth to your stew. Pour a splash of beef broth into the pot. Use a wooden spoon to scrape up the browned bits stuck to the bottom. This step is key for enhancing the stew’s flavor. Now, return the seared beef to the pot. Add the sliced carrots, diced potatoes, the remaining beef broth, tomato paste, dried thyme, dried rosemary, and the bay leaf. Don’t forget to add a pinch of salt and pepper. Stir everything until well mixed. Close the lid tightly on the Instant Pot. Make sure the steam release valve is set to “Sealing.” Select the “Manual” function. Adjust the cooking time to 35 minutes at high pressure. When the cooking time is up, let the Instant Pot naturally release pressure for 10 minutes. This helps make the beef tender. After that, carefully quick-release any remaining pressure by turning the valve to “Venting.” If you want a thicker stew, mix 2 tablespoons of cornstarch with cold water to make a slurry. Stir this into the warm stew. Set the Instant Pot back to “Sauté” for 5 minutes. Stir often until the stew thickens to your liking. Before serving, remember to remove the bay leaf. Garnish the stew with freshly chopped parsley for color. Ladle it into bowls while hot. Enjoy this hearty meal! Check the [Full Recipe] for more details. Browning meat is key. It builds flavor and color. When you sear beef, you create a nice crust. This adds a rich taste to your stew. Make sure to do this step well. For seasoning, use salt and pepper early. This helps to boost the flavor. Add herbs like thyme and rosemary for aroma. If you love a kick, throw in some paprika. Pair your beef stew with sides that shine. Mashed potatoes work great. They soak up all the stew's goodness. You can also serve it with green beans or a fresh salad. Bread is a must! Choose crusty bread for dipping. Sourdough or baguette are fantastic options. They bring texture and enhance the meal. Want to deepen the taste? Try adding red wine. A splash of wine gives a rich layer to your stew. If you prefer, soy sauce works too. It adds umami that makes flavors pop. Don’t forget about extra veggies! Mushrooms, peas, or bell peppers can brighten your stew. They add nutrition and color. Chop them up and toss them in before cooking. For the full recipe, check out the details above. Happy cooking! {{image_4}} You can use chicken or pork in your stew. For chicken, use boneless thighs or breasts. Cut them into bite-sized pieces. Sear them just like you do with beef. Chicken cooks faster, so reduce the cooking time to 25 minutes. For pork, use shoulder or loin. Cut into 1-inch cubes and follow the same steps as beef. Both meats will soak up the rich flavors of your stew. To make a vegetarian stew, skip the meat entirely. Use hearty vegetables like mushrooms, butternut squash, or lentils. Replace beef broth with vegetable broth for a lighter taste. You can add beans for protein and texture. Cook it just like the beef stew. This version is still rich and filling, perfect for anyone. You can change the taste by using different herbs and spices. Instead of thyme and rosemary, try basil and oregano for an Italian twist. Or, add cumin and coriander for a warm, earthy flavor. For a touch of heat, add red pepper flakes or a splash of hot sauce. Each change gives you a new dish to enjoy. To refrigerate beef stew, let it cool first. Pour the stew into a container. Seal it tightly with a lid. Store it in the fridge for up to three days. If you want to enjoy it later, use the freezer. To freeze beef stew, follow these steps. Cool the stew completely first. Then, transfer it to freezer-safe bags or containers. Remove as much air as possible to avoid freezer burn. Label the bags with the date. You can freeze it for up to three months. To reheat, let it thaw in the fridge overnight. Heat it in the microwave or on the stove until hot. In the fridge, beef stew lasts about three days. If you freeze it, it can last for three months. After that, the quality may decline. Be sure to check for any off smells or changes in texture before eating. When stored correctly, the stew stays flavorful and comforting. Yes, you can skip browning the meat. However, your stew may lack flavor. Browning adds depth and richness. It creates a lovely crust and enhances the dish. If you skip this step, consider adding more spices. If your stew is too thick, add more beef broth. Start with half a cup and stir well. You can also use water if needed. Another option is to add more veggies. They will release moisture as they cook. You can use frozen beef, but adjust the cooking time. Increase the time to 45 minutes for frozen chunks. This allows the meat to cook through properly. Make sure to add a few extra minutes if pieces are large. The beef is tender when it falls apart easily. You can check by using a fork. If it shreds easily, it's done. Aim for a melt-in-your-mouth texture for the best stew. Yes, this recipe is great for meal prep. You can make it ahead and store leftovers. It keeps well in the fridge for about three days. You can also freeze it for up to three months. Just reheat before serving. Check out the Full Recipe for more details. This blog post covered delicious Instant Pot beef stew. You learned the key ingredients, simple steps, and expert tips. I emphasized the importance of browning the beef for flavor. You can customize the recipe with different proteins or vegetables too. Stored correctly, it lasts well and is perfect for meals later. Enjoying this hearty dish brings warmth and satisfaction. I hope you try this recipe and share it with friends. Your kitchen adventures await!](https://fastmealmate.com/wp-content/uploads/2025/07/4eb70415-c4b6-43db-bf2d-31d3ec08fe2e-768x768.webp)

![For a great crispy tofu panini, you need: - 1 block firm tofu, well-pressed and sliced into 1/2 inch slabs - 1 tablespoon soy sauce - 1 tablespoon sesame oil - 1 tablespoon cornstarch - 1 large round ciabatta or focaccia bread, sliced in half horizontally - 1/2 cup fresh spinach leaves, washed and dried - 1/2 red bell pepper, roasted, peeled, and sliced thin - 1 small ripe avocado, sliced - 2 tablespoons hummus or vegan mayonnaise - Salt and freshly ground black pepper to taste - Olive oil, for grilling These ingredients work together to create a crispy, tasty panini that is both filling and healthy. You can add some extra flavor with these ingredients: - Sliced tomatoes for freshness - Red onion for a bit of bite - Fresh herbs like basil or cilantro - A dash of hot sauce for heat If you want to mix things up, these optional ingredients can make your panini even better. To make your meal complete, consider these sides: - A light salad with lemon vinaigrette - Sweet potato fries for crunch - A bowl of soup, like tomato or lentil These sides balance the flavors and add variety to your meal. Plus, they are easy to prepare! For the full recipe, check out the detailed steps to bring your crispy tofu panini to life. To start, we need to prepare the tofu. First, press the block of firm tofu. Use a clean kitchen towel or tofu press. This step removes excess moisture. Removing moisture is key for achieving crispiness later. Once pressed, slice the tofu into even slabs, each about 1/2 inch thick. This ensures even cooking and crispiness. Next, we will marinate the tofu. In a mixing bowl, whisk together soy sauce, sesame oil, and a pinch of salt and pepper. Then, add your tofu slices to this mixture. Make sure each piece gets coated well. Let the tofu soak in the marinade for about 15 minutes. This allows the tofu to absorb all those tasty flavors. Now, it’s time to cook the tofu. After marinating, take the slices out and sprinkle cornstarch on both sides. This coating is crucial for that nice, crispy texture. Heat a non-stick skillet over medium heat. Add a drizzle of olive oil to the pan. When the oil shimmers, carefully lay the coated tofu slices in the skillet. Cook each slice for about 4-5 minutes on each side. Look for a golden brown color and a crispy texture. Once done, transfer the tofu to a plate and set it aside. Let’s move on to assembling the panini. Take your ciabatta or focaccia bread and cut it in half horizontally. Spread hummus or vegan mayo on the inside of both halves. This adds moisture and flavor to the sandwich. On the bottom half, layer fresh spinach leaves first. Then add the crispy tofu slices, followed by roasted red bell pepper slices. Finally, place avocado slices on top. Now, close the sandwich with the top half of the bread. Press it down gently to hold everything in place. Next, we grill the panini. Preheat your panini press or another skillet over medium heat. Brush the outside of the sandwich with olive oil. This helps to create a crunchy crust while grilling. If using a skillet, place a heavy pan on top of the sandwich. This presses it down as it cooks. Grill for about 3-4 minutes on each side. Look for a beautiful golden brown color and a crispy texture. Once grilled to perfection, remove the panini from the heat. Slice it in half with a sharp knife and serve warm for the best taste. Enjoy your crispy tofu panini, a flavorful and satisfying delight! For the full recipe, check out the earlier sections. To make your tofu crispy, follow these tips: - Press the tofu well: Remove as much water as possible. This helps the tofu absorb flavors better. - Use cornstarch: Coat both sides of the tofu slices with cornstarch. This creates a crunchy crust. - Heat your skillet properly: Use medium heat and wait for the oil to shimmer before adding the tofu. - Do not overcrowd the pan: Cook in batches if needed. This allows each piece to get crisp. Here are some mistakes to watch out for: - Skipping the marination: Marinating adds flavor. Don’t rush this step. - Using too little oil: A light drizzle helps achieve that golden color and crisp texture. - Not slicing evenly: Make sure your tofu slabs are even. This ensures consistent cooking. - Opening the panini too soon: Let it grill fully to get the best texture. Having the right tools makes a big difference. Here are my top picks: - Panini press: This tool cooks evenly and gives perfect grill marks. - Non-stick skillet: If you don’t have a press, a good skillet works too. - Heavy pan: Use it to press down the sandwich while it cooks in a skillet. - Sharp knife: A sharp knife helps slice your panini without squishing it. Using these tips and tools, you can create a delicious crispy tofu panini. For the full recipe, check out the earlier sections. {{image_4}} When making a crispy tofu panini, you can switch up the ingredients to match your taste. This adds fun and keeps things interesting. You can use different sauces or spreads. Try using pesto or spicy mustard instead of hummus. Swap spinach for kale or arugula for a bolder flavor. For added crunch, add sliced cucumbers or pickles. You can also replace the red bell pepper with grilled zucchini or eggplant. Each swap brings a new twist to your panini. To keep this dish vegan, stick with plant-based ingredients. Use gluten-free bread to make it gluten-free. Many brands offer delicious options that taste great. Check labels to ensure they have no animal products. This allows everyone to enjoy the crispy tofu panini without worry. Fresh produce can change with the seasons. In spring, try adding fresh asparagus or sprouts. In summer, include ripe tomatoes or zucchini. In fall, swap in roasted butternut squash for a sweet flavor. Winter might call for roasted root vegetables like carrots or sweet potatoes. These seasonal swaps help you enjoy fresh tastes all year long. This recipe offers endless possibilities for creativity. Use the [Full Recipe] as your base, and let your imagination run wild with variations! To keep your crispy tofu panini fresh, wrap it tightly. Use plastic wrap or foil for best results. Store it in the fridge for up to three days. Avoid leaving it out at room temperature. This helps prevent sogginess and keeps the flavors intact. To reheat, use a skillet over medium heat. Place the panini in the skillet and cover it. Heat for about 4-5 minutes on each side. This method helps restore the crispiness. You can also use a toaster oven for a similar effect. Avoid the microwave, as it can make the bread soft. If you want to freeze your panini, wrap it well in plastic wrap and foil. It can last for up to a month in the freezer. When you’re ready to eat, thaw it in the fridge overnight. Reheat it in a skillet for the best texture. This way, you can enjoy a quick meal without losing flavor. To make tofu extra crispy, start with firm tofu. Press it well to remove water. Slice it into even slabs. Marinate the slices in soy sauce and sesame oil. Let them soak for at least 15 minutes. After marinating, coat each slice with cornstarch. This coating helps create that crunchy texture you want. Cook the tofu in a hot skillet with olive oil. Flip it until golden brown on both sides. Yes, you can use many types of bread. Ciabatta and focaccia work great, but others can too. Try sourdough or whole grain for a different taste. Each bread type adds its own flavor and texture. Choose one that you love, and enjoy your panini in a new way. Dipping sauces can enhance your panini experience. Hummus is a classic choice. It adds creaminess and flavor. Vegan mayo also works well for a smooth dip. You can try spicy salsa for a kick. Another option is a tangy vinaigrette. Each sauce complements the crispy tofu and adds fun flavors. For more ideas, check out the Full Recipe for inspiration. In summary, we explored how to make a crispy tofu panini. We covered the main and optional ingredients, step-by-step cooking tips, and even some fun variations. Remember to store leftovers well and reheat them correctly for the best taste. Experiment with flavors and enjoy this dish as part of your meals. With a few simple steps, you can have a delicious, crispy tofu panini that satisfies your cravings. Enjoy your cooking journey!](https://fastmealmate.com/wp-content/uploads/2025/06/c0074219-6fc3-4ba3-a1d2-dcd469194d4e-768x768.webp)
![- Fettuccine or Linguine: I love using fettuccine or linguine for this dish. These pastas hold the creamy sauce well. Their flat shape allows for a perfect bite every time. - Fresh Seafood: When choosing shrimp, look for firm, pink, and shiny ones. For scallops, they should be plump and slightly translucent. Fresh seafood makes all the difference in flavor. - Aromatics and Seasoning: Garlic and onion add depth to the dish. Use three cloves of garlic for a bold flavor. A small onion gives a nice sweetness. Fresh lemon juice and zest brighten the entire meal. - Fresh Basil Leaves: Adding fresh basil leaves boosts flavor and looks great. Tear them by hand for a rustic touch. Scatter them on top just before serving. - Grated Parmesan Cheese: Choose a good-quality Parmesan cheese for the best taste. Grate it fresh for a rich, nutty finish. It melts nicely into the pasta and adds creaminess. For the full recipe, visit the details above and enjoy the process! Start by boiling a large pot of salted water. Add the fettuccine or linguine. Cook it until it's al dente. This means it should be firm but cooked through. This step is key because overcooked pasta becomes mushy. After cooking, drain the pasta but save about ½ cup of the pasta water. This water can help thicken your sauce later. Next, heat 2 tablespoons of olive oil in a large skillet over medium heat. Wait until the oil shimmers before adding minced garlic and chopped onion. Sauté for about 3-4 minutes. You want the onion to become clear and fragrant. This step builds a great flavor base for your dish. Now it’s time to add the seafood. Place the shrimp and scallops in the skillet. Cook for about 4-5 minutes, stirring gently. The shrimp will turn pink, and the scallops will look opaque when done. Avoid overcooking them, or they will become rubbery. After the seafood is cooked, pour in a cup of heavy cream. Stir well to mix all the ingredients. Then, add the lemon zest, lemon juice, and red pepper flakes if you want some heat. Season with salt and black pepper. Let this sauce simmer for about 2-3 minutes. This time lets all the flavors blend together nicely. Finally, add the cooked pasta to the skillet. Toss everything gently to coat the noodles in the creamy sauce. If the sauce is too thick, add the reserved pasta water a little at a time. This helps reach the perfect consistency. Let it rest for a minute before serving to deepen the flavors. For the complete recipe, check the [Full Recipe]. To make the best seafood pasta, pay attention to the seafood. Always use fresh shrimp and scallops. Look for firm shrimp and plump scallops. Avoid overcooking seafood; it should be cooked just until it turns opaque. A common mistake is cooking seafood too long. This can make it tough and chewy. Spices and herbs bring your dish to life. Use fresh herbs like basil or parsley. Lemon zest adds brightness. A pinch of red pepper flakes adds heat. Try adding a dash of white wine for depth. These flavors work well with the creamy sauce and seafood. Plating is key to a great meal. Use large, shallow bowls for serving. Twirl the pasta for an elegant look. Garnish with fresh basil leaves and a sprinkle of Parmesan cheese. Drizzle a little extra olive oil on top for shine. This makes your dish appealing and appetizing. For a fun touch, consider adding a lemon wedge on the side. It gives a pop of color and flavor. These small details can impress your guests. For the complete recipe, check out the [Full Recipe]. {{image_4}} If you want to change up the seafood in this dish, there are great options. You can substitute shrimp and scallops with: - Crab meat - Lobster - Mussels - Clams These options can add unique flavors to your pasta. For example, crab meat gives a sweet taste, while mussels add a briny touch. Just make sure to adjust the cooking time, as some seafood cooks faster than others. You can switch up the pasta type for different health goals. Consider using: - Whole wheat pasta - Gluten-free pasta Whole wheat pasta has more fiber and nutrients than standard pasta. Gluten-free pasta is great for those with wheat allergies. Both options work well with the sauce and seafood. Just cook them according to package directions for the best texture. Want to try something new? You can play with the sauce for your dish. Here are some ideas: - Use marinara sauce for a classic Italian touch. - Try a basil pesto for a fresh and herbal flavor. Marinara sauce adds a rich tomato taste. Pesto brings in bright flavors and a creamy texture. Feel free to mix and match these sauces with your seafood for fun twists. You can find the full recipe to guide you through all these ideas. After enjoying your seafood pasta, store leftovers right away. Let the dish cool for about 30 minutes. Then, place it in an airtight container. This keeps it fresh for up to three days. Make sure to check for any signs of spoilage before eating. When reheating seafood pasta, keep the texture and flavor in mind. Use a skillet over low heat. Add a splash of water or broth to help with moisture. Stir gently to avoid breaking the seafood. Heat until it’s warm, about 5-7 minutes. You can also use the microwave. Just cover the dish loosely with a lid or wrap to keep it moist. To freeze your seafood pasta, let it cool completely first. Place it in a freezer-safe container. It can last up to two months in the freezer. To defrost, move the container to the fridge overnight. Reheat gently in a skillet or microwave, adding a splash of cream or broth to restore creaminess. Enjoy your delicious seafood pasta anytime! For the full recipe, check out the earlier section. You can tell shrimp and scallops are cooked when they change color. Shrimp should turn pink, and scallops should become opaque. For shrimp, look for a tight curl. For scallops, they should have a firm texture. If you cut into them, they should be white inside with no translucent areas. This means they are safe to eat. Yes, you can prepare this recipe ahead of time. Cook the pasta and seafood separately. Store them in airtight containers in the fridge. When you are ready to eat, simply reheat the seafood and mix it with the pasta and sauce. This makes it easy for busy weeknights or special occasions. A crisp white wine works best with seafood pasta. Look for a Sauvignon Blanc or Pinot Grigio. These wines have bright flavors that complement the seafood. If you prefer red, a light Pinot Noir can also be a good choice. The key is to avoid heavy wines that might overpower the dish. Yes, frozen seafood is a great option. Thaw your shrimp and scallops in the fridge overnight or under cold water. Avoid using hot water, as it can start to cook the seafood. Once thawed, pat them dry with a paper towel before cooking. This helps achieve a nice sear and prevents excess moisture in your dish. For the best flavor, try to use high-quality frozen seafood. You can find the full recipe [here](#). You've learned key ingredients for seafood pasta and how to cook it perfectly. Fettuccine or linguine, fresh seafood, and the right spices are essential. Remember to cook your pasta al dente and reserve some water. Proper techniques for sautéing and combining everything create a delicious cream sauce. Try different seafood, pasta types, and sauces for variety. Store and reheat your leftovers properly to keep the flavor. Now, you have what you need to make amazing seafood pasta at home. Enjoy your cooking adventure!](https://fastmealmate.com/wp-content/uploads/2025/06/7c1ca401-a8ff-43d0-aae3-34555c9d3a34-768x768.webp)