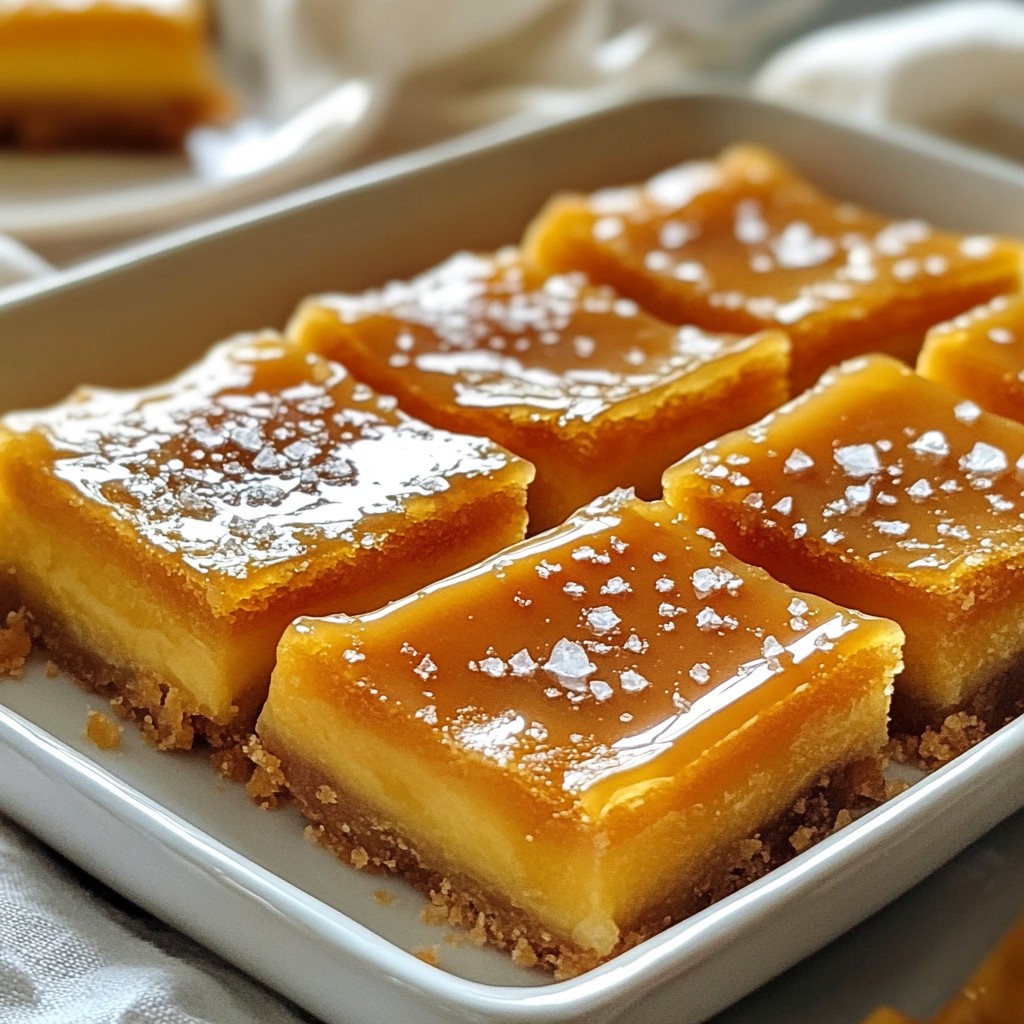
Are you ready for a treat that blends sweet and salty in every bite? These Salted Caramel Butter Bars are a game-changer. With just a few basic ingredients, you can whip up a delightful dessert that's perfect for sharing—or keeping all to yourself! In this blog post, I’ll take you through each step and share my tips to ensure your bars come out perfectly. Let’s get baking!
Why I Love This Recipe
- Decadent Flavor: These butter bars are the perfect balance of rich, buttery goodness and sweet caramel, making them irresistible.
- Easy to Make: With straightforward ingredients and simple steps, this recipe is perfect for bakers of all levels.
- Versatile Treat: Enjoy these bars as a dessert, snack, or even a delightful addition to a potluck or gathering.
- Customizable: Feel free to experiment by adding nuts, chocolate chips, or even a sprinkle of sea salt for an extra flavor kick.
Ingredients
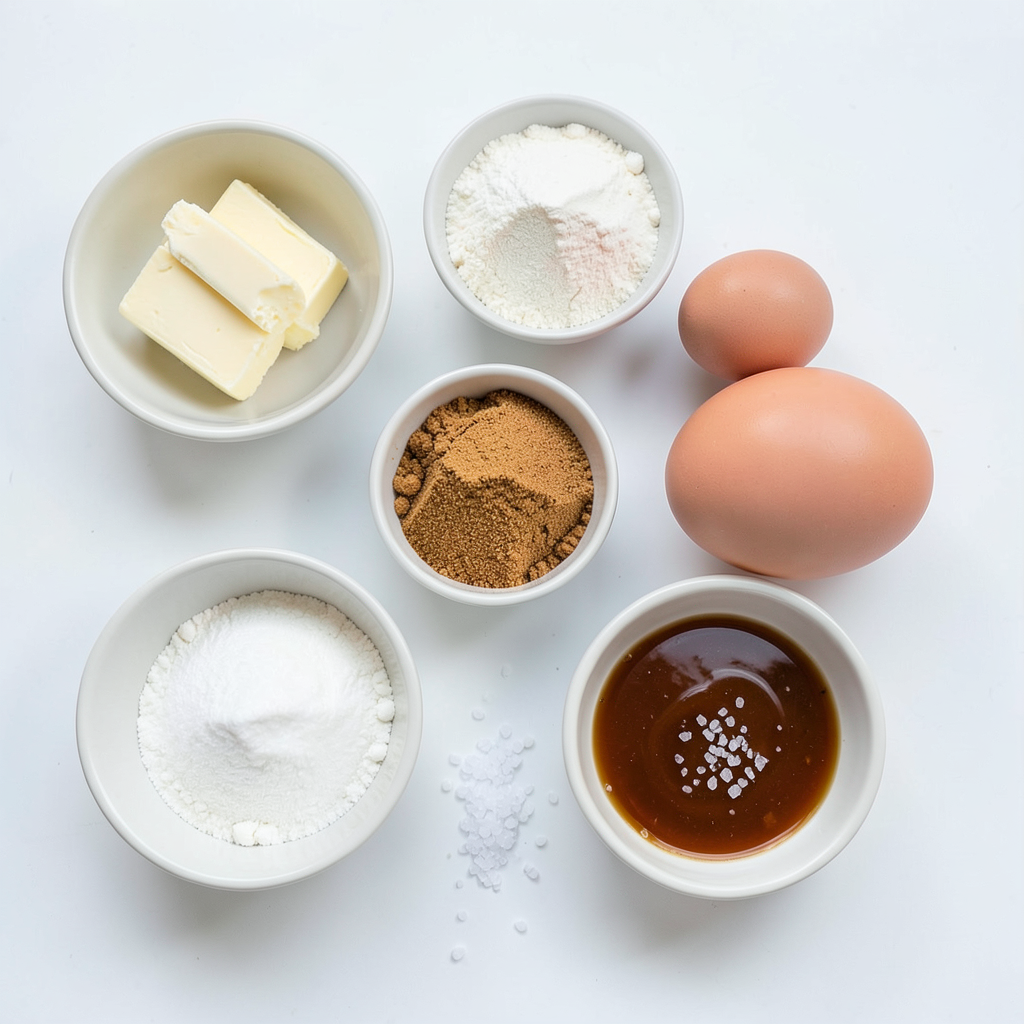
To make salted caramel butter bars, you need a few simple ingredients that create rich flavors. Here’s what you’ll need:
- 1 cup unsalted butter, softened to room temperature
- 1 cup granulated sugar
- 1 cup packed brown sugar
- 2 large eggs
- 2 teaspoons pure vanilla extract
- 3 cups all-purpose flour
- 1 teaspoon baking powder
- 1/2 teaspoon fine sea salt
- 1 cup caramel sauce (store-bought or homemade)
- 1 teaspoon flaked sea salt (for garnish)
Each ingredient plays a key role. The unsalted butter gives a creamy texture. Granulated and brown sugars create a sweet base. Eggs add moisture and help the bars rise. Vanilla extract brings warmth and depth.
All-purpose flour is the backbone of the dough. Baking powder helps it rise for a soft bite. Fine sea salt balances the sweetness. The caramel sauce adds a gooey, sweet layer. Flaked sea salt on top enhances the flavor with a salty kick.
These ingredients blend to create a treat that is both buttery and sweet. The combination makes these bars truly irresistible.
Step-by-Step Instructions
Preparation Steps
1. First, preheat your oven to 350°F (175°C). Grab a 9x13 inch baking pan. Lightly grease it and line it with parchment paper. Let some paper hang over the edges. This helps with easy removal later.
2. In a large mixing bowl, cream together 1 cup of softened unsalted butter, 1 cup of granulated sugar, and 1 cup of packed brown sugar. Use an electric mixer on medium speed. Beat until the mix is light and fluffy, about 3-4 minutes.
3. Now, add in 2 large eggs. Do this one by one. Make sure to mix well after each egg. Then, add 2 teaspoons of pure vanilla extract. Mix until everything combines smoothly.
Mixing Dry Ingredients
1. In another bowl, whisk together 3 cups of all-purpose flour, 1 teaspoon of baking powder, and 1/2 teaspoon of fine sea salt. This step helps to mix the leavening agent well.
Assembling the Bars
1. Take about two-thirds of your dough. Evenly spread it in the bottom of the prepared baking pan. Press it down firmly to create a solid base layer.
2. Carefully drizzle 1 cup of caramel sauce over this base layer. Make sure to cover it evenly.
3. Now, take the remaining dough. Drop it in handfuls over the caramel layer. You don’t need to cover it all. Let some caramel peek through for a nice look!
4. If you want, use a spatula to gently spread the topping dough or keep dotting it with your fingers.
Baking Process
1. Place the pan in the preheated oven. Bake for 25-30 minutes. You want the edges to turn a golden brown. Check with a toothpick. It should come out mostly clean, with a few moist crumbs.
2. Once baked, let the bars cool in the pan for about 10 minutes. While still warm, sprinkle 1 teaspoon of flaked sea salt over the top. Then, let the bars cool completely before lifting them out with the parchment paper.
3. Transfer the bars to a cutting board. Slice them into squares or rectangles. Enjoy the sweet and salty mix!
Tips & Tricks
Achieving the Perfect Texture
To get the best texture in your salted caramel butter bars, avoid overmixing the dough. Overmixing can make your bars tough. Mix until the ingredients just come together. This will keep them soft and chewy.
The ideal baking time is between 25 to 30 minutes. Check for golden edges and a mostly clean toothpick. A few moist crumbs are okay. Let them cool for ten minutes before adding salt on top.
Flavor Enhancements
To make your bars even better, consider adding toppings. Chopped nuts, like pecans or walnuts, add crunch. You can also sprinkle some chocolate chips for a sweet twist.
When it comes to caramel, homemade is often best. You can control the flavor and sweetness. If you're short on time, store-bought caramel works well too. Just drizzle it generously over the dough for a rich taste.
Pro Tips
- Use Room Temperature Butter: Make sure your butter is at room temperature for easier creaming with the sugars, resulting in a lighter texture for the bars.
- Chill the Dough: If the dough is too sticky to handle, chill it in the refrigerator for about 30 minutes. This will make it easier to spread over the caramel layer.
- Homemade Caramel Sauce: For an elevated flavor, try making your own caramel sauce. It’s simpler than you think and adds a personal touch!
- Storage Tips: Store the bars in an airtight container at room temperature for up to a week, or freeze for longer shelf life. Just make sure to separate layers with parchment paper to prevent sticking.
Variations
Add-Ins
You can make these salted caramel butter bars even better by adding mix-ins. Here are a few ideas:
- Nuts: Chopped walnuts or pecans add a nice crunch. Mix about half a cup into the dough before spreading it in the pan.
- Chocolate Chips: Dark, milk, or white chocolate chips work great. Add one cup for a sweet surprise in every bite.
- Flavoring Options: Want a twist? Add espresso powder for a coffee kick. You can also use a bit more sea salt to enhance the caramel flavor.
Dietary Adjustments
If you have dietary needs, you can still enjoy these bars:
- Gluten-Free Version: Swap all-purpose flour for a gluten-free flour blend. Make sure it has a good structure for baking. Almond flour can also work well in this recipe.
- Vegan Substitutions: Use coconut oil instead of butter and flax eggs instead of regular eggs. Combine one tablespoon of ground flaxseed with three tablespoons of water. Let it sit for a few minutes until it thickens.
These adjustments make the bars friendly for everyone. Get creative and enjoy the sweet flavor!
Storage Info
Storing Leftovers
To keep your salted caramel butter bars fresh, use an airtight container. Glass or plastic containers work well. If you plan to eat them in a few days, store them at room temperature. Make sure to keep them away from direct sunlight. For longer storage, refrigerate them. This keeps them soft and tasty.
Freezing Instructions
If you want to save some for later, freezing is a great option. First, cut the bars into squares. Wrap each piece in plastic wrap. Then, place them in a freezer-safe bag. Be sure to remove as much air as possible. When you’re ready to eat, thaw them in the fridge overnight. For the best texture, let them sit at room temperature for about 30 minutes before enjoying.
FAQs
Common Questions
Can I use salted butter instead of unsalted? Yes, you can use salted butter. This will add more salt to your bars. Just reduce the added sea salt in the recipe to balance the flavors.
How do I know when the bars are done baking? Check the edges of the bars. They should be golden brown. Insert a toothpick in the center. If it comes out mostly clean, your bars are done. A few moist crumbs are fine.
What can I substitute for caramel sauce? You can use butterscotch sauce or chocolate sauce. You can even make a homemade caramel sauce if you prefer.
Serving Suggestions
Best pairings with salted caramel butter bars These bars pair well with vanilla ice cream or whipped cream. A cup of coffee or tea complements the sweetness nicely.
Creative ways to serve or present the bars Serve the bars on a rustic wooden platter. Add a small bowl of extra caramel sauce for drizzling. Top with a sprinkle of flaked sea salt for a nice touch.
These salted caramel butter bars are easy and fun to make. You learned the key ingredients and steps to create them. I shared tips for the best texture and flavor. You can even try different add-ins or adjustments to suit your needs.
In the end, these bars are a treat everyone will enjoy. Experiment with flavors and share them with friends. Happy baking!