Pumpkin Spice Baked Donuts Delightful Fall Treat

Fall is here, which means it’s time to treat yourself to some delicious pumpkin spice baked donuts! These warm, fluffy bites will fill your kitchen with a cozy aroma. They’re easy to make and perfect for sharing. Whether you want a sweet indulgence or a healthier twist, I’ve got you covered. Grab your apron, and let’s dive into the delightful world of pumpkin spice baked donuts!
Ingredients
Overview of Ingredients
To make Pumpkin Spice Baked Donuts, you need a few key ingredients:
– 1 cup all-purpose flour
– 1/2 cup pumpkin puree
– 1/4 cup granulated sugar
– 1/4 cup packed brown sugar
– 1 teaspoon baking powder
– 1/2 teaspoon baking soda
– 1 teaspoon pumpkin pie spice
– 1/4 teaspoon salt
– 1/2 teaspoon vanilla extract
– 1/4 cup milk (dairy or non-dairy)
– 1 large egg
– 2 tablespoons melted butter or coconut oil
If you need to make swaps, here are some ideas. You can use gluten-free flour in place of all-purpose flour. Almond milk or oat milk works well if you prefer non-dairy options. For the egg, try a flax egg or applesauce. These swaps keep the flavor and texture great.
Measuring Tips
Measuring ingredients correctly is very important. Use a dry measuring cup for flour. Spoon the flour into the cup and level it off with a knife. This way, you avoid packing it down, which can lead to dense donuts.
For liquids, use a liquid measuring cup with markings. Pour the milk in until it reaches the right line.
Using room temperature ingredients helps too. If the egg and milk are at room temperature, they blend better. This leads to a smoother batter and fluffier donuts.
Step-by-Step Instructions
Preparation
1. First, preheat your oven to 350°F (175°C). This step is key to getting soft, fluffy donuts.
2. While the oven warms up, prepare your donut pan. Lightly grease it with non-stick spray or a bit of oil. This will help the donuts release easily later.
3. In a large mixing bowl, gather all the dry ingredients. Combine:
– 1 cup all-purpose flour
– 1/4 cup granulated sugar
– 1/4 cup packed brown sugar
– 1 teaspoon baking powder
– 1/2 teaspoon baking soda
– 1 teaspoon pumpkin pie spice
– 1/4 teaspoon salt
4. Whisk these dry ingredients until well mixed. This helps avoid lumps in the batter.
5. In a separate bowl, mix the wet ingredients. Blend together:
– 1/2 cup pumpkin puree
– 1/4 cup milk (dairy or non-dairy)
– 1/2 teaspoon vanilla extract
– 1 large egg
– 2 tablespoons melted butter or coconut oil
6. Stir these wet ingredients until you achieve a smooth, creamy mixture.
Combining Ingredients
1. Now, it’s time to combine the wet and dry ingredients. Pour the wet mix into the bowl of dry mix.
2. Stir gently. Be careful not to overmix. A few lumps are okay! Overmixing can lead to dense donuts, which we want to avoid.
3. The batter should have a thick but smooth consistency. This is the key to a good texture.
Baking Instructions
1. To fill the donut pan, use a piping bag or a zip-top bag with one corner cut off. Pipe the batter into each cavity, filling them about two-thirds full. This allows space for rising.
2. Place the filled pan in your preheated oven. Bake for about 10-12 minutes. The donuts are ready when they turn a light golden color.
3. To check for doneness, insert a toothpick into the center. If it comes out clean, your donuts are perfect!
4. Once baked, take the donut pan out of the oven. Let the donuts cool in the pan for about 5 minutes.
5. After this, gently press the donuts out of the pan and transfer them to a wire rack. Let them cool completely before serving.
Tips & Tricks
Baking Tips
To make fluffy and light donuts, use room temperature ingredients. Cold items can lead to dense donuts. Mix your dry ingredients well to avoid lumps. When combining wet and dry, stir gently. A few lumps are okay; overmixing is a common mistake.
Common mistakes to avoid include:
– Not measuring ingredients accurately.
– Using cold eggs or milk.
– Overbaking the donuts, which can dry them out.
Presentation Tips
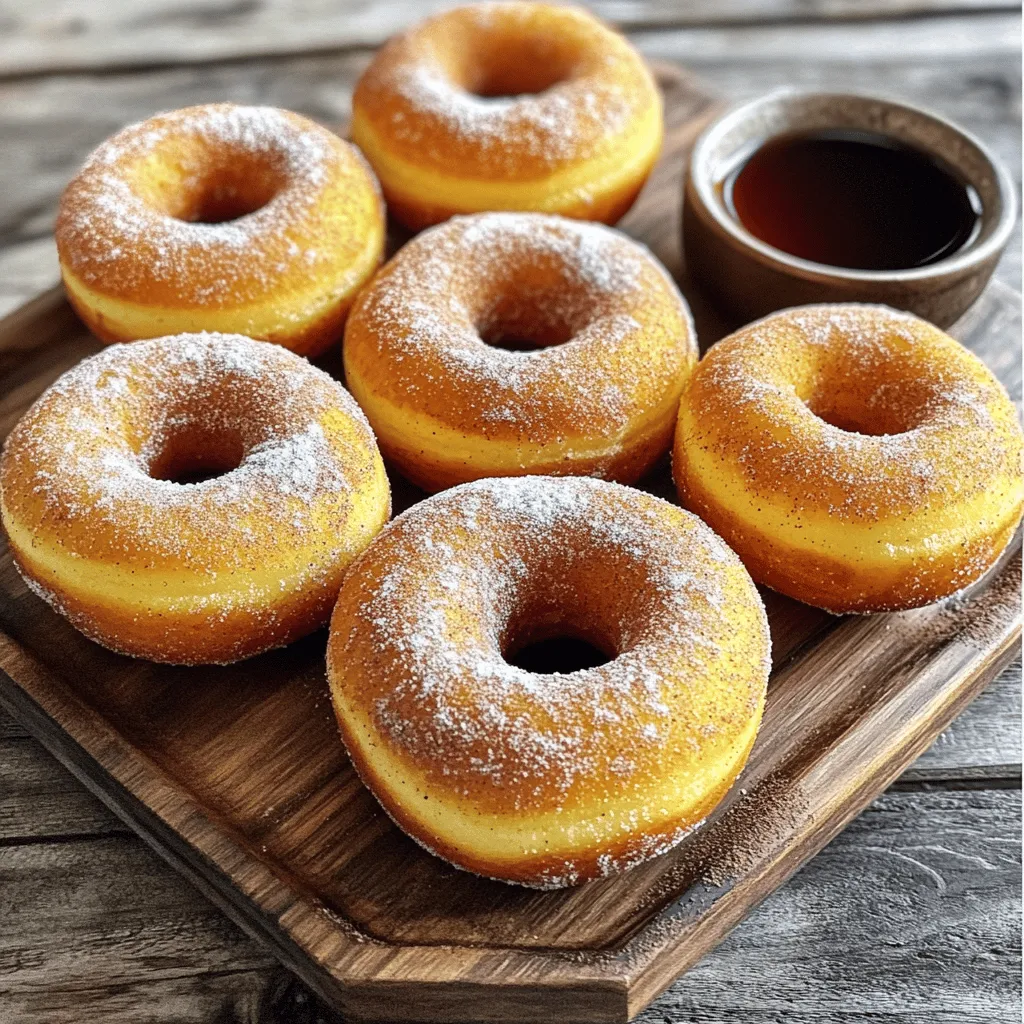
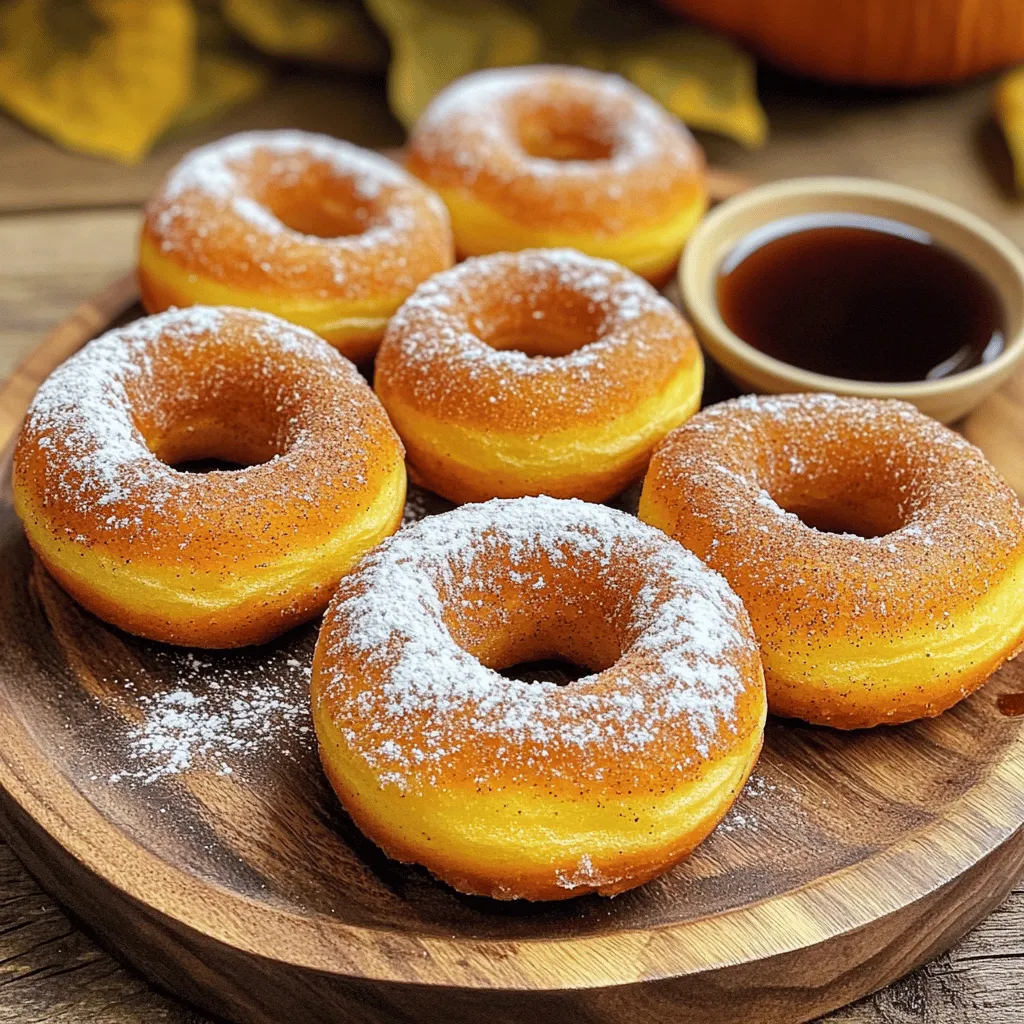
For a lovely finish, dust your cooled donuts with powdered sugar. You can also dip them in a mix of cinnamon and sugar. This adds flavor and a nice look. Arrange the donuts on a rustic wooden platter for charm.
Pair your donuts with a small bowl of warm maple syrup for dipping. A hot drink, like coffee or tea, makes a great match too. Enjoy!

Variations
Flavor Variations
You can enhance these donuts with fun flavors. Adding chocolate chips gives a sweet twist. I recommend about half a cup of mini chocolate chips. You can also add nuts like walnuts for a crunchy texture. Just fold them into the batter before you fill the donut pan.
If you want to skip pumpkin spice, try chai spice instead. Chai spice mixes well with the pumpkin flavor. It adds warmth and a unique taste. You can even combine both spices for a mixed flavor that excites your palate!
Health-Conscious Options
For a healthier version, you can reduce the sugar. Use only two tablespoons of granulated sugar. You can also swap the milk for almond or oat milk. Both options work great in this recipe.
If you want to make these donuts vegan, it’s easy! Use flaxseed meal mixed with water instead of an egg. Combine one tablespoon of flaxseed meal with three tablespoons of water. Let it sit for a few minutes until it thickens.
You can also replace the butter with coconut oil. This change keeps the flavor rich without dairy. These simple swaps make your donuts healthier while still tasty!
Storage Info
Short-Term Storage
To keep your Pumpkin Spice Baked Donuts fresh, store them in an airtight container. This will help prevent them from drying out. Place the donuts in a cool area, away from sunlight. They will stay fresh for about 2 to 3 days. If you want to keep them soft, add a slice of bread to the container. The bread will help maintain moisture.
Long-Term Storage
If you want to save some donuts for later, freezing works well. To freeze, wrap each donut tightly in plastic wrap. Then, place them in a freezer-safe bag. This method keeps them fresh for about 2 to 3 months. When you’re ready to eat them, take the donuts out and let them thaw at room temperature. For the best texture, warm them in the oven for a few minutes after thawing. This step will bring back their delightful taste and soft texture.
FAQs
Common Questions
How long do Pumpkin Spice Baked Donuts last?
Pumpkin Spice Baked Donuts stay fresh for 2 to 3 days at room temperature. Store them in an airtight container. For longer storage, place them in the fridge. They can last up to one week in the fridge.
Can I make the batter ahead of time?
Yes, you can prepare the batter ahead of time. Store it in the fridge for up to 24 hours. Just be sure to mix it gently before filling the donut pan. This helps keep the texture light and fluffy.
Troubleshooting
What to do if the donuts turn out dense or too dry?
If your donuts turn out dense, it may be due to overmixing the batter. Mix just until combined. If they are too dry, you can add a splash of milk to moisten them. Avoid adding too much liquid at once.
How to fix a batter that’s too runny or thick?
For a runny batter, add a bit more flour, one tablespoon at a time. If your batter is too thick, stir in a little milk until it reaches a smoother consistency. Aim for a thick, but pourable batter for perfect donuts.
Making Pumpkin Spice Baked Donuts is fun and easy. We covered all the key ingredients, tips for measuring, and step-by-step baking instructions. You learned how to store your donuts for the best taste and freshness.
Baking can be a little tricky, but these tips help ensure success. Try out the variations for your own twist. Remember, practice makes perfect. Enjoy your tasty treats!


![To make a Zesty Italian Pasta Salad, you need fresh and colorful ingredients. Here’s the complete list of ingredients you will need: - 2 cups rotini pasta - 1 cup cherry tomatoes, halved - 1 cup cucumber, diced - 1/2 cup black olives, sliced - 1/2 cup red bell pepper, chopped - 1/4 cup red onion, finely chopped - 1/2 cup mozzarella balls, halved - 1/3 cup Italian dressing - 1 tablespoon fresh basil, chopped - 1 teaspoon dried oregano - Salt and pepper to taste Each ingredient brings its own flavor and texture. The rotini pasta is fun and holds dressings well. Cherry tomatoes add sweetness, while cucumbers give a nice crunch. Black olives bring a salty bite, and bell peppers add color and freshness. Red onions add a bit of sharpness, while mozzarella balls provide creaminess. For the dressing, you can use store-bought or make your own. I love using fresh basil and oregano for a burst of flavor. Finally, season with salt and pepper to balance everything. You can find the full recipe [here]. Enjoy your cooking adventure! - Bring salted water to a boil. - Cook rotini pasta until al dente. - Drain and cool under cold water. Cooking the pasta is the first step. Use a large pot and fill it with water. Add a good amount of salt to the water. This step adds flavor to the pasta. Once the water boils, add the rotini pasta. Follow the package directions for cooking time until it is al dente. This means the pasta should be firm but cooked. After cooking, drain the pasta and rinse it under cold water. This stops the cooking process and cools the pasta quickly. - Combine cherry tomatoes, cucumber, olives, bell pepper, and onion. - Stir gently to mix. While the pasta cools, you can prepare the vegetables. Take a large bowl and add the halved cherry tomatoes, diced cucumber, sliced black olives, chopped red bell pepper, and finely chopped red onion. Each vegetable brings its own flavor and texture to the salad. Stir gently to mix them without squishing the tomatoes. This colorful mix will make your salad bright and fun! - Add cooled pasta to the vegetable mix. - Incorporate mozzarella balls. - Drizzle with dressing and seasonings. Once the pasta is cool, add it to the bowl with the mixed vegetables. Next, add halved mozzarella balls. These little cheese bites add creaminess. Now, drizzle the Italian dressing over the pasta and vegetables. Don't forget to sprinkle the fresh basil, dried oregano, salt, and pepper. These seasonings will enhance the flavors. - Toss ingredients to combine. - Refrigerate for at least 30 minutes. Now, it is time to mix everything. Toss all the ingredients together carefully. You want every part to be coated with dressing. Cover the bowl with a lid or plastic wrap. Place it in the fridge for at least 30 minutes. Chilling the salad helps the flavors blend well. Trust me, the wait is worth it! To get the best taste from your Zesty Italian Pasta Salad, choose a good Italian dressing. Brands like Annie's or Ken's work well. Don't use too much dressing at first; you can always add more later. Always taste as you go. A little salt and pepper can boost the flavor. Remember, it's easy to add, but hard to take away. Serving your pasta salad is just as fun as making it! You can use a large bowl for a family-style meal. This makes it easy for everyone to help themselves. For a more stylish look, you can serve it in small bowls. This way, each guest gets their own. A sprinkle of fresh basil on top adds a nice touch. It makes the dish look bright and tasty! One common mistake is overcooking the pasta. Make sure to cook it just until it's al dente. This keeps your pasta from getting mushy. Another mistake is not chilling the salad. Chilling helps the flavors blend well. If you skip this step, your salad may not taste as good. Aim to chill it for at least 30 minutes before serving. For the full recipe, check out the Zesty Italian Pasta Salad section. {{image_4}} You can easily adapt this salad to fit different diets. For a gluten-free option, use gluten-free rotini pasta. It cooks just like regular pasta. Many brands make great options now. For a vegan twist, swap the mozzarella cheese with vegan cheese or even avocado. Both add creaminess and flavor to your dish. Want to make this salad more filling? Add some protein! Grilled chicken works great. Just chop it into bite-sized pieces. Shrimp is another tasty choice. Cook it until pink and toss it in. For a plant-based option, chickpeas are perfect. They add a nice texture. When you add protein, taste your salad again. You may need to adjust the seasoning. Just add a pinch of salt or a dash of dressing. Using seasonal veggies can elevate your pasta salad. In summer, add fresh zucchini or bell peppers. They bring a nice crunch and color. In fall, roasted butternut squash can add sweet notes. You can also switch up the dressing. Try a balsamic vinaigrette for a tangy twist. This keeps your salad exciting and fresh year-round. To store your zesty Italian pasta salad, use airtight containers. Glass or plastic containers work well. Make sure the lid seals tightly to keep air out. This helps maintain freshness. For best results, store the salad in the fridge within two hours of serving. You can freeze pasta salad, but it might change texture. To freeze, place it in a freezer-safe container. Label the container with the date. When ready to eat, thaw it in the fridge overnight. Reheat gently on the stove or in the microwave. Be careful not to overcook it again. In the fridge, your pasta salad lasts about three to five days. Keep an eye out for signs of spoilage. If it has an off smell, or if the vegetables look mushy, it’s best to toss it. Trust your senses; they guide you well in the kitchen. You can make Zesty Italian Pasta Salad a day before serving. Cook the pasta, mix it with the veggies, and add the dressing. Store it in the fridge. Chilling helps the flavors blend well. Just give it a good toss before serving. This makes it a great option for parties. Yes, you can customize the ingredients to fit your taste. Try adding different vegetables like bell peppers or zucchini. You can also swap out mozzarella for feta or add beans for protein. Get creative! Make it your own. Italian Pasta Salad pairs well with grilled meats, like chicken or steak. It also goes nicely with crusty bread or a fresh green salad. For a fun twist, serve it with garlic bread for a complete meal. No, it's not safe to leave pasta salad out for long. The safe time is about two hours. After that, bacteria can grow, making it unsafe to eat. Keep it chilled if you are not serving it right away. Absolutely! Homemade Italian dressing adds a personal touch. You can control the flavors and ingredients. Mix olive oil, vinegar, herbs, and spices to create your blend. This makes the salad even more special. For the full recipe, check out the section above! This Zesty Italian Pasta Salad is a bright and tasty dish. It combines fresh veggies, pasta, and cheese. Each bite is full of flavor. Here’s a quick look at what you need and how to make it. - 2 cups rotini pasta - 1 cup cherry tomatoes, halved - 1 cup cucumber, diced - 1/2 cup black olives, sliced - 1/2 cup red bell pepper, chopped - 1/4 cup red onion, finely chopped - 1/2 cup mozzarella balls, halved - 1/3 cup Italian dressing (store-bought or homemade) - 1 tablespoon fresh basil, chopped - 1 teaspoon dried oregano - Salt and pepper to taste First, cook the rotini pasta in salted boiling water. Follow the package instructions for best results. Drain and cool the pasta under cold water. This stops the cooking and keeps it firm. While the pasta cools, chop the veggies. Use a large bowl for the cherry tomatoes, cucumber, black olives, red bell pepper, and red onion. Stir them gently to mix. Next, add the cooled pasta to the veggies. Toss in the mozzarella balls, making sure they spread evenly. Now, drizzle the Italian dressing over the mix. Add the chopped basil, dried oregano, and a sprinkle of salt and pepper. Toss everything together until well coated. Finally, cover the bowl and chill in the fridge for at least 30 minutes. This step helps all the flavors blend nicely. Serve the pasta salad in a large bowl. You can also use individual bowls for a fun touch. Garnish with extra basil leaves for color. Enjoy this tasty dish at picnics or family meals! This blog post detailed how to make a zesty Italian pasta salad. We reviewed all the ingredients, cooking steps, and tips for the best flavor. You learned how to store leftovers and variations to suit your diet. Remember to chill the salad and avoid overcooking the pasta. With these tips, you can impress friends and family with this easy dish. Enjoy creating your own version of this refreshing salad!](https://fastmealmate.com/wp-content/uploads/2025/06/c8b502a6-31c8-41d1-a3bc-a403a8dd39f3-768x768.webp)


![- 1 cup Biscoff cookie spread - 2 cups whole milk - 1 cup heavy cream - 1/2 cup granulated sugar - 1/4 cup cornstarch - 1 teaspoon vanilla extract - 1/8 teaspoon salt - 3 ripe bananas, sliced - 1 cup crushed Biscoff cookies (for layering and garnish) - Whipped cream (optional, for topping) The Biscoff banana pudding is a treat, but it comes with calories. Each serving has about 350 calories. It has sugar and fat from the cookies and cream. If you want to reduce calories, you can use less sugar or lighter cream. You can also switch to a non-dairy milk for a vegan option. This dessert has a good mix of flavors and textures. You get the creaminess from the pudding and the crunch from the cookies. - Mix Dry Ingredients: In a medium saucepan, combine 1/2 cup granulated sugar, 1/4 cup cornstarch, and 1/8 teaspoon salt. Whisk them until there are no lumps. - Add Milk and Cook Mixture: Slowly pour in 2 cups of whole milk while whisking. This helps to avoid clumps in your pudding. Place the saucepan on medium heat and stir constantly. Cook until the mixture thickens and bubbles, about 5 to 7 minutes. - Incorporate Flavors: Once thickened, remove the saucepan from heat. Stir in 1 teaspoon vanilla extract and 1 cup of Biscoff cookie spread. Mix well until everything is smooth and combined. - Whip the Cream: In a separate bowl, whip 1 cup of heavy cream using an electric mixer. Beat until soft peaks form. Make sure it holds shape but is not too stiff. - Combine with Biscoff Mixture: Gently fold the whipped cream into the Biscoff mixture. Use a spatula and be gentle to keep the airy texture. - Layer the Dessert: In a large dish or individual cups, lay down sliced bananas. Then, spoon a layer of the Biscoff pudding over the bananas. - Add Crushed Cookies: Sprinkle a layer of crushed Biscoff cookies on the pudding. Repeat the layers with the remaining ingredients. Ensure the top layer is the Biscoff pudding. - Finishing Touches: For a nice look, pipe or dollop whipped cream on top. Garnish with extra crushed Biscoff cookies. - Chill the Dessert: Cover the dessert and place it in the fridge for at least 4 hours, or overnight. This helps all the flavors blend together. For the complete recipe, check the [Full Recipe]. Enjoy your cooking! To get the right whipped cream consistency, start with cold heavy cream. Use a clean bowl and beaters for the best results. Whip at medium speed until soft peaks form. This means the cream should hold its shape but still be smooth. Avoid over-whipping, as this can turn it into butter. To prevent lumps in the pudding, whisk the dry ingredients well before adding milk. Pour in the milk slowly while stirring. This helps mix everything evenly. Keep stirring as you cook the mixture over medium heat. This ensures a smooth pudding without any lumps. For the best presentation, use clear glasses or bowls. This shows off the lovely layers of bananas, creamy pudding, and crunchy cookies. You can also add a banana slice or a whole Biscoff cookie on top for a nice touch. This makes each serving look even more inviting. For garnishing ideas, sprinkle extra crushed Biscoff cookies on top. A dollop of whipped cream adds a nice finishing touch. You can also drizzle some melted Biscoff cookie spread over the top for added flavor and flair. The best time to prepare this dessert is a day ahead. This gives the flavors time to blend well. The pudding needs at least 4 hours in the fridge, but overnight is even better. This chilling time lets the pudding set perfectly. For optimal flavor, chill the dessert for at least 4 hours. This helps all the elements come together. The longer you chill, the more delicious it gets! Enjoy your Biscoff banana pudding after the wait; it will be worth it. {{image_4}} You can make this dessert even more fun by adding chocolate layers. Just mix cocoa powder into the Biscoff pudding. This mix creates a rich, sweet flavor. You can also use chocolate pudding as a layer. The blend of chocolate and Biscoff is a match made in dessert heaven. You can easily make a vegan version of Biscoff banana pudding. Use almond milk or coconut milk instead of whole milk. For the cream, try coconut cream. You can replace granulated sugar with maple syrup or agave. These swaps keep the taste yummy while being plant-based. If you need a gluten-free option, use gluten-free cookies. Look for brands that make gluten-free Biscoff-style cookies. Ensure that all other ingredients are gluten-free. This way, everyone can enjoy this delightful dessert without worry. To keep your Biscoff banana pudding fresh, store leftovers in the fridge. Use an airtight container to prevent air and moisture from spoiling it. If you don’t have one, cover the dish tightly with plastic wrap. This keeps the pudding creamy and tasty. In the fridge, this pudding lasts about 3 to 5 days. After that, it may lose its texture and flavor. Always check for any signs of spoilage before enjoying it again. If it smells off or looks strange, it’s best to toss it. Yes, you can freeze this pudding! To freeze, spoon it into a freezer-safe container, leaving room for expansion. Cover tightly with a lid or plastic wrap. When you're ready to eat, thaw in the fridge overnight. Avoid refreezing once thawed, as it may change the texture. Enjoy your creamy treat! For the full recipe, check out the Biscoff banana pudding delight. Can I use other nut butters instead of Biscoff? You can try using almond or peanut butter. However, Biscoff has a unique flavor. It adds a sweet, spiced taste. This makes it hard to replicate. Use other nut butters if you prefer them. The result will be different but still tasty. How do I know when the pudding mixture is thick enough? Stir the mixture while it cooks. It will start to bubble and thicken. When it coats the back of a spoon, it's ready. If it drips off the spoon slowly, you've got the right texture. This usually takes about 5-7 minutes. Can I make this dessert ahead of time? Yes, you can make it a day in advance. It tastes better when the flavors blend. Just cover it well and chill it in the fridge. This way, you save time and enjoy a delicious dessert. Can I use low-fat milk? Low-fat milk works, but it changes the creaminess. The pudding may be less rich. If you choose this option, consider adding a little extra whipped cream for texture. What if I don't have cornstarch? You can use flour as a substitute. It will work to thicken the pudding. Use about twice the amount of flour. Just remember, it might slightly change the taste. What can I pair with Biscoff banana pudding? This dessert pairs well with fresh fruit. Try berries or slices of mango. It also goes great with coffee or tea. The flavors balance nicely. Is it suitable for special occasions? Absolutely! Biscoff banana pudding is perfect for parties. Its layers look stunning in clear cups. Everyone loves a sweet and creamy dessert like this. It's a showstopper that impresses guests! This blog post covered how to make a delicious Biscoff banana pudding. We explored key ingredients and discussed the preparation and assembly steps to perfect the dish. I shared tips for achieving the best texture and serving suggestions to impress guests. You also learned about variations for diet needs and how to store leftovers safely. Enjoying this pudding can bring joy to many occasions. With the right ingredients and care, you can make this treat a family favorite.](https://fastmealmate.com/wp-content/uploads/2025/05/85e9a37f-c50b-46e1-af24-a41950287baa-768x768.webp)