Pumpkin Pecan Pie Bars Flavorful and Simple Delight

Get ready to bring autumn to your kitchen with my Pumpkin Pecan Pie Bars! These bars blend the creamy sweetness of pumpkin with the crunch of pecans in a simple and satisfying dessert. Plus, they are easy to make and perfect for gatherings or cozy nights at home. Join me as we explore the ingredients, steps, and tips to create this flavorful delight that everyone will love!
Ingredients
List of Ingredients
– 1 ½ cups all-purpose flour
– ½ cup packed brown sugar
– ½ teaspoon salt
– ¾ cup unsalted butter, melted and slightly cooled
– 1 cup pumpkin puree (canned or fresh)
– 1 cup sweetened condensed milk
– 2 large eggs
– 1 teaspoon vanilla extract
– 1 teaspoon ground cinnamon
– ½ teaspoon ground nutmeg
– ½ teaspoon ground ginger
– 1 cup chopped pecans
– Extra pecan halves for decorative topping
When making pumpkin pecan pie bars, each ingredient plays an important role. The all-purpose flour creates a solid crust that holds everything together. Brown sugar adds sweetness and a hint of caramel flavor. The salt balances the sweetness, making each bite more enjoyable.
Melted butter gives the crust a rich taste. You can use canned or fresh pumpkin puree. Both options work well, but canned is quicker. Sweetened condensed milk makes the filling creamy and sweet. The eggs help bind the filling and give it a smooth texture.
Vanilla extract adds depth to the flavors. Ground cinnamon, nutmeg, and ginger bring warmth and spice to the bars. Chopped pecans add a nice crunch and nutty taste. The extra pecan halves on top make for a beautiful finish.
Each ingredient combines to form a tasty treat.
Step-by-Step Instructions
Prepping the Oven and Dish
– Preheat your oven to 350°F (175°C).
– Lightly grease a 9×13 inch baking dish with butter or cooking spray.
Making the Crust
– In a medium bowl, combine 1 ½ cups of all-purpose flour, ½ cup of packed brown sugar, and ½ teaspoon of salt.
– Pour in ¾ cup of melted butter and mix. Use a fork or your fingers until it looks like coarse crumbs.
Preparing the Filling
– In a large bowl, whisk together 1 cup of pumpkin puree and 1 cup of sweetened condensed milk.
– Add in 2 large eggs and 1 teaspoon of vanilla extract. Beat until the mixture is smooth.
Final Assembly and Baking
– Stir in 1 teaspoon of ground cinnamon, ½ teaspoon of ground nutmeg, and ½ teaspoon of ground ginger.
– Gently fold in 1 cup of chopped pecans.
– Pour the filling over the cooled crust. Smooth it with a spatula.
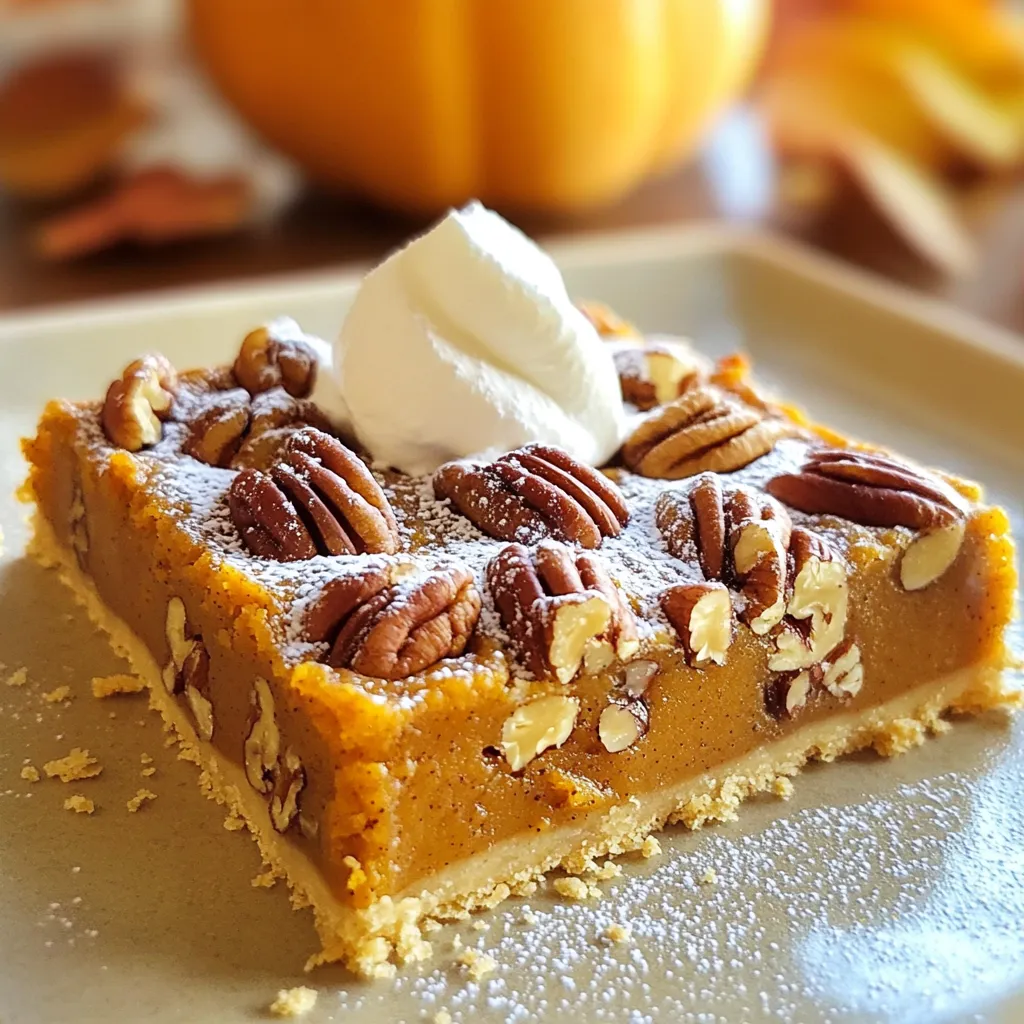
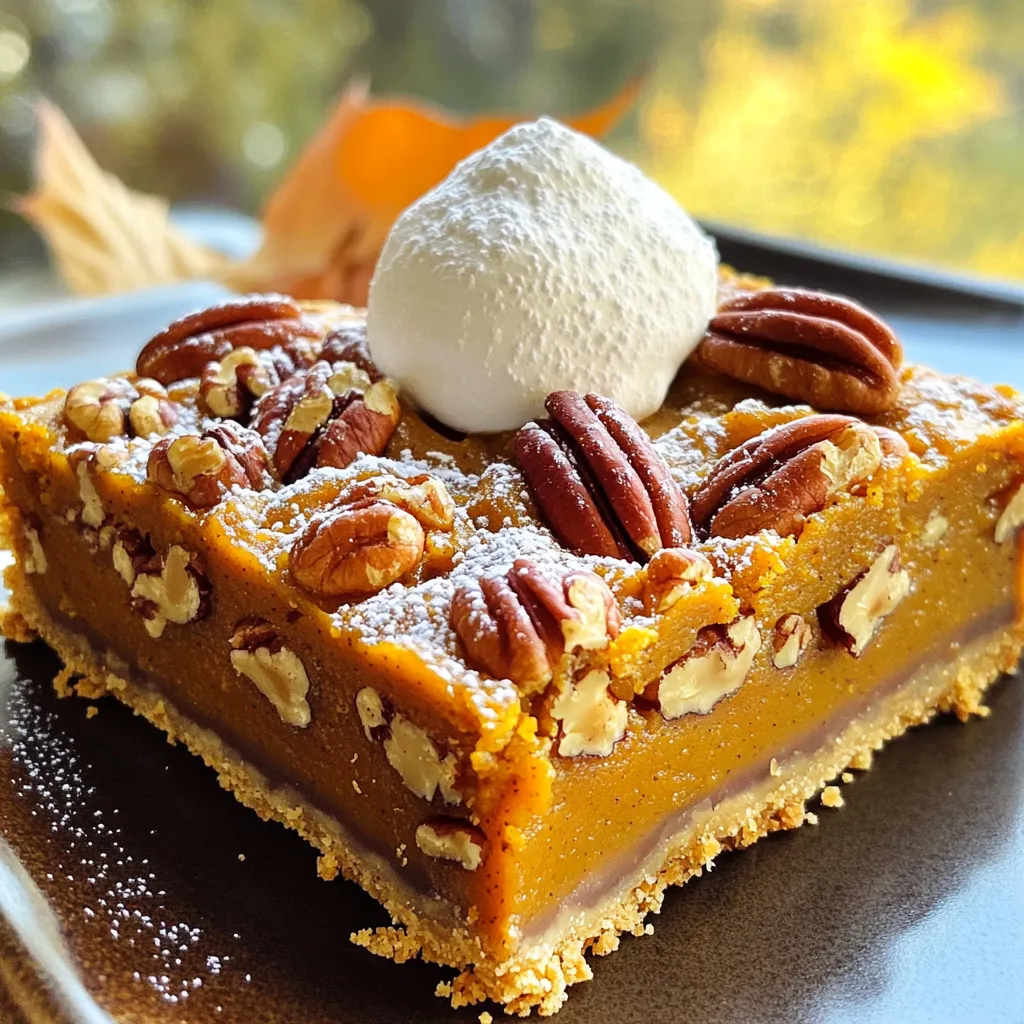
– Add extra pecan halves on top, pressing them gently into the filling.
– Bake for 25-30 minutes. The filling should be set. A toothpick inserted in the center should come out clean.
– Let the pumpkin pecan bars cool completely in the dish. Then, cut them into squares for serving.
Tips & Tricks
Perfecting the Crust
To make a great crust, mix your flour, brown sugar, and salt well. This helps make it smooth. Use cold butter for a flaky texture. Cold butter keeps the crust crunchy. If you use melted butter, the crust can become too soft. So, choose wisely!
Flavor Enhancements
To boost flavor, add more spices. Try a pinch of cloves or allspice. These extra spices can make your bars even tastier. For toppings, pair the bars with a drizzle of caramel or a sprinkle of sea salt. The mix of sweet and salty can be amazing!
Serving Suggestions
For garnishes, think of a dusting of powdered sugar. You can also top with whipped cream or ice cream. These add a rich touch. As for drinks, a warm cup of chai or a spiced cider works well. They complement the flavors of pumpkin and pecans beautifully.

Variations
Gluten-Free Options
You can easily make pumpkin pecan pie bars gluten-free. Just swap out the all-purpose flour for gluten-free flour. Options include almond flour, coconut flour, or a gluten-free all-purpose blend. Each type gives a unique taste and texture. Almond flour adds a nutty flavor, while coconut flour absorbs more moisture. When using gluten-free flour, adjust the liquid in the recipe. This helps keep the bars moist.
Nut-Free Alternatives
If you need nut-free options, replace the pecans with seeds. Sunflower seeds work well and add a nice crunch. Pumpkin seeds are another great choice. They give a slight earthiness that complements the pumpkin. You can also use chocolate chips for a sweet twist. These swaps keep the bars tasty while being safe for those with nut allergies.
Flavor Variations
You can add fun flavors to your pumpkin pecan pie bars. Try mixing in chocolate chips for a rich, sweet bite. Dark chocolate or milk chocolate both work great. Caramel can also enhance the flavor. Drizzle it over the top before baking, or swirl it into the filling. This adds a gooey texture that pairs well with the pumpkin. With these variations, you can make your bars unique and exciting.
Storage Info
Proper Storage Techniques
To keep your pumpkin pecan pie bars fresh, store them right. After cooling, cut the bars into squares. Place them in an airtight container. Separate layers with parchment paper to avoid sticking.
For refrigerating, keep the container in the fridge. This method helps maintain flavor and texture. If you want to freeze, wrap each bar in plastic wrap. Then, place them in a freezer-safe bag. This keeps them fresh for a long time.
Shelf Life
In the fridge, these bars last about five days. You may notice changes in texture and flavor after this time.
Look for signs of spoilage. If you see mold or smell something off, it’s best to toss them. Freshness is key for the best taste.
FAQs
Can I make these bars ahead of time?
Yes, you can make these bars ahead of time. They store well in the fridge. After baking, let them cool completely. Then, cover the dish with plastic wrap or foil. If you want, you can cut them into squares before storing. These bars taste even better after a day in the fridge. The flavors meld together nicely.
How do I know when the bars are done?
You can tell the bars are done by looking at the filling. It should be set and not jiggly. Insert a toothpick into the center. If it comes out clean, the bars are ready. The edges may look slightly golden, too. This means the crust and filling are cooked through.
Can I use fresh pumpkin instead of canned?
Yes, you can use fresh pumpkin. Fresh pumpkin gives a bright, bold taste. To use fresh pumpkin, start by roasting it. Cut the pumpkin in half and scoop out the seeds. Bake it in the oven until soft. Then, mash it or blend it until smooth. Use this fresh puree in your recipe like you would canned pumpkin. It adds a nice touch and is very rewarding.
In this blog post, I covered how to make delicious pumpkin bars. We discussed the key ingredients like flour, pumpkin puree, and spices. I shared step-by-step instructions, along with useful tips to perfect your bars. Remember that variations are easy, whether you want gluten-free options or extra flavors. Proper storage is also key to keeping your bars fresh. Enjoy trying this recipe with your friends and family. Simple steps can lead to amazing treats that bring joy!


![- 3 medium zucchinis, thinly sliced - 1 cup corn kernels (fresh, frozen, or canned) - 1 cup cherry tomatoes, halved - 1 cup shredded cheddar cheese - 1 cup shredded Monterey Jack cheese - 1 medium onion, diced - 2 cloves garlic, minced - 3 large eggs - 1 cup milk (dairy or non-dairy) - 1 teaspoon dried oregano - 1 teaspoon paprika - Salt and black pepper to taste - Olive oil for greasing In this recipe, zucchini shines as the main ingredient. It adds a fresh taste and soft texture. The Monterey Jack cheese provides a creamy melt that perfectly blends with the other veggies. I love how the corn adds a sweet crunch, while the tomatoes burst with juiciness. - 1 cup cooked quinoa or rice (for added texture, optional) - Different cheese options like feta or gouda If you want to add more texture, quinoa or rice works great. They make the dish heartier and more filling. You can also switch out the cheese. Try feta for a tangy kick or gouda for a smoky flavor. Each option adds something unique to the casserole. - Dairy-free alternatives using almond or oat milk - Gluten-free options with quinoa instead of rice You can easily adapt this dish for different diets. For dairy-free options, use almond or oat milk and dairy-free cheese. If you need it to be gluten-free, just swap rice for quinoa. This way, everyone can enjoy this yummy meal without worry! 1. Preheat the oven and grease the dish: Start by setting your oven to 375°F (190°C). This step is key to ensure even baking. Use olive oil to grease a 9x13 inch casserole dish. This helps the casserole come out easily after baking. 2. Sautéing garlic and onion: In a large skillet, pour a tablespoon of olive oil. Heat it over medium heat. Once hot, add the diced onion and minced garlic. Sauté them for about 5 minutes. You want the onion to be soft and clear. 1. Combining vegetables and seasonings: In a big mixing bowl, add the sliced zucchini, corn, and halved cherry tomatoes. Toss in the sautéed onion and garlic. If you are using quinoa or rice, add it now. Sprinkle in the dried oregano, paprika, salt, and black pepper. Mix everything well. This ensures all flavors blend nicely. 2. Preparing the egg and cheese mixture: In another bowl, whisk together the eggs and milk until smooth. Then, fold in half of the shredded cheddar and Monterey Jack cheese. This will make the egg mix creamy and rich. 1. Layering the ingredients: Pour half of the veggie mix into the greased dish. Next, take half of the egg and cheese mixture and pour it over the veggies. Repeat with the rest of the vegetable and egg mixtures. This layering builds great flavor. 2. Adding cheese on top: Finish by sprinkling the remaining cheddar and Monterey Jack cheese on top. This creates a cheesy crust that everyone will love. Now, your casserole is ready to bake. For the full recipe, check out the details provided earlier. To avoid sogginess in your Easy Zucchini Jack Casserole, make sure to salt the zucchini first. This draws out excess water. Let it sit for about 10 minutes, then pat it dry with a paper towel. This simple step helps keep the casserole firm. Adjusting the cooking time is important too. If you add more vegetables or grains, the casserole may need extra time in the oven. Keep an eye on it. Look for a golden top and a firm center as signs that it’s done. If you want to swap the cheese, consider using feta or goat cheese. Both add a unique flavor. You can also try vegan cheese for a dairy-free version. For vegetable variations, you can add bell peppers or spinach. These options add color and nutrients to your dish. Don't be afraid to mix and match your favorite veggies! Garnishing your casserole can make it pop. Fresh herbs like basil or parsley add color and flavor. You can add a sprinkle of red pepper flakes for a bit of heat. Pair your casserole with a fresh side salad. This adds crunch and balances the meal. A simple green salad or coleslaw works great. For something heartier, serve it with crusty bread or garlic knots. For the full recipe, check out the [Full Recipe]. {{image_4}} You can easily make this casserole vegetarian or vegan. For vegetarians, just keep the eggs and dairy. If you want a vegan dish, replace the eggs with flaxseed meal or a chia seed mix. Mix 1 tablespoon of flaxseed meal or chia seeds with 2.5 tablespoons of water. Let it sit for 5 minutes to thicken before adding it to your mix. Adding plant-based proteins is also a great idea. Consider using lentils or chickpeas. They boost protein and add texture to your casserole. You can mix them with the veggies before baking. Cheese lovers can experiment with flavors. Instead of Monterey Jack, use sharp cheddar or spicy pepper jack. They add a nice kick to your dish. You can also explore other melting cheeses like Gouda or Gruyère. Each cheese gives the casserole a unique taste. Just make sure to mix and match to find your favorite combo. To elevate the flavor, add spices and herbs. Consider garlic powder, cumin, or basil. These give your casserole a nice twist. You can also incorporate proteins like chicken or beans. Shredded chicken adds heartiness, while black beans provide fiber. Mix them in with the veggies for a satisfying meal. For the full recipe, check out the [Full Recipe]. After you make your Easy Zucchini Jack Casserole, let it cool completely. Place it in an airtight container or cover it with plastic wrap. Store it in the fridge for up to 3-5 days. When reheating, use the oven for the best results. Preheat the oven to 350°F (175°C) and heat for about 15-20 minutes. This will keep it warm and tasty. If you want to keep the casserole longer, freezing is a great option. First, let it cool completely. Cut it into portions and wrap each piece tightly in plastic wrap. Then, place the wrapped pieces in a freezer-safe bag or container. This will help keep the flavors fresh. You can freeze it for up to 2-3 months. To thaw, move it to the fridge overnight. Reheat in the oven the same way, at 350°F (175°C) for 15-20 minutes. In the fridge, your casserole lasts for about 3-5 days. Look for signs of spoilage before eating. If you see any mold or smell something off, it’s best to toss it. A fresh casserole should smell cheesy and inviting. If it looks dry or hard, it may be time to say goodbye. Enjoy your casserole while it tastes its best! You can find the full recipe to make it again later. To make this casserole, start by preheating your oven to 375°F (190°C). Grease a 9x13 inch dish with olive oil. Next, sauté diced onion and minced garlic in olive oil until soft. In a large bowl, mix sliced zucchini, corn, cherry tomatoes, and the sautéed onion and garlic. If you want, add cooked quinoa or rice. Sprinkle in dried oregano, paprika, salt, and pepper, and mix well. In another bowl, whisk together eggs and milk. Fold in half of the shredded cheddar and Monterey jack cheese. In your greased dish, layer half the veggie mix, then pour on half the egg mixture. Repeat these layers with the remaining ingredients. Top with the rest of the cheese. Bake for 35-40 minutes until golden brown and set. Let it cool for 5-10 minutes before serving. You can find the full recipe details above. Yes, you can prepare the casserole ahead of time. Simply assemble it up to the baking step. Cover it with plastic wrap or foil and store it in the fridge overnight. When you are ready to eat, just bake it straight from the fridge. You may need to add a few extra minutes to the baking time. If you want to store leftovers, allow the casserole to cool completely. Then, cover it and keep it in the fridge for up to 3 days. To reheat, pop it back in the oven at 350°F (175°C) until warmed through. This casserole pairs well with a variety of side dishes. A fresh garden salad adds a nice crunch. You might also serve it with garlic bread or a simple pasta dish. If you want something heartier, consider grilled chicken or roasted veggies. For a fun twist, try serving it with salsa or hot sauce for some extra flavor. Feel free to mix and match sides to fit your meal! In this post, we explored the easy way to make a tasty Zucchini Jack Casserole. You learned about key ingredients, step-by-step instructions, and helpful tips to ensure success. We also shared ideas for dietary needs and creative variations. Remember, cooking is fun and allows you to experiment. Enjoy making this dish your own and sharing it with loved ones. Happy cooking!](https://fastmealmate.com/wp-content/uploads/2025/07/8604bb3f-9fea-4d3d-b4ff-32cbded89348-768x768.webp)

