Pepperoni Mozzarella Croissant Rolls Tasty Snack Idea

Looking for a quick and tasty snack? Try these Pepperoni Mozzarella Croissant Rolls! With just a few simple ingredients, including crescent dough and tasty pepperoni, you can whip up a delicious treat in no time. Whether you need a game day appetizer or an after-school bite, these rolls are sure to impress. Let’s dive into the recipe and make snack time a hit!
Why I Love This Recipe
- Easy to Make: This recipe uses refrigerated crescent roll dough, making it a quick and simple option for delicious snacks or appetizers.
- Perfect for Parties: These croissant rolls are a crowd-pleaser, combining classic pizza flavors that everyone loves.
- Customizable: You can easily modify the filling ingredients to suit your taste, adding veggies or different cheeses.
- Deliciously Dippable: Serving with marinara sauce adds an extra layer of flavor, making these rolls even more enjoyable.
Ingredients
Main Ingredients
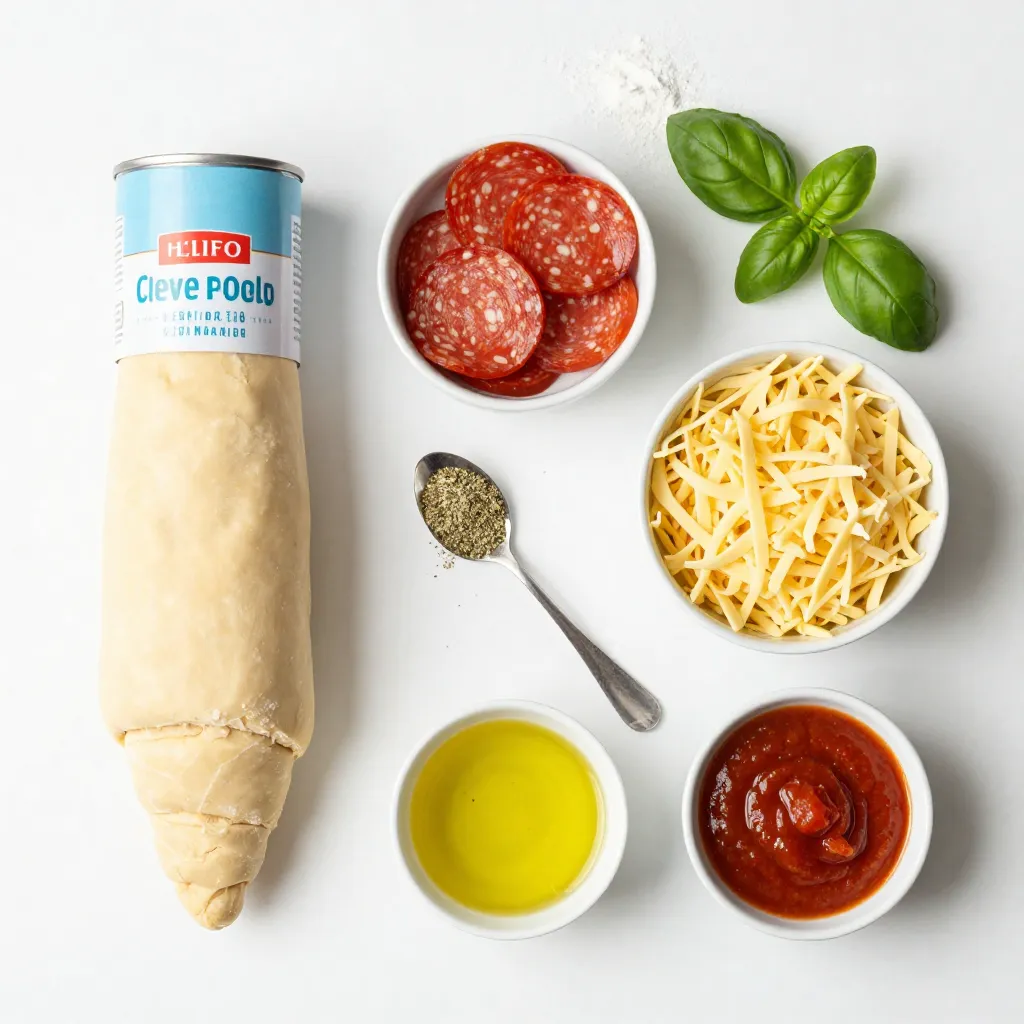
– 1 can of refrigerated crescent roll dough
– 1 cup sliced pepperoni
– 1 cup shredded mozzarella cheese
Seasoning and Preparation
– 1 teaspoon Italian seasoning
– 1 tablespoon olive oil
– Marinara sauce for dipping (optional)
– Fresh basil leaves for garnish (optional)
The main ingredients for Pepperoni Mozzarella Croissant Rolls are simple yet tasty. First, you need the refrigerated crescent roll dough. This dough makes the rolls fluffy and flaky. Then, grab one cup of sliced pepperoni. This adds a nice, spicy flavor. You will also need one cup of shredded mozzarella cheese. This cheese melts perfectly and makes everything gooey and delicious.
For seasoning, I add one teaspoon of Italian seasoning. This blend brings out a wonderful taste. A tablespoon of olive oil is great for brushing on the rolls. It helps them turn golden brown and shiny. You can serve these rolls with marinara sauce for dipping, which adds extra flavor. If you want, sprinkle some fresh basil leaves on top for color and a fresh taste.
These ingredients together create a delightful snack. They’re perfect for parties or a cozy night in.

Step-by-Step Instructions
Preheat and Prepare
– Preheat oven to 375°F (190°C).
– Line baking sheet with parchment paper.
Prepare the Dough
– Unroll and separate the crescent roll dough.
Mix the Cheese Filling
– Combine mozzarella and Italian seasoning in a bowl.
Assemble, Roll Up, and Bake
– Take a triangle of dough and place a pepperoni slice at the base.
– Add a tablespoon of the cheese mixture on top.
– Roll tightly from the wide end to the pointed end.
– Place the rolled croissants on the baking sheet.
– Brush each roll with olive oil for a golden finish.
– Bake for 12-15 minutes until puffed and golden brown.
– Let cool for a couple of minutes before serving.
– Serve with marinara sauce for dipping and garnish with basil leaves.
Tips & Tricks
Perfecting the Rolls
– Make sure to spread the filling evenly. This helps each bite taste great.
– Use fresh ingredients for the best flavor. Fresh mozzarella and pepperoni shine in this dish.
Baking Tips
– Watch the baking time closely. You want the rolls to be golden brown.
– Adjust the oven rack to the center. This helps the rolls cook evenly.
Serving Suggestions
– Serve the rolls warm with marinara sauce. It adds a tasty touch.
– Drizzle a bit of olive oil over the rolls for a nice look. It also adds flavor.
These tips will help you make Pepperoni Mozzarella Croissant Rolls that are sure to impress!
Pro Tips
- Use Fresh Ingredients: For the best flavor, opt for fresh mozzarella cheese instead of pre-shredded. It melts beautifully and enhances the overall taste.
- Experiment with Fillings: Feel free to customize your croissants with additional ingredients like sliced olives, bell peppers, or even a sprinkle of Parmesan cheese for added depth.
- Check for Doneness: Ovens can vary, so keep an eye on your croissants. They should be golden brown and puffed up; if they seem pale, give them an extra minute or two.
- Storage Tips: If you have leftovers, store them in an airtight container in the fridge. Reheat in the oven for a few minutes to restore their crispiness.
Variations
Cheese Variations
You can switch mozzarella with cheddar or provolone. Each cheese gives a new flavor. You can also add cream cheese. This makes the filling richer and creamier.
Add-ins
Want to mix it up? You can add vegetables like bell peppers or olives. They add crunch and color. You can also try cold cuts, like salami or ham. These add a new taste to each bite.
Seasoning Variations
For a fresh twist, try different herbs. Oregano or rosemary work well. They add a nice aroma. You can also sprinkle garlic powder for extra flavor. This small change can make a big difference in taste.
Storage Info
Refrigeration
Store any leftover croissant rolls in an airtight container. This keeps them fresh. Consume within 2-3 days for the best taste. After that, they may lose their crunch and flavor.
Freezing
You can freeze uncooked rolls before baking. This gives you a quick meal option later. Make sure to wrap them properly. Use plastic wrap or foil to avoid freezer burn, so they stay tasty.
Reheating
To reheat, the oven works best. It keeps the rolls nice and crispy. Preheat your oven to 350°F (175°C) and bake for 5-7 minutes. You can also use the microwave for a quick option, but they may not stay as crisp. Enjoy your tasty snack!
FAQs
Can I make these croissant rolls ahead of time?
Yes, you can prepare and refrigerate the assembled rolls before baking. This makes it easy to have a quick snack ready. Just take them out and bake when you want to enjoy them.
What can I substitute for crescent roll dough?
Puff pastry or pizza dough can work in place of crescent roll dough. Both options will give you a nice texture and flavor. Choose what you have on hand or what you like best.
How do I know when the croissants are done?
Look for a puffed appearance and a golden-brown color. This means they are ready to take out. The perfect croissant should be fluffy and light, with a lovely crispy outside.
These rolls, made with crescent dough, pepperoni, and mozzarella, are easy and fun. You learned how to prepare and bake them, plus tips for perfect results. Don’t forget the variations and storage options to enjoy them later.
The best part? You can make these your own with different cheeses and fillings. Satisfy your cravings or impress friends at gatherings. Simple ingredients combine to create a tasty treat every time. Enjoy your next snac

Pepperoni Mozzarella Croissant Rolls
Ingredients
- 1 can refrigerated crescent roll dough
- 1 cup sliced pepperoni
- 1 cup shredded mozzarella cheese
- 1 teaspoon Italian seasoning
- 1 tablespoon olive oil
- to taste Marinara sauce for dipping (optional)
- to taste Fresh basil leaves for garnish (optional)
- as needed Flour for dusting
Instructions
- Begin by preheating your oven to 375°F (190°C). While the oven is heating, line a baking sheet with parchment paper to prevent sticking.
- On a clean, lightly floured surface, carefully unroll the crescent roll dough. Gently separate it into individual triangles along the perforated edges.
- In a small mixing bowl, combine the shredded mozzarella cheese with the Italian seasoning, ensuring that the cheese is evenly coated with the spices for extra flavor.
- Take each triangle of dough and place a slice of pepperoni at the base. Follow this with a generous tablespoon of the seasoned mozzarella mixture. Make sure to leave some space at the edges to prevent spilling.
- Starting from the wide end of each triangle, roll the dough tightly towards the pointed end, making sure to fully enclose the pepperoni and mozzarella inside the crescent roll.
- Arrange the rolled croissants on the prepared baking sheet. Using a pastry brush, lightly brush each roll with olive oil to achieve a lovely golden finish when baked.
- Place the baking sheet in the preheated oven and bake for approximately 12-15 minutes. Keep an eye on them, baking until the croissants are puffed and have turned a beautiful golden brown.
- Once baked, carefully remove the croissants from the oven and allow them to cool for a couple of minutes on the baking sheet.
- Serve the warm croissant rolls alongside marinara sauce for dipping. If you like, garnish them with fresh basil leaves for a burst of color and flavor.


. To make crispy zucchini fritters, start by removing excess moisture. This step is crucial. Grate the zucchini and sprinkle it with salt. Let it sit for about ten minutes. Then, use a clean towel to squeeze out the water. The drier your zucchini, the firmer your fritters will be. Next, pay attention to frying temperature. Heat your olive oil over medium heat until it shimmers. If the oil is too hot, the outside will burn before the inside cooks. If it's too cool, the fritters will soak up too much oil and become greasy. Use olive oil for frying. It has a nice flavor and a good smoke point. This oil will help achieve that perfect golden color. Pair your fritters with delicious dips. Greek yogurt or sour cream works great. You can also try tzatziki for a refreshing twist. For a beautiful presentation, arrange the fritters on a colorful platter. Add a sprinkle of fresh herbs, like parsley or dill. This adds color and a fresh taste. If your fritters are falling apart, it might be due to too much moisture. Ensure you've squeezed out all the water from the zucchini. You might also need to add a bit more flour to bind the mix. For more flavor, consider adding spices. Cumin or Italian seasoning can elevate the taste. You can also mix in different cheeses, like feta or cheddar, for a new twist. {{image_4}} For a healthier twist on zucchini fritters, try using whole wheat flour. This choice adds fiber and nutrients. It also gives the fritters a nice, nutty flavor. You can also bake the fritters instead of frying them. Just place them on a baking sheet, brush with a little olive oil, and bake until golden. This method cuts down on oil and keeps the fritters light. To mix things up, consider adding different cheeses. Feta gives a tangy touch, while cheddar brings a sharp flavor. You can also spice things up by incorporating spices. Cumin or Italian seasoning can add depth. A pinch of red pepper flakes can give them a kick too! If you need a gluten-free option, almond flour works well. It keeps the fritters nice and crispy. For those following a vegan diet, you can replace the egg with a flaxseed mixture. Just mix one tablespoon of ground flaxseed with three tablespoons of water. Let it sit for a few minutes until it thickens. This simple swap allows everyone to enjoy these tasty fritters. Don't forget to check the Full Recipe for all the details! To keep your zucchini fritters fresh, place them in an airtight container. Make sure to layer parchment paper between fritters to prevent sticking. Store them in the fridge for up to three days. After this time, the fritters may lose their crispiness. If you notice any off smell or mold, it's best to toss them. When it comes to reheating, the oven is your best friend. Preheat it to 350°F (175°C). Place the fritters on a baking sheet and heat for about 10 minutes. This keeps them crispy. You can use the microwave for quick reheating, but they may turn soft. If you choose this method, heat them on a microwave-safe plate for about 30 seconds. For the best taste, stick to the oven whenever possible. For more tips, you can check the Full Recipe. Zucchini fritters can last up to three days in the fridge. To store them, place them in an airtight container. Check for signs of spoilage like a sour smell or visible mold. If you see either, it's best to toss them. Yes, you can freeze zucchini fritters! To do this, let them cool completely. Then, place them in a single layer on a baking sheet and freeze for about an hour. Once frozen, transfer them to a freezer-safe bag. They will keep for up to three months. Zucchini fritters pair well with a variety of sides. You can serve them with: - Greek yogurt or sour cream - Fresh salsa or marinara sauce - A crisp green salad - Roasted vegetables These options add flavor and help balance the dish. Yes, you can make zucchini fritters ahead of time. Prepare them and store them in the fridge for up to a day. When ready to eat, just heat them in a skillet until warm. This keeps them crispy and delicious. For the full recipe, check out the Crispy Zucchini Bliss Fritters. Zucchini fritters are easy to make and tasty. You learned about key ingredients, step-by-step cooking, and tips for success. You also explored variations for healthy and dietary needs. Remember, removing excess moisture helps keep them crispy. Try different flavors or dips for fun. Store leftovers properly and reheat them well. Enjoy your zucchini fritters as a snack or a meal! Keep experimenting to make them your own. Happy cooking!](https://fastmealmate.com/wp-content/uploads/2025/06/98182d0e-52f3-455d-9b2a-3674903e8280-768x768.webp)
![- 1 pound ground beef (80/20 blend) - ½ teaspoon salt - ½ teaspoon black pepper - ½ cup cheddar cheese, shredded - ½ cup mozzarella cheese, shredded - 4 large flour tortillas - 4 tablespoons cream cheese, softened - ¼ cup dill pickles, diced - ¼ cup diced tomatoes - ¼ cup onion, minced - 2 tablespoons ketchup - 2 tablespoons mustard - Olive oil, for cooking Creating Cheeseburger Quesadilla Smash Sliders is a fun way to enjoy flavors. With the right ingredients, your sliders burst with taste. First, let’s start with the beef. I like using an 80/20 blend. This mix gives a juicy bite. Next, season it well with salt and pepper. Don't skip this step; flavor is key. For the cheese, I use both cheddar and mozzarella. The cheddar brings a sharp taste, while mozzarella melts beautifully. You can feel the cheese stretch in every bite. The flour tortillas are the base for these sliders. They hold everything together and crisp up nicely when cooked. I recommend using large tortillas for easier assembly. Cream cheese adds richness. Spread it on the tortillas for a creamy layer. Then, top it off with diced dill pickles, tomatoes, and onions. These toppings add crunch and freshness. Finally, drizzle some ketchup and mustard for that classic burger taste. Use olive oil to cook the quesadillas. It helps create a golden brown crust while keeping everything moist inside. For the full recipe, check the details above. This will guide you step by step to create your own Cheeseburger Quesadilla Smash Sliders. Enjoy the flavor explosion! To start, grab a medium mixing bowl. Add 1 pound of ground beef, ½ teaspoon of salt, ½ teaspoon of black pepper, and 1 teaspoon of garlic powder. Use your hands to mix everything gently. Once mixed, divide the beef into small patties, each about 2-3 ounces. Next, heat a skillet on medium heat. Add a drizzle of olive oil. When the pan is hot, place the patties in the skillet. Cook for 3-4 minutes until they turn brown. Flip them over and cook for another 3-4 minutes. Once done, remove the patties and set them aside on a plate. Now it's time to build your quesadilla! Lower the skillet heat to medium-low. Take 4 large flour tortillas and spread 1 tablespoon of softened cream cheese on one side of each tortilla. Place one tortilla in the skillet with the cream cheese-side facing up. Add a generous amount of cheddar cheese, then stack half of the cooked burger patties on top. Next, sprinkle on the diced pickles, diced tomatoes, and minced onions. Drizzle a bit of ketchup and mustard over this. Finish by adding a layer of shredded mozzarella cheese. Carefully place another tortilla on top, cream cheese-side down. Press it gently with a spatula to hold everything together. Cook the quesadilla for about 2-3 minutes. Look for a golden-brown color on the bottom tortilla and melted cheese. Now, flip the quesadilla gently and cook the other side for another 2-3 minutes. When both sides are browned, take the quesadilla off the heat. Let it cool for a minute, then slice it into quarters or sliders. Repeat this for the rest of your tortillas and filling ingredients. Serve the warm cheeseburger quesadilla sliders on a platter. I like to add extra diced pickles and some ketchup and mustard for dipping on the side. Enjoy this flavor explosion! For the full recipe, check out the [Full Recipe]. To make the best burger texture, use ground beef that is 80/20. This mix provides the right fat content for juicy patties. When you form the patties, handle the meat gently. Overworking it can make the burgers tough. Aim for small patties, about 2-3 ounces, for sliders. For seasoning, keep it simple. A mix of salt, black pepper, and garlic powder works great. These flavors enhance the beef without overpowering it. Be sure to season both sides of each patty before cooking. This will help lock in the taste. To get that perfect cheese melt, use a mix of cheeses. Cheddar and mozzarella are my go-tos. Cheddar adds sharpness, while mozzarella brings stretchiness. Spread cheese evenly, so it melts all the way through. For a fun twist, try pepper jack cheese for a spicy kick. You can also experiment with gouda or fontina. These will add richness and depth. Just remember to slice the cheese thinly for quicker melting. Cooking your quesadillas to a perfect golden brown is key. Use medium-low heat for even cooking. This prevents burning while letting the cheese melt fully. When flipping quesadillas, use a large spatula. Slide it under the quesadilla gently to avoid spills. If you're nervous about flipping, consider using a plate. Simply slide one side onto the plate, then flip it back into the pan. This method keeps your fillings intact. {{image_4}} You can switch up the meat in this dish. Ground turkey or chicken works well. Both have a lighter flavor but still taste great. For a plant-based option, try lentils or black beans. These give you a nice texture and flavor. Using these options can help you cater to different diets. To boost taste, add spices like paprika or cumin. These spices add warmth and depth. You can also mix in sauces, like barbecue or sriracha, for a kick. Experimenting with different cheeses can change the flavor too. Pepper jack adds heat, while gouda brings a smoky taste. Topping with fresh herbs, like cilantro or chives, can brighten each bite. You can serve these quesadilla sliders in many ways. They work as a classic quesadilla or as fun sliders. For parties, cut them into smaller pieces. Arrange them on a colorful platter to impress your guests. You might also serve them with dips, like guacamole or salsa, for extra flavor. Each style can make your meal exciting and unique. To keep your cheeseburger quesadilla sliders fresh, place them in an airtight container. This helps lock in flavor and moisture. Store them in the fridge for up to three days. After that, the taste may decline, and the texture could change. If you want to save them longer, freezing is a good option. Wrap each quesadilla slider tightly in plastic wrap. Then, place them in a freezer-safe bag or container. This keeps them safe from freezer burn. You can freeze them for up to three months. When you're ready to eat, let them thaw overnight in the fridge before reheating. For the best taste, reheat using the oven. Preheat it to 350°F (175°C). Place the quesadilla sliders on a baking sheet. Heat for about 10-15 minutes, until warm and crispy. If you use a microwave, put them on a plate. Heat for 30-60 seconds. This method is faster but may not keep the crunch. To restore crunchiness, consider finishing in a hot pan for a minute. Yes, you can prepare these sliders ahead. Make the patties and cook them. Let them cool. Then, store them in the fridge. When ready to serve, assemble the quesadillas. You can use either fresh tortillas or pre-made ones. If you use pre-made tortillas, spread cream cheese and layer the fillings. Cook them quickly in a hot skillet. This way, they stay crispy and warm. You can serve many tasty sides with these sliders. Consider some crispy fries or sweet potato fries. They pair well with the cheesy sliders. A fresh salad can balance the richness. You might also try dipping sauces like ranch or spicy mayo. These add extra flavor and fun. You could even serve a zesty salsa for a fresh kick. To make these sliders vegetarian, swap out the beef for a meat alternative. You could use black beans or lentils as a base. Another option is to use plant-based burger patties. Just season them like the beef. Add your favorite toppings, like cheese and veggies. You can still enjoy the same great flavors without meat. Just make sure all the other ingredients are vegetarian-friendly. You can make tasty Cheeseburger Quesadilla Smash Sliders easily. Start with classic ingredients and follow straightforward steps for delicious results. Don’t forget to try different proteins and toppings to suit your taste. Storing any leftovers is simple, and reheating them will keep them just as good. With these tips, you can impress guests or enjoy a fun meal at home. Making this dish lets you explore flavors while fitting right into your busy day. Enjoy your cooking adventure!](https://fastmealmate.com/wp-content/uploads/2025/07/3ea5f9d6-0f24-4765-99ee-1beab0673b04-768x768.webp)

![- 1 pre-made 9-inch pie crust - 6 large eggs - 1 cup whole milk For this quiche, I use a pre-made pie crust. It saves time and gives a nice crunch. Next, I add large eggs and whole milk. These create a rich and creamy base that holds everything together. - 1 cup cooked turkey bacon, chopped into bite-sized pieces - 1 cup cherry tomatoes, halved - 1 cup fresh spinach, chopped - 1 cup shredded cheddar cheese The flavor comes from turkey bacon, cherry tomatoes, fresh spinach, and cheddar cheese. Turkey bacon gives a smoky taste. Cherry tomatoes add sweetness, while spinach brings freshness. Cheddar cheese melts wonderfully, making the quiche extra tasty. - 1 teaspoon garlic powder - 1 teaspoon onion powder - Salt and pepper to taste Seasoning is key for a great quiche. I use garlic powder and onion powder for depth. Adding salt and pepper enhances all the flavors. This blend makes every bite delicious. You can check the [Full Recipe] for more details on this savory dish. - Preheat the oven to 375°F (190°C). - Fit the pie crust into the pie dish. To start, you need to preheat your oven. This step is key to getting that perfect, fluffy texture in your quiche. Next, take your pre-made pie crust and carefully fit it into a 9-inch pie dish. Press it gently against the sides to make it even. Set it aside while you prepare the filling. - Whisk eggs and whole milk. - Incorporate garlic powder, onion powder, salt, and pepper. In a large mixing bowl, break open six large eggs. Pour in one cup of whole milk. Whisk them together until the mixture is smooth. This will be the base of your quiche. Now, add one teaspoon of garlic powder and one teaspoon of onion powder. Don't forget to season with salt and pepper to taste. Stir well to mix in all the flavors. - Fold in bacon, tomatoes, spinach, and cheese. - Pour the mixture into the crust. Now comes the fun part! Gently fold in the cooked turkey bacon, halved cherry tomatoes, chopped spinach, and shredded cheddar cheese. Make sure everything is evenly mixed. Then, pour this mixture into the prepared pie crust. Use a spatula to spread the ingredients evenly. This helps them cook nicely. - Bake for 35-40 minutes. - Check for doneness with a toothpick. Place your quiche in the preheated oven. Bake it for about 35 to 40 minutes. You want it to puff up and turn golden brown. To check if it’s done, insert a toothpick into the center. If it comes out clean, your quiche is ready. Enjoy this savory dish, and for the full recipe, be sure to check the details provided earlier. Getting the egg and milk ratio right is key. I use six large eggs and one cup of whole milk. This mix gives the quiche a creamy texture. Too much milk will make it runny, while too few eggs can lead to a dry quiche. After baking, let the quiche cool for about ten minutes. Cooling makes slicing much easier. If you cut it right away, it may fall apart. For sides, I love serving my quiche with a fresh green salad. The crispness of the salad complements the rich quiche. Another great option is fruit. Try fresh berries or sliced melons for a sweet touch. When it comes to seasonings, fresh herbs like basil or chives can really enhance the flavors. A sprinkle of smoked paprika can add a nice depth too. Serve each slice on a colorful plate for a fun look. Garnish with extra cherry tomato halves and a sprig of parsley. This adds color and makes it more appealing. For a pop of color, consider using a bright salad alongside the quiche. The mix of green, red, and yellow will catch the eye. It makes a simple meal look fancy with little effort. You can find the full recipe to create this beautiful dish and impress your guests! {{image_4}} You can make a crustless BLT quiche easily. Just skip the pie crust. Grease your pie dish with oil or butter. Then, pour your filling directly into the dish. Bake it the same way as the regular quiche. The crustless version is lighter and gluten-free. It saves time, too. You won’t have to roll out dough or worry about a soggy crust. Plus, it keeps the focus on the tasty filling. You can mix things up with different proteins. Try using ham or crispy pancetta instead of turkey bacon. Each protein adds its own flavor. You can also change up the veggies. Bell peppers add sweetness, while zucchini offers a mild taste. Feel free to get creative and use what you have on hand. If you want a low-fat quiche, use skim milk instead of whole milk. You can also reduce the amount of cheese. This keeps the quiche tasty without all the fat. For a gluten-free option, look for a gluten-free pie crust. Many stores offer these now. You can even make your own with almond flour or oat flour. This way, everyone can enjoy your quiche! For the full recipe, check out the detailed instructions above. To store leftover quiche, let it cool completely. This helps keep moisture in check. Place it in an airtight container. A glass or plastic container works great. Make sure to wrap it tightly with plastic wrap too. This keeps the flavors fresh. Reheat your quiche in the oven for the best texture. Preheat the oven to 350°F (175°C). Place the quiche in the oven for about 15-20 minutes. If you're in a hurry, you can use the microwave. Heat it for 1-2 minutes, but keep an eye on it. The crust may lose its crunch in the microwave. To freeze quiche, wrap it well in plastic wrap and then in foil. It keeps well for about 2-3 months. When you’re ready to eat, take it out of the freezer. Place it in the fridge to thaw overnight. For reheating, follow the same oven method as before. This ensures your quiche tastes just as good as fresh. To keep your quiche from being watery, control the moisture in your ingredients. Use dry turkey bacon and pat it with a towel to absorb grease. For vegetables, like spinach and tomatoes, squeeze out excess water before adding them. This simple step prevents sogginess. Baking the quiche properly also helps. A preheated oven allows the egg mixture to set quickly, locking in flavors without extra moisture. Yes, you can prepare your quiche the night before. To do this, assemble your quiche as normal. Cover it tightly with plastic wrap or foil and refrigerate. This way, the flavors meld together overnight. When ready to bake, remove it from the fridge and let it sit for about 15 minutes. This helps it cook evenly. Bake according to the instructions in the Full Recipe for a delicious breakfast or brunch! If you want an alternative to turkey bacon, try regular bacon for a richer flavor. For a vegetarian option, use mushrooms or tempeh. Both add great texture and taste to your quiche. You could also use smoked tofu for a unique twist. Each of these options brings its own flavor, so choose what you like best. You can tell your quiche is done when it’s puffed and golden on top. Insert a toothpick into the center; it should come out clean. If it has some egg mixture on it, bake for a few more minutes and check again. It’s important to let it cool for about 10 minutes after baking. This resting time makes slicing easier and helps the filling set. BLT quiche is a tasty dish that mixes flavors and textures. We covered key ingredients like pie crust, eggs, milk, turkey bacon, and veggies. The step-by-step guide helps you bake it perfectly, while tips on storing and reheating keep it fresh for later. You can even switch up the ingredients for new twists. Remember, cooking is about experimenting. Enjoy your time in the kitchen, and don’t be afraid to make it your own!](https://fastmealmate.com/wp-content/uploads/2025/06/6e495986-43c5-45ef-a717-6d7df2569586-768x768.webp)
![- 16 oz firm tofu, pressed and cubed - 1 cup plant-based milk (almond or soy) - 1 tablespoon apple cider vinegar - 1 cup all-purpose flour - 1 cup cornmeal - 2 teaspoons garlic powder - 2 teaspoons onion powder - 1 teaspoon smoked paprika - 1 teaspoon cayenne pepper (adjust to your spice preference) - 1 teaspoon salt - 1 teaspoon black pepper - 1 tablespoon maple syrup - ¼ cup hot chili oil - Fresh pickles and sliced bread for serving I love using firm tofu for this recipe. It holds its shape and gives a nice bite. Pressing the tofu is key. It removes excess water and helps the nuggets get crispy. The buttermilk mixture is easy to make. Just mix plant-based milk with apple cider vinegar. Let it sit for five minutes. It thickens and works well for coating. For the dry ingredients, I use all-purpose flour and cornmeal. The cornmeal adds a crunchy texture. The spices pack on the flavor. Garlic powder and onion powder make the nuggets taste savory. Smoked paprika adds a lovely depth. Cayenne pepper is what brings the heat. Adjust it to make it milder or spicier based on your taste. Maple syrup in the hot oil glaze gives a sweet touch. It balances the spice perfectly. Don't forget the fresh pickles! They add a refreshing crunch when served with the nuggets. Sliced bread is optional but makes a great sandwich. Enjoy your Vegan Nashville Hot Tofu Nuggets! For the complete step-by-step guide, check out the Full Recipe. - Preheat the oven to 400°F (200°C). - Press the tofu to remove water, then cut it into nugget-sized pieces. - In a bowl, combine 1 cup of plant-based milk with 1 tablespoon of apple cider vinegar. - Let it sit for 5 minutes. This thickens and curdles the milk. - In one dish, mix 1 cup of flour with garlic powder, onion powder, smoked paprika, salt, and black pepper. - In another dish, pour in 1 cup of cornmeal and mix in cayenne pepper. - Dip each nugget in the flour mix, coating it well. - Next, dip it in the buttermilk, letting excess drip off. - Finally, roll it in the cornmeal mix, pressing gently for a thick coating. - Arrange the coated nuggets on a baking sheet lined with parchment paper. - Lightly oil the nuggets to help them crisp up. - Bake for 25-30 minutes, flipping them halfway for even browning. - In a small bowl, mix hot chili oil with 1 tablespoon of maple syrup for the glaze. - Toss the baked nuggets in the glaze to coat them evenly. Enjoy these spicy treats with fresh pickles for extra flavor! To get the best texture with tofu, pressing is key. Start by using a tofu press or a simple method. Wrap your tofu in a clean towel and place a heavy object on top. Let it press for at least 30 minutes. This step gets rid of extra moisture. It helps your nuggets become crispy. For that perfect crisp, ensure a solid coating. After you coat each nugget in the flour mix, dip it in the buttermilk mixture. Then, roll it in the cornmeal mix. The cornmeal gives a crunchy bite. Lightly spray the nuggets with oil before baking. This adds to their crispiness. Adjusting spice levels is easy. If you want more heat, add more cayenne pepper. Just remember, start small. You can always add more later. For milder nuggets, reduce the cayenne to suit your taste. You can also mix in other spices. Try smoked paprika for a deep flavor. Add some cumin for a warm touch. Garlic powder and onion powder boost the taste without extra heat. Experiment to find your perfect blend. Presentation matters! Arrange your nuggets on a large, colorful platter. Add fresh pickles on top for a pop of color. A sprig of parsley also brightens the dish. You can serve with a side of dipping sauce for added flavor. Consider using sliced bread or buns for a sandwich. It makes for a fun meal. This way, your Vegan Nashville Hot Tofu Nuggets look as good as they taste. {{image_4}} You can change the flavor of your Vegan Nashville Hot Tofu Nuggets by using different spices. Try adding cumin for a warm taste or chili powder for a kick. You can also mix in herbs like thyme or oregano. Fresh herbs add brightness and depth to each bite. These nuggets pair well with many sides. Serve them with crispy fries or a fresh salad. You can also create a delicious sandwich. Place the tofu nuggets in a bun and add your favorite toppings. Think lettuce, tomatoes, and a drizzle of vegan mayo for extra flavor. If you need a gluten-free version, swap out the all-purpose flour and cornmeal. Use almond flour instead of regular flour for the breading. For cornmeal, try using gluten-free breadcrumbs. These changes keep the nuggets tasty and the texture just right. To keep your Vegan Nashville Hot Tofu Nuggets fresh, cool them first. Let them sit at room temperature for about 30 minutes. This helps avoid steam buildup, which makes them soggy. Once cooled, pack them in airtight containers. Glass or BPA-free plastic works best. Make sure to store them in the fridge. They stay good for up to four days. To reheat your tofu nuggets, the oven is best. Preheat it to 375°F (190°C). Place the nuggets on a baking sheet. Bake them for about 10-15 minutes. This method keeps them crispy. You can also use an air fryer. Set it at 350°F (175°C) and cook for about 5-8 minutes. Avoid microwaving as it makes them soft and chewy. You can freeze these nuggets, both baked and unbaked. For unbaked nuggets, arrange them on a baking sheet. Freeze until solid, then transfer to a freezer bag. This saves space. For baked nuggets, let them cool first. Then, place them in a freezer-safe container. They last up to three months. When ready to eat, thaw overnight in the fridge. Bake or air fry them again for best results. You should use firm or extra-firm tofu. Silken tofu is too soft for nuggets. Firm tofu holds its shape well. Extra-firm tofu gives a nice texture. Press it to remove moisture for the best results. This step helps the nuggets get crispy. Yes, this recipe is nut-free. The main ingredients do not include nuts. If you want to add a creamy dip, use tahini or sunflower seed butter. Both options are safe and tasty. Always check labels to ensure all ingredients are nut-free. To kick up the heat, add more cayenne pepper. You can also mix in hot sauce for extra spice. Try using a spicy chili oil instead of regular oil. Red pepper flakes are another good option. Adjust the heat to fit your taste. Yes, you can fry the nuggets! Heat oil in a deep pan for frying. Coat the tofu nuggets well for a crispy crust. Fry in batches to keep the oil hot. This method gives a crunchy texture and rich flavor. Just be careful with hot oil. These nuggets pair well with fresh pickles and sliced bread. You can also serve them with coleslaw for a cool crunch. Dipping sauces like ranch or hot sauce add more flavor. Sweet potato fries make a great side, too! You can find the [Full Recipe] for Vegan Nashville Hot Tofu Nuggets online. In this blog post, we explored how to make Vegan Nashville Hot Tofu Nuggets. We covered key ingredients, like firm tofu and spices, and detailed how to prepare, bread, and bake them to get that perfect crunch. I shared tips for adjusting spice levels and achieving great texture. You now have ideas for serving and storing leftovers too. Enjoy creating this tasty dish, and don’t be afraid to experiment with new flavors! Dive in and make these nuggets your own.](https://fastmealmate.com/wp-content/uploads/2025/06/1c2352f9-cf3e-44e9-8ce8-a5cbad64ddd1-768x768.webp)