Oven Baked Chicken and Rice Tasty Family Meal

Looking for a tasty family meal that’s easy to make? You’re in the right spot! Oven Baked Chicken and Rice is a perfect dish that pleases everyone. It’s simple to prepare and packed with flavor. In this article, I’ll share the key ingredients, step-by-step instructions, and helpful tips to create a delicious dinner. Get ready to impress your loved ones with this hearty meal that brings the family together!
Why I Love This Recipe
- Comfort Food: This dish combines tender chicken and flavorful rice, making it a perfect cozy meal for any occasion.
- One-Pan Wonder: With everything cooked in one skillet, cleanup is a breeze, allowing you to enjoy your meal without the hassle.
- Flavor Explosion: The blend of spices and aromatics infuses the rice with amazing flavor, elevating a simple dish to something special.
- Customizable: Easily adapt this recipe by adding your favorite vegetables or spices to suit your taste preferences.
Ingredients
List of Ingredients
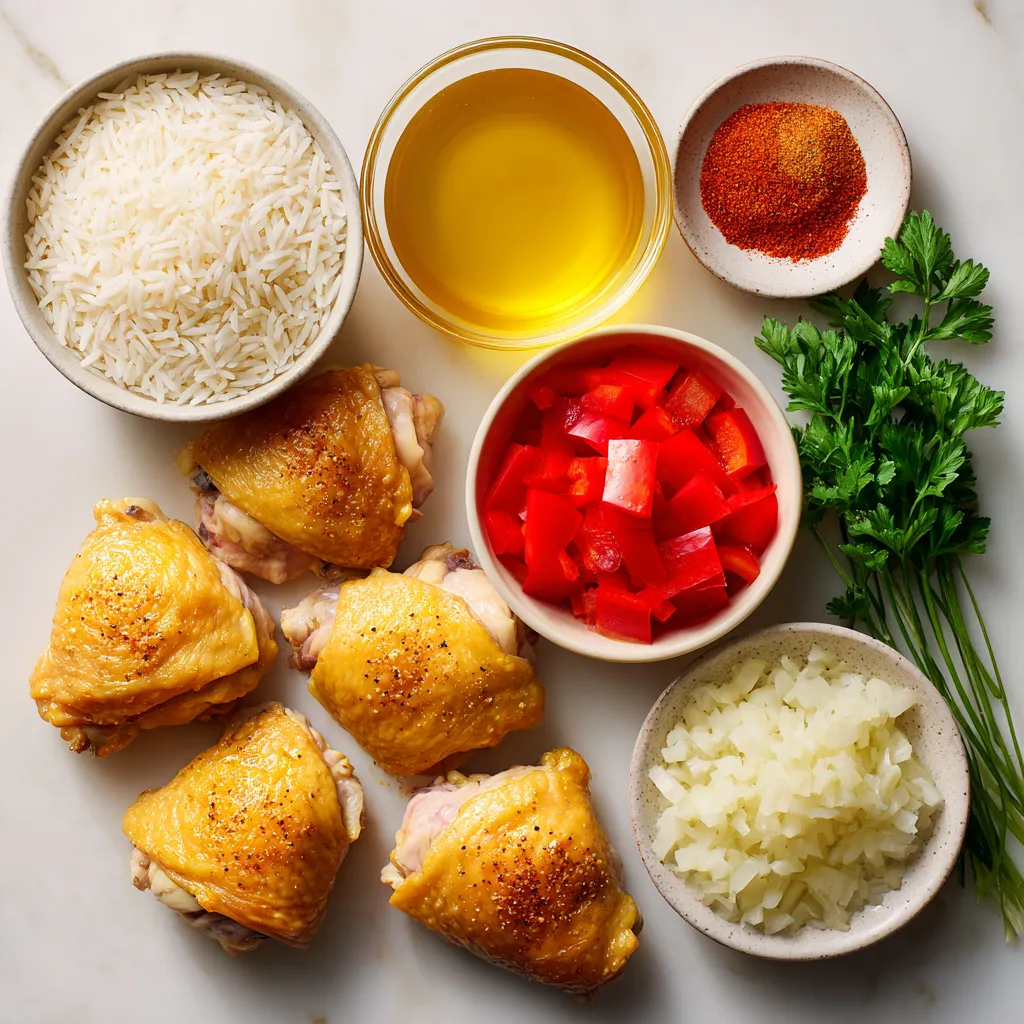
– 4 bone-in chicken thighs (skin-on for crispiness)
– 1 cup long-grain white rice
– 2 cups chicken broth (preferably low-sodium)
– 1 small onion, finely chopped
– 3 cloves garlic, minced
– 1 red bell pepper, diced
– 1 tablespoon sweet paprika
– 1 teaspoon dried thyme
– 1 teaspoon ground cumin
– Salt and freshly cracked black pepper to taste
– 2 tablespoons extra-virgin olive oil
– Fresh parsley, chopped, for garnish
Optional Ingredients for Enhanced Flavor
You can boost the flavor of your dish with some extras. Try adding:
– 1 carrot, diced, for sweetness and color
– 1 cup frozen peas, for a pop of green
– A squeeze of lemon juice, for brightness
– 1 bay leaf, to deepen the taste
Ingredient Substitutions
If you lack some ingredients, don’t worry! Here are some swaps:
– Chicken thighs can be replaced with drumsticks or breasts.
– Long-grain rice can be swapped for basmati or jasmine rice.
– Low-sodium broth can be replaced with water, but add more salt.
– Fresh parsley can be substituted with cilantro or green onions.
This list helps you gather what you need for a tasty oven-baked chicken and rice meal. Each ingredient plays a role in building flavor and texture.

Step-by-Step Instructions
Prepping the Chicken and Rice
Start by gathering your ingredients. You need four bone-in chicken thighs, one cup of long-grain white rice, and two cups of chicken broth. Chop one small onion and mince three cloves of garlic. Dice one red bell pepper.
Next, preheat your oven to 375°F (190°C). This step is key for even cooking. While the oven heats, season the chicken thighs with salt and black pepper. This adds flavor right from the start.
Cooking the Aromatics
In a large oven-safe skillet, pour in two tablespoons of extra-virgin olive oil. Heat it over medium heat. Once hot, add the chopped onion and minced garlic. Sauté these for about three to four minutes until the onion looks clear and smells good.
Then, stir in the diced red bell pepper along with one tablespoon of sweet paprika, one teaspoon of dried thyme, and one teaspoon of ground cumin. Add salt and black pepper to taste. Cook this mixture for another two minutes. This helps the spices release their flavor.
Combining Ingredients and Baking
Now, add the uncooked rice to the skillet. Stir well to coat the rice with the spices and veggies. Pour in the chicken broth and bring it to a gentle simmer. This is where the rice starts to absorb all that wonderful flavor.
Nestle the chicken thighs, skin-side up, into the rice mixture. Cover the skillet with a lid or aluminum foil. Place it in the oven and bake for 30 minutes.
After 30 minutes, take off the lid or foil. This helps the chicken skin get nice and crispy. Bake for another 15 to 20 minutes. The chicken should turn golden brown and reach an internal temperature of 165°F (74°C).
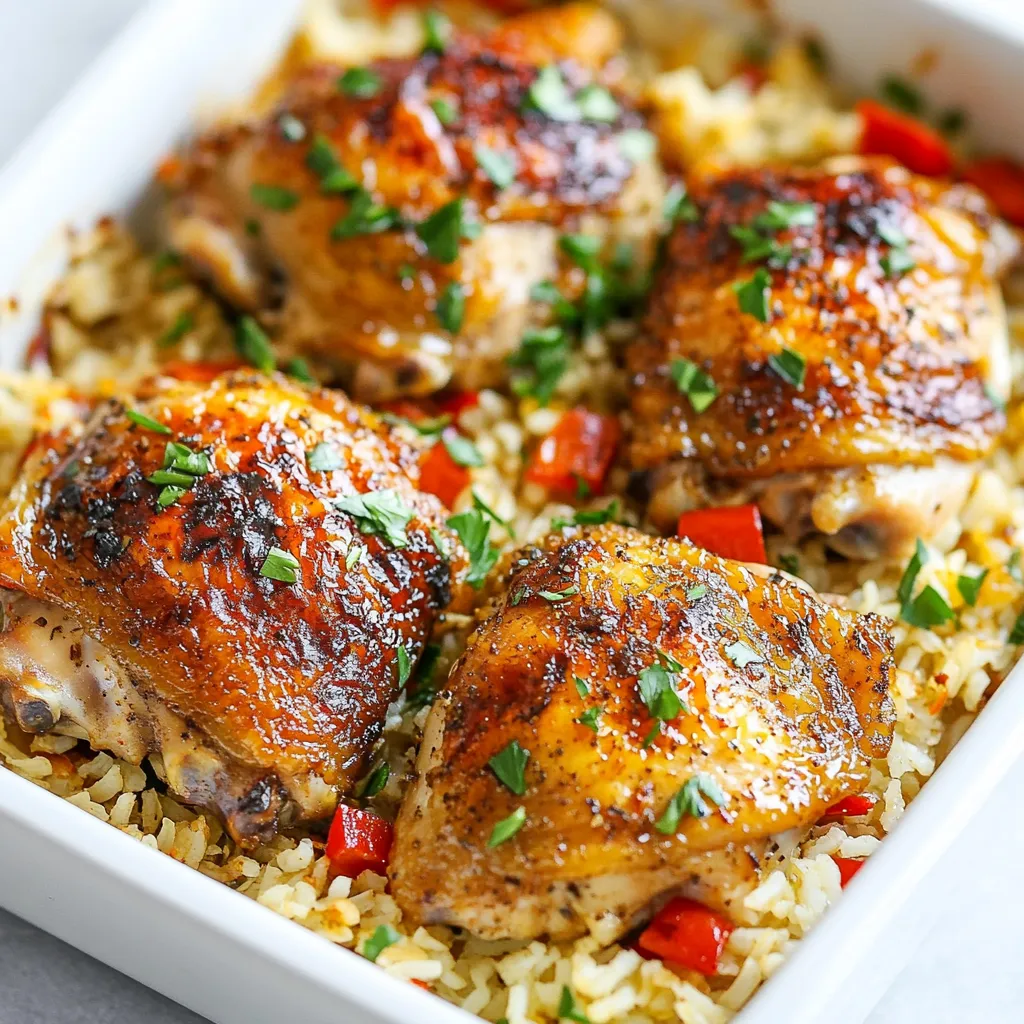
Once done, take the skillet out of the oven. Let it rest for about five minutes. Use a fork to fluff the rice gently. Finally, garnish with fresh chopped parsley for a pop of color and taste. Enjoy your meal!
Tips & Tricks
Achieving Crispy Chicken Skin
To get crispy chicken skin, start with skin-on chicken thighs. Pat the skin dry with paper towels. This helps remove moisture. Moisture makes it hard to crisp up. Sprinkle a good amount of salt on the skin. Salt draws out more moisture. When baking, don’t cover the chicken for the last part. This lets heat circulate around the skin. Bake it uncovered for the last 15 to 20 minutes. Check the internal temperature. It should reach 165°F (74°C) for safety.
Flavor Enhancements to Try
You can boost the flavor of your oven-baked chicken and rice in many ways. Try adding lemon juice or zest for brightness. Fresh herbs like rosemary or thyme add depth. You can also sprinkle some chili flakes for heat. If you love cheese, add a little grated parmesan before baking. It adds a nice savory touch. For a smoky flavor, use smoked paprika instead of sweet paprika. Experiment with these ideas to find your favorite twist.
Troubleshooting Common Issues
If your chicken skin is not crispy, check the moisture. Make sure the skin is dry before cooking. If your rice is too dry, it might need more broth. You can add a little more broth halfway through cooking. If the rice is soggy, reduce the liquid next time. Always fluff the rice gently after cooking. This keeps it from getting mushy. If your dish feels bland, adjust the seasoning. A pinch of salt or pepper can go a long way!
Pro Tips
- Choose Quality Chicken: Opt for organic, free-range chicken thighs for the best flavor and texture.
- Rice Variations: Experiment with different types of rice, such as brown rice or jasmine rice, for unique flavors and nutrition.
- Spice it Up: Add a pinch of cayenne pepper for a spicy kick or fresh herbs like rosemary for additional depth of flavor.
- Resting Time: Allow the dish to rest after baking to let the flavors meld and make the chicken juicier.

Variations
Substituting Chicken for Other Proteins
You can easily swap chicken for other proteins. Try using bone-in pork chops or turkey thighs. Both options work well and add different flavors. If you choose pork, cook it until it reaches 145°F (63°C). For turkey, aim for 165°F (74°C). Adjust your cooking time based on the protein you use. This swap keeps your meal exciting and delicious.
Vegetarian or Vegan Alternatives
For a vegetarian or vegan option, replace the chicken with hearty vegetables. Use mushrooms, zucchini, or eggplant for a meaty texture. You can also add chickpeas or lentils for protein. Swap chicken broth with vegetable broth to keep the flavors intact. Bake the dish the same way. It’s a great way to enjoy this meal while keeping it plant-based.
Different Rice Types and Their Cooking Times
Using different rice types can change the taste and texture. Long-grain white rice cooks in about 30 minutes. Brown rice takes longer, around 45-50 minutes. Jasmine or basmati rice adds a nice aroma but may need slight adjustments in liquid. Always check the cooking time on the package for the best results. This way, you can enjoy various flavors with each meal.
Storage Info
How to Store Leftovers
To store leftovers, let the dish cool first. Place the chicken and rice in an airtight container. Make sure to refrigerate it within two hours of cooking. This helps keep it fresh. You can store it for up to three days. Always label your container with the date. This way, you know when to use it.
Reheating Tips for Best Results
When you reheat, use the oven for the best taste. Preheat the oven to 350°F (175°C). Transfer the chicken and rice to a baking dish. Add a splash of chicken broth to keep it moist. Cover the dish with foil to trap steam. Heat for about 20 minutes or until hot. You can also use a microwave. Just place a damp paper towel on top to keep it from drying out.
Freezing Guidance
To freeze, let the dish cool completely. Use freezer-safe containers or bags. You can separate the chicken and rice or keep them together. If using bags, remove as much air as you can. This prevents freezer burn. Label with the date and freeze for up to three months. When ready to eat, thaw it in the fridge overnight before reheating.
FAQs
How long does it take to bake oven-baked chicken and rice?
Baking oven-baked chicken and rice takes about 45 to 50 minutes. First, you bake it covered for 30 minutes. This allows the rice to cook fully. Then, you uncover it for an extra 15 to 20 minutes. This step helps the chicken skin to get nice and crispy. Always check the chicken’s internal temperature. It should reach 165°F (74°C) to ensure it is safe to eat.
Can I use brown rice in this recipe?
Yes, you can use brown rice, but it needs more time. Brown rice usually takes about 45 to 50 minutes to cook. You should also add a bit more broth. This extra liquid helps the rice cook evenly and absorb flavors. Keep in mind that the cooking time for brown rice may change the overall cooking time of your meal.
What can I serve with oven-baked chicken and rice?
You can serve many tasty sides with oven-baked chicken and rice. Some great options include:
– Steamed broccoli
– Roasted vegetables
– A fresh garden salad
– Garlic bread
– Sautéed green beans
These sides add color and balance to the meal. They also bring in more nutrients, making your dinner even better. Enjoy experimenting with different pairings!
In this post, we explored the key ingredients and steps to make oven-baked chicken and rice. We discussed optional flavors, ingredient swaps, and tips for crispy skin. I shared variations for proteins, rice types, and vegan options. Plus, you learned how to store and reheat leftovers.
Overall, this dish is easy to customize. You can make it your own with simple tweaks. Enjoy your cooking journey and savor each bit

Savory Oven-Baked Chicken and Rice Delight
Ingredients
- 4 pieces bone-in chicken thighs (skin-on for crispiness)
- 1 cup long-grain white rice
- 2 cups chicken broth (preferably low-sodium)
- 1 small onion, finely chopped
- 3 cloves garlic, minced
- 1 piece red bell pepper, diced
- 1 tablespoon sweet paprika
- 1 teaspoon dried thyme
- 1 teaspoon ground cumin
- to taste salt and freshly cracked black pepper
- 2 tablespoons extra-virgin olive oil
- for garnish fresh parsley, chopped
Instructions
- Preheat the Oven: Set your oven to 375°F (190°C) to prepare for baking.
- Sauté Aromatics: In a large oven-safe skillet, heat the olive oil over medium heat. Add the finely chopped onion and minced garlic, sautéing until the onion turns translucent and fragrant, approximately 3-4 minutes.
- Add Veggies and Spices: Stir in the diced red bell pepper along with the sweet paprika, dried thyme, ground cumin, salt, and freshly cracked black pepper. Cook for an additional 2 minutes to allow the spices to bloom and enhance the flavor profile.
- Incorporate the Rice: Add the uncooked long-grain white rice to the skillet, stirring well to ensure the rice is evenly coated with the aromatic spice mixture.
- Pour in the Broth: Carefully pour in the chicken broth and bring the mixture to a gentle simmer. This helps the rice begin to absorb all the delicious flavors.
- Nestle the Chicken: Gently place the chicken thighs, skin-side facing up, into the rice mixture, ensuring they are nestled down within the rice.
- Cover and Bake: Cover the skillet with a lid or aluminum foil. Transfer it to the preheated oven and bake for 30 minutes.
- Finishing Touches: After 30 minutes, remove the lid or foil to allow the chicken skin to crisp up. Continue baking for an additional 15-20 minutes, or until the chicken is beautifully golden and has reached an internal temperature of 165°F (74°C).
- Rest and Serve: Once fully cooked, remove the skillet from the oven and let it rest for about 5 minutes. Using a fork, fluff the rice gently and garnish with freshly chopped parsley for a burst of color and flavor.


![To make this dish, gather these key ingredients: - 2 boneless, skinless chicken thighs - 2 tablespoons gochujang (Korean chili paste) - 1 tablespoon soy sauce - 1 tablespoon honey - 1 teaspoon sesame oil - 1 garlic clove, finely minced - 1 teaspoon fresh ginger, grated - 2 cups cooked rice (white or brown) - 1 cup Napa cabbage, shredded - 1 medium carrot, julienned - 2 green onions, finely chopped - 1 tablespoon sesame seeds - Salt and freshly ground black pepper to taste These ingredients create a bold and tasty flavor. The chicken absorbs the gochujang and other sauces, making each bite delicious. The fresh veggies add crunch and color. You can add more fun flavors with these optional items: - Kimchi for a tangy kick - Sliced cucumbers for freshness - Avocado for creaminess - Extra sesame seeds for crunch - More green onions for a pop of color Feel free to mix and match these extras. They add depth and make your bowl even more exciting. To prepare this dish, you will need: - A medium bowl for marinating - A grill pan or heavy skillet for cooking - A cutting board and knife for chopping - Measuring spoons for accuracy - A serving bowl to assemble your dish Having the right tools makes cooking easier. You’ll enjoy making this meal even more when you have everything at hand. Check out the Full Recipe for detailed steps! To start, you need a good marinade for the chicken. In a medium bowl, mix the gochujang, soy sauce, honey, sesame oil, minced garlic, and grated ginger. Whisk this mixture until it feels smooth. Now, add the chicken thighs. Make sure to coat them well with the marinade. Cover the bowl with plastic wrap. Let it sit in the fridge for at least 30 minutes. For richer flavor, you can marinate for up to 4 hours. Next, it’s time to cook the chicken. Preheat a grill pan or a heavy skillet on medium-high heat. When it gets hot, place the marinated chicken in the pan. Avoid crowding the pan. Cook each side for about 6 to 7 minutes. You want the chicken to be golden-brown and fully cooked. It should reach an internal temperature of 165°F (75°C). Once cooked, take the chicken out and let it rest for a few minutes. After resting, slice it into bite-sized pieces. While the chicken rests, let’s focus on the veggies. In the same pan, add a splash of oil if needed. Sauté the shredded Napa cabbage and julienned carrot for about 3 to 4 minutes. Stir them occasionally. You want them to be tender but still a bit crunchy. Lightly season with salt and black pepper to taste. Now it's time to put everything together. In a large serving bowl, start with a base of cooked rice. Layer the sautéed cabbage and carrots on top. Then, arrange the sliced grilled chicken over the vegetables. For the final touch, sprinkle chopped green onions and sesame seeds over the top. If you like it spicy, drizzle some extra gochujang on top. Enjoy your Easy Korean BBQ Chicken Rice Bowl! For the full recipe, check out the details above. Marinating chicken adds flavor and keeps it moist. Always use a mix of gochujang, soy sauce, honey, sesame oil, garlic, and ginger. Make sure to coat the chicken well. Cover the bowl and chill it in the fridge. Aim for at least 30 minutes. For a deeper taste, marinate for up to 4 hours. This extra time allows the flavors to soak in nicely. The right rice texture makes your bowl special. For this recipe, use either white or brown rice. Rinse the rice under cold water before cooking. This step removes excess starch and prevents stickiness. Cook the rice according to package instructions. Fluff it with a fork after cooking. This keeps the grains separate and light, perfect for a rice bowl. A beautiful bowl makes any meal more inviting. Use deep, colorful dishes for a striking look. Start with a base of rice, then layer on the veggies and chicken. Arrange the chicken slices neatly for a great visual. Finish with green onions and sesame seeds on top. You could also add small bowls of sauces for a fun touch. Use chopsticks to enhance the Korean BBQ feel. {{image_4}} You can swap chicken for other proteins. Try using pork, beef, or shrimp. Each option adds a new taste. If you choose beef, flank steak works well. For shrimp, use large, peeled ones. Just adjust cooking times as needed. You can easily make this dish vegan or vegetarian. Instead of chicken, use tofu or tempeh. Marinate them just like the chicken. For a twist, add marinated mushrooms for extra flavor. You can also use seitan for a meaty texture. Feel free to get creative with your veggies. You can use bell peppers, broccoli, or zucchini. Just chop them up and sauté them along with the cabbage and carrots. This way, your rice bowl stays colorful and fresh. Add your favorite greens for extra nutrition. After enjoying your Easy Korean BBQ Chicken Rice Bowl, store leftovers in an airtight container. Keep the chicken and veggies separate from the rice. This method helps keep everything fresh and tasty. Store it in the fridge for up to three days. If you want to keep it longer, consider freezing the chicken and veggies together. The rice can be stored separately. To reheat, use a microwave or skillet. If using a microwave, heat in short bursts to avoid drying out the chicken. You can add a splash of water to help keep moisture. If using a skillet, add a little oil and heat on low until warmed. This method helps maintain the chicken's juicy texture and the veggies' crunch. For meal prep, freeze the marinated chicken before cooking. This way, the flavors blend better. Place the chicken in a freezer bag and remove as much air as possible. You can freeze the sautéed veggies too. When ready to cook, thaw everything overnight in the fridge. This ensures your meal is quick and easy, with great taste. For the Full Recipe, be sure to check the instructions again before cooking! Yes, you can use chicken breast. Chicken breast cooks faster and is leaner. Just remember that it can dry out more easily than thighs. To keep it juicy, don’t overcook it. Adjust cooking time to about 5-6 minutes per side. If you need a substitute for gochujang, try miso paste mixed with a bit of chili powder. This mix gives a similar depth of flavor. You can also use sriracha for heat, but it won’t have the same sweetness. To add more spice, mix in extra gochujang. You can also add sliced fresh chilies or a dash of red pepper flakes. Adjust the heat to your liking. Remember, it’s easier to add spice than to take it away. Yes, you can prepare the chicken and veggies ahead of time. Marinate the chicken and store it in the fridge for up to 4 hours. Cook the chicken and veggies just before serving for the best flavor. For a full recipe, check out the [Full Recipe]. This blog post covered everything you need for an Easy Korean BBQ Chicken Rice Bowl. We explored essential and optional ingredients, plus equipment needed for cooking. I shared clear steps for marinating and cooking the chicken, sautéing veggies, and tips for perfect rice. We also looked at tasty variations and smart storage options. Ultimately, this dish is flexible and fun to make. Enjoy experimenting with flavors and keep your meals exciting!](https://fastmealmate.com/wp-content/uploads/2025/07/632ec05d-af1e-4ba2-bf58-6505b43008ee-768x768.webp)
![- Canned mixed beans: I love using black beans, kidney beans, and chickpeas. They add protein and fiber to the soup. Their different textures make the soup hearty and filling. Look for low-sodium options for a healthier choice. - Fresh vegetables: Carrots and celery bring sweetness and crunch. They create a great base for the soup. I also like adding kale or spinach for color and nutrients. These greens wilt nicely and enhance the soup's flavor. - Seasoning essentials: Garlic powder, onion powder, and smoked paprika are key. They add depth and warmth to the soup. Don't forget salt and cracked black pepper to taste. These simple seasonings really bring the dish to life. - Suggestions for proteins: You can add cooked chicken or sausage for extra heartiness. If you prefer plant-based, try tofu or tempeh. These options add flavor and make the soup more filling. - Boosting nutrition: Consider adding grains like quinoa or barley. They add texture and make the soup even more nutritious. You can also toss in lentils for a protein boost. - Alternative greens: If you want to mix things up, try Swiss chard or arugula. They offer different tastes and nutrients. Experimenting with greens keeps the soup fresh and exciting. Check out the Full Recipe for all the details on making this delicious soup! Start by heating the olive oil in a medium saucepan over medium heat. You want it shimmering but not smoking. Add the diced carrots and celery. Sauté them for about three minutes. This helps release their sweet flavors. Don’t rush this step; the heat must be just right. It sets a strong base for your soup. Next, it’s time to build your soup. Stir in the mixed beans. Cook them for one more minute. This warms the beans and helps their flavor blend in. Then, pour in the vegetable broth and diced tomatoes. Season with garlic powder, onion powder, and smoked paprika. Sprinkle in salt and black pepper to taste. Bring the broth to a gentle simmer. Let it cook for about five minutes. This allows the flavors to meld beautifully. Now, fold in the chopped kale or spinach right before serving. Cook them for just one minute. This will wilt the greens without overcooking them. Finally, taste your soup. Adjust the seasoning with more salt and pepper if you like. Serve it hot, and don’t forget to garnish with fresh herbs. For the full recipe, check the provided link. Enjoy your healthy, hearty bean soup! Using pre-cooked or canned ingredients makes cooking fast. Canned mixed beans are a great choice. They save time, and you get lots of protein. Just rinse and drain them. This helps remove extra sodium. To cut cooking time further, sauté your veggies first. Carrots and celery soften quickly. Once they start to cook, add your beans. This gives them a warm flavor. Combine everything in the pot with broth and tomatoes. You’ll have a tasty soup in just ten minutes. To boost flavor, use fresh herbs like parsley or cilantro. They add a bright taste and look nice. Spices like smoked paprika and garlic powder also help. They give the soup depth. Balancing acidity is key. Use diced tomatoes for a sweet touch. You can add a splash of lemon juice too. This adds brightness without overpowering the soup. Taste as you go, and adjust seasoning to suit your liking. Explore more flavor ideas in the [Full Recipe]. {{image_4}} You can easily make a vegetarian or vegan version of Minute Hearty Bean Soup. The base of this soup is already plant-based. Just ensure you use vegetable broth. This way, the soup stays rich in flavor and nutrition. You can also add more beans or lentils for extra protein. For those needing gluten-free options, focus on your broth and ingredients. Use certified gluten-free vegetable broth. Most canned mixed beans are gluten-free, too. Check the labels to be safe. You can also use fresh or frozen vegetables, which are naturally gluten-free. To make this soup even more exciting, try adding global flavors. For a Mexican twist, add corn and chili powder. Fresh cilantro gives it a bright taste too. For Mediterranean flair, stir in some olives and use herbs like oregano and thyme. If you want an Asian twist, consider adding ginger and soy sauce. You can also toss in some bok choy or mushrooms. This fusion idea keeps the soup fun and fresh. Feel free to mix ingredients from different cuisines for a unique taste experience. For more details on how to prepare this delicious soup, check out the Full Recipe. To keep your Minute Hearty Bean Soup fresh, store it properly. When you refrigerate it, it lasts for about three to four days. Make sure to use an airtight container. This helps prevent any off-flavors and keeps it safe. If you want to save it for later, freezing is a great option. The soup will stay good for around three months in the freezer. Use freezer-safe bags or containers. Leave some space at the top, as the soup expands when it freezes. When thawing, place it in the fridge overnight for best results. Reheating your soup is easy. The best way is to use the stove. Pour the soup into a saucepan and warm it over medium heat. Stir it often to avoid sticking. This keeps the texture nice. If you’re short on time, you can use a microwave. Place the soup in a microwave-safe bowl and cover it loosely. Heat it in short bursts, stirring in between. This helps it heat evenly. Sometimes, reheated soup can lose some flavor. You can fix this! Add a splash of fresh broth or a squeeze of lemon juice. This will brighten up the taste and make it feel fresh again. For the full recipe, check the [Full Recipe]. Can I use dried beans instead of canned? Yes, you can use dried beans. Just soak them overnight and cook them first. This adds time but gives great flavor. Make sure to adjust the broth and cooking time. How can I make the soup spicier or milder? To spice it up, add crushed red pepper or cayenne. For milder soup, skip these spices. You can also balance spice with a dollop of sour cream or plain yogurt. What can I use instead of vegetable broth? You can use chicken broth for a richer taste. Water works too, but it may lack flavor. Add more spices if you use water. Alternatives to kale or spinach for greens? Swiss chard or collard greens are great options. You can also use arugula for a peppery kick. Each green brings its own unique flavor and nutrition. What to serve with hearty bean soup? Crusty bread is a perfect match. You can also pair it with a fresh salad or grilled cheese. These sides add texture and balance to the meal. Creative ways to enjoy leftovers? Try using the soup as a base for a grain bowl. Top it with cooked rice or quinoa. You can also blend it for a creamy dip or sauce. This blog post covered how to make Minute Hearty Bean Soup. We explored essential ingredients like canned beans and fresh veggies. I shared steps for crafting a rich base and enhancing flavors. You learned quick cooking tips to save time without losing taste. There are also many variations, like vegan options and global twists. In closing, this soup is easy, tasty, and very versatile. Enjoy creating your perfect bowl!](https://fastmealmate.com/wp-content/uploads/2025/06/6eb35ef4-c964-4ad2-94ab-a053d6d9dc9e-768x768.webp)


