Old-Fashioned Peanut Brittle Crunchy and Tasty Treat

Do you love sweet, crunchy treats? Nothing beats homemade peanut brittle. This old-fashioned candy is simple to make and offers a delightful crunch with every bite. In this post, I will guide you through the ingredients, step-by-step instructions, and tips to make the perfect batch. Whether you’re a candy-making novice or a pro, you’ll find something valuable here. Let’s dive into the world of peanut brittle!
Why I Love This Recipe
- Easy to Make: This peanut brittle recipe is straightforward and requires minimal ingredients, making it perfect for both beginners and seasoned chefs.
- Perfect for Gifting: The beautifully arranged brittle pieces make a delightful gift, especially when wrapped in clear cellophane with a ribbon.
- Customizable: You can easily adjust the recipe by adding other nuts or flavors to create your own signature version of peanut brittle.
- Crunchy and Addictive: The satisfying crunch and sweet, nutty flavor of the peanut brittle make it a snack that’s hard to resist!
Ingredients
Main Ingredients for Old-Fashioned Peanut Brittle
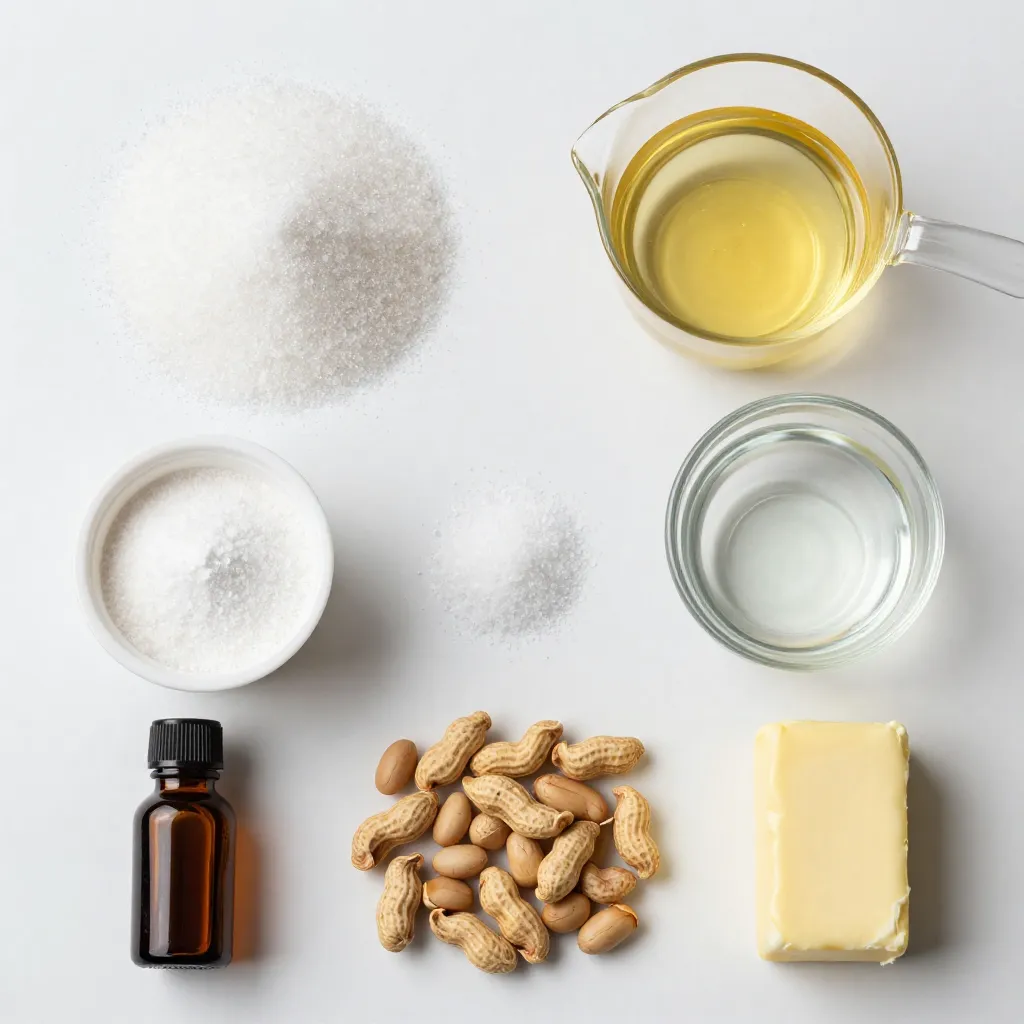
To make old-fashioned peanut brittle, you need just a few simple items:
– 2 cups granulated sugar
– 1 cup light corn syrup
– 1/4 cup water
– 1/2 teaspoon salt
– 1/4 teaspoon baking soda
– 1 teaspoon vanilla extract
– 2 cups raw unsalted peanuts
– 2 tablespoons unsalted butter
These ingredients come together to create a crunchy, sweet treat. Each plays a role in giving the brittle its classic taste.
Optional Ingredients for Flavor Variations
You can change up the flavor of your peanut brittle by adding:
– A pinch of cinnamon for warmth
– A splash of almond extract for a nutty twist
– Sea salt on top for a sweet-salty combo
These options let you customize the brittle to suit your taste.
Equipment Needed for Preparation
To make peanut brittle, you’ll need some basic tools:
– A heavy-bottomed saucepan
– A candy thermometer
– A spatula for spreading
– A baking sheet lined with parchment paper or a silicone mat
Having the right equipment makes the process smoother and helps ensure perfect results.

Step-by-Step Instructions
Preparing the Baking Sheet
Start by getting a large baking sheet. Line it with parchment paper or a silicone mat. This keeps the peanut brittle from sticking. Make sure to cover the whole sheet. This step is very important for easy removal later.
Combining and Heating the Sugar Mixture
In a heavy saucepan, mix together the sugar, corn syrup, water, and salt. Stir gently until all the sugar is moistened. This helps it dissolve evenly. Place the saucepan over medium heat. Stir from time to time until the sugar melts. When it has melted, stop stirring. Now, let it boil.
Monitoring Temperature and Adding Peanuts
Attach a candy thermometer to the side of the saucepan. Let the mixture boil without stirring. Keep a close watch until it reaches 300°F, the hard crack stage. This can take 10 to 15 minutes. When it hits the right temperature, quickly add the raw peanuts. Stir often as it cooks for another 2 to 3 minutes. The mixture will turn a lovely golden amber color.
Finalizing the Mixture with Baking Soda and Vanilla
Take the saucepan off the heat. Carefully whisk in the baking soda and vanilla extract. Expect some bubbling here; this is normal. Stir quickly to mix everything well. The baking soda adds a nice crunch to the brittle.
Spreading and Cooling the Brittle
Pour the hot peanut mixture onto your lined baking sheet. Use a spatula to spread it evenly. Be careful not to touch the hot mixture. Let it cool at room temperature for about 30 minutes. It will harden and become crisp.
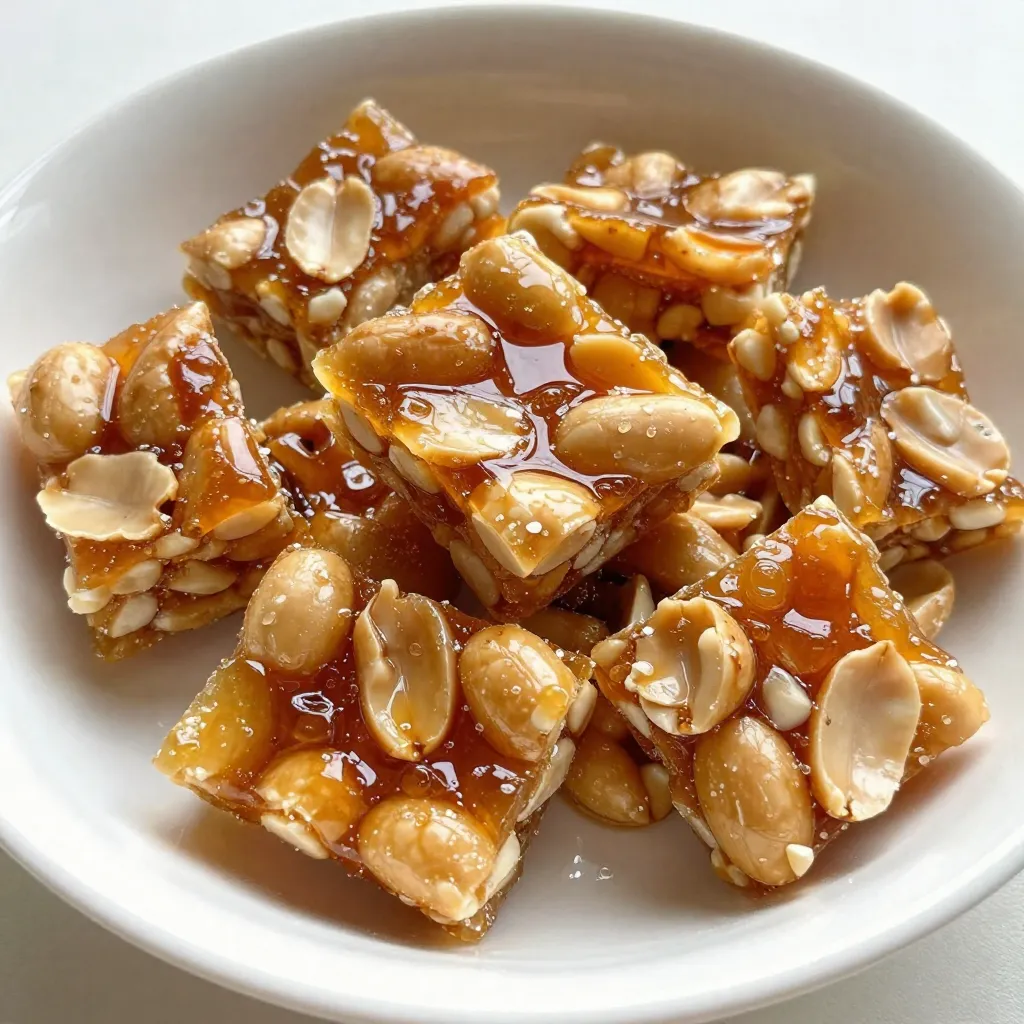
Breaking into Pieces and Serving
Once the brittle has cooled, break it into pieces. You can choose the size you like. Serve the pieces in a decorative container or platter. Enjoy this crunchy and tasty treat!
Tips & Tricks
Achieving the Perfect Texture
To get a great texture, aim for the hard crack stage. This happens at 300°F. Use a candy thermometer for accuracy. If it is too soft, the brittle won’t snap. If it is too hard, it may break your teeth. Watch closely as it boils. You want a nice golden amber color before adding the peanuts.
Avoiding Common Mistakes
One common mistake is stirring too much while boiling the sugar. Once the sugar dissolves, stop stirring. Stirring can cause graininess. Another mistake is not lining the baking sheet. This can make it hard to remove the brittle once it cools. Lastly, don’t skip the baking soda. It helps make the brittle light and crunchy.
Tools to Simplify Your Candy-Making
Using a heavy-bottomed saucepan is key. It spreads heat evenly and helps prevent burning. A candy thermometer is also a must-have. It takes the guesswork out of the cooking process. Silicone spatulas are great for spreading the mixture. They can withstand high heat and make cleanup easier.
Pro Tips
- Use a Candy Thermometer: Achieving the right temperature is crucial for the perfect brittle. A candy thermometer ensures you reach the hard crack stage without guesswork.
- Be Cautious with Hot Sugar: The sugar mixture can reach very high temperatures. Always use oven mitts and avoid touching it directly to prevent burns.
- Store Properly: To keep your peanut brittle fresh and crunchy, store it in an airtight container at room temperature away from humidity.
- Experiment with Nuts: While peanuts are classic, feel free to experiment with other nuts like almonds or cashews for a unique twist on the traditional recipe.
Variations
Nut Alternatives for Different Flavors
You can switch up the nuts in your peanut brittle. Try using almonds, cashews, or pecans. Each nut adds a unique taste and crunch. For example, cashews give a creamier flavor. Almonds add a nice bite. You can mix different nuts too! This makes your brittle fun and exciting to eat.
Adding Chocolate or Spice for a Twist
Adding a layer of chocolate can elevate your brittle. Melt dark or milk chocolate and drizzle it over the cooled brittle. You can also sprinkle some sea salt on top for a sweet-salty combo. If you like spice, try adding a pinch of cayenne pepper or cinnamon to the mixture. This gives your brittle a warm kick and makes it special.
Vegan Modification Suggestions
Making this treat vegan is easy! Simply replace the butter with coconut oil or vegan butter. Ensure your vanilla extract is pure. You can also use agave syrup instead of corn syrup. This keeps the texture while making it plant-based. Now everyone can enjoy this crunchy delight!
Storage Info
Best Practices for Storing Peanut Brittle
To keep your peanut brittle fresh, store it in an airtight container. You can use a glass jar or a plastic container. Make sure the brittle is completely cool before you seal it. This step helps keep moisture out and maintains its crunch. Avoid placing the brittle in a humid area, as this can make it sticky.
How Long Does Homemade Peanut Brittle Last?
Homemade peanut brittle can last for up to two weeks when stored properly. If you want to keep it longer, consider freezing it. In the freezer, it can stay good for about three months. Just remember to wrap it tightly in plastic wrap before placing it in a freezer bag.
Tips for Re-crisping Stale Brittle
If your peanut brittle loses its crunch, don’t worry. You can easily fix it! Preheat your oven to 300°F. Place the brittle on a baking sheet in a single layer. Bake for about 5 to 10 minutes. This will help restore its crispy texture. Just let it cool again before you enjoy it!
FAQs
What is the origin of peanut brittle?
Peanut brittle has roots in the United States. It became popular in the 19th century. Many say it comes from the Southern states. It is a festive treat often made during holidays. The mix of sugar and peanuts creates a crunchy delight.
Can I use roasted peanuts instead of raw?
Yes, you can use roasted peanuts. They add a nice flavor. However, raw peanuts give a fresher taste. If you choose roasted, skip the cooking time for peanuts. Just add them when the sugar mixture is ready.
How do I quickly fix grainy peanut brittle?
To fix grainy peanut brittle, reheat the mixture. You can add a little water. Heat it gently until it melts again. Stir it slowly until smooth. Then, cool it down and break it into pieces.
Is it okay to double the recipe?
Yes, you can double the recipe. Just use a larger pan to hold the mixture. Make sure to monitor the cooking time. The temperature should still reach 300°F for the best results.
What can I serve with peanut brittle?
Peanut brittle pairs well with many treats. You can serve it with ice cream for a sweet crunch. It also complements hot chocolate or coffee. For a festive touch, add it to gift baskets during holidays.
Making old-fashioned peanut brittle is simple and fun. You learned the key ingredients, tools, and step-by-step instructions needed to create this tasty treat. Tips and tricks help you avoid common mistakes and achieve the perfect texture. You can even explore variations with nuts, chocolate, or vegan options. Lastly, proper storage keeps your brittle fresh. Enjoy this sweet snack, share it with friends, and experiment with flavors. Peanut brittle brings joy and crunch to any occasion. Now, it’s time to make your own batc

Classic Peanut Brittle Delight
Ingredients
- 2 cups granulated sugar
- 1 cup light corn syrup
- 1 4 cup water
- 1 teaspoon salt
- 1 4 teaspoon baking soda
- 1 teaspoon vanilla extract
- 2 cups raw unsalted peanuts
- 2 tablespoons unsalted butter
Instructions
- Prepare the Baking Sheet: Begin by lining a large baking sheet with parchment paper or a silicone baking mat. This step is crucial as it prevents the peanut brittle from sticking when it cools.
- Combine Sugar Mixture: In a heavy-bottomed saucepan, combine the granulated sugar, light corn syrup, water, and salt. Gently stir the mixture to ensure that all the sugar is moistened.
- Heat the Mixture: Place the saucepan over medium heat. Stir occasionally until the sugar fully dissolves. Once dissolved, stop stirring and increase the heat to bring the mixture to a vigorous boil.
- Monitor Temperature: Attach a candy thermometer to the saucepan. Allow the mixture to boil without stirring until it reaches 300°F (the hard crack stage). This process will take approximately 10 to 15 minutes, so keep a close eye on it.
- Add Peanuts: Once your mixture hits the right temperature, quickly stir in the raw unsalted peanuts. Continue cooking, stirring often, until the mixture transforms into a beautiful golden amber color, roughly 2 to 3 minutes more.
- Add Baking Soda and Vanilla: Remove the saucepan from heat immediately. Carefully whisk in the baking soda and vanilla extract—expect the mixture to bubble vigorously. Stir quickly until everything is well combined.
- Spread the Mixture: With caution, pour the hot peanut mixture onto your prepared baking sheet. Use a spatula to spread it into an even layer, taking care to avoid contact with the hot mixture.
- Cool the Brittle: Allow the peanut brittle to cool completely at room temperature. This should take about 30 minutes or until it hardens to a crisp texture.
- Break into Pieces: Once cooled, break the peanut brittle into irregular pieces according to your desired size.


![For a great crispy tofu panini, you need: - 1 block firm tofu, well-pressed and sliced into 1/2 inch slabs - 1 tablespoon soy sauce - 1 tablespoon sesame oil - 1 tablespoon cornstarch - 1 large round ciabatta or focaccia bread, sliced in half horizontally - 1/2 cup fresh spinach leaves, washed and dried - 1/2 red bell pepper, roasted, peeled, and sliced thin - 1 small ripe avocado, sliced - 2 tablespoons hummus or vegan mayonnaise - Salt and freshly ground black pepper to taste - Olive oil, for grilling These ingredients work together to create a crispy, tasty panini that is both filling and healthy. You can add some extra flavor with these ingredients: - Sliced tomatoes for freshness - Red onion for a bit of bite - Fresh herbs like basil or cilantro - A dash of hot sauce for heat If you want to mix things up, these optional ingredients can make your panini even better. To make your meal complete, consider these sides: - A light salad with lemon vinaigrette - Sweet potato fries for crunch - A bowl of soup, like tomato or lentil These sides balance the flavors and add variety to your meal. Plus, they are easy to prepare! For the full recipe, check out the detailed steps to bring your crispy tofu panini to life. To start, we need to prepare the tofu. First, press the block of firm tofu. Use a clean kitchen towel or tofu press. This step removes excess moisture. Removing moisture is key for achieving crispiness later. Once pressed, slice the tofu into even slabs, each about 1/2 inch thick. This ensures even cooking and crispiness. Next, we will marinate the tofu. In a mixing bowl, whisk together soy sauce, sesame oil, and a pinch of salt and pepper. Then, add your tofu slices to this mixture. Make sure each piece gets coated well. Let the tofu soak in the marinade for about 15 minutes. This allows the tofu to absorb all those tasty flavors. Now, it’s time to cook the tofu. After marinating, take the slices out and sprinkle cornstarch on both sides. This coating is crucial for that nice, crispy texture. Heat a non-stick skillet over medium heat. Add a drizzle of olive oil to the pan. When the oil shimmers, carefully lay the coated tofu slices in the skillet. Cook each slice for about 4-5 minutes on each side. Look for a golden brown color and a crispy texture. Once done, transfer the tofu to a plate and set it aside. Let’s move on to assembling the panini. Take your ciabatta or focaccia bread and cut it in half horizontally. Spread hummus or vegan mayo on the inside of both halves. This adds moisture and flavor to the sandwich. On the bottom half, layer fresh spinach leaves first. Then add the crispy tofu slices, followed by roasted red bell pepper slices. Finally, place avocado slices on top. Now, close the sandwich with the top half of the bread. Press it down gently to hold everything in place. Next, we grill the panini. Preheat your panini press or another skillet over medium heat. Brush the outside of the sandwich with olive oil. This helps to create a crunchy crust while grilling. If using a skillet, place a heavy pan on top of the sandwich. This presses it down as it cooks. Grill for about 3-4 minutes on each side. Look for a beautiful golden brown color and a crispy texture. Once grilled to perfection, remove the panini from the heat. Slice it in half with a sharp knife and serve warm for the best taste. Enjoy your crispy tofu panini, a flavorful and satisfying delight! For the full recipe, check out the earlier sections. To make your tofu crispy, follow these tips: - Press the tofu well: Remove as much water as possible. This helps the tofu absorb flavors better. - Use cornstarch: Coat both sides of the tofu slices with cornstarch. This creates a crunchy crust. - Heat your skillet properly: Use medium heat and wait for the oil to shimmer before adding the tofu. - Do not overcrowd the pan: Cook in batches if needed. This allows each piece to get crisp. Here are some mistakes to watch out for: - Skipping the marination: Marinating adds flavor. Don’t rush this step. - Using too little oil: A light drizzle helps achieve that golden color and crisp texture. - Not slicing evenly: Make sure your tofu slabs are even. This ensures consistent cooking. - Opening the panini too soon: Let it grill fully to get the best texture. Having the right tools makes a big difference. Here are my top picks: - Panini press: This tool cooks evenly and gives perfect grill marks. - Non-stick skillet: If you don’t have a press, a good skillet works too. - Heavy pan: Use it to press down the sandwich while it cooks in a skillet. - Sharp knife: A sharp knife helps slice your panini without squishing it. Using these tips and tools, you can create a delicious crispy tofu panini. For the full recipe, check out the earlier sections. {{image_4}} When making a crispy tofu panini, you can switch up the ingredients to match your taste. This adds fun and keeps things interesting. You can use different sauces or spreads. Try using pesto or spicy mustard instead of hummus. Swap spinach for kale or arugula for a bolder flavor. For added crunch, add sliced cucumbers or pickles. You can also replace the red bell pepper with grilled zucchini or eggplant. Each swap brings a new twist to your panini. To keep this dish vegan, stick with plant-based ingredients. Use gluten-free bread to make it gluten-free. Many brands offer delicious options that taste great. Check labels to ensure they have no animal products. This allows everyone to enjoy the crispy tofu panini without worry. Fresh produce can change with the seasons. In spring, try adding fresh asparagus or sprouts. In summer, include ripe tomatoes or zucchini. In fall, swap in roasted butternut squash for a sweet flavor. Winter might call for roasted root vegetables like carrots or sweet potatoes. These seasonal swaps help you enjoy fresh tastes all year long. This recipe offers endless possibilities for creativity. Use the [Full Recipe] as your base, and let your imagination run wild with variations! To keep your crispy tofu panini fresh, wrap it tightly. Use plastic wrap or foil for best results. Store it in the fridge for up to three days. Avoid leaving it out at room temperature. This helps prevent sogginess and keeps the flavors intact. To reheat, use a skillet over medium heat. Place the panini in the skillet and cover it. Heat for about 4-5 minutes on each side. This method helps restore the crispiness. You can also use a toaster oven for a similar effect. Avoid the microwave, as it can make the bread soft. If you want to freeze your panini, wrap it well in plastic wrap and foil. It can last for up to a month in the freezer. When you’re ready to eat, thaw it in the fridge overnight. Reheat it in a skillet for the best texture. This way, you can enjoy a quick meal without losing flavor. To make tofu extra crispy, start with firm tofu. Press it well to remove water. Slice it into even slabs. Marinate the slices in soy sauce and sesame oil. Let them soak for at least 15 minutes. After marinating, coat each slice with cornstarch. This coating helps create that crunchy texture you want. Cook the tofu in a hot skillet with olive oil. Flip it until golden brown on both sides. Yes, you can use many types of bread. Ciabatta and focaccia work great, but others can too. Try sourdough or whole grain for a different taste. Each bread type adds its own flavor and texture. Choose one that you love, and enjoy your panini in a new way. Dipping sauces can enhance your panini experience. Hummus is a classic choice. It adds creaminess and flavor. Vegan mayo also works well for a smooth dip. You can try spicy salsa for a kick. Another option is a tangy vinaigrette. Each sauce complements the crispy tofu and adds fun flavors. For more ideas, check out the Full Recipe for inspiration. In summary, we explored how to make a crispy tofu panini. We covered the main and optional ingredients, step-by-step cooking tips, and even some fun variations. Remember to store leftovers well and reheat them correctly for the best taste. Experiment with flavors and enjoy this dish as part of your meals. With a few simple steps, you can have a delicious, crispy tofu panini that satisfies your cravings. Enjoy your cooking journey!](https://fastmealmate.com/wp-content/uploads/2025/06/c0074219-6fc3-4ba3-a1d2-dcd469194d4e-768x768.webp)
![Here are the ingredients you need for Peach Blueberry Greek Yogurt Cake. Gather these items before you start. - 1 cup plain Greek yogurt - 1 cup granulated sugar - 1/2 cup vegetable oil - 3 large eggs - 1 teaspoon vanilla extract - 2 cups all-purpose flour - 1 tablespoon baking powder - 1/2 teaspoon baking soda - 1/4 teaspoon salt - 1 cup fresh peaches, diced - 1 cup fresh blueberries - Zest of 1 lemon - Powdered sugar for dusting (optional) Using Greek yogurt makes this cake moist and adds a nice tang. Fresh peaches and blueberries bring sweetness and color. The lemon zest brightens the flavor, making each bite delightful. You can easily find most of these ingredients at your local store. For the full recipe, check the section on instructions. Enjoy baking this tasty treat! - Preheat your oven to 350°F (175°C). - Prepare and grease the cake pan. Use butter or oil and a little flour. This helps the cake come out easily. - Combine wet ingredients. In a large bowl, mix Greek yogurt, sugar, oil, eggs, and vanilla. Whisk until smooth. - Sift and combine dry ingredients. In another bowl, sift flour, baking powder, baking soda, and salt. This makes the cake light and fluffy. - Fold in the fruits. Gently add diced peaches, blueberries, and lemon zest to the batter. Be careful not to break the fruit. - Bake and check for doneness. Pour the batter into the pan. Bake for 35-40 minutes. Your cake is done when it is golden brown and a toothpick comes out clean. Enjoy making this delicious Peach Blueberry Greek Yogurt Cake by following the [Full Recipe]. - Avoiding overmixing: When you mix the wet and dry ingredients, stir just until combined. Overmixing can make your cake tough. The batter should look a bit lumpy, and that's okay! - Signs your cake is done: Your cake is ready when it turns golden brown. A toothpick inserted in the center should come out clean or have a few moist crumbs. This tells you it’s perfectly baked. - Presentation ideas: Serve your cake on a lovely cake stand. Top it with whole blueberries and thin peach slices. This adds color and charm to your dish. - Pairing with whipped cream: A dollop of fresh whipped cream takes this cake to another level. The cream’s richness balances the fruity flavors and makes each bite heavenly. - Incorrect ingredient ratios: Always measure your ingredients carefully. Too much flour or too little sugar can ruin the cake's texture and taste. - Not greasing the cake pan properly: Make sure to grease your pan well. Use butter or oil and dust it with flour. This step helps the cake come out easily after baking, preventing any tears. For the Full Recipe, be sure to check out the detailed instructions on how to make this delightful cake! {{image_4}} You can change fruits in this cake. Raspberries and strawberries work well. They add a nice flavor. You can also use flavored yogurt. Try vanilla or peach yogurt for a twist. This will change the taste slightly but keep it tasty. If you need gluten-free options, use a gluten-free flour blend. This keeps the cake light. For lower sugar choices, you can use a sugar substitute. This will keep the cake sweet without the extra sugar. Always check the package for the best ratio. Making cupcakes or mini cakes is fun and easy. Use a muffin tin to create individual servings. Bake them for about 20-25 minutes. Check for doneness with a toothpick. This way, you can share with friends or enjoy them yourself! You can store the Peach Blueberry Greek Yogurt Cake in two ways. If you plan to eat it quickly, keep it at room temperature. Just wrap it in plastic wrap or place it in an airtight container. This keeps the cake moist. If you want to save it longer, put it in the fridge. The cold will help it stay fresh for days. This cake stays fresh for about 3 days at room temperature. If you store it in the fridge, it can last up to a week. The flavors will deepen over time, which is a nice bonus! Just make sure to check for any signs of spoilage before enjoying. If you have leftover cake, freezing is a great option. Cut the cake into slices for easy serving later. Wrap each slice in plastic wrap tightly. Then, place the wrapped slices in a freezer bag. Make sure you remove the air. This way, the cake can last up to 3 months in the freezer. When you’re ready to eat it, just thaw it in the fridge overnight. Enjoy your delicious Peach Blueberry Greek Yogurt Cake again! For the full recipe, check out the earlier section. To make this cake, follow these steps: 1. Preheat the oven to 350°F (175°C). Grease a 9-inch cake pan. 2. In a bowl, mix Greek yogurt, sugar, oil, eggs, and vanilla. Whisk until smooth. 3. In another bowl, sift flour, baking powder, baking soda, and salt. 4. Gradually add the dry mix to the wet mix. Stir gently to combine. 5. Fold in diced peaches, blueberries, and lemon zest. 6. Pour the batter into the pan and smooth the top. 7. Bake for 35-40 minutes until golden. Check for doneness. 8. Cool the cake for 10 minutes in the pan, then transfer to a wire rack. You can find the full recipe in the earlier sections. Yes, you can use canned peaches. However, they may change the cake's texture. Canned peaches are softer and wetter than fresh ones. This extra moisture may make the cake denser. If you use canned peaches, drain them well. This will help keep the cake light and fluffy. You can make this cake dairy-free. Use coconut yogurt or almond yogurt instead of Greek yogurt. For eggs, try flaxseed meal or applesauce. Mix 1 tablespoon of flaxseed meal with 3 tablespoons of water per egg. Let it sit until it thickens. This will help bind the ingredients together. If you don’t have a toothpick, check the cake by pressing lightly on the top. If it springs back, it’s done. You can also look for a golden-brown top. The sides should pull away from the pan slightly. These signs mean your cake is ready to be taken out of the oven. This blog post showed you how to make a delicious Peach Blueberry Greek Yogurt Cake. You learned about the simple ingredients, step-by-step instructions, and some helpful tips. Remember to avoid overmixing and choose the right baking time. Feel free to customize the recipe with different fruits or dietary changes. Store your cake properly to keep it fresh. Enjoy your baking adventure and impress your friends with this tasty treat!](https://fastmealmate.com/wp-content/uploads/2025/06/b601b86f-d636-457f-a46c-3ca961086cb7-768x768.webp)


