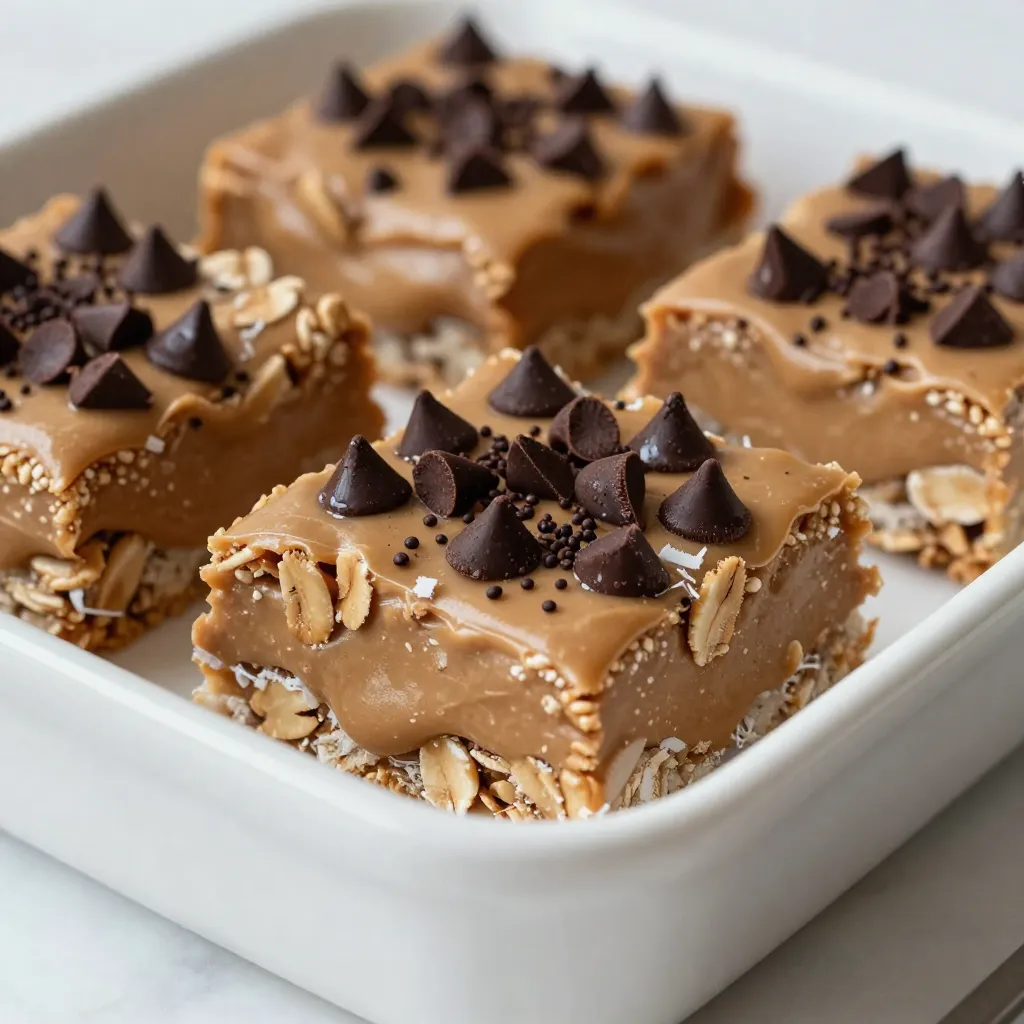
Are you craving a tasty snack that requires no baking? Look no further! These No-Bake Peanut Butter Bars are simple to make and packed with flavor. With just a handful of ingredients like peanut butter, oats, and chocolate chips, you’ll whip up a treat that the whole family will love. Join me in making these easy and delicious bars, perfect for any occasion. Let’s dive into the recipe!
Why I Love This Recipe
- Quick and Easy: This recipe comes together in just 10 minutes, making it perfect for a last-minute treat.
- No Baking Required: You can enjoy these delicious bars without turning on the oven, which means less mess and hassle.
- Healthy Ingredients: With natural peanut butter, oats, and flaxseed, these bars are a nutritious snack option that doesn’t compromise on taste.
- Customizable: You can easily switch up the ingredients, like using different nut butters, sweeteners, or mix-ins to suit your preferences.
Ingredients
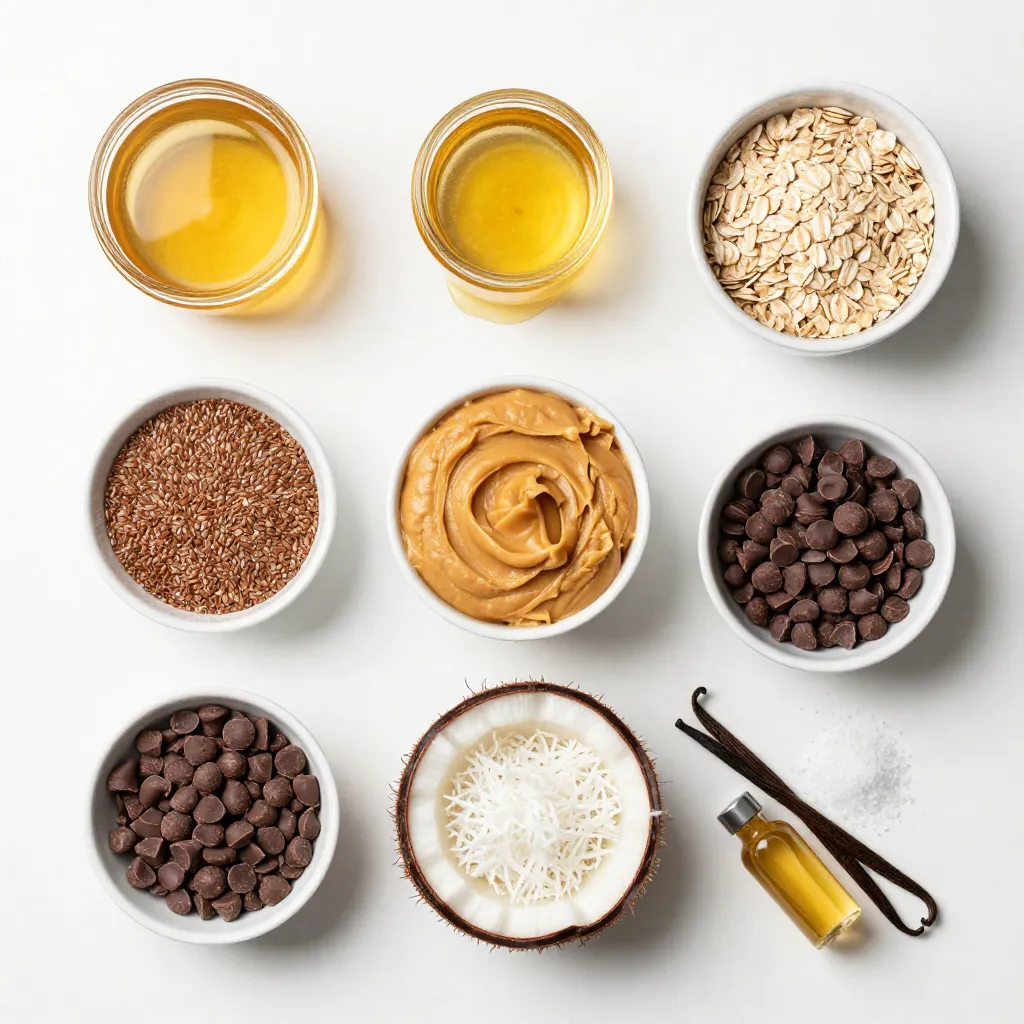
List of Ingredients
– 1 cup natural peanut butter (smooth or crunchy)
– 1/2 cup honey or maple syrup
– 2 cups rolled oats (old-fashioned preferred)
– 1/2 cup ground flaxseed
– 1/2 cup shredded coconut (unsweetened)
– 1/2 cup chocolate chips (dark or semi-sweet)
– 1/4 teaspoon salt
– 1 teaspoon vanilla extract
– Optional toppings
When making No-Bake Peanut Butter Bars, you need to gather some simple ingredients. First, choose your favorite peanut butter. Smooth peanut butter gives a creamy texture, while crunchy adds some fun bits. Next, pick a sweetener like honey or maple syrup. Both options work well to bind the bars together.
For chewiness, grab rolled oats. Old-fashioned oats are best for this recipe. Ground flaxseed adds nutrition and a nice nutty flavor. You can also include shredded coconut for extra texture. Unsweetened coconut keeps it healthy and light.
Chocolate chips are a must for a sweet touch. Choose dark chocolate for a rich flavor or semi-sweet for more sweetness. A little salt helps to bring out all the flavors in the bars. Lastly, add vanilla extract for some aromatic sweetness. If you want extra flair, consider optional toppings like melted chocolate or more coconut. These simple, wholesome ingredients make for a delicious treat!
Step-by-Step Instructions
Preparation Steps
– Start by mixing the peanut butter and sweetener. In a large bowl, add 1 cup of natural peanut butter and 1/2 cup of honey or maple syrup. Use a spatula or spoon to blend until smooth and creamy.
– Next, incorporate the dry ingredients. Gradually add 2 cups of rolled oats, 1/2 cup of ground flaxseed, 1/2 cup of shredded coconut, 1/4 teaspoon of salt, and 1 teaspoon of vanilla extract. Stir well until everything combines.
– Now it’s time to fold in the chocolate chips. Gently mix in 1/2 cup of chocolate chips, ensuring even distribution. This adds a lovely chocolate burst in every bite.
– Prepare the baking dish by lining an 8×8 inch dish with parchment paper. Let some of the paper hang over the edges. This helps lift the bars out later.
Setting the Bars
– Transfer the mixture into the lined baking dish. Use the back of a spatula or your hands to press down firmly. This creates an even layer and helps the bars hold together.
– For added flair, melt some extra chocolate for a drizzle. You can microwave a few chocolate chips or use a double boiler. Drizzle the melted chocolate over the pressed mixture.
– Cover the dish with plastic wrap or foil. Place it in the refrigerator for at least 2 hours. This chilling time is crucial for the bars to set and hold their shape.
– When set, lift the mixture from the baking dish using the parchment overhang. Place it on a cutting board and slice into squares or rectangles for serving.
Tips & Tricks
Texture and Flavor Enhancements
Choosing the right peanut butter is key. You can pick smooth for a creamy treat or crunchy for added bites. Both styles work well in this recipe. The flavor changes slightly based on your choice. Smooth peanut butter gives a rich, velvety taste, while crunchy peanut butter adds fun texture.
For sweeteners, you have two great options: honey or maple syrup. Honey provides a rich sweetness and a slight floral note. Maple syrup has a warm, earthy flavor. Both bind the ingredients well. Using one or the other will not hurt the bars. Just choose what you like best.
Serving Suggestions
Presentation matters when serving these bars. Arrange them on a colorful platter. A sprinkle of shredded coconut on top makes them look inviting. Drizzling melted chocolate over the bars adds a touch of elegance.
Pair these bars with a glass of cold milk or a cup of coffee. They can also be a great snack for kids after school. You can serve them with fresh fruit or yogurt for a more balanced treat. Enjoying these bars with friends or family makes them even better!
Pro Tips
- Choose Your Peanut Butter Wisely: Opt for natural peanut butter without added sugars or oils for a healthier option that enhances flavor.
- Chill for Best Results: The longer you chill the bars, the firmer they will become, making them easier to cut and more enjoyable to eat.
- Customize Your Mix-Ins: Feel free to add nuts, seeds, or dried fruit for extra texture and flavor variations.
- Storage Tips: Keep the bars in an airtight container in the fridge for up to a week for optimal freshness.
Variations
Dietary Modifications
You can easily change this recipe to suit your needs.
– Gluten-free options: Use certified gluten-free oats. This way, everyone can enjoy them without worry.
– Vegan adaptations: Swap honey for maple syrup. Use dairy-free chocolate chips for a fully vegan treat.
– Nut-free alternatives: Try sun butter or soy nut butter instead of peanut butter. This option is great for kids’ schools.
Flavor Additions
Adding flavors makes these bars even better.
– Adding spices: Sprinkle in some cinnamon or nutmeg. These spices give a warm touch and add depth to the flavor.
– Incorporating dried fruits or nuts: Mix in raisins, cranberries, or chopped nuts for extra texture and taste. Dried fruits add natural sweetness, while nuts give a nice crunch.
Storage Info
Best Practices for Storage
To keep your no-bake peanut butter bars fresh, store them in an airtight container. This will help maintain their taste and texture. Place a piece of parchment paper between layers if you stack them. Make sure to store them in the refrigerator. The cool temperature keeps them firm and tasty.
Shelf Life and Freezing
These bars last about a week in the fridge. You can also freeze them for longer storage. Wrap them tightly in plastic wrap or foil before placing them in a freezer-safe bag. They can last up to three months in the freezer. When you’re ready to enjoy them, just thaw them in the fridge overnight.
FAQs
Common Questions
Can I use different nut butters?
Yes, you can. Almond butter, cashew butter, or sunflower seed butter work well. Just keep the same amount.
How do I make these bars firmer?
To make the bars firmer, add more oats or flaxseed. You can also chill them longer in the fridge.
Are these bars healthy?
These bars are a good source of protein and healthy fats. They are also rich in fiber from oats and flaxseed.
Can I add protein powder?
Yes, you can add protein powder. Start with a scoop and mix it into the peanut butter blend.
What to do if I don’t have flaxseed?
If you don’t have flaxseed, you can use chia seeds. They provide similar nutrition and help bind the mixture.
These no-bake bars are easy and fun to make. You need just a few simple ingredients like peanut butter, oats, and chocolate chips. I shared step-by-step instructions that let you mix and set the bars perfectly. There are also tips on flavors, dietary changes, and storage.
Enjoy making these bars your way. They are tasty and fit many diets! Try different ingredients to find your favorite mix. Get creative and make these bars a treat everyone will lov


