Are you craving a sweet treat but don’t want to turn on the oven? You’re in the right place! These No Bake Peanut Butter Bars are quick, easy, and delicious. With just a few simple ingredients, you can whip up a tasty snack that’s perfect for any time of day. Follow my step-by-step guide and discover helpful tips to customize your bars. Let’s dive in and start making these delightful treats!
Why I Love This Recipe
- Quick and Easy: This recipe takes just 10 minutes to prepare, making it a perfect treat for those busy days when you crave something delicious without spending hours in the kitchen.
- Healthy Ingredients: Made with natural peanut butter, rolled oats, and protein powder, these bars are not only tasty but also packed with nutrients, providing a wholesome snack option.
- Customizable: You can easily modify this recipe to suit your taste, whether by using different nut butters, sweeteners, or adding extra mix-ins like dried fruits or nuts.
- Perfect for Meal Prep: These no-bake bars store well in the fridge, making them an ideal option for meal prep. You can grab one whenever you need a quick energy boost!
Ingredients
To make No Bake Peanut Butter Bars, you will need the following ingredients:
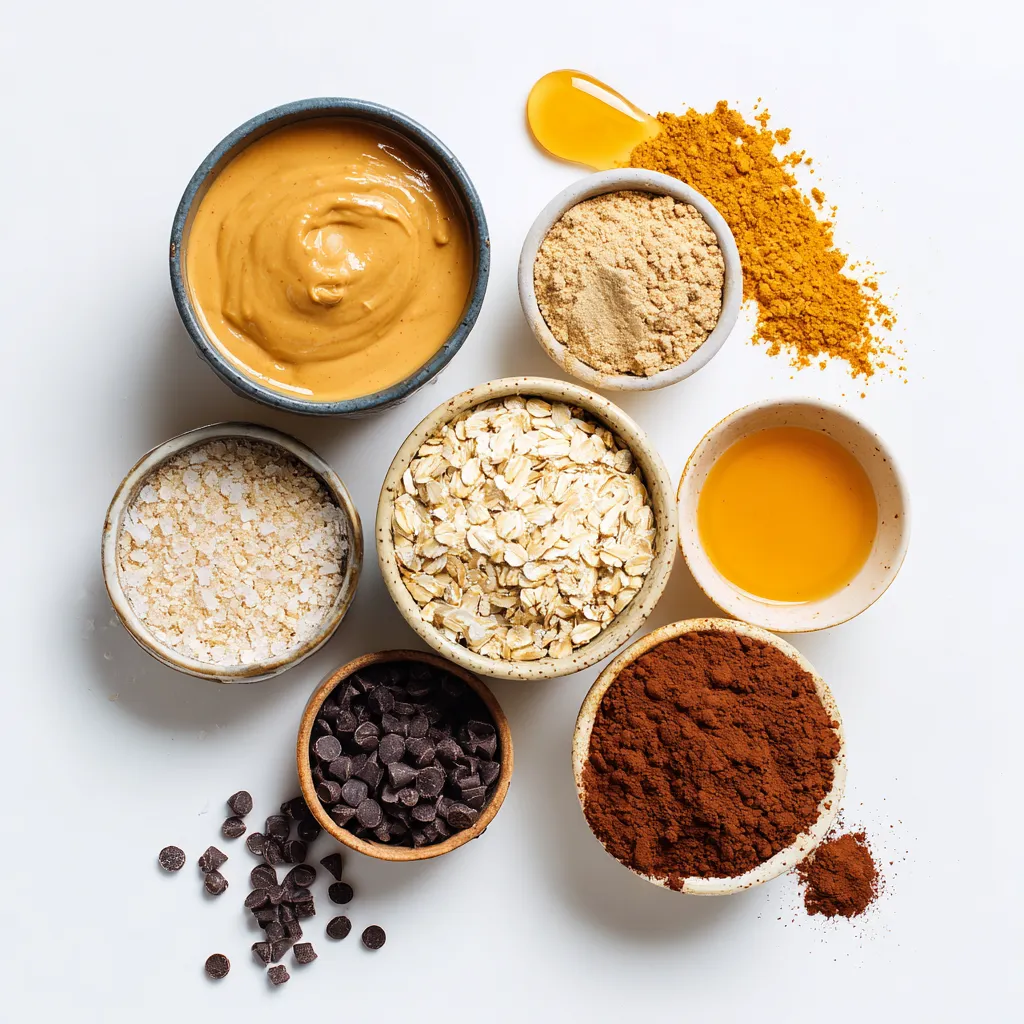
– 1 cup natural peanut butter (creamy or crunchy)
– 1/2 cup pure maple syrup or honey
– 1 cup rolled oats
– 1/2 cup protein powder (vanilla or chocolate)
– 1/2 cup mini chocolate chips (dark or semi-sweet)
– 1/4 cup unsweetened cocoa powder
– Pinch of salt
Each item plays a key role in creating delicious bars. The natural peanut butter gives a rich flavor and creamy texture. Using pure maple syrup or honey adds sweetness without processed sugars. Rolled oats provide a hearty base that holds everything together.
Protein powder boosts nutrition and can add a nice flavor twist. The mini chocolate chips bring a delightful bite of sweetness. Unsweetened cocoa powder deepens the chocolate flavor, making these bars hard to resist. Finally, a pinch of salt enhances the overall taste.
These ingredients combine to create a tasty treat that is both easy to make and satisfying. You can adjust any of these based on your likes or diet needs. Enjoy creating your own version of these bars!
Step-by-Step Instructions
Preparing the Peanut Butter Base
Start by taking a large bowl. Here, you will combine 1 cup of natural peanut butter with 1/2 cup of pure maple syrup or honey. Mix them well until the texture is smooth. This step creates the tasty base for your bars.
Mixing Dry Ingredients
Now it’s time to add the dry ingredients. Add 1 cup of rolled oats, 1/2 cup of protein powder, 1/4 cup of unsweetened cocoa powder, and a pinch of salt. Stir everything together until you no longer see any dry bits. This ensures each bite is full of flavor.
Incorporating Chocolate Chips
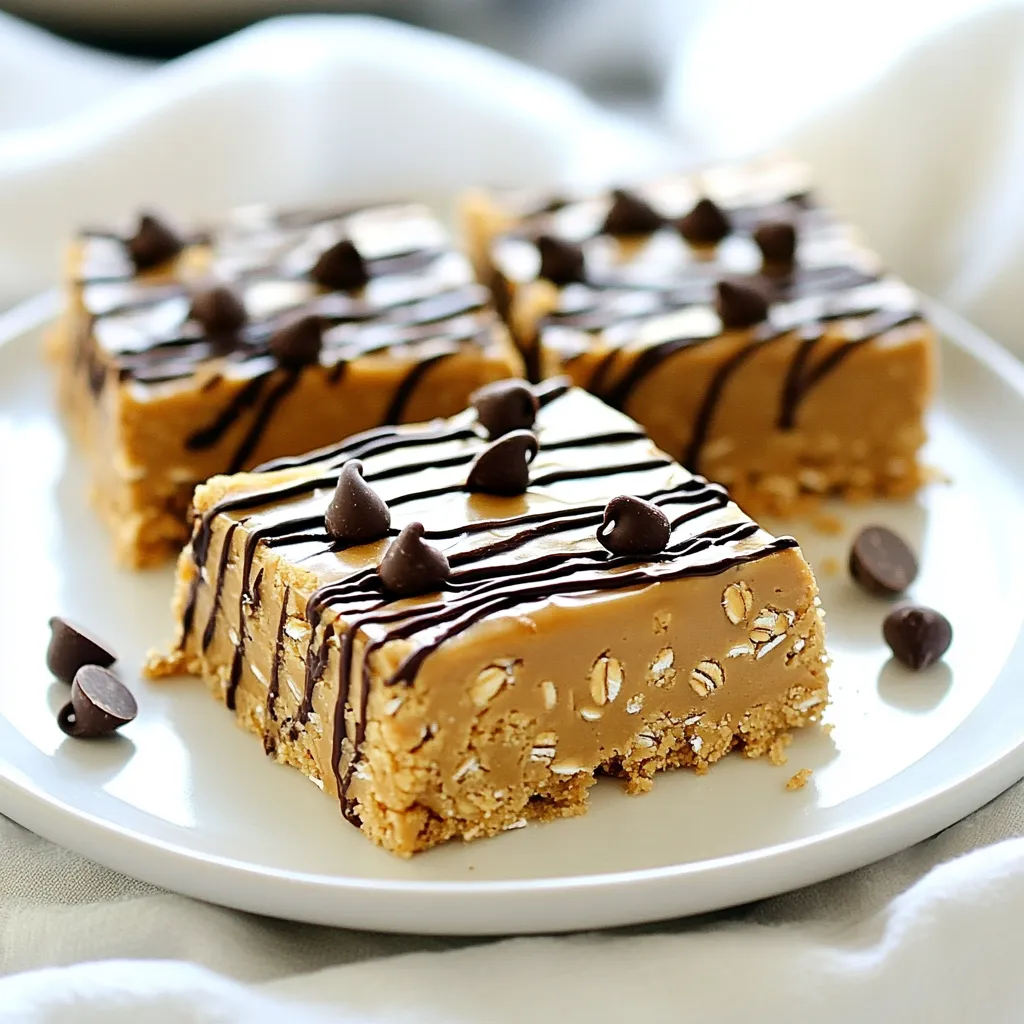
Next, fold in 1/2 cup of mini chocolate chips. Use a spatula to mix gently. This helps spread the chocolate chips evenly throughout the mixture. You want a little chocolate in every square!
Setting the Bars
Grab an 8×8 inch baking pan and line it with parchment paper. Make sure some paper hangs over the edges. This will help you lift the bars out later. Now, transfer the mixture into the pan. Press down firmly using your hands or a spatula. This step helps the bars hold their shape.
Chilling Process
Put the pan in the refrigerator. Let it chill for at least 2 hours. This time is important for the bars to set properly. After chilling, check the texture. The bars should feel firm but not hard.
Tips & Tricks
Customization Ideas
You can easily change this recipe to fit your taste.
– Using different nut butters: Swap peanut butter for almond, cashew, or sunflower butter. Each nut butter adds its unique flavor.
– Adjusting sweetness levels: If you like it sweeter, add more maple syrup or honey. For less sweetness, cut back on the syrup.
Presentation Tips
How you serve your bars can make them more fun to eat.
– Creative ways to serve the bars: Arrange the bars on a colorful plate or a wooden board. This makes a nice display for guests.
– Drizzling peanut butter or chocolate for garnish: Melt some peanut butter or chocolate and drizzle it over the bars. This adds flavor and makes them look fancy.
Troubleshooting Common Issues
If your bars don’t set right, here are some tips.
– Bars not setting properly: If the bars are too soft, they may need more chilling time. You can also add a bit more oats to help them firm up.
– Adjusting consistency before chilling: If your mixture seems too dry, add a splash of maple syrup or a bit of water. If it’s too wet, mix in more oats or protein powder.
Pro Tips
- Choose Your Peanut Butter Wisely: Use natural peanut butter without added sugars or oils for the healthiest option. The flavor will be rich and authentic, enhancing your bars.
- Experiment with Sweeteners: While maple syrup and honey are great, feel free to try agave nectar or brown rice syrup for a different taste profile.
- Customize Your Mix-Ins: Add nuts, seeds, or dried fruits to introduce different textures and flavors. This is a great way to make the bars your own!
- Proper Storage: Store the bars in an airtight container in the refrigerator. They can last up to a week, making them perfect for meal prep and snacking!
Variations
Healthier Ingredient Swaps
You can make these no bake peanut butter bars even healthier. One great swap is using agave nectar instead of maple syrup or honey. Agave is lower on the glycemic index. This means it won’t spike your blood sugar as much.
Incorporating seeds like chia or flaxseeds is another easy change. These seeds add fiber and omega-3 fatty acids. Plus, they give your bars a crunchy texture. Just a couple of tablespoons will do the trick!
Flavor Enhancements
To boost the flavor, try adding a splash of vanilla extract. It makes the bars taste richer and more aromatic. Another option is to sprinkle in some cinnamon. This spice brings warmth and a hint of sweetness without extra sugar.
You can also experiment with dried fruits or nuts. Chopped dates or cranberries add natural sweetness. Nuts like almonds or walnuts add a nice crunch. Just keep the balance in mind so the bars do not get too dry or crumbly.
Storage Info
Best Storage Practices
To keep your no bake peanut butter bars fresh, use an airtight container. A glass or plastic container works well. If you want to keep them longer, the freezer is a great option. Just wrap each bar in plastic wrap before placing them in a freezer bag. This helps prevent freezer burn.
Storing in the refrigerator helps maintain the bars’ chewy texture. They stay fresh there for a week. If you choose to freeze them, they can last for up to three months. Just remember to let them thaw in the fridge before enjoying.
Shelf Life
These bars can last about a week in the fridge. If you notice any changes in color or smell, it’s best to toss them. Freshness is key, so check for a nice peanut butter smell. If they smell off or look dry, they may not be good anymore.
When stored correctly, you can enjoy these treats for a long time. Just follow these tips to keep them tasty and safe to eat!
FAQs
Can I make these bars vegan?
Yes, you can make these bars vegan easily. Just swap honey for maple syrup. Choose dairy-free chocolate chips for the mix. If you use plant-based protein powder, your bars will be fully vegan. It’s a simple change that keeps the flavors intact.
How do I know when the bars are set?
The bars are ready when they feel firm to the touch. You can also gently press the top. If it springs back, they are set. After chilling for two hours, they should be cold and solid. Keep an eye on the texture; it helps to know when to cut them.
Can I freeze these no bake bars?
Yes, these bars freeze well! Cut them into squares first. Wrap each piece in plastic wrap, then place them in a freezer-safe container. When you want to eat them, leave them in the fridge overnight to thaw. They taste great even after freezing!
You learned how to make tasty no-bake peanut butter bars. We covered the ingredients, easy steps, and personalizing tips. You can swap in flavors you like and choose your sweeteners. Storage ideas ensure your bars stay fresh.
With these recipes and tips, making your bars is simple and fun. Enjoy creating your own snacks! Keep experimenting for new flavors. You’ll always find something tasty for you and your friend


