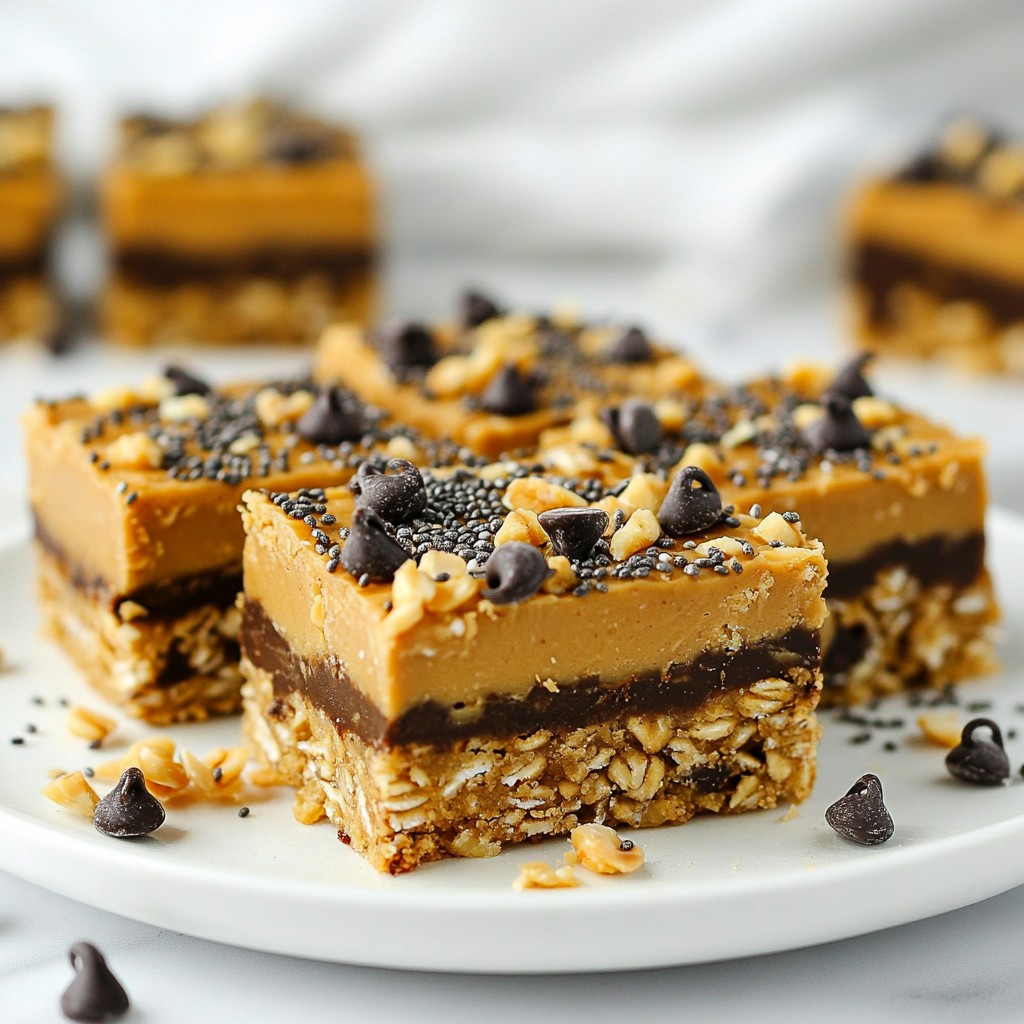
Looking for a quick and tasty treat? These No-Bake Peanut Butter Bars are easy to make and delicious! With simple ingredients like peanut butter, honey, and oats, you can whip up a snack in no time. Perfect for busy days or sweet cravings, this recipe will leave you wanting more. Let’s dive into this easy step-by-step guide and get started on making your new favorite bars!
Why I Love This Recipe
- Quick and Easy: This recipe requires only 10 minutes of prep time, making it perfect for busy days.
- Healthy Ingredients: Packed with natural peanut butter, oats, and chia seeds, these bars provide great nutrition.
- No Baking Required: Simply mix, press, and refrigerate—no oven needed for this delicious treat!
- Customizable: Easily adapt the recipe by changing the nuts or chocolate type to suit your taste.
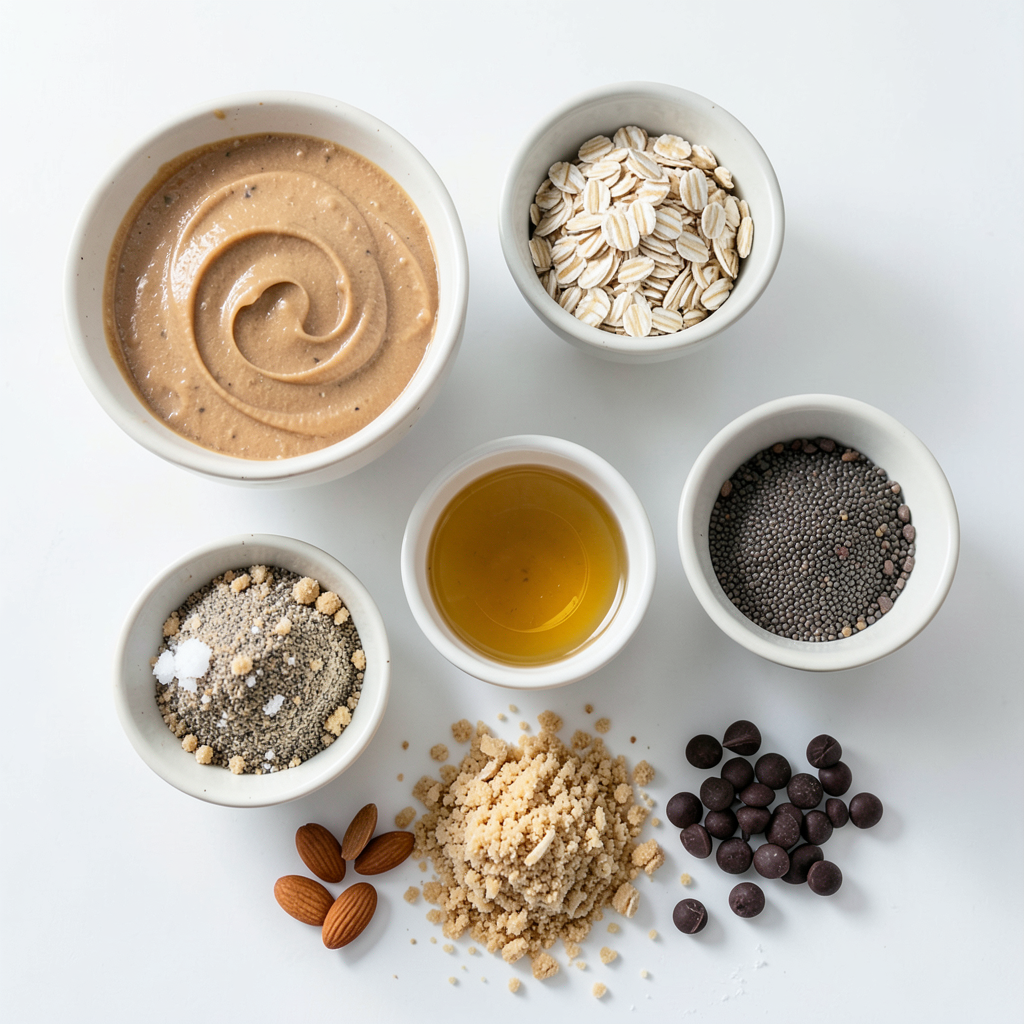
Ingredients
To make your no-bake peanut butter bars, gather these simple ingredients:
- 1 cup natural peanut butter (creamy or crunchy)
- 1/2 cup honey or maple syrup
- 2 cups rolled oats (preferably old-fashioned)
- 1/2 cup graham cracker crumbs
- 1/4 cup chia seeds
- 1/2 cup dark chocolate chips (or semi-sweet)
- 1/4 cup chopped nuts (almonds or walnuts)
- Pinch of salt
These ingredients work together to create a tasty treat. The peanut butter brings a rich, nutty flavor, while the honey or maple syrup adds sweetness. Old-fashioned oats give the bars a chewy texture, and graham cracker crumbs add a nice crunch. Chia seeds boost nutrition, and dark chocolate chips provide that sweet finish.
Feel free to mix and match some ingredients if you want. Use almond butter instead of peanut butter or swap honey for agave. The best part? You can customize these bars to fit your taste. Enjoy the process!
Step-by-Step Instructions
Preparation of the Peanut Butter Mixture
Start by grabbing a large mixing bowl. In this bowl, add 1 cup of natural peanut butter and 1/2 cup of honey or maple syrup. Mix them well until they are smooth. You want to make sure no lumps are left. This mix is the heart of your bars.
Next, it's time to add the dry ingredients. Gradually stir in 2 cups of rolled oats, 1/2 cup of graham cracker crumbs, 1/4 cup of chia seeds, and a pinch of salt. Mix everything together until it forms a thick dough. The oats and crumbs add texture, while the chia seeds give a boost of nutrition.
Finalizing the Mixture
Now, gently fold in 1/2 cup of dark chocolate chips and 1/4 cup of chopped nuts. I love using almonds or walnuts, but you can pick your favorite. Make sure the chocolate and nuts are evenly spread throughout the mixture. This way, every bite will be delicious!
Prepare an 8x8 inch baking dish by lining it with parchment paper. Make sure the paper hangs over the edges. This helps you lift the bars out later with ease.
Setting the Bars
Carefully pour the peanut butter mixture into the lined baking dish. Use a spatula to press the mix down firmly and evenly into all corners. You want it to be compact and uniform.
If you want to make them even more tempting, sprinkle a few extra chocolate chips or nuts on top. Lightly press them into the surface to make it look nice.
Cover the dish tightly with plastic wrap. Refrigerate it for at least 2 hours, or until the bars are set and firm. Once they are ready, lift them out using the parchment paper. Place them on a cutting board and slice into squares or rectangles. Enjoy your tasty no-bake peanut butter bars!
Tips & Tricks
Perfecting Your No-Bake Peanut Butter Bars
To make the best no-bake peanut butter bars, focus on the mixture's consistency. You want it thick but not too dry. If it feels crumbly, add a bit more peanut butter or honey. Stir well until everything blends smoothly.
When it comes to sweetness, you can choose between honey and maple syrup. Honey gives a rich flavor, while maple syrup adds a nice hint of caramel. Taste the mixture as you go. Adjust the sweetness to what you like best.
Presentation Suggestions
For a stunning display, arrange the bars on a rustic wooden board. You can slice them into squares or rectangles for easy serving. To make it extra special, sprinkle some extra peanuts on top. A light drizzle of melted chocolate over the bars looks beautiful and adds more flavor.
Garnishing with chopped nuts or a few chocolate chips enhances both taste and looks. This way, your no-bake peanut butter bars will impress everyone who sees them!
Pro Tips
- Choose Your Sweetener Wisely: Opt for honey for a more traditional flavor or maple syrup for a vegan alternative. Both will provide a different sweetness profile, so pick based on your preference!
- Texture Matters: For a chewy texture, use old-fashioned rolled oats. Instant oats will make the bars softer and less crunchy, so stick with rolled oats for that perfect bite!
- Customize with Mix-Ins: Feel free to add your favorite nuts, dried fruits, or seeds to the mix. This not only enhances flavor but also boosts the nutritional value of your bars!
- Storage Tips: Store the bars in an airtight container in the refrigerator for up to a week, or freeze them for longer storage. Just be sure to separate layers with parchment paper to prevent sticking!
Variations
Flavor Variations
You can easily change the taste of your no-bake peanut butter bars. One fun way is by swapping the peanut butter for other nut butters. Almond or cashew butter will give you new flavors. Both options are creamy and rich.
You can also add spices to boost the taste. A sprinkle of cinnamon can make your bars warm and cozy. If you prefer a sweet aroma, try adding vanilla extract. Just a little will make a big difference!
Healthier Alternatives
If you want to make your bars healthier, consider using sugar-free sweeteners. These can replace honey or maple syrup. They keep the sweetness while cutting down on sugar.
You can also add superfoods to enhance nutrition. For instance, chia seeds are already in the recipe, but you can add flaxseeds or hemp seeds, too. These extra ingredients boost fiber and omega-3 fatty acids.
Storage Info
Best Practices for Storing Bars
To keep your no-bake peanut butter bars fresh, store them in the fridge. Place the bars in an airtight container. You can also use a glass dish with a lid. This helps keep moisture out and avoids any weird smells from your fridge.
If you want to store them longer, freeze the bars. Wrap each bar in plastic wrap first. Then, place them in a freezer-safe bag or container. This keeps them safe for up to three months.
Shelf Life
In the fridge, these bars will stay fresh for about a week. If you see any mold or a change in smell, toss them. Signs of spoilage include an off smell or a dry, crumbly texture. Always check before eating. Enjoy your delicious treats while they are still at their best!
FAQs
Common Questions About No-Bake Peanut Butter Bars
Can I make these bars vegan? Yes, you can make these bars vegan by using maple syrup instead of honey. Also, choose dark chocolate chips that are dairy-free. This way, you can enjoy a delicious treat that fits a vegan diet.
How can I make them gluten-free? To make these bars gluten-free, simply use gluten-free rolled oats and gluten-free graham cracker crumbs. Check labels to ensure all ingredients are certified gluten-free.
What’s the best way to cut the bars for even shapes? For even shapes, let the bars chill until firm. Once set, lift them out using the parchment paper. Use a sharp knife to slice them into squares or rectangles. Wipe the knife between cuts for clean edges.
Troubleshooting Tips
What to do if the mixture is too dry or too sticky? If the mixture is too dry, add a small amount of peanut butter or maple syrup. Mix well until it reaches a cohesive dough. If it’s too sticky, sprinkle in a bit more oats or graham cracker crumbs. Stir until the texture improves.
Adjusting ingredients for dietary preferences You can swap ingredients based on your needs. Use almond butter instead of peanut butter if you prefer. For sweetness, try agave syrup instead of honey or maple syrup. This flexibility helps tailor the recipe to fit different diets.
You learned how to create delicious no-bake peanut butter bars. We covered all the ingredients and step-by-step instructions. I shared tips for perfecting and presenting your bars, along with tasty variations. Remember to store them properly for freshness. With these easy recipes and tricks, you can enjoy a yummy treat anytime. Have fun making these bars and customize them just for you!