No-Bake Gnome Mini Cheesecakes Delightful Treat

Looking for a fun dessert that impresses without heating up your kitchen? No-Bake Gnome Mini Cheesecakes are the perfect choice! With a creamy filling and a playful gnome theme, these treats are simple to make and delightfully tasty. I’ll guide you through easy steps, fun decorations, and clever ingredient swaps to create a dessert everyone will love. Let’s dive into this gnome-tastic adventure!
Why I Love This Recipe
- Fun Theme: The gnome theme adds a playful touch, making these mini cheesecakes perfect for parties or gatherings.
- No-Bake Convenience: These cheesecakes are easy to make without turning on the oven, perfect for warm days.
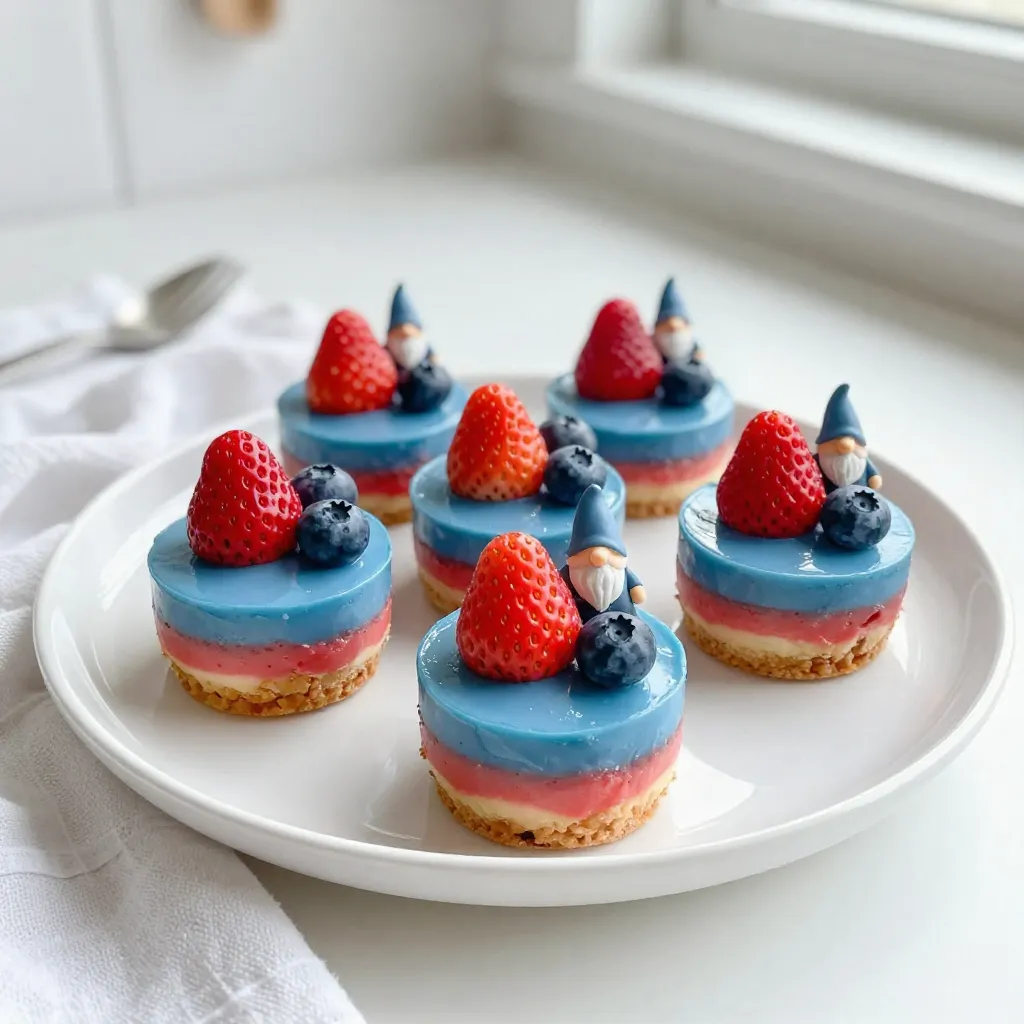
- Colorful Presentation: The vibrant red and blue colors create an eye-catching dessert that delights both kids and adults.
- Customizable Toppings: Fresh fruit and mini gnome figurines allow for creative decoration, making each cheesecake unique.
Ingredients
List of Ingredients
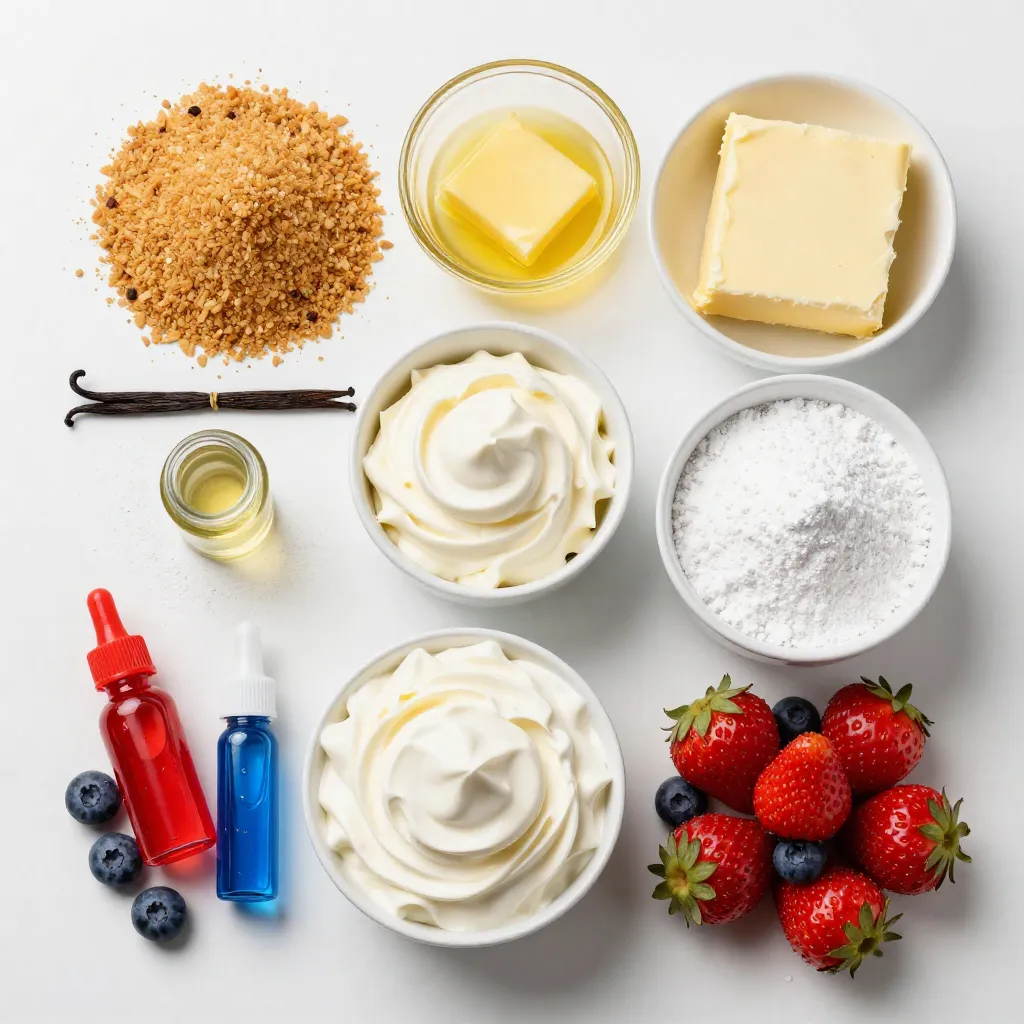
– 1 ½ cups graham cracker crumbs
– ½ cup unsalted butter, melted
– 2 cups cream cheese, softened
– 1 cup powdered sugar
– 1 teaspoon pure vanilla extract
– 1 cup heavy whipping cream
– Red and blue food coloring (gel preferred)
– Fresh strawberries and blueberries for decoration
– Mini gnome figurines (optional)
Optional Decorations
For a fun touch, use mini gnome figurines on top of each cheesecake. They add charm and make the treat more festive. You can also add fresh strawberries and blueberries as toppings. Edible flowers or mint leaves can enhance the look, creating a garden vibe.
Ingredient Substitutions
If you run out of graham crackers, you can use vanilla wafers instead. For a lighter cheesecake, try using reduced-fat cream cheese. If you want a sweeter taste, you can swap powdered sugar for honey or maple syrup. Ensure you adjust the amounts to match your taste. If you cannot find heavy cream, use whipped coconut cream for a dairy-free option.

Step-by-Step Instructions
Preparing the Crust
First, gather your ingredients. You need graham cracker crumbs and melted butter. In a medium bowl, mix the crumbs with the butter. Stir until the crumbs look wet. This helps the crust stick together. Next, take mini tart pans or a muffin tin. Firmly press the crumb mixture into the bottom of each pan. Make sure it’s even. This step is key for a good base. Now, place the crusts in the fridge to chill. They need to set while you make the filling.
Making the Cheesecake Filling
Now, it’s time to make the creamy filling. In a large bowl, beat the softened cream cheese with an electric mixer. Mix on medium speed for about 2 to 3 minutes. The goal is a smooth and creamy texture. Gradually add powdered sugar and vanilla extract. Mix until everything is well combined. Scrape the sides of the bowl as needed. In another bowl, whip the heavy cream until stiff peaks form. This takes about 3 to 5 minutes. Be careful here; don’t overwhip the cream. Now, gently fold the whipped cream into the cream cheese mix with a spatula. Be light-handed to keep the air in the cream.
Chilling and Setting the Cheesecakes
Next, divide the cheesecake filling into two bowls. Add red food coloring to one bowl and blue to the other. Stir until you get the colors you want. Carefully spoon the red filling into half of the crusts and the blue into the rest. Use a spatula to smooth the tops for a neat look. Once filled, place the mini cheesecakes back in the fridge. They need to chill for at least 4 hours. This helps them set properly. After chilling, they will be firm and ready to serve.
Tips & Tricks
Perfecting the Cheesecake Texture
To get a smooth and creamy cheesecake, use softened cream cheese. Cold cream cheese will clump. Beat it well for 2-3 minutes until silky. When you add the powdered sugar, mix slowly at first. This helps avoid a sugar cloud in your kitchen. When whipping the cream, watch for stiff peaks. This step is key for a light texture. Mixing the whipped cream into the cheese gently helps keep air in. Avoid overmixing; this keeps the cheesecake fluffy.
Decorating Ideas for Gnome Theme
Make your mini cheesecakes fun and festive. Use fresh strawberries and blueberries for color. Place a mini gnome figurine on each cheesecake. This adds a playful touch. You can also use edible flowers. They brighten the platter and add charm. For extra flair, sprinkle some mint leaves around. Arrange everything on a colorful plate to impress your guests.
Common Mistakes to Avoid
One common mistake is not chilling the crust long enough. The crust needs to be firm before adding the filling. Another mistake is overwhipping the cream. This can turn it grainy instead of fluffy. When coloring the cheesecakes, add food coloring slowly. You can always add more, but it’s tough to fix if it’s too dark. Finally, don’t skip the chilling time after filling. Let them set for at least 4 hours to achieve the perfect texture.
Pro Tips
- Use Room Temperature Ingredients: Allow your cream cheese and heavy cream to come to room temperature for a smoother, creamier cheesecake filling.
- Don’t Overwhip the Cream: Whipping the heavy cream to stiff peaks is essential, but be careful not to overwhip, as this can lead to a grainy texture.
- Chill Longer for Best Results: For the best texture, consider chilling the mini cheesecakes overnight. This allows them to set perfectly and enhances the flavors.
- Customize Your Colors: Experiment with different shades of food coloring to create unique cheesecake designs that match your theme or occasion.
Variations
Flavor Variations
You can change the flavor of these mini cheesecakes easily. Try adding lemon juice for a fresh twist. You can also mix in some cocoa powder to make chocolate gnome cheesecakes. Want something fruity? Fold in pureed strawberries or blueberries for a berry blast. Each flavor brings a new taste, making your cheesecakes fun and exciting.
Alternative Crust Options
If you want to switch things up, explore different crust options. Use crushed Oreos or vanilla wafers instead of graham crackers. For a nutty flavor, try ground almonds or pecans mixed with melted butter. You can even make a gluten-free crust using almond flour. These changes can add unique flavors and textures to your gnome mini cheesecakes.
Healthier Ingredient Swaps
You can make these cheesecakes a bit healthier with simple swaps. Use Greek yogurt instead of cream cheese for a lighter version. This will still keep it creamy. Try honey or maple syrup in place of powdered sugar for a natural sweetener. You can also use coconut cream instead of heavy whipping cream for a dairy-free option. These swaps help you enjoy a tasty treat without the guilt.
Storage Info
How to Store No-Bake Cheesecakes
To keep your no-bake gnome mini cheesecakes fresh, place them in an airtight container. Store them in the refrigerator. They stay good for up to five days. Make sure to keep them covered. This helps prevent them from drying out or absorbing other smells.
Freezing Tips
You can freeze these mini cheesecakes too! Wrap each cheesecake tightly in plastic wrap. Then place them in a freezer-safe bag or container. They last for about two months in the freezer. When you’re ready to eat, thaw them overnight in the fridge. This keeps the texture creamy and smooth.
Best Serving Practices
For the best taste, serve your mini cheesecakes cold. Before serving, add fresh strawberries and blueberries for a pop of color. You can also place mini gnome figurines on top for fun! Arrange them on a bright platter for a lovely presentation. If you want, add edible flowers for a garden feel. Enjoy the smiles they bring!
FAQs
Can I make these mini cheesecakes ahead of time?
Yes, you can make these mini cheesecakes in advance. They chill well in the fridge for up to three days. This makes them perfect for parties or special events. Just keep them covered to prevent drying out. When ready to serve, add your tasty toppings.
What can I use instead of graham crackers?
If you don’t have graham crackers, try using crushed cookies. Options like Oreo or digestive biscuits work well. You can even use crushed pretzels for a salty twist. Just mix them with melted butter like you would with graham crackers.
How do I achieve the best color for the cheesecake filling?
To get the best colors, use gel food coloring. Gel colors are more vibrant than liquid ones. Start by adding a few drops and mix well. You can always add more if needed. This way, you’ll get the shades you want for your mini cheesecakes.
In this blog post, we explored how to make no-bake cheesecakes, from ingredients to storage. You learned about key ingredients, optional decorations, and smart substitutions. I shared step-by-step instructions for the crust and filling, along with tips for the best texture. You discovered fun variations and how to store your treats.
Remember, making cheesecake is simple and fun. Enjoy experimenting with flavors, textures, and designs. Your next dessert is just around the corne

Gnome-Themed No-Bake Mini Cheesecakes
Ingredients
- 1.5 cups graham cracker crumbs
- 0.5 cups unsalted butter, melted
- 2 cups cream cheese, softened to room temperature
- 1 cups powdered sugar
- 1 teaspoon pure vanilla extract
- 1 cups heavy whipping cream
- to taste red and blue food coloring (gel preferred for vibrancy)
- for decoration fresh strawberries and blueberries
- optional mini gnome figurines
Instructions
- In a medium mixing bowl, combine the graham cracker crumbs with melted butter. Stir well until all the crumbs are evenly coated in butter.
- Firmly press the graham cracker mixture into the bottom of mini tart pans or a muffin tin, creating an even crust. Place the crusts in the refrigerator to chill while you prepare the cheesecake filling.
- In a large mixing bowl, using an electric mixer, beat the softened cream cheese on medium speed until smooth and creamy, about 2-3 minutes.
- Gradually add in the powdered sugar and vanilla extract, mixing until thoroughly combined and creamy in texture. Scrape down the sides of the bowl as needed.
- In a separate mixing bowl, whip the heavy cream using an electric mixer until stiff peaks form, typically around 3-5 minutes. Be careful not to overwhip.
- Gently fold the whipped cream into the cream cheese mixture using a spatula, being cautious not to deflate the cream. Mix just until incorporated.
- Divide the cheesecake filling evenly into two bowls. Add a few drops of red food coloring to one bowl and blue to the other. Stir until you achieve your desired shades of color.
- Carefully spoon the red cheesecake filling into half of the prepared crusts and the blue filling into the remaining crusts. Use a spatula to smooth the tops for an even finish.
- Place the mini cheesecakes back in the refrigerator and let them chill for at least 4 hours, or until they are firm and set.


![To make Mango Mint Lassi, you need a few key ingredients. Here’s what you’ll need: - 1 ripe mango, peeled and diced into small pieces - 1 cup plain yogurt (Greek yogurt recommended for added creaminess) - 1/2 cup milk (optional: use almond or coconut milk for a dairy-free alternative) - 1/4 cup fresh mint leaves, roughly chopped - 2 tablespoons honey or maple syrup (adjust to your taste) - 1/2 teaspoon ground cardamom (optional for a touch of warmth) - Ice cubes (optional, for a refreshing chilled drink) - A pinch of salt to enhance the flavors These ingredients create a sweet and creamy drink that is perfect for hot days. You can change this recipe to suit your taste. Here are some optional ingredients you might like: - Coconut cream for extra richness - A squeeze of lime juice for a tangy kick - Other fruits like banana or pineapple for different flavors - Chia seeds for added health benefits - Vanilla extract for a sweeter aroma Feel free to mix and match these ingredients to make the drink your own. If you have dietary needs, no problem! Here are some substitutes you can use: - Use almond or coconut milk instead of regular milk for a dairy-free option. - Replace yogurt with dairy-free yogurt for a vegan choice. - Honey can be swapped with agave nectar or stevia for a sugar-free drink. - If you are allergic to nuts, stick with regular yogurt and milk. These substitutes keep the drink tasty while meeting your dietary needs. Enjoy experimenting with different flavors and textures! To make a mango mint lassi, start with fresh ingredients. First, you need one ripe mango. Peel and dice the mango into small pieces. This helps it blend better. Next, grab one cup of plain yogurt. Greek yogurt gives a nice creamy texture. If you want, you can also use half a cup of milk. This makes the lassi smoother. If you're dairy-free, choose almond or coconut milk. Now, add a quarter cup of fresh mint leaves. Chop them roughly to release their flavor. For sweetness, use two tablespoons of honey or maple syrup. You can adjust this later based on your taste. Finally, add a pinch of salt. This enhances all the flavors. Now it is time to blend! In your blender, combine the mango, yogurt, milk, and sweetener. Secure the lid tightly to avoid spills. Start blending on high speed. Keep blending until you see a smooth and creamy mixture. If you like your lassi cold, add some ice cubes. Blend again until everything is mixed well. Check the texture. If it is too thick, add a bit more milk. Blend again to combine. You want it creamy but pourable, perfect for sipping. After blending, taste your lassi. If you want it sweeter, add more honey or maple syrup. Blend briefly to mix in the extra sweetener. If your lassi is too thick, add a splash of milk. Blend again until you reach the right consistency. Pour the lassi into tall glasses. This recipe makes enough for 2-3 servings. For a nice touch, garnish each glass with a mint sprig and a slice of mango. This makes your drink look extra special. Enjoy your refreshing mango mint lassi! For the full recipe, check the earlier section. Choosing the right mango is key to a tasty mango mint lassi. Look for mangoes that are soft but not mushy. They should have a sweet aroma. The skin color may vary based on the type, so focus on feel and smell. The best mango for this drink is the Ataulfo or Haden variety. These types have a creamy texture and rich flavor, perfect for blending. You can make mango mint lassi ahead of time. Prepare the lassi and store it in the fridge. It stays fresh for about 24 hours. Just give it a quick stir before serving. If you want it cold, add ice cubes right before you drink it. This keeps the lassi from getting watery. Spices can boost the flavor of your lassi. Ground cardamom adds a nice touch of warmth. You can also try a dash of cinnamon for a different twist. For a fun kick, consider adding a pinch of cayenne pepper. This spice brings a hint of heat that balances the sweetness of the mango. Experiment with these spices to find your favorite mix! For the full recipe, check out the [Full Recipe]. {{image_4}} To make a vegan Mango Mint Lassi, simply swap regular yogurt for a plant-based one. Use almond, coconut, or cashew yogurt for a creamy base. You can also choose almond or coconut milk instead of cow's milk. This keeps the lassi light and refreshing while still full of flavor. If you want a sugar-free version, skip the honey or maple syrup. You can use ripe mango for natural sweetness. You might also add a few drops of vanilla extract to enhance the flavor. This way, you still enjoy a tasty drink without extra sugar. Feel free to play with flavors! You can add berries or peaches for a fruity twist. Basil or cilantro can replace mint for a unique taste. Each variation brings a new twist, making the lassi fun to explore. Use the full recipe to get started on these adventures! After making your Mango Mint Lassi, store any leftovers in the fridge. Use a clean, airtight container. This helps keep the drink fresh for about 2 to 3 days. When you’re ready to enjoy it again, give it a good shake or stir. The ingredients may separate, but that’s normal. You can freeze Mango Mint Lassi for later use. Pour it into ice cube trays or freezer-safe bags. If you use bags, remove as much air as possible before sealing. The lassi can last up to 2 months in the freezer. To use, thaw it in the fridge overnight or blend it straight from frozen for a slushy treat. If your lassi is too thick after storage, add a splash of milk or water. Blend it again to reach your desired texture. For a refreshing twist, serve it over ice cubes or blend in some fresh mint leaves. This will revive the flavors and make it taste fresh again. Enjoy your creamy drink! Mango Mint Lassi comes from India. Lassi is a yogurt drink, popular in Indian homes. It often includes fruit or spices. The mango adds sweetness, while mint gives a fresh twist. People enjoy it in hot weather for its cooling effect. This drink represents the rich flavors of Indian cuisine. Yes, you can make Mango Mint Lassi ahead of time. Blend it and store it in the fridge. It stays fresh for up to two days. Just remember to stir it before serving. If it separates, don’t worry; this is normal. Adding ice cubes when serving makes it extra refreshing. Mango Mint Lassi is quite healthy! It has yogurt, which is good for your gut. Yogurt contains probiotics that help digestion. Mango is full of vitamins, especially vitamin C and vitamin A. Mint adds a burst of flavor and aids digestion too. This drink is a tasty way to enjoy nutrients while keeping cool. Mango Mint Lassi is a tasty and easy drink to make. We covered key ingredients and how to customize them. The steps to blend this drink help create a smooth texture. Tips on selecting mangoes and serving it with flair add to the fun. Variations suit all diets, and storage tips keep it fresh. Try this drink yourself to taste the joy. It’s a simple delight you can share with everyone. Enjoy making it your own!](https://fastmealmate.com/wp-content/uploads/2025/06/4c375769-c270-449a-b275-479d6ed1cf7d-768x768.webp)
![To make One Pan Harvest Chicken and Maple Veggies, gather these key ingredients: - 4 boneless, skinless chicken thighs - 1 large sweet potato, peeled and diced into 1-inch cubes - 2 cups Brussels sprouts, halved - 2 medium carrots, sliced into rounds - 1 large red onion, cut into wedges - 1/4 cup pure maple syrup These ingredients create a colorful and flavorful dish. The chicken provides protein, while the veggies add texture and sweetness. For the delicious marinade, you will need: - 2 tablespoons extra virgin olive oil - 1 teaspoon garlic powder - 1 teaspoon smoked paprika - 1 teaspoon dried thyme - Salt and freshly ground black pepper, to taste This mix of spices brings depth to the chicken. The olive oil helps keep the meat moist and tender. Feel free to switch up the veggies based on what is fresh. Here are some ideas: - Swap sweet potatoes for butternut squash in the fall. - Try green beans instead of Brussels sprouts in the summer. - Use parsnips in place of carrots for a unique flavor. Adjusting your veggies can keep this dish exciting and fresh throughout the year. For the full recipe, check out the complete guide. First, preheat your oven to 400°F (200°C). This step is key for even cooking. While the oven heats, gather your ingredients. You will need chicken thighs, veggies, and seasonings. Make sure to wash the vegetables well. This ensures a fresh taste in your dish. In a large bowl, add two tablespoons of extra virgin olive oil. Then, mix in one teaspoon each of garlic powder, smoked paprika, and dried thyme. Don’t forget to sprinkle in some salt and pepper. This blend will give your chicken great flavor. Now, add the chicken thighs to the bowl. Use your hands or a spoon to coat each piece well with the marinade. Make sure every inch gets some love. In another bowl, toss together the sweet potatoes, Brussels sprouts, carrot rounds, and red onion wedges. Drizzle half of the maple syrup over the veggies. Stir them until they are well coated. Next, take a large baking sheet or oven-safe skillet. Place the marinated chicken in the center and surround it with the veggies. This layout helps everything cook evenly. Finally, pour the remaining maple syrup over the chicken and veggies. This adds sweetness and flavor. Now, you’re ready to bake! For the full recipe details, check out [Full Recipe]. To get juicy chicken, choose boneless, skinless thighs. They stay moist and cook evenly. Use a meat thermometer to check doneness. Aim for 165°F (75°C) in the thickest part. Let the chicken rest for a few minutes after baking. This helps keep the juices inside. Each vegetable cooks at a different rate. Sweet potatoes need longer, while Brussels sprouts cook fast. Cut the sweet potatoes smaller for even cooking. If you want softer carrots, slice them thinner. Always check the doneness of your veggies with a fork. They should be tender but not mushy. For a rustic look, serve right from the pan. This shows off the colors and textures. If you prefer a more formal style, plate the chicken and veggies separately. Drizzle some maple glaze over the dish for shine and flavor. Adding fresh parsley as a garnish gives a bright touch. For a fun twist, use colorful plates to enhance the dish's appeal. For full details, check the Full Recipe. {{image_4}} You can mix and match veggies for your dish. If you want to try something new, consider using: - Butternut squash - Cauliflower florets - Green beans - Zucchini, sliced These options add different colors and tastes to your meal. Each veggie cooks well with the chicken and maple glaze. Feel free to experiment with what you have at home! You can switch up the protein for this recipe. If you prefer beef, use tender beef cuts. For a leaner option, turkey thighs work well too. If you want a plant-based meal, try chickpeas or tofu. Both soak up the flavors nicely. Use the same cooking time to keep everything balanced. Changing the herbs and spices can give your dish a fresh twist. Here are some ideas: - Swap thyme for rosemary for a woodsy taste. - Use cumin for a warm, earthy flavor. - Add a pinch of cinnamon for a hint of sweetness. These changes not only add new tastes but also keep things exciting in the kitchen. Don't hesitate to play around with different combinations to find what you love! Store any leftovers in an airtight container. This keeps the chicken and veggies fresh. Let them cool to room temperature before sealing. You can keep them in the fridge for up to three days. If you want to enjoy the meal later, consider freezing it. To reheat, preheat your oven to 350°F (175°C). Place the leftovers in an oven-safe dish. Cover it with foil to keep moisture in. Heat for about 15-20 minutes. This method helps keep the chicken juicy and the veggies tender. You can also use a microwave if you're short on time. Just cover the dish and heat for a few minutes until warm. If you freeze the dish, make sure to use a freezer-safe container. It can last up to three months in the freezer. When you're ready to eat, thaw it in the fridge overnight. This helps maintain texture and taste. After thawing, reheat it using the oven or microwave for the best results. Enjoy your meal again with great flavor! Yes, you can use chicken breast. Chicken breasts cook faster than thighs. They may dry out if overcooked. I recommend checking the temperature early. Aim for 165°F (75°C). Adjust the cooking time to about 20-25 minutes. This keeps the meat tender and juicy. To make this dish gluten-free, ensure all ingredients are gluten-free. The spices and maple syrup should be checked for gluten. Avoid any sauces or mixes that may contain gluten. This recipe naturally uses whole foods, so it's easy to keep it gluten-free. This dish pairs well with a few sides. Consider serving it with: - Quinoa for a hearty grain option - A fresh green salad for crunch - Mashed potatoes for comfort - Crusty bread to soak up the sweet sauce These sides complement the flavors of the chicken and veggies. Enjoy experimenting with different combinations! You’ve now learned how to make One Pan Harvest Chicken and Maple Veggies. We covered ingredients, preparation steps, and helpful tips for perfecting this dish. You can also try different veggies and proteins to keep it fresh. Store leftovers properly to enjoy again. Cooking should be fun and easy, so don’t hesitate to experiment. Trust in your skills, and enjoy every tasty bite. Happy cooking!](https://fastmealmate.com/wp-content/uploads/2025/07/0df21e0d-fcb2-40bc-96f0-06bb271e9586-768x768.webp)


