Mouthwatering Mushroom Stuffed Chicken Breasts Recipe

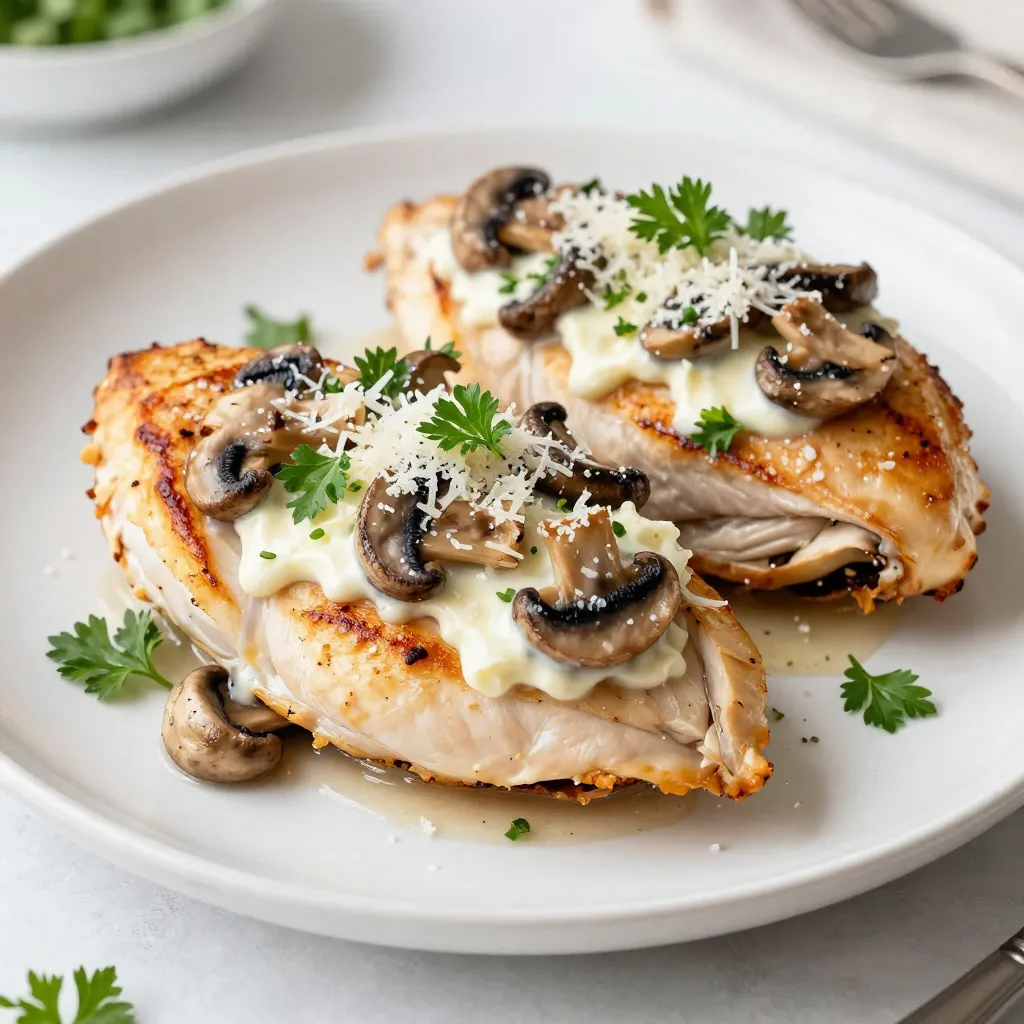
Get ready to impress your family with my Mouthwatering Mushroom Stuffed Chicken Breasts Recipe! This dish brings together juicy chicken and a creamy, savory mushroom filling. It’s simple to make and packs a punch of flavor. Whether you’re a kitchen pro or a beginner, you’ll love how easy this recipe is. So, grab your ingredients, and let’s start creating a meal that’s sure to wow everyone at your table!
Why I Love This Recipe
- Flavorful Filling: The combination of mushrooms and cream cheese creates a rich and savory filling that elevates the chicken to a gourmet level.
- Easy to Prepare: This recipe requires minimal prep work and can be made in under an hour, making it perfect for busy weeknights.
- Impressive Presentation: When sliced, the stuffed chicken showcases a beautiful filling, making it an impressive dish for dinner guests.
- Versatile Pairing: This dish pairs wonderfully with various sides, such as roasted vegetables or a fresh salad, providing a well-rounded meal.
Ingredients
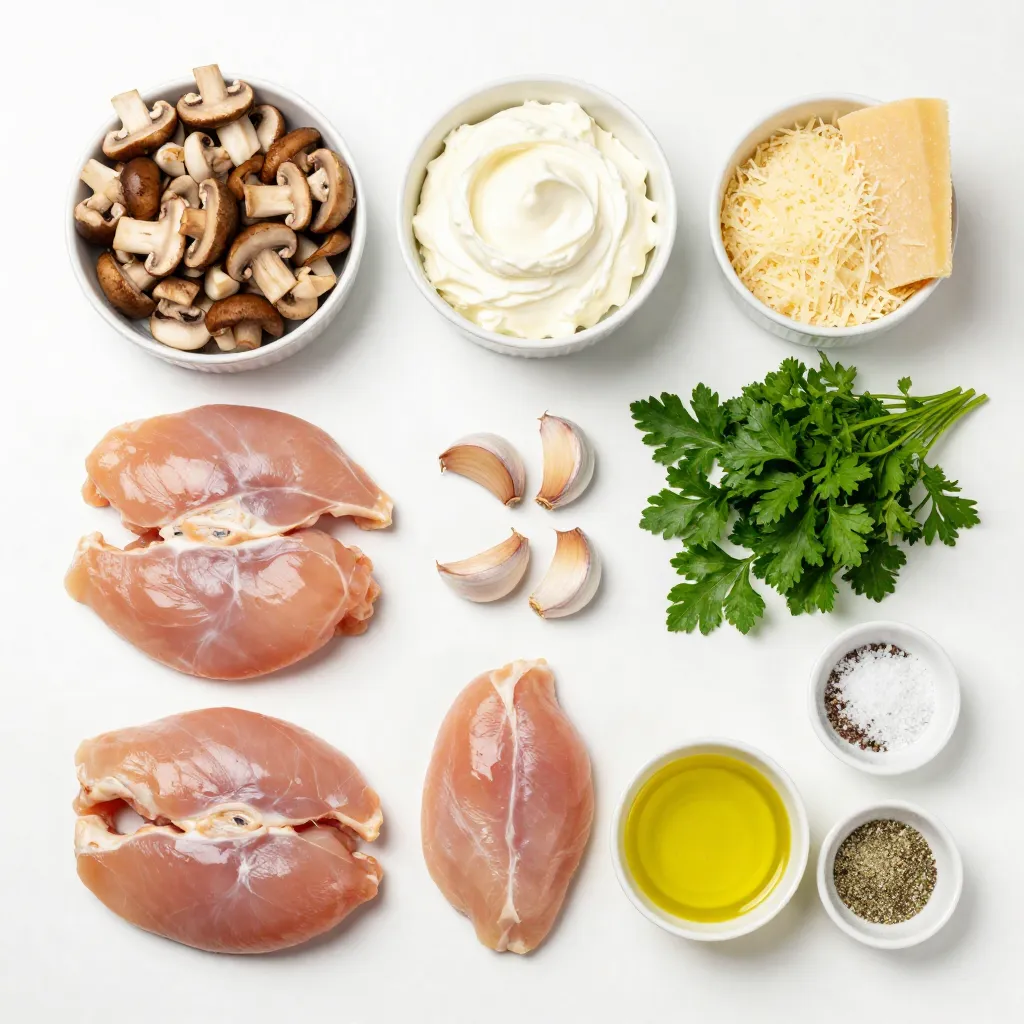
To make these tasty mushroom stuffed chicken breasts, you need a few simple ingredients. Here’s the list to get you started:
– 4 boneless, skinless chicken breasts
– 1 cup mixed mushrooms, finely chopped (cremini, shiitake, button)
– 1/2 cup cream cheese, softened
– 1/4 cup grated Parmesan cheese
– 1/4 cup fresh parsley, chopped
– 2 cloves garlic, minced
– 1 teaspoon onion powder
– Salt and pepper, to taste
– 1 tablespoon olive oil
– 1 teaspoon Italian seasoning
– Toothpicks or kitchen twine for securing
Each ingredient plays a role in making this dish delicious. The chicken is the star, while the mushrooms add a rich, earthy flavor. Cream cheese provides creaminess, and Parmesan adds a salty touch. Garlic and herbs bring in that fresh taste. Make sure you have all these items ready to create a meal everyone will love.

Step-by-Step Instructions
Preparation Steps
1. Preheat your oven to 375°F (190°C). This helps cook the chicken evenly.
2. Heat olive oil in a medium skillet over medium heat. Add the finely chopped mushrooms.
3. Sauté the mushrooms for 5-7 minutes until they turn golden brown. Stir in minced garlic and cook for one more minute.
4. In a large bowl, mix the sautéed mushrooms and garlic with softened cream cheese, grated Parmesan cheese, chopped parsley, onion powder, Italian seasoning, salt, and pepper. Stir until smooth.
5. Take a chicken breast and slice it horizontally to create a pocket. Repeat for the other breasts.
6. Fill each chicken pocket with 2-3 tablespoons of the mushroom mix. Be careful not to overstuff.
7. Secure the openings with toothpicks or kitchen twine to keep the filling inside.
8. Season the outside of each chicken breast with salt, pepper, and a sprinkle of Italian seasoning.
Cooking Instructions
1. Heat olive oil in a large, oven-safe skillet over medium-high heat.
2. Sear each stuffed chicken breast for 3-4 minutes on each side until golden brown.
3. Transfer the skillet to the preheated oven. Bake for about 25-30 minutes until the chicken reaches an internal temperature of 165°F (75°C).
4. After baking, let the chicken rest for 5 minutes before serving. This keeps the juices inside.
Enjoy your delicious mushroom stuffed chicken breasts!
Tips & Tricks
Cooking Tips
– Ensure chicken is even for even cooking: Start by using chicken breasts that are similar in size. This helps them cook at the same rate. If some pieces are thick, gently pound them to an even thickness. This way, every bite is juicy and tender.
– Avoid overstuffing to prevent spilling: When filling the chicken pockets, use about 2-3 tablespoons of stuffing. If you put in too much, the filling might spill out during cooking. It’s better to have enough flavor without the mess.
Serving Suggestions
– Suggested side dishes to complement the meal: Mushroom stuffed chicken pairs well with roasted vegetables or a fresh garden salad. You can also serve it with creamy mashed potatoes for a hearty meal.
– Presentation tips, including garnishing: For a beautiful plate, slice each stuffed chicken breast diagonally. This shows off the tasty mushroom filling. Garnish with extra chopped parsley for color. A drizzle of balsamic glaze can add a nice touch too. Enjoy the mix of flavors and colors on your plate!
Pro Tips
- Choose Fresh Mushrooms: Use a variety of fresh mushrooms for a more complex flavor. Avoid canned mushrooms as they tend to be less flavorful and can alter the texture of your filling.
- Let the Filling Cool: Allow the mushroom filling to cool slightly before stuffing it into the chicken. This prevents the chicken from cooking too quickly and helps maintain moisture.
- Use a Meat Thermometer: To ensure your chicken is cooked perfectly, use a meat thermometer to check for an internal temperature of 165°F (75°C). This guarantees that the chicken is safe to eat and juicy.
- Rest Before Serving: Let the chicken rest for about 5 minutes after baking. This allows the juices to redistribute, resulting in a more flavorful and moist chicken breast.
Variations
Ingredient Substitutions
You can easily change some ingredients in this recipe. Here are a few ideas:
– Alternative cheeses: Swap out cream cheese for ricotta or feta. Each cheese brings a new flavor and texture.
– Different herbs: Try using fresh thyme or basil instead of parsley. These herbs add a nice twist to the dish.
Flavor Variations
Mixing in different flavors can make your dish unique. Here are some suggestions:
– Adding spinach or sun-dried tomatoes: Both add color and taste. Spinach gives a fresh feel, while sun-dried tomatoes add a touch of sweetness.
– Experimenting with spices: Spice things up with paprika or cayenne. These spices can bring warmth and depth to the filling.
Feel free to play with these ideas and make the recipe yours!
Storage Info
Short-term Storage Tips
To keep your mushroom stuffed chicken breasts fresh, store any leftovers in the fridge. Place them in an airtight container. This prevents the chicken from drying out and keeps the flavors intact. Make sure to eat the leftovers within 3 to 4 days for the best taste.
Long-term Storage Advice
If you want to keep these stuffed chicken breasts for longer, freezing is a great option. Wrap each stuffed breast tightly in plastic wrap, then place them in a freezer bag. This helps prevent freezer burn. You can freeze them for up to 3 months. To reheat, thaw them overnight in the fridge. Then, bake in the oven at 375°F (190°C) until fully heated. This ensures they stay juicy and delicious.
FAQs
Common Questions
How do I know when the chicken is fully cooked?
You can use a meat thermometer to check. Insert it into the thickest part of the chicken. The chicken should reach an internal temperature of 165°F (75°C). If you don’t have a thermometer, cut into the chicken. The juices should run clear, not pink. This shows the chicken is safe to eat and juicy.
Can I use frozen chicken breasts for this recipe?
You can use frozen chicken, but it needs to thaw first. Thaw the chicken in the fridge overnight. This helps it cook evenly. If you cook from frozen, it may not cook through. Always check the temperature to be safe.
What should I serve with mushroom stuffed chicken breasts?
This dish pairs well with many sides. Try roasted vegetables for color and flavor. A fresh garden salad adds crunch. You can also serve it with rice or mashed potatoes for a hearty meal. Add some bread to soak up the juices!
In this post, we covered how to make mushroom stuffed chicken breasts. You learned about the needed ingredients, preparation, cooking steps, and serving ideas. Don’t forget to try variations and substitutions to make this dish your own. Proper storage ensures you enjoy your leftovers too. Cooking can be fun and rewarding. With these tips, you’ll impress friends and family at your next meal. Enjoy experimenting and make every bite coun

Mushroom Stuffed Chicken Breasts
Ingredients
- 4 pieces boneless, skinless chicken breasts
- 1 cup mixed mushrooms, finely chopped
- 1 2 cup cream cheese, softened to room temperature
- 1 4 cup grated Parmesan cheese
- 1 4 cup fresh parsley, finely chopped
- 2 cloves garlic, minced
- 1 teaspoon onion powder
- to taste Salt and freshly ground black pepper
- 1 tablespoon olive oil
- 1 teaspoon Italian seasoning
- as needed Toothpicks or kitchen twine for securing
Instructions
- Preheat your oven to 375°F (190°C).
- In a medium skillet over medium heat, pour in the olive oil. Once it shimmers, add the chopped mushrooms. Sauté them for about 5-7 minutes or until they turn golden brown and their moisture has evaporated. Then, stir in the minced garlic and cook for an additional minute until fragrant.
- In a large mixing bowl, combine the sautéed mushroom and garlic mixture with softened cream cheese, grated Parmesan cheese, fresh chopped parsley, onion powder, Italian seasoning, along with a generous pinch of salt and pepper. Stir well until the mixture is smooth and evenly combined.
- Take one chicken breast and carefully slice it horizontally to form a pocket, ensuring you don’t cut all the way through. Repeat this process for the remaining chicken breasts to create pockets for stuffing.
- Generously fill each chicken pocket with the mushroom filling, using approximately 2-3 tablespoons per breast. Be sure not to overstuff to avoid spilling.
- Secure the openings of the stuffed chicken breasts using toothpicks or tie them with kitchen twine to hold the filling in place during cooking.
- Season the exterior of each stuffed chicken breast with salt, pepper, and a sprinkle of additional Italian seasoning for flavor.
- In a large, oven-safe skillet, heat some olive oil over medium-high heat. Carefully place the chicken breasts in the skillet and sear for about 3-4 minutes on each side until they develop a beautiful golden brown crust.
- Once seared, transfer the skillet directly to your preheated oven. Bake the chicken breasts for approximately 25-30 minutes or until they reach an internal temperature of 165°F (75°C).
- Once cooked, remove the skillet from the oven and let the stuffed chicken breasts rest for about 5 minutes before serving.


![- 2 cups all-purpose flour - 1 ½ cups granulated sugar - ½ cup unsalted butter, softened - 1 cup creamy ricotta cheese - 3 large eggs, at room temperature - 1 tsp pure vanilla extract - 1 tsp baking powder - ½ tsp baking soda - ½ tsp salt - 1 tsp ground cinnamon - 1 cup mini chocolate chips - ½ cup crushed pistachios (for topping) - Powdered sugar (for dusting) To create a Cannoli Cake, use fresh ingredients. Fresh items bring out the best taste. Quality ricotta makes the cake creamy and rich. Fresh eggs help the cake rise well. I always suggest using high-quality vanilla extract. It enhances the flavor. You can make some substitutions if needed. For a dairy-free option, try almond or coconut milk yogurt instead of ricotta. You can also use dairy-free butter. These swaps keep the taste close to the original. Another option is to switch out regular flour for gluten-free flour. This helps those with gluten sensitivities enjoy the cake too. Whatever you choose, keep it fresh to ensure the best Cannoli Cake experience. Check the [Full Recipe] for more details. 1. Preheat the Oven: Start by preheating your oven to 350°F (175°C). 2. Prepare Cake Pans: Grease two 9-inch round cake pans with butter. Dust them with flour to help the cakes come out easily. 3. Cream the Butter and Sugar: In a large bowl, mix the softened butter and granulated sugar. Use an electric mixer for about 3-4 minutes until light and fluffy. 4. Incorporate Ricotta: Add the ricotta cheese to this mixture. Blend until it is smooth and free of lumps. 5. Mix in Eggs and Vanilla: Crack three large eggs into the bowl, mixing well after each. Add in the pure vanilla extract and combine. 6. Combine Dry Ingredients: In a separate bowl, whisk together the flour, baking powder, baking soda, salt, and cinnamon. 7. Combine Wet and Dry Mixtures: Gradually add the dry mix to the ricotta mix. Stir gently until just combined. Don’t overmix; some lumps are fine! 8. Fold in Chocolate Chips: With a spatula, fold in mini chocolate chips until they are spread throughout the batter. 9. Divide the Batter: Pour the batter evenly into the prepared pans. Smooth the tops with a spatula. - Baking Time and Temperature: Place the pans in the oven and bake for 25-30 minutes. - Check Doneness: To check if the cakes are done, insert a toothpick in the center. It should come out clean. 1. Cool the Cakes: After baking, take the cakes out and let them cool in the pans for about 10 minutes. Then, invert them onto wire racks to cool completely. 2. Layer the Cakes: Once cool, put one cake layer on a serving plate. Spread a layer of ricotta filling on top. You can mix powdered sugar with ricotta for sweetness. Place the second layer on top. 3. Frost: Use any leftover ricotta filling or whipped cream to frost the top and sides of the cake. 4. Garnish: For a lovely finish, sprinkle crushed pistachios on top. Dust it with powdered sugar before serving. For more details on the ingredients and the full recipe, check the [Full Recipe]. To get the best texture in your Cannoli Cake, avoid overmixing. Mix until the wet and dry ingredients just come together. You want some lumps to keep it light. Using room temperature ingredients is key. It helps everything blend smoothly, which gives the cake a fluffy texture. You can add spices or extracts for a unique twist. Try adding a pinch of nutmeg or almond extract for extra flavor. These small changes can make your cake stand out. For serving, consider pairing it with fresh berries or a scoop of vanilla ice cream. These sides brighten the cake and add freshness. For the full flavor experience, try my Full Recipe for Cannoli Cake. {{image_4}} You can have fun with Cannoli Cake by changing the filling. While the classic ricotta is great, try adding chocolate or fruit. - Chocolate Filling: Mix in cocoa powder or melted chocolate for a rich taste. - Fruit Filling: Use pureed strawberries or raspberries for a fresh twist. You can also switch up the cake flavors. A lemon or almond cake base adds a new layer of taste. Want to mix up the frosting? Use whipped cream, cream cheese, or even a flavored buttercream. If you want a gluten-free version, swap regular flour for almond or coconut flour. You can also find gluten-free cake mixes. For a vegan Cannoli Cake, replace eggs with flax eggs and use vegan butter. Substitute ricotta with cashew cream or a store-bought vegan alternative. If you're cutting back on sugar, reduce the granulated sugar by half. You can also use natural sweeteners like honey or maple syrup. Just keep in mind that these may change the cake's texture. These variations help you enjoy Cannoli Cake while meeting different dietary needs. For the full recipe, check out the Cannoli Cake Delight section. To keep your Cannoli Cake fresh, store it in an airtight container. This will help prevent it from drying out and losing flavor. If you have leftovers, place them in the fridge. It is best to wrap each slice in plastic wrap before putting it in the container. For freezing, slice the cake first. Wrap each slice tightly in plastic wrap, then place them in a freezer-safe bag. This way, you can take out one slice at a time. When you want to enjoy a slice, let it thaw in the fridge overnight. Cannoli Cake can stay fresh in the fridge for about 4 to 5 days. If frozen, it can last up to 3 months. Always look for signs of spoilage. If the cake smells off or has a change in texture, it's best to toss it. Mold is a clear sign that the cake is no longer safe to eat. Enjoy your Cannoli Cake while it's fresh for the best taste! What is Cannoli Cake? Cannoli cake is a delightful dessert inspired by the classic Italian cannoli. It features layers of moist cake filled with a rich ricotta mixture. The cake often includes mini chocolate chips and hints of cinnamon, giving it a sweet and creamy flavor. Can I make Cannoli Cake ahead of time? Yes! You can make cannoli cake a day or two in advance. Just store it in the fridge. Keep it covered to maintain freshness. This also allows the flavors to blend nicely. How long does Cannoli Cake last in the refrigerator? Cannoli cake lasts about 3 to 5 days in the refrigerator. Make sure to cover it well. Check for any signs of spoilage before serving. Can I use other cheeses instead of ricotta? You can use mascarpone cheese if you want a richer taste. Cream cheese is another option for a different flavor. However, ricotta provides the classic cannoli texture you crave. Pairing Cannoli Cake with beverages Cannoli cake pairs well with coffee or espresso. A glass of sweet dessert wine also complements its flavors. For a non-alcoholic option, try a chilled almond milk or vanilla soda. Ideal occasions for serving Cannoli Cake Serve cannoli cake at birthday parties, family gatherings, or holidays. It's perfect for any celebration. You can also enjoy it as a special treat on a cozy night in. Making a Cannoli Cake is fun and rewarding. You learned about fresh ingredients, step-by-step baking, and cooling tips. We explored variations and storage methods, too. Remember, fresh tastes best, and small changes can make a big difference. You can adapt this cake to fit any diet or preference. Now it’s time to gather your ingredients and start baking. Enjoy each bite of your tasty creation! This cake is a treat everyone will love.](https://fastmealmate.com/wp-content/uploads/2025/06/6e5f8d9a-9791-42a1-9598-f56c39528743-768x768.webp)

