Mexican Chicken Casserole Flavorful and Hearty Meal

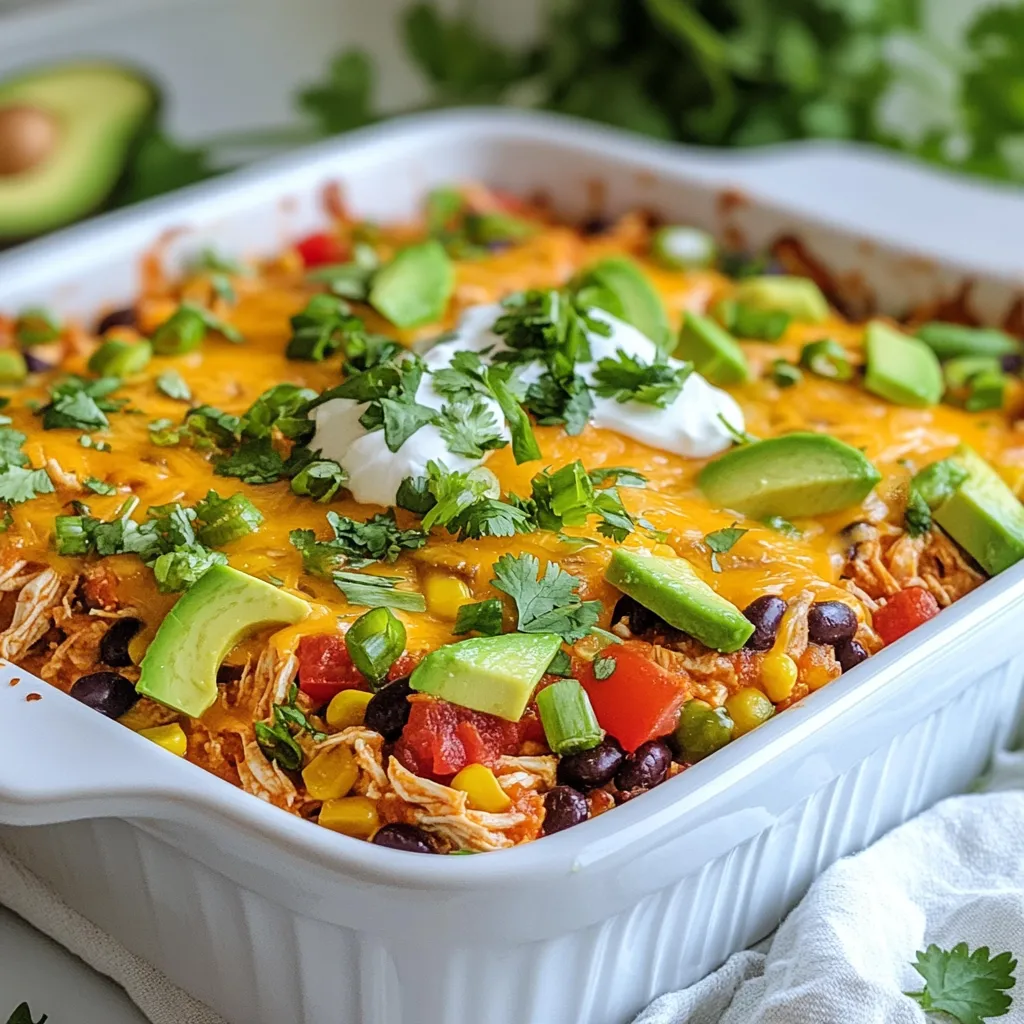
Looking for a meal that bursts with flavor and warmth? My Mexican Chicken Casserole is the answer! This dish combines tender chicken, zesty spices, and hearty ingredients, creating a comforting meal for the whole family. Whether you’re hosting a gathering or just feeding the kids, this recipe is easy and fun to make. Let’s dive into the ingredients and steps to craft this delicious casserole together!
Why I Love This Recipe
- Flavorful Ingredients: This casserole is packed with vibrant flavors from the combination of spices, black beans, and zesty salsa, making every bite a fiesta for your taste buds.
- Quick and Easy: With a prep time of just 20 minutes, this dish is perfect for busy weeknights when you need a hearty meal without spending hours in the kitchen.
- Customizable: You can easily adjust the ingredients to suit your family’s preferences, whether it’s swapping chicken for beef or adding more veggies.
- Great for Leftovers: This casserole keeps well in the fridge, making it a convenient choice for meal prep or an easy lunch the next day.
Ingredients
List of Ingredients
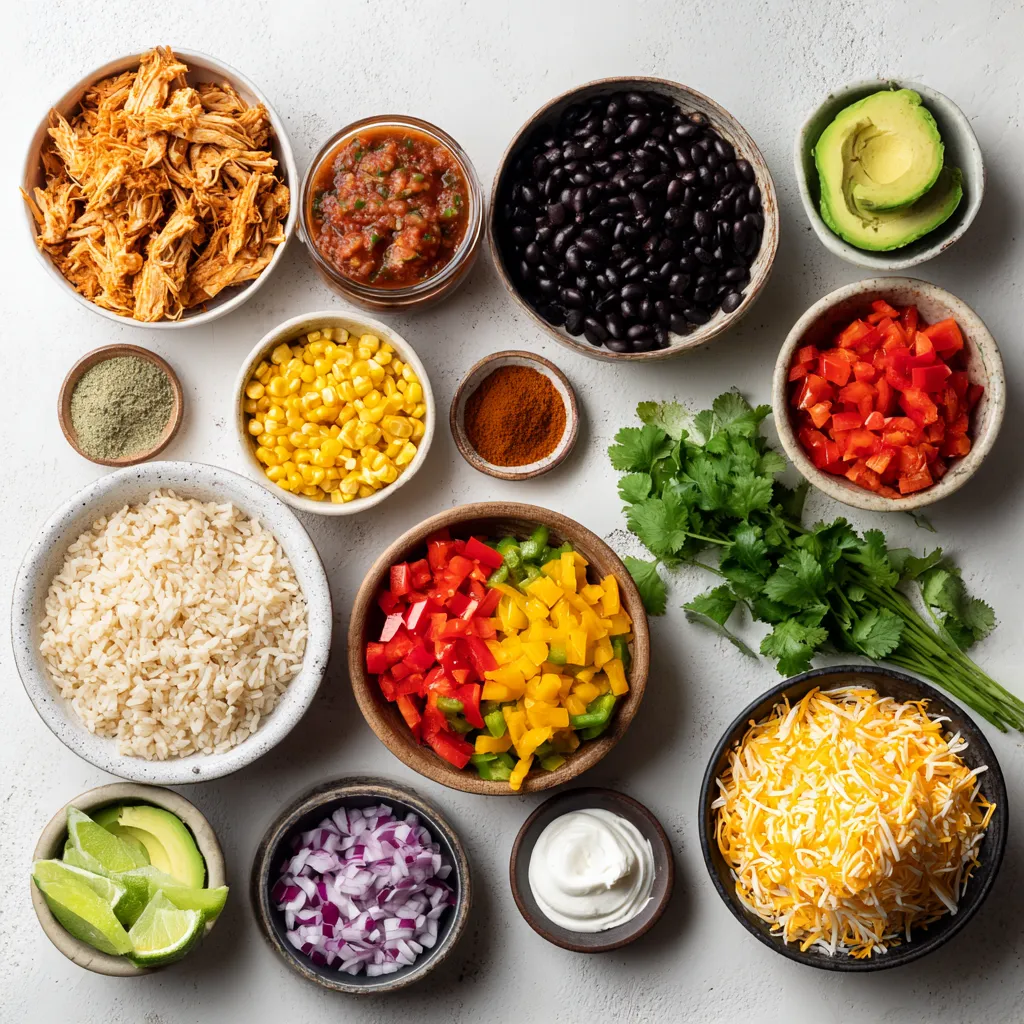
To make a tasty Mexican chicken casserole, gather these ingredients:
– 2 cups shredded cooked chicken
– 1 can (15 oz) black beans, drained and rinsed
– 1 can (15 oz) corn, drained
– 1 can (10 oz) diced tomatoes with green chilies
– 1 cup salsa
– 1 teaspoon ground cumin
– 1 teaspoon chili powder
– 2 cups cooked brown rice
– 1 cup shredded sharp cheddar cheese
– 1 cup diced bell peppers (a vibrant mix of red and green)
– 1/2 cup finely diced red onion
– Fresh cilantro, chopped (for garnish)
– Slices of ripe avocado (for serving)
– Creamy sour cream (for serving)
Ingredient Substitutions
You can easily swap some ingredients based on what you have. Use rotisserie chicken instead of cooking your own. If you want a vegetarian dish, replace chicken with extra beans or lentils. Instead of black beans, pinto beans can work well. You can use frozen corn if you don’t have canned. If you don’t like bell peppers, use zucchini or spinach instead. For a lighter cheese, try Monterey Jack.
Nutritional Information
This casserole is hearty and filling. Each serving has about:
– Calories: 450
– Protein: 30g
– Carbohydrates: 50g
– Dietary Fiber: 10g
– Fat: 15g
It offers a balance of nutrients, making it a great choice for a main meal.

Step-by-Step Instructions
Preparation Steps
1. Preheat your oven to 350°F (175°C). Grease a large casserole dish with cooking spray.
2. In a big mixing bowl, combine 2 cups of shredded cooked chicken, 1 can of black beans, and 1 can of corn. Add 1 can of diced tomatoes with green chilies and 1 cup of salsa. Mix well.
3. Stir in 2 cups of cooked brown rice, 1 teaspoon of ground cumin, and 1 teaspoon of chili powder. Add 1 cup of diced bell peppers and 1/2 cup of finely diced red onion. Mix until all ingredients are combined.
4. Pour the mixture into the greased casserole dish. Spread it evenly with a spatula.
Baking Instructions
5. Sprinkle 1 cup of shredded sharp cheddar cheese over the top.
6. Cover the dish with aluminum foil tightly and place it in the oven. Bake for 25 minutes.
7. Remove the foil to let the cheese brown. Bake for another 10-15 minutes until golden and bubbly.
8. Once done, take the dish out and let it rest for 5 minutes.
Serving Suggestions
9. Garnish with freshly chopped cilantro for color and flavor.
10. Serve warm with slices of ripe avocado and a dollop of creamy sour cream. This adds extra creaminess and taste.
For a nice touch, serve in individual bowls with avocado slices and cilantro. It makes a pretty meal!
Tips & Tricks
How to Perfect the Recipe
To make the best Mexican Chicken Casserole, use fresh ingredients. The chicken should be cooked and shredded well. For a richer flavor, try marinating the chicken in salsa before cooking. Mixing the spices, like cumin and chili powder, adds a nice kick. Be sure to spread the mixture evenly in the dish. This way, every bite is full of flavor. Lastly, let it rest after baking. This helps the layers hold together better.
Common Mistakes to Avoid
A few common mistakes can ruin your casserole. First, don’t skip the step of draining the beans and corn. Extra liquid can make your dish soggy. Secondly, avoid using low-quality cheese. Good cheese melts better and enhances the dish. Also, don’t rush the baking time. Covering the casserole helps it cook evenly. Lastly, remember to let it rest before serving. This makes serving easier and keeps it from falling apart.
Reheating Instructions
To reheat your Mexican Chicken Casserole, preheat the oven to 350°F (175°C). Place the casserole in an oven-safe dish if you stored it in the fridge. Cover it with foil to keep it moist. Heat for about 20-25 minutes or until warmed through. You can also use a microwave for quick reheating. Just cover it with a microwave-safe lid. Heat in 1-minute intervals, checking often to avoid overcooking. Enjoy the flavors as they come back to life!
Pro Tips
- Use Rotisserie Chicken: For a quicker prep time, consider using store-bought rotisserie chicken. It adds flavor and saves you time on cooking!
- Customize Your Veggies: Feel free to switch up the bell peppers with other vegetables like zucchini or spinach for added nutrition and flavor.
- Enhance the Spice Level: If you love heat, add some diced jalapeños or a sprinkle of cayenne pepper to the mixture for a spicy kick.
- Make Ahead: This casserole can be assembled a day in advance and stored in the fridge. Just bake it when you’re ready for a delicious meal!

Variations
Vegetarian Mexican Chicken Casserole
To make a vegetarian version, swap chicken for more beans or veggies. Use 2 cans of black beans or a mix of beans and lentils. Add extra bell peppers, zucchini, or corn for flavor. You can keep the same spices like cumin and chili powder. This way, you still get a hearty meal with great taste.
Spicy Version
If you love heat, add jalapeños or serrano peppers. Mix diced peppers into the casserole for more spice. You can also use spicy salsa instead of mild. For an extra kick, sprinkle some red pepper flakes on top before baking. This will make your casserole bold and exciting.
Gluten-Free Options
To keep this dish gluten-free, make sure your salsa and other canned goods are labeled gluten-free. Use brown rice as your base, as it is naturally gluten-free. Avoid regular soy sauce or any wheat-based ingredients. This way, everyone can enjoy this tasty meal without worry.
Storage Info
How to Store Leftovers
After enjoying your meal, let the casserole cool. Place any leftovers in an airtight container. Keep it in the fridge for up to four days. This keeps the flavors fresh and tasty. If you want, label the container with the date. This way, you can track how long it’s been stored.
Freezing Instructions
To freeze your casserole, first let it cool completely. Then, transfer it to a freezer-safe container. You can also wrap it tightly in plastic wrap and foil. This helps prevent freezer burn. You can freeze it for up to three months. When you’re ready to eat it, just thaw it overnight in the fridge.
Reheating Tips
To reheat the casserole, preheat your oven to 350°F (175°C). Place the casserole in a baking dish and cover it with foil. Bake for about 20 minutes or until it’s hot. If you want the cheese to get bubbly, remove the foil for the last 5 minutes. You can also reheat individual portions in the microwave. Just heat for 1-2 minutes, checking to see if it’s warm enough. Enjoy your meal again!
FAQs
How can I make this casserole ahead of time?
You can prepare this casserole a day before. Cook the chicken and mix all the ingredients. Place the mixture in a greased dish, cover it, and store it in your fridge. When you are ready, just bake it. It will save you time on busy days.
Can I use uncooked chicken in this recipe?
I do not recommend using uncooked chicken. It needs more time to cook through. Using cooked chicken helps the flavors blend well. Plus, it makes the casserole creamy and delicious.
What can I serve with Mexican Chicken Casserole?
You can serve this casserole with simple sides. Sliced avocado adds creaminess. A dollop of sour cream gives a nice touch. Fresh cilantro can brighten the meal. You might also enjoy a light salad or corn tortilla chips on the side.
In this post, we explored key ingredients and how to prepare a delicious Mexican chicken casserole. I shared tips for perfecting your dish and avoiding common mistakes. You learned how to store leftovers and variations you can try. Cooking can be fun and rewarding. By following these steps, you can create a meal that’s tasty and satisfying. Enjoy your cooking adventure and try out these ideas toda

Mexican Chicken Casserole Fiesta
Ingredients
- 2 cups shredded cooked chicken
- 1 can (15 oz) black beans, drained and rinsed
- 1 can (15 oz) corn, drained
- 1 can (10 oz) diced tomatoes with green chilies
- 1 cup salsa
- 1 teaspoon ground cumin
- 1 teaspoon chili powder
- 2 cups cooked brown rice
- 1 cup shredded sharp cheddar cheese
- 1 cup diced bell peppers (a vibrant mix of red and green)
- 0.5 cup finely diced red onion
- 1 bunch fresh cilantro, chopped (for garnish)
- 1 slices ripe avocado (for serving)
- 1 dollop creamy sour cream (for serving)
Instructions
- Begin by preheating your oven to 350°F (175°C). Grease a large casserole dish with cooking spray or a light coating of olive oil to prevent sticking.
- In a spacious mixing bowl, combine the shredded cooked chicken, drained and rinsed black beans, drained corn, diced tomatoes with green chilies, and the zesty salsa. Stir the mixture thoroughly to ensure every ingredient is well combined.
- Introduce the cooked brown rice, ground cumin, chili powder, diced bell peppers, and finely chopped red onion into the bowl. Mix everything together until the ingredients are evenly distributed.
- Transfer the hearty mixture into the prepared casserole dish, spreading it out with a spatula to create an even layer.
- Generously sprinkle the shredded sharp cheddar cheese over the top of the casserole, creating a cheesy layer that will melt and bubble during baking.
- Cover the casserole dish with aluminum foil, making sure it's tightly sealed, and place it in the preheated oven. Bake for 25 minutes to allow the flavors to meld together.
- After the initial baking time, carefully remove the foil to let the cheese get wonderfully golden and bubbly. Bake for an additional 10-15 minutes until the cheese is melted and slightly browned.
- Once baked to perfection, take the dish out of the oven and let it rest for 5 minutes to set. This will make it easier to serve.
- Before serving, garnish the casserole with freshly chopped cilantro, adding a pop of color and freshness.
- Serve the casserole warm, accompanied by slices of creamy avocado and a dollop of sour cream on the side for an extra indulgent touch.


![To make Minute Cajun Shrimp and Corn Chowder, you need some key ingredients: - 1 lb large shrimp, peeled and deveined - 2 cups corn kernels (fresh or frozen) - 1 medium onion, diced - 2 cloves garlic, minced - 1 red bell pepper, diced - 2 medium potatoes, peeled and diced These ingredients form the base of your chowder. The shrimp give it a nice protein punch. The corn adds sweetness, while the onion and garlic bring out savory flavors. Next, we need our liquids to make this chowder rich and tasty: - 4 cups chicken or vegetable broth - 1 cup coconut milk The broth adds depth, while coconut milk gives creaminess. You can use chicken broth for a richer taste, or vegetable broth if you want a lighter option. Now, let's spice things up! - 2 tablespoons Cajun seasoning - 1 teaspoon smoked paprika - Salt and fresh cracked pepper to taste - 2 tablespoons olive oil - Fresh parsley, chopped (for garnish) Cajun seasoning brings the heat and flavor. Smoked paprika adds a nice touch, giving a warm, smoky flavor. Salt and pepper are essential for balance. Olive oil helps to sauté the veggies, and parsley makes it pretty. For the full recipe, check out [Full Recipe]. 1. Heat 2 tablespoons of olive oil in a large pot over medium heat. 2. Once the oil shimmers, add 1 diced onion, 2 minced garlic cloves, and 1 diced red bell pepper. 3. Sauté these ingredients for about 4-5 minutes until the onions are soft and fragrant. 4. Next, add 2 diced potatoes to the pot. Cook for another 5 minutes, stirring often. 1. Sprinkle in 2 tablespoons of Cajun seasoning and 1 teaspoon of smoked paprika. 2. Stir well to coat the vegetables with the spices. 3. Pour in 4 cups of chicken or vegetable broth and bring the mixture to a gentle simmer. 4. Cook for 10-15 minutes until the potatoes are fork-tender. 1. Add 2 cups of corn and 1 pound of peeled shrimp to the pot. 2. Gradually stir in 1 cup of coconut milk until blended. 3. Cook for an additional 5 minutes until the shrimp turn pink and opaque. 4. Taste the chowder and adjust the seasoning with salt and fresh cracked pepper as needed. 5. Let it rest for a few minutes to thicken before serving. This process ensures you create a delicious and comforting chowder that captures the essence of Cajun cooking. For the full recipe, check the earlier section. For this chowder, I recommend sautéing the vegetables rather than boiling them. Sautéing brings out the sweet flavors in the onion and red bell pepper. Use medium heat and keep an eye on them. Avoid letting them brown too much, as this can change the taste. To avoid overcooking the shrimp, add them near the end of cooking. They only need about five minutes to cook through. When they turn pink and opaque, they are done. Remove them from the heat right away to keep them tender. To boost the taste, consider adding a pinch of cayenne pepper or paprika. Both will add depth without overwhelming the dish. Fresh herbs like thyme or cilantro can also brighten the chowder. If you want a different creamy texture, you can swap coconut milk for heavy cream or even Greek yogurt. Each option adds richness while changing the flavor slightly. Serve the chowder in deep bowls for a cozy feel. A sprinkle of fresh parsley on top adds color and freshness. You could also add a dash of extra Cajun seasoning for a nice touch. Pair your chowder with crusty bread or cornbread. Both make great sides for dipping. They also complement the rich flavors of the chowder. For a refreshing twist, serve with a light salad on the side. {{image_4}} You can easily make this chowder fit your diet. - Gluten-free options: Use gluten-free broth and check labels on your seasonings. They should not have gluten. - Dairy alternatives: Swap coconut milk with almond milk or oat milk. This keeps it creamy without dairy. Feeling creative? Here are some fun swaps. - Other seafood options: You can use crab or lobster instead of shrimp. Both add a rich flavor. - Additional vegetables to include: Try adding diced carrots or celery. They add crunch and more flavor. Adjusting the flavors can make this dish your own. - Changing the spice level: If you like it mild, use less Cajun seasoning. For a spicy kick, add more! - Using different types of broth for variations: Chicken broth gives a warm taste, but vegetable broth offers a lighter flavor. Try both to see which you prefer. For the full recipe, refer to the original instructions to get started! To store leftovers, let the chowder cool first. Pour it into an airtight container. This keeps it fresh longer. I recommend using glass or BPA-free plastic containers. They seal well and do not absorb odors. If you want to freeze the chowder, follow these steps: 1. Cool the chowder completely. 2. Divide it into portions in freezer-safe bags or containers. 3. Remove as much air as possible before sealing. For reheating frozen chowder, thaw it in the fridge overnight. Heat it gently on the stove over low heat. Stir often to prevent sticking. In the fridge, you can keep the chowder for about 3 to 4 days. If you freeze it, it lasts for up to 3 months. Always check for freshness before eating. Making Minute Cajun shrimp and corn chowder takes just 30 minutes. You spend about 10 minutes prepping the ingredients. Then, you cook everything for 20 minutes. It's a quick meal for busy days. Yes, you can use frozen shrimp. Just make sure to thaw them first. Frozen shrimp are often easier to find and save time. They cook just as well in the chowder. If you don't have Cajun seasoning, you can use a mix of spices. Try paprika, cayenne pepper, garlic powder, and onion powder. You can also make a simple blend at home. This helps you customize the flavors to your taste. For a milder chowder, reduce the cayenne pepper. This blog post shared a simple recipe for Cajun shrimp and corn chowder. You learned about the main ingredients, broths, and seasonings that bring flavor. I also outlined step-by-step instructions for perfect results. Helpful tips and dietary variations enhance your chowder experience. In the end, this chowder is flexible and easy to make. Enjoy experimenting with flavors and ingredients your way. Make it your own, and savor every bite.](https://fastmealmate.com/wp-content/uploads/2025/07/c6449679-e116-43ab-bcba-93cf12d2671e-768x768.webp)

![- 4 boneless, skinless chicken breasts - 1 cup coconut milk (preferably full-fat for creaminess) - 2 tablespoons freshly squeezed lime juice - Zest of 1 lime - 2 tablespoons honey - 2 cloves garlic, minced - 1 teaspoon fresh ginger, grated - 1 teaspoon ground cumin - Salt and pepper to taste - 1 tablespoon olive oil The main ingredients in Coconut Lime Chicken create a perfect balance of flavors. The chicken breasts are the star, providing a solid base. Coconut milk adds creaminess and richness. Lime juice brings bright acidity and zest. Honey balances the tanginess. Garlic and ginger enhance depth, while cumin adds warmth. - Fresh cilantro leaves - Lime wedges for serving Garnishes can elevate your dish. Fresh cilantro adds a pop of color and freshness. Lime wedges provide an extra burst of citrus when served. - Grill or skillet - Resealable plastic bag for marinating A grill or skillet works great for cooking the chicken. The resealable bag is perfect for marinating. It helps the chicken soak up all those delicious flavors. For the Full Recipe, check out the detailed instructions that guide you through the steps to make this delicious Coconut Lime Chicken. To start, gather your ingredients. Combine 1 cup of coconut milk, 2 tablespoons of lime juice, lime zest, 2 tablespoons of honey, 2 minced garlic cloves, 1 teaspoon of grated ginger, and 1 teaspoon of ground cumin in a medium bowl. Add a pinch of salt and pepper to boost the flavor. Whisk these ingredients together until they blend well. This creates a creamy and fragrant marinade. - Tip: Use a sturdy whisk to mix. It helps create a smooth consistency without clumps. Next, it's time to marinate the chicken. Place 4 boneless, skinless chicken breasts into a large resealable plastic bag. Pour the marinade over the chicken. Make sure each piece is coated evenly. Seal the bag tightly and press out any air. For the best flavor, marinate in the fridge for at least 30 minutes. You can marinate for up to 4 hours for a richer taste. - Tip: Flip the bag halfway through marinating. This ensures all sides soak up the flavor. Now, let’s cook the chicken. Preheat your grill or a large skillet over medium-high heat. If using a skillet, drizzle in 1 tablespoon of olive oil. Let it heat until it shimmers but does not smoke. Carefully remove the chicken from the marinade. Allow any excess marinade to drip off. Place the chicken on the grill or in the skillet. Cook each piece for about 6-7 minutes on each side. The chicken is done when it is no longer pink inside and reaches an internal temperature of 165°F. - Tip: If using a skillet, turn the chicken often for even cooking. Once cooked, transfer the chicken to a plate. Let it rest for about 5 minutes. Resting helps the juices stay inside. Finally, slice the chicken and serve it with leftover marinade, fresh cilantro, and lime wedges. For the Full Recipe, check the complete details in the earlier section. Enjoy your Coconut Lime Chicken! Marinating your chicken is key for great taste. I recommend marinating for at least 30 minutes. For deeper flavors, let it sit for up to 4 hours. The coconut milk and lime juice work wonders together. You can also add spices like paprika or herbs like thyme. These will give your dish a unique twist. Resting your chicken after cooking is crucial. Let it sit for 5 minutes before slicing. This helps the juices stay inside. The ideal internal temperature for fully cooked chicken is 165°F (75°C). Use a meat thermometer to check. This step ensures your chicken stays juicy and tender. A great plate makes your meal more inviting. Arrange the sliced chicken on a bright platter. Sprinkle fresh cilantro over the top for color. Serve lime wedges on the side for extra zest. You can also add a side of coconut rice or a fresh salad. These choices elevate your dish, making it visually appealing and delicious. For the full recipe, check out the Coconut Lime Chicken recipe. {{image_4}} You can change the protein in this dish. Try shrimp or tofu for a fun twist. Each option offers a unique taste while soaking up the coconut and lime flavors. If you want to switch up the marinade, use pineapple juice instead of lime juice. This swap adds a sweet touch that works well. You can cook Coconut Lime Chicken in different ways. Oven-baking gives a nice, even cook. Set the oven to 375°F and bake for 25-30 minutes. Slow-cooking is great for busy days. Just put the marinated chicken in a slow cooker for 4-6 hours on low. Grilling adds a smoky flavor that many people love. It gives nice grill marks and a bit of char. Pan-searing is quick and keeps the chicken juicy. Use medium-high heat and watch it closely for great results. Coconut Lime Chicken pairs well with many sides. Coconut rice is a perfect fit. The creaminess of the rice matches the chicken's flavors. A fresh garden salad with lime vinaigrette adds brightness. You can also serve it with roasted vegetables for a colorful plate. For drinks, try a light white wine like Sauvignon Blanc. It complements the lime well. Coconut water is also refreshing and ties in with the meal. If you want a fun twist, mix a tropical cocktail with rum and pineapple juice. For the full recipe, check the earlier section. Enjoy your cooking adventure! To keep your Coconut Lime Chicken fresh, follow these simple steps. First, let the chicken cool completely after cooking. Place any leftover chicken in an airtight container. You can store it in the fridge for up to four days. If you want to keep it longer, freeze the chicken. Wrap it tightly in plastic wrap, then place it in a freezer bag. This helps prevent freezer burn. It can last up to three months in the freezer. When you're ready to eat, remember to label your container with the date. This will help you track how long it's been stored. Reheating your Coconut Lime Chicken is easy, but do it carefully. To keep it moist, I suggest using the oven. Preheat it to 350°F (175°C). Place the chicken in a baking dish, cover it with foil, and heat for about 15 to 20 minutes. Make sure it reaches an internal temperature of 165°F (75°C). You can also reheat in the microwave. Use a microwave-safe dish and cover it with a damp paper towel. Heat for one minute, then check if it's warm. If not, heat in 30-second bursts until hot. Avoid overheating, as this can dry out the chicken. If you want to enjoy your leftovers, consider adding them to salads or wraps for a tasty twist. I recommend marinating the chicken for at least 30 minutes. This time gives the chicken a nice flavor boost. If you have more time, you can marinate it for up to 4 hours. Longer marinating allows the flavors to soak in deeper. Just remember, do not marinate for more than 4 hours. The acid in lime juice can make the chicken tough if left too long. Yes, you can use canned coconut milk for this recipe. I suggest using full-fat coconut milk for the best results. Full-fat coconut milk adds creaminess and richness to the dish. It also helps create a smooth marinade that clings well to the chicken. Low-fat coconut milk can work, but it may not have the same depth of flavor. Coconut Lime Chicken pairs well with many side dishes. Here are some great options: - Coconut rice: It complements the flavor beautifully. - Fresh garden salad: A light salad adds crispness. - Grilled vegetables: They add color and nutrition. - Quinoa: A healthy grain that absorbs flavors well. You can also serve it with lime wedges for an extra citrus kick! For a refreshing drink, consider coconut water or a light mojito. For the full recipe, check out the [Full Recipe]. This blog post covered the key ingredients and steps for making Coconut Lime Chicken. We discussed the main ingredients, marinade tips, and cooking techniques. I shared ways to enhance flavor and ensure juicy chicken, plus creative serving ideas. You can explore variations and proper storage tips for leftovers. Remember, using quality ingredients and following these steps leads to tasty meals. Enjoy experimenting with this recipe to create your perfect dish!](https://fastmealmate.com/wp-content/uploads/2025/06/fb549dd5-9e1c-4fac-867b-0fcc137097f2-768x768.webp)
