
Get ready to elevate your holiday baking with Mary Berry’s Mini Christmas Cakes! These delightful treats burst with festive flavors, featuring a mix of dried fruits, nuts, and warm spices. Whether you’re an experienced baker or just starting out, you’ll love how easy these cakes are to make and decorate. Follow along as I guide you through each step to create these charming festive goodies that are perfect for gifting or celebrating.
Why I Love This Recipe
- Festive Flavor Explosion: These mini cakes are packed with rich flavors from mixed dried fruits, nuts, and warm spices, making them a delightful treat for the holiday season.
- Perfect Portion Size: Mini cakes are ideal for holiday gatherings, allowing guests to indulge without overindulging.
- Customizable Decoration: With marzipan and icing, you can get creative with the presentation, making them not only delicious but also visually stunning.
- Easy to Make: This recipe is straightforward and requires basic ingredients, perfect for bakers of all levels to enjoy.
Ingredients
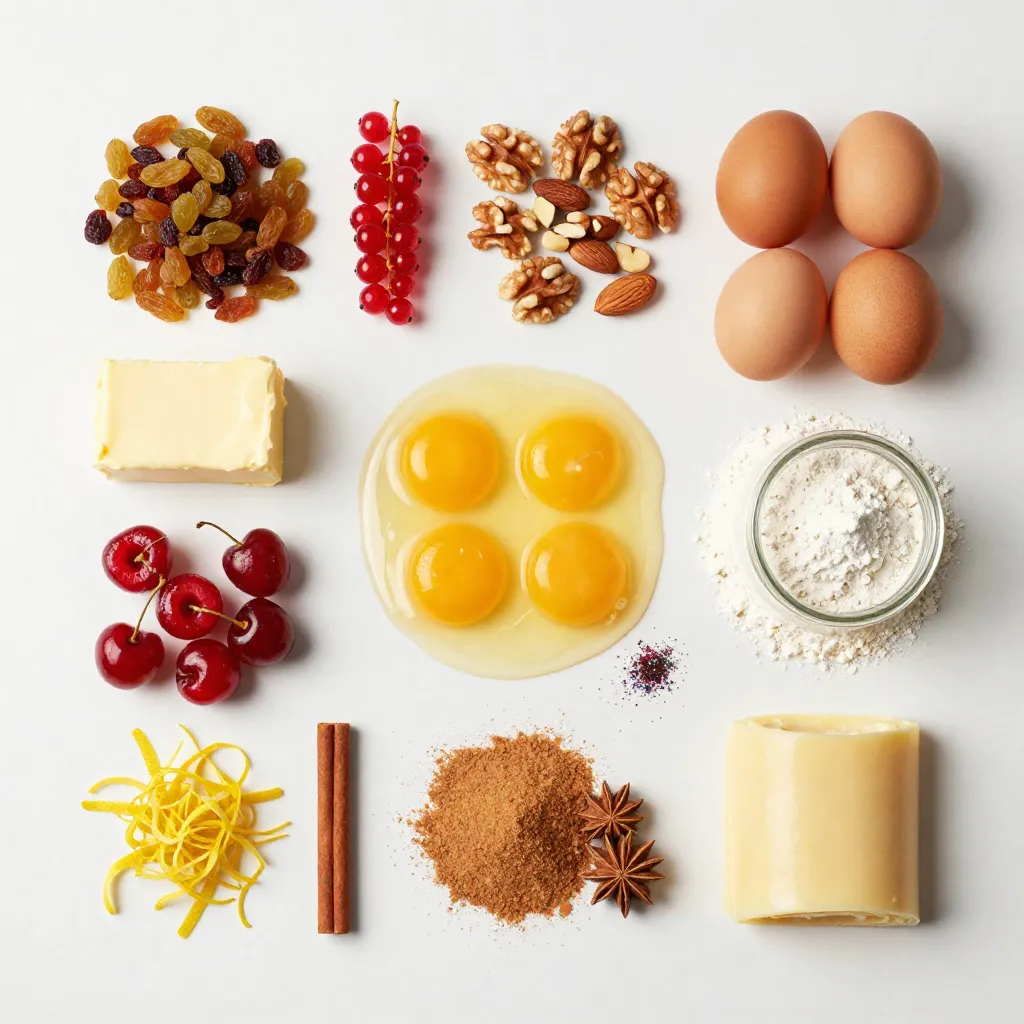
To make Mary Berry’s mini Christmas cakes, gather these ingredients:
– Mixed dried fruit: 200g of raisins, currants, and chopped dates
– Glacé cherries and nuts: 100g halved glacé cherries, 100g chopped walnuts and almonds
– Butter and sugar: 150g unsalted butter, 150g brown sugar
– Dry ingredients: 175g plain flour, 1 tsp baking powder, 1 tsp ground cinnamon, 1/2 tsp ground nutmeg
– Additional flavors: Zest of 1 lemon
– Toppings: 100g marzipan, 100g ready-to-roll icing, optional edible glitter
These ingredients bring together rich flavors. The dried fruit adds sweetness and texture. The combined nuts give a nice crunch. The spices create warmth, making these cakes festive. The lemon zest brightens the overall taste. The marzipan and icing finish each cake with a smooth touch. You can even add glitter for a magical sparkle!
Now that you have the ingredients, you’ll be ready to create tasty mini cakes that shine at any holiday gathering.
Step-by-Step Instructions
Preparing to Bake
First, preheat your oven to 150°C (300°F). This low heat helps the cakes cook through evenly. Next, prepare a muffin tin by placing 12 cupcake liners inside. This step keeps the cakes from sticking.
In a large mixing bowl, cream 150g of softened unsalted butter with 150g of brown sugar. Use an electric mixer for about 3-5 minutes. You want the mix to be light and fluffy. This step adds air to the batter, making the cakes soft.
Mixing Batter
Now, add in 3 large eggs, one at a time. Beat each egg well before adding the next. This keeps the mixture smooth and helps it rise better.
Next, sift in 175g of plain flour, 1 tsp of baking powder, 1 tsp of ground cinnamon, and 1/2 tsp of ground nutmeg. Gently fold these dry ingredients into the batter using a spatula. Be careful not to overmix, as this can make the cakes tough.
Adding Fruity Goodness
Time to add the fun! Mix in 200g of mixed dried fruit, 100g of halved glacé cherries, and 100g of roughly chopped mixed nuts. Finally, add the zest of 1 lemon for extra flavor. Stir gently until everything is evenly mixed.
Using a spoon or an ice cream scoop, fill each cupcake liner with the batter. Aim to leave about a quarter of space at the top. This allows the cakes to rise nicely.
Baking and Cooling
Bake your mini cakes for about 25-30 minutes. To check if they’re done, insert a skewer into the center of one. If it comes out clean, they’re ready.
Once baked, let the cakes cool in the tin for about 10 minutes. After that, transfer them to a wire rack to cool completely. This helps prevent sogginess and allows air to circulate.
Decorating Mini Cakes
When the cakes are cool, it is time to decorate! Take a thin layer of marzipan (about 100g), and carefully place it on each mini cake. Smooth it out so it sticks well.
Next, add a layer of ready-to-roll icing (100g) on top. Make sure it is smooth on both the top and sides. For a festive touch, sprinkle on some edible glitter. This adds a charming sparkle and makes the cakes look extra special!
Tips & Tricks
Perfecting the Recipe
To get light and fluffy mini cakes, avoid overmixing the batter. Once you add flour, mix just enough to blend. Overmixing can lead to tough cakes. Use room temperature eggs and butter. This helps the ingredients blend well and makes a better texture.
Baking Tips
Check if the cakes are done by inserting a skewer into the center. If it comes out clean, they are ready. Avoid opening the oven door too soon, as this can cause the cakes to sink. Also, make sure to bake them at the right temperature for even cooking.
Presentation Tips
For a festive look, arrange your mini cakes on a decorative platter. You can add seasonal touches like holly or cinnamon sticks around them. A little edible glitter on top adds charm and sparkle. It makes your cakes look inviting and festive!
Pro Tips
- Ensure Room Temperature Ingredients: Make sure your eggs and butter are at room temperature before starting. This helps create a smoother batter and better texture in your cakes.
- Use Quality Dried Fruits: Opt for high-quality mixed dried fruits and nuts for the best flavor. This will enhance the overall taste of your mini cakes.
- Check for Doneness: To ensure your cakes are perfectly baked, use a skewer to check for doneness. If it comes out clean, the cakes are ready!
- Decorate with Care: When applying marzipan and icing, take your time to ensure a smooth finish. This not only looks professional but also enhances the overall presentation.
Variations
Alternative Ingredients
You can switch up the dried fruits in your mini cakes. Try apricots, figs, or cranberries for a new twist. Each fruit adds its own flavor and texture. You can also mix different nuts. Pecans or hazelnuts can bring a unique crunch.
For flavor enhancements, consider adding spices like ginger or cloves. A splash of orange juice or zest can brighten the taste. You can even add a bit of brandy or rum for a festive kick.
Decoration Variations
Customizing the icing on your cakes can be a fun way to express your creativity. Use cookie cutters to make festive shapes like stars or trees from the icing. You can also pipe designs with colored icing for a personal touch.
For special occasions, think about themed decorations. Add edible flowers for spring, or chocolate snowflakes for winter. Seasonal sprinkles can make your cakes pop with color and festivity.
Healthier Versions
If you want a lighter cake, you can substitute some ingredients. Use whole wheat flour instead of plain flour for added fiber. Also, try replacing the butter with unsweetened applesauce. This keeps the cake moist while cutting calories.
For sugar alternatives, consider using honey or maple syrup. These can add a natural sweetness without refined sugar. Just remember to adjust the liquid ingredients in your recipe.
Storage Info
Proper Storage Practices
To keep your mini cakes fresh, you should store them in a cool, dry place. Use an airtight container to prevent them from drying out. Wrap each cake in plastic wrap to seal in moisture. This way, your cakes stay soft and tasty.
For long-term storage, consider using a tin or a plastic container. Ensure it seals tightly. This method protects the cakes from air and light. Both factors can lead to a stale texture.
Freezing Mini Cakes
Freezing is a great option for preserving mini cakes. First, let the cakes cool completely. Wrap each cake in plastic wrap, then place them in a freezer bag. Squeeze out excess air to prevent freezer burn.
When you’re ready to enjoy them, move the cakes to the fridge overnight. This method allows them to thaw slowly. If you need them fast, you can thaw them at room temperature.
Mini cakes can last up to three months in the freezer. After that, their flavor and texture may decline.
FAQs
Common Questions about Mini Christmas Cakes
Can I make these cakes ahead of time?
Yes, you can make these cakes a week in advance. Just bake them and let them cool. Wrap each cake in plastic wrap to keep them fresh. Store them in a cool, dry place. This helps the flavors blend well.
What can I substitute for marzipan?
If you need a substitute for marzipan, use almond paste. It has a similar texture and flavor. You can also use fondant for a smooth finish. If you want a nut-free option, try using a thin layer of buttercream instead.
Baking and Storage Questions
How should I store any leftover cakes?
To store leftover cakes, place them in an airtight container. This keeps them moist and fresh. You can also wrap them in plastic wrap. Store them at room temperature for up to five days.
What is the best way to freeze these cakes?
Freezing mini cakes is easy. Wrap each cake tightly in plastic wrap and then in foil. This prevents freezer burn. They last up to three months in the freezer. To thaw, move them to the fridge overnight before serving.
Ingredient and Flavor Questions
Can I use different nuts or fruits?
Absolutely! Feel free to swap in your favorite nuts or dried fruits. Pecans, hazelnuts, or even dried apricots work well. Just make sure to keep the total weight the same for balance.
How do I make mini cakes look more festive?
Make your mini cakes pop with color! Use bright icing and fun edible decorations. You can add sprinkles or stars for a cheerful touch. A few fresh berries or a sprig of rosemary can add charm, too!
This post covered everything you need to bake delightful mini Christmas cakes. From essential ingredients to step-by-step methods, every detail was included. You learned how to mix, bake, and beautifully decorate these tasty treats. Remember, feel free to swap ingredients or tailor decorations to fit your style. Enjoy the process, and don’t worry if they aren’t perfect. With practice, your mini cakes can become a cherished tradition. Happy bakin


