Lotus Biscoff Cinnamon Rolls Scrumptious and Easy Treat

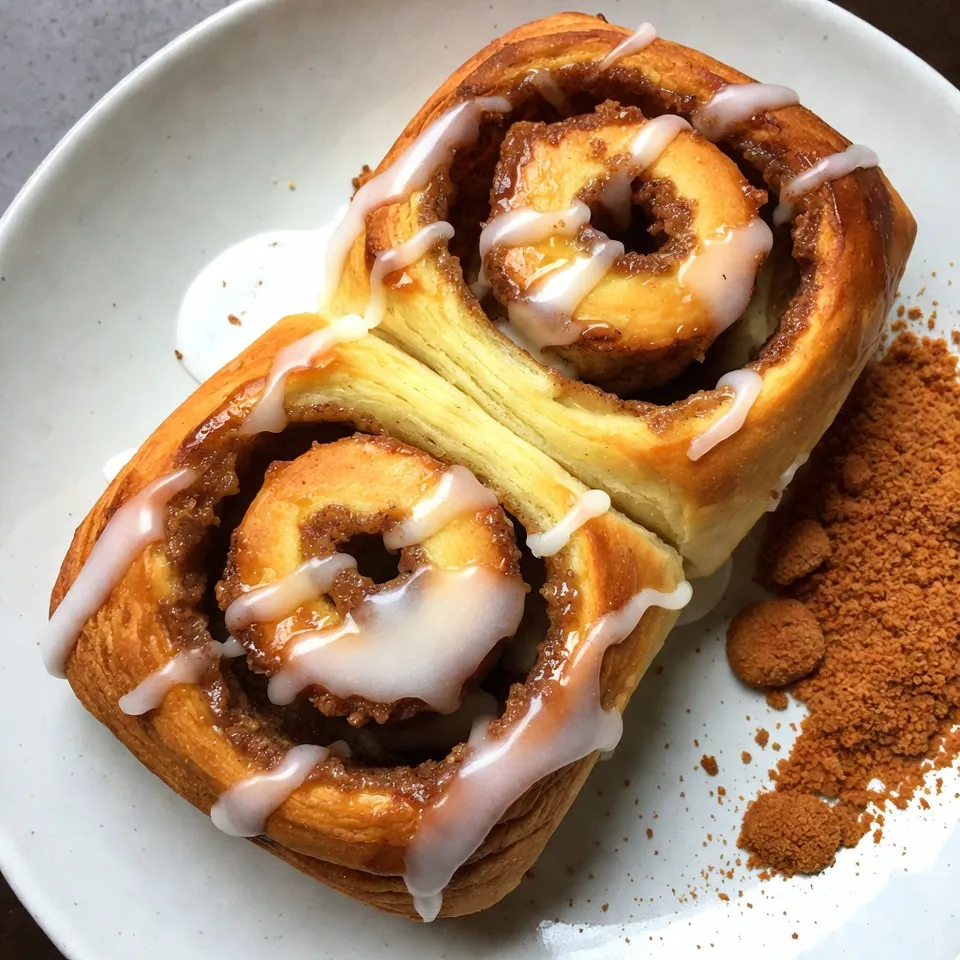
Are you ready to indulge in a sweet, gooey treat that’s easy to make? Lotus Biscoff Cinnamon Rolls combine rich flavors with simple steps, making them perfect for any occasion. Imagine biting into warm, soft rolls filled with a creamy Biscoff spread and a hint of cinnamon. In this post, I’ll guide you through every step, from mixing the dough to that sweet icing on top. Let’s get baking!
Why I Love This Recipe
- Deliciously Unique Flavor: The combination of warm cinnamon and the rich, caramel-like taste of Lotus Biscoff spread creates an indulgent treat that’s unlike any other cinnamon roll.
- Quick and Easy: This recipe comes together in just 45 minutes, making it perfect for a weekend breakfast or a last-minute dessert.
- Versatile Topping Options: The icing can be adjusted to your preference, and you can even add extra Biscoff spread or crushed cookies for added texture and flavor.
- Perfect for Sharing: These rolls are a crowd-pleaser, making them great for gatherings, brunches, or simply to enjoy with family and friends.
Ingredients
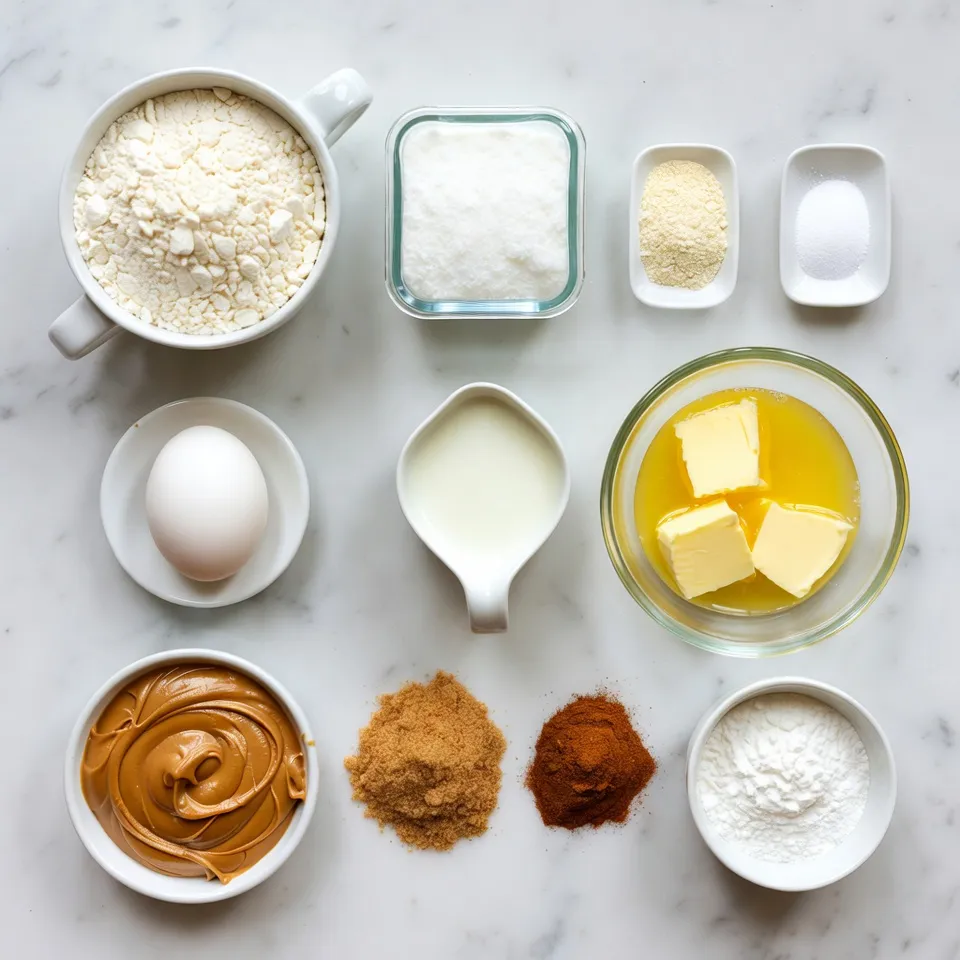
List of Main Ingredients
– 2 cups of all-purpose flour
– 3/4 cup of milk
– 1/4 cup of unsalted butter
Sweetening Elements
– 2 tablespoons of granulated sugar
– 1/4 cup of brown sugar
– 1/2 cup of powdered sugar (for icing)
Flavor Enhancers
– 1/2 cup of Lotus Biscoff spread
– 1 tablespoon of ground cinnamon
– 1 large egg
These ingredients create a sweet and rich flavor. The all-purpose flour forms the base for your dough. Milk adds moisture, while unsalted butter gives a rich taste. Granulated and brown sugars sweeten the rolls, and powdered sugar makes the icing smooth.
Lotus Biscoff spread is the star here, adding a unique flavor. Ground cinnamon gives a warm spice note. Finally, the egg helps bind the dough. Each part plays a key role in making these cinnamon rolls a hit.

Step-by-Step Instructions
Preparing the Dough
– Preheat the oven: Set your oven to 350°F (175°C). This warms it up for baking.
– Mix dry ingredients: In a big bowl, whisk together 2 cups of flour, 2 tablespoons of sugar, 1 tablespoon of baking powder, and 1/2 teaspoon of salt. This makes sure everything is blended well.
– Combine wet ingredients: In another bowl, add 3/4 cup of milk, 1/4 cup of melted butter, and 1 large egg. Whisk them until they mix nicely.
– Combine mixtures: Pour the wet mix into the dry mix. Stir gently until you see a dough forming. Transfer it to a floured surface. Knead it for about 1 minute until smooth.
Assembling the Rolls
– Roll out the dough: Use a rolling pin to shape the dough into a rectangle, about 12 inches by 8 inches. Keep it even for nice rolls.
– Spread Biscoff layer: Take 1/2 cup of Lotus Biscoff spread and dollop it on the dough. Use a spatula to spread it evenly.
– Add cinnamon sugar: In a small bowl, mix 1/4 cup of brown sugar with 1 tablespoon of ground cinnamon. Sprinkle this mixture over the Biscoff layer.
– Roll up the dough: Start at one long edge and roll the dough tightly. Pinch the seams to seal it well.
Baking the Rolls
– Slice rolls: Cut the rolled dough into 1-inch pieces with a sharp knife. Place them in a greased 9×13 inch baking dish. Leave some space between them.
– Bake: Put the dish in the oven. Bake for 20-25 minutes until golden brown and fragrant.
– Prepare icing: While the rolls bake, mix 1/2 cup of powdered sugar with 1-2 tablespoons of milk in a small bowl. Whisk until smooth. Adjust milk for your preferred thickness.
– Glaze rolls: After baking, let the rolls cool for 5 minutes. Drizzle the icing over the warm rolls for a sweet finish.
Tips & Tricks
Perfecting the Dough
To make elastic dough, knead it gently. You only need about one minute. This short kneading helps it become smooth. Make sure your surface is lightly floured. This will prevent sticking.
When you roll out the dough, aim for a rectangle. Try to keep the thickness even. This helps all the rolls bake at the same time. Use a rolling pin for the best results. If you find it sticking, add a little more flour.
Icing Consistency
For the icing, you want the right thickness. Start with a small amount of milk. Add it slowly to the powdered sugar. Whisk until smooth. If it’s too thick, add more milk. If it’s too thin, sprinkle in more powdered sugar.
If you want to avoid powdered sugar, try using cream cheese. Mix it with a bit of milk. This gives you a tasty, creamy glaze. It also adds a nice tang.
Serving Suggestions
For a beautiful presentation, serve the rolls warm. You can top them with extra Biscoff spread. A sprinkle of crushed Biscoff cookies adds crunch and color.
Pair these rolls with coffee or chai tea. They make a perfect breakfast or snack. You can also enjoy them with a scoop of vanilla ice cream for dessert.
Pro Tips
- Use Room Temperature Ingredients: Allow your milk, butter, and egg to come to room temperature before mixing. This helps create a smoother dough and results in fluffier rolls.
- Don’t Overwork the Dough: Knead the dough just until it’s smooth and elastic. Over-kneading can make the rolls tough instead of soft and pillowy.
- Adjust Baking Time: Keep an eye on the rolls as they bake. Ovens can vary, so check for a golden color and a fragrant aroma to determine doneness.
- Customize Your Icing: Feel free to add a pinch of cinnamon or vanilla extract to the icing for an extra flavor boost that complements the Biscoff spread.

Variations
Flavor Modifications
You can change the flavor of your Lotus Biscoff cinnamon rolls. Adding nuts like walnuts or pecans gives a nice crunch. Mixing in other spices, such as nutmeg, adds warmth and depth. You can also swap out the Biscoff spread for other spreads. Nutella or peanut butter works well and gives a new twist.
Dietary Adjustments
If you need gluten-free rolls, use a gluten-free flour blend. Look for one that measures cup-for-cup like all-purpose flour. For vegan options, swap the butter for coconut oil and use almond milk. You can also replace the egg with a flax egg made from ground flaxseed and water.
Mini or Jumbo Versions
You can make mini cinnamon rolls by cutting the dough into smaller pieces. Roll the dough into a log and cut it into ½-inch slices. They will bake quickly, so check them after 15 minutes. For jumbo rolls, cut the dough into larger pieces, about 2 inches thick. Bake them for a bit longer, around 25-30 minutes. Both sizes are fun and tasty!
Storage Info
Storing Leftovers
To keep your Lotus Biscoff cinnamon rolls fresh, store them in the fridge. Place them in an airtight container. They will last for about 3 to 5 days. If you don’t have an airtight container, wrap them in plastic wrap. This helps to keep moisture in and air out.
Freezing Options
You can freeze your rolls for later enjoyment. If you freeze unbaked rolls, they stay fresh longer. Just prepare them until the slicing step, then wrap them tightly. For baked rolls, let them cool first. Then, place them in a freezer-safe container. Both types can last up to 3 months. To thaw, place them in the fridge overnight. For reheating, bake them at 350°F for about 10-15 minutes until warm.
Recommended Storage Containers
Choose containers that seal tightly. Glass or plastic with a good seal works best. Avoid metal containers, as they can rust. To prevent sogginess, place a paper towel inside the container. This absorbs any extra moisture. By following these tips, your cinnamon rolls will taste as fresh as when you baked them!
FAQs
How do you make Lotus Biscoff Cinnamon Rolls from scratch?
To make these rolls, start with simple steps. Mix your dry ingredients in one bowl. In another bowl, whisk together the milk, melted butter, and egg. Combine both mixtures to form a dough. Roll the dough out into a rectangle. Spread Lotus Biscoff on top, then sprinkle cinnamon sugar. Roll it up tightly and slice it into pieces. Place them in a baking dish and bake at 350°F for 20-25 minutes. Finally, drizzle icing on top.
Can you use store-bought Biscoff cookies in the recipe?
Yes, you can use store-bought Biscoff cookies! Crush them into fine crumbs and sprinkle on the Biscoff spread. This adds a nice crunch and boosts flavor. You can also add crushed cookies to the icing for extra sweetness. It’s a fun way to enhance your rolls.
What can I substitute for Lotus Biscoff spread?
If you don’t have Lotus Biscoff spread, try using Nutella or peanut butter. These spreads offer different flavors but still work well. Almond butter is another option, giving a nutty taste. Each spread will change the flavor profile a bit, so choose what you love most.
How can I make these cinnamon rolls more festive?
To make these rolls festive, add seasonal spices like nutmeg or ginger. You can also mix in dried fruits like cranberries or raisins for a holiday touch. For toppings, consider using colored icing or sprinkles. Serve them warm with a side of whipped cream for a special treat.
This article outlined how to make Lotus Biscoff cinnamon rolls. We covered ingredients, from flour to flavor add-ons. I shared step-by-step directions to create perfect rolls. Helpful tips ensured your dough and icing turn out just right. We also explored fun variations to fit any diet.
Try this recipe at home for a sweet treat. Your friends and family will love these rolls! Enjoy baking and sharing this delicious jo

Lotus Biscoff Cinnamon Rolls Delight
Ingredients
- 2 cups all-purpose flour
- 2 tablespoons granulated sugar
- 1 tablespoon baking powder
- 1 teaspoon salt
- 3.75 cups milk
- 0.25 cups unsalted butter, melted
- 1 large egg
- 0.5 cups Lotus Biscoff spread
- 0.25 cups brown sugar
- 1 tablespoon ground cinnamon
- 0.5 cups powdered sugar (for the icing)
- 1 tablespoons milk (for the icing)
Instructions
- Preheat the Oven: Start by setting your oven to preheat at 350°F (175°C) to ensure it's ready for your rolls.
- Mix Dry Ingredients: Take a large mixing bowl and whisk together the all-purpose flour, granulated sugar, baking powder, and salt until they are well combined and aerated.
- Combine Wet Ingredients: In a separate bowl, pour in the milk, melted unsalted butter, and the egg. Whisk these together until they form a uniform mixture.
- Combine Mixtures: Slowly pour the wet mixture into the bowl with the dry ingredients. Stir gently until you see a cohesive dough forming. Once it has come together, transfer the dough to a lightly floured surface and knead it gently for about 1 minute until it’s smooth and elastic.
- Roll Out Dough: Using a rolling pin, roll out the dough into a rectangle that measures approximately 12 inches by 8 inches. Aim for an even thickness for uniform rolls.
- Spread Biscoff Layer: Take the Lotus Biscoff spread and dollop it onto the rolled-out dough. Use a spatula to spread it evenly across the entire surface.
- Add Cinnamon Sugar: In a small bowl, combine the brown sugar and ground cinnamon. Mix well and then sprinkle this mixture evenly over the Biscoff layer, ensuring good coverage.
- Roll Up: Begin at one long edge of the rectangle and carefully roll the dough towards the opposite edge, making a tight log. Once rolled, pinch the seams to seal it securely.
- Slice Rolls: Using a sharp knife, cut the log into 1-inch pieces. Arrange these rolls in a greased 9x13 inch baking dish, spacing them slightly apart.
- Bake: Place the dish in the preheated oven and bake for 20-25 minutes or until the tops are golden and fragrant.
- Prepare Icing: While the cinnamon rolls are baking, prepare the icing. In a small bowl, combine the powdered sugar with 1-2 tablespoons of milk. Whisk until you achieve a smooth, drizzleable consistency. Adjust the milk quantity based on your desired thickness.
- Glaze Rolls: Once the rolls have finished baking, allow them to cool for about 5 minutes in the dish. Then, generously drizzle the prepared icing over the warm rolls for a luscious finish.


![Here are the ingredients you need for Peach Blueberry Greek Yogurt Cake. Gather these items before you start. - 1 cup plain Greek yogurt - 1 cup granulated sugar - 1/2 cup vegetable oil - 3 large eggs - 1 teaspoon vanilla extract - 2 cups all-purpose flour - 1 tablespoon baking powder - 1/2 teaspoon baking soda - 1/4 teaspoon salt - 1 cup fresh peaches, diced - 1 cup fresh blueberries - Zest of 1 lemon - Powdered sugar for dusting (optional) Using Greek yogurt makes this cake moist and adds a nice tang. Fresh peaches and blueberries bring sweetness and color. The lemon zest brightens the flavor, making each bite delightful. You can easily find most of these ingredients at your local store. For the full recipe, check the section on instructions. Enjoy baking this tasty treat! - Preheat your oven to 350°F (175°C). - Prepare and grease the cake pan. Use butter or oil and a little flour. This helps the cake come out easily. - Combine wet ingredients. In a large bowl, mix Greek yogurt, sugar, oil, eggs, and vanilla. Whisk until smooth. - Sift and combine dry ingredients. In another bowl, sift flour, baking powder, baking soda, and salt. This makes the cake light and fluffy. - Fold in the fruits. Gently add diced peaches, blueberries, and lemon zest to the batter. Be careful not to break the fruit. - Bake and check for doneness. Pour the batter into the pan. Bake for 35-40 minutes. Your cake is done when it is golden brown and a toothpick comes out clean. Enjoy making this delicious Peach Blueberry Greek Yogurt Cake by following the [Full Recipe]. - Avoiding overmixing: When you mix the wet and dry ingredients, stir just until combined. Overmixing can make your cake tough. The batter should look a bit lumpy, and that's okay! - Signs your cake is done: Your cake is ready when it turns golden brown. A toothpick inserted in the center should come out clean or have a few moist crumbs. This tells you it’s perfectly baked. - Presentation ideas: Serve your cake on a lovely cake stand. Top it with whole blueberries and thin peach slices. This adds color and charm to your dish. - Pairing with whipped cream: A dollop of fresh whipped cream takes this cake to another level. The cream’s richness balances the fruity flavors and makes each bite heavenly. - Incorrect ingredient ratios: Always measure your ingredients carefully. Too much flour or too little sugar can ruin the cake's texture and taste. - Not greasing the cake pan properly: Make sure to grease your pan well. Use butter or oil and dust it with flour. This step helps the cake come out easily after baking, preventing any tears. For the Full Recipe, be sure to check out the detailed instructions on how to make this delightful cake! {{image_4}} You can change fruits in this cake. Raspberries and strawberries work well. They add a nice flavor. You can also use flavored yogurt. Try vanilla or peach yogurt for a twist. This will change the taste slightly but keep it tasty. If you need gluten-free options, use a gluten-free flour blend. This keeps the cake light. For lower sugar choices, you can use a sugar substitute. This will keep the cake sweet without the extra sugar. Always check the package for the best ratio. Making cupcakes or mini cakes is fun and easy. Use a muffin tin to create individual servings. Bake them for about 20-25 minutes. Check for doneness with a toothpick. This way, you can share with friends or enjoy them yourself! You can store the Peach Blueberry Greek Yogurt Cake in two ways. If you plan to eat it quickly, keep it at room temperature. Just wrap it in plastic wrap or place it in an airtight container. This keeps the cake moist. If you want to save it longer, put it in the fridge. The cold will help it stay fresh for days. This cake stays fresh for about 3 days at room temperature. If you store it in the fridge, it can last up to a week. The flavors will deepen over time, which is a nice bonus! Just make sure to check for any signs of spoilage before enjoying. If you have leftover cake, freezing is a great option. Cut the cake into slices for easy serving later. Wrap each slice in plastic wrap tightly. Then, place the wrapped slices in a freezer bag. Make sure you remove the air. This way, the cake can last up to 3 months in the freezer. When you’re ready to eat it, just thaw it in the fridge overnight. Enjoy your delicious Peach Blueberry Greek Yogurt Cake again! For the full recipe, check out the earlier section. To make this cake, follow these steps: 1. Preheat the oven to 350°F (175°C). Grease a 9-inch cake pan. 2. In a bowl, mix Greek yogurt, sugar, oil, eggs, and vanilla. Whisk until smooth. 3. In another bowl, sift flour, baking powder, baking soda, and salt. 4. Gradually add the dry mix to the wet mix. Stir gently to combine. 5. Fold in diced peaches, blueberries, and lemon zest. 6. Pour the batter into the pan and smooth the top. 7. Bake for 35-40 minutes until golden. Check for doneness. 8. Cool the cake for 10 minutes in the pan, then transfer to a wire rack. You can find the full recipe in the earlier sections. Yes, you can use canned peaches. However, they may change the cake's texture. Canned peaches are softer and wetter than fresh ones. This extra moisture may make the cake denser. If you use canned peaches, drain them well. This will help keep the cake light and fluffy. You can make this cake dairy-free. Use coconut yogurt or almond yogurt instead of Greek yogurt. For eggs, try flaxseed meal or applesauce. Mix 1 tablespoon of flaxseed meal with 3 tablespoons of water per egg. Let it sit until it thickens. This will help bind the ingredients together. If you don’t have a toothpick, check the cake by pressing lightly on the top. If it springs back, it’s done. You can also look for a golden-brown top. The sides should pull away from the pan slightly. These signs mean your cake is ready to be taken out of the oven. This blog post showed you how to make a delicious Peach Blueberry Greek Yogurt Cake. You learned about the simple ingredients, step-by-step instructions, and some helpful tips. Remember to avoid overmixing and choose the right baking time. Feel free to customize the recipe with different fruits or dietary changes. Store your cake properly to keep it fresh. Enjoy your baking adventure and impress your friends with this tasty treat!](https://fastmealmate.com/wp-content/uploads/2025/06/b601b86f-d636-457f-a46c-3ca961086cb7-768x768.webp)
![To make this delicious bread, gather these items: - 1 cup fresh strawberries, hulled and diced - 1 cup rhubarb, diced - 1/2 cup unsalted butter, softened to room temperature - 1 cup granulated sugar, divided - 2 large eggs, at room temperature - 1 teaspoon pure vanilla extract - 1/2 cup Greek yogurt, plain - 2 cups all-purpose flour - 1 teaspoon baking powder - 1/2 teaspoon baking soda - 1/4 teaspoon sea salt - 1/2 teaspoon ground cinnamon (optional) - 1/4 cup chopped walnuts or pecans (optional) Using fresh ingredients is key to good flavor. Fresh strawberries and rhubarb give the bread a tart and sweet taste. They also add moisture, making the bread soft. When you choose fresh fruits, look for vibrant colors and firm textures. This will enhance your final dish. If you can, visit a local farmer’s market for the best produce. It really makes a difference in taste. You can make the bread even better with some optional ingredients. Adding ground cinnamon brings warmth and depth to the flavor. If you like crunch, chopped walnuts or pecans add a nice texture. These nuts also pair well with the fruit. You can mix and match these extras based on your taste. Feel free to experiment and find what you love! For the full recipe, check out the earlier sections. Start by preheating your oven to 350°F (175°C). This warms the oven for even baking. Grease and flour a 9x5-inch loaf pan. This step helps the bread slide out easily after baking. Next, prepare the fruit. In a medium bowl, mix the diced strawberries and rhubarb. Sprinkle 1 tablespoon of sugar over the fruit and toss gently. Let it sit for a few minutes. This draws out moisture and brings out the fruit's flavor. In a large mixing bowl, cream the softened butter with the remaining sugar. Use an electric mixer for about 3-4 minutes. The mixture should look light and fluffy. Add the eggs one at a time, mixing well after each addition. Then, mix in the vanilla extract and Greek yogurt until smooth. In another bowl, whisk together the flour, baking powder, baking soda, sea salt, and ground cinnamon. Gradually add this dry mix to the wet ingredients. Stir gently until just combined to avoid a dense bread. Finally, fold in the prepared strawberries and rhubarb. If you like, add chopped nuts for crunch. Pour the batter into your greased loaf pan. Smooth the top with a spatula for an even surface. Bake in the preheated oven for 55-65 minutes. Check if it’s done by inserting a toothpick in the center. It should come out clean or with a few moist crumbs. Once baked, let the bread cool in the pan for about 10 minutes. Then, transfer it to a wire rack to cool completely. This step is important for the best texture. Now, you can slice and enjoy your strawberry rhubarb delight bread! For the full recipe, refer to the earlier section. To get that soft and fluffy bread, you must mix the batter just right. When you mix the wet and dry ingredients, do it slowly. Stir until just combined. This helps keep air in the batter. Over-mixing makes your bread dense. Remember, a few lumps are okay! One common mistake is using cold ingredients. Always start with eggs and yogurt at room temperature. This helps the batter mix better and rise nicely. Another mistake is not measuring the flour properly. Too much flour can lead to a dry texture. Use a spoon to scoop flour into your measuring cup, then level it off for accuracy. Want to add more flavor? Try adding a bit of lemon zest. It brightens the bread and pairs well with strawberries and rhubarb. You can also mix in spices like nutmeg or ginger for warmth. If you like nuts, fold in walnuts or pecans for crunch. You can find the full recipe for this delicious bread above. {{image_4}} You can easily adapt this recipe for different diets. If you want a dairy-free option, swap the butter for coconut oil or a plant-based butter. Use almond or oat yogurt in place of Greek yogurt. For a gluten-free bread, replace all-purpose flour with a gluten-free blend. Always check the labels to ensure your substitutes fit your needs. This recipe is versatile, allowing you to play with flavors. Instead of strawberries, try blueberries or diced apples. You can mix in lemon zest for a fresh twist. If you love spices, add nutmeg or cardamom for warmth. These changes keep the bread exciting and fun! Get creative with add-ins to enhance your bread. Try adding chocolate chips for a sweet treat. For crunch, include a handful of sunflower seeds or pumpkin seeds. You can also mix in a scoop of shredded coconut for a tropical touch. These add-ins make each slice unique and flavorful. For the complete recipe, check out the [Full Recipe]. To keep your strawberry rhubarb bread fresh, store it at room temperature. Wrap it tightly in plastic wrap or foil. This helps to prevent it from drying out. If you have leftover bread, try to keep it in an airtight container. This way, it stays soft and delicious for a few days. Avoid storing it in the fridge, as that can make it stale faster. If you want to save your bread for later, freezing is a great option. First, let the bread cool completely after baking. Then, slice it into pieces. Wrap each slice in plastic wrap, and then place them in a freezer bag. Make sure to squeeze out any air before sealing. You can freeze it for up to three months. When you're ready to enjoy it, you can thaw it overnight in the fridge or leave it at room temperature for a few hours. To enjoy your strawberry rhubarb bread warm, preheat your oven to 350°F (175°C). Place the slices on a baking sheet and cover with foil. Heat for about 10-15 minutes. This keeps the bread moist and enhances its flavors. You can also use a microwave. Just heat each slice for about 15-20 seconds. However, the oven method gives the best taste and texture. Enjoy your warm slices with a little butter or jam for extra flavor! To keep your bread moist, use fresh fruit. Fresh strawberries and rhubarb add natural moisture. You can also add Greek yogurt. It adds creaminess and keeps the bread soft. Be careful not to over-mix your batter. Over-mixing can cause dense bread. Bake until just done to keep it fluffy. Yes, you can use frozen strawberries and rhubarb. Thaw them and drain excess liquid first. This prevents your bread from getting soggy. The flavor will still be good, but fresh fruit tastes better. Try to use fresh when possible, especially in peak season. This bread is great on its own. For a special treat, serve it with whipped cream. You can also pair it with butter or cream cheese. A sprinkle of powdered sugar adds a nice touch. Serve it warm for the best taste. Enjoy it with your favorite tea or coffee! Strawberry rhubarb bread is simple and fun to make. We covered key ingredients, step-by-step instructions, and helpful tips. Fresh ingredients are vital for great flavor. Remember to avoid common mistakes for the best texture. You can add your own flavors too, which makes it even better. Don’t forget how to store it well, so you can enjoy every bite later. I hope these tips inspire you to bake and savor this delicious bread. Enjoy your time in the kitchen!](https://fastmealmate.com/wp-content/uploads/2025/06/5214b0a0-4654-456a-8121-021057b3e65e-768x768.webp)


