Looking for a quick and tasty dinner? You found it! Loaded Veggie Baked Ziti is packed with flavor and nutrition. This dish is perfect for families and is easy to make. You can customize it with your favorite veggies and toppings. In this post, I’ll share all the steps, tips, and secrets to make your ziti a hit at the dinner table. Let’s dive into this delicious recipe!
Why I Love This Recipe
- Flavorful Veggies: This baked ziti is packed with a variety of fresh vegetables, making each bite a burst of flavor and nutrition.
- Cheesy Goodness: With layers of ricotta, mozzarella, and Parmesan, every serving is delightfully cheesy and satisfying.
- Easy to Make: This recipe is straightforward and perfect for weeknight dinners or meal prep, allowing you to whip up a hearty meal in no time.
- Customizable: You can easily adjust the vegetables or add your favorite protein, making it versatile for any taste preference.
Ingredients
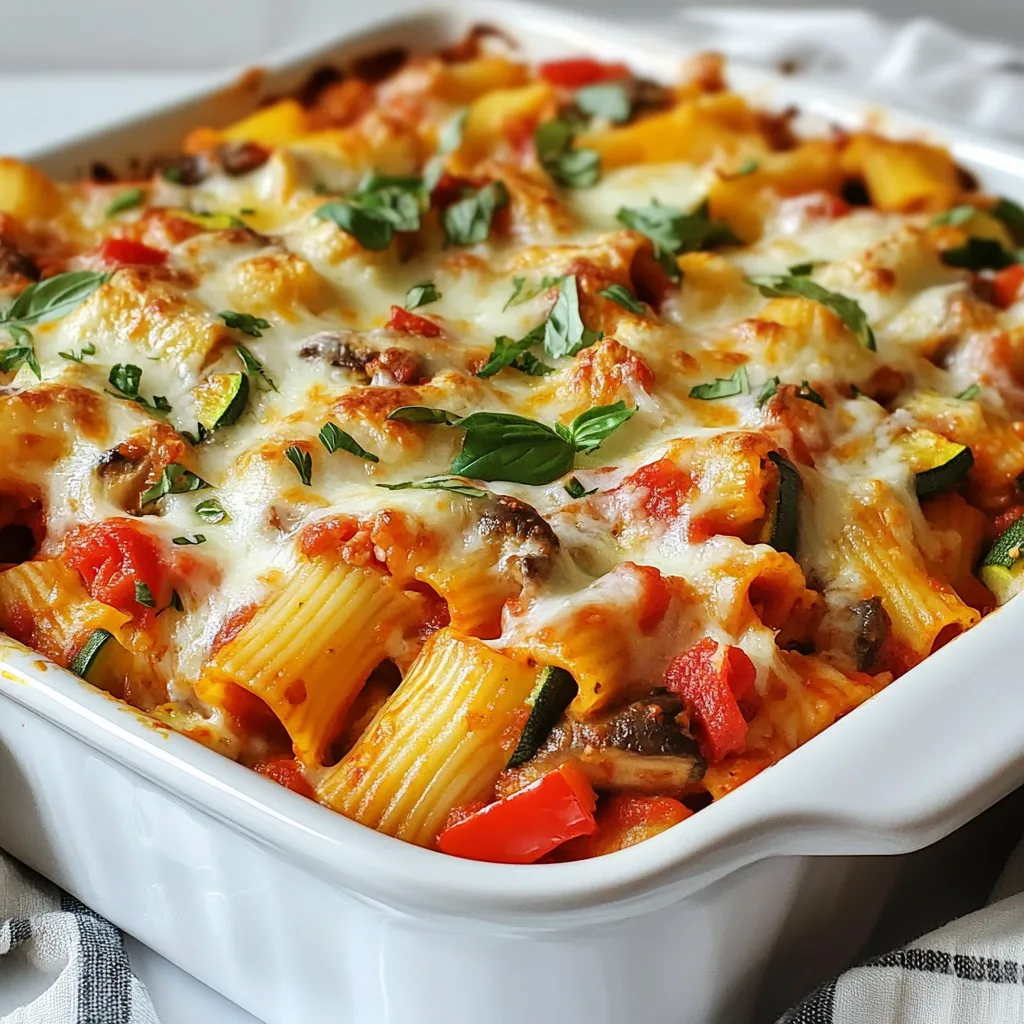
Main ingredients for Loaded Veggie Baked Ziti
For this dish, you need the following main ingredients:
– 12 oz ziti pasta
– 2 tablespoons olive oil
– 1 large onion, diced
– 3 cloves garlic, minced
– 1 red bell pepper, diced
– 1 medium zucchini, chopped
– 1 cup mushrooms, sliced
– 1 ½ cups fresh spinach
– 24 oz marinara sauce
– 1 teaspoon dried oregano
– 1 teaspoon dried basil
– Salt and pepper to taste
– 1 ½ cups ricotta cheese
– 2 cups shredded mozzarella cheese (divided)
– ½ cup grated Parmesan cheese (divided)
– Fresh basil leaves for garnish
These ingredients create a rich, tasty meal. The ziti pasta serves as a hearty base. The vegetables add color and nutrition. The cheeses melt together for a creamy texture.
Common substitutions for ingredients
You can easily swap some ingredients:
– For ziti pasta, use penne or rigatoni.
– Instead of olive oil, try avocado oil or butter.
– If you lack fresh spinach, use kale or Swiss chard.
– Swap ricotta with cottage cheese or vegan cream cheese.
– Use any favorite marinara sauce if you don’t have a specific brand.
These changes can still keep your dish delicious. Feel free to get creative with what you have.
Recommended toppings and garnishes
To elevate your Loaded Veggie Baked Ziti, consider these toppings:
– Extra mozzarella cheese for a cheesier top.
– Fresh basil leaves for a burst of flavor.
– A sprinkle of red pepper flakes for heat.
– Grated Parmesan cheese for a salty finish.
These toppings not only enhance the look but also the taste. They add layers of flavor and texture. Enjoy experimenting with these ideas!

Step-by-Step Instructions
Preparation tips before cooking
Start by gathering all your ingredients. This makes cooking easier and faster. Chop the onion, garlic, red bell pepper, zucchini, and mushrooms ahead of time. This way, you can just toss them in the pan when needed. Make sure to measure out the ricotta, mozzarella, and Parmesan cheese. Having everything ready will help you stay organized.
Cooking guide for each step
1. Preheat your oven to 375°F (190°C). This ensures your ziti bakes evenly.
2. Boil a large pot of salted water. Add the ziti pasta and cook it until al dente. This usually takes about 8-10 minutes. Drain the pasta and set it aside.
3. In a large skillet, heat 2 tablespoons of olive oil over medium heat. Add the diced onion. Sauté it for about 5 minutes until it is soft.
4. Add 3 cloves of minced garlic to the skillet. Cook for another minute. You want the garlic to be fragrant.
5. Now, toss in the red bell pepper, zucchini, and mushrooms. Cook these veggies for about 5-7 minutes. They should be tender and slightly caramelized.
6. Stir in 1 ½ cups of fresh spinach. Add 24 oz of marinara sauce, 1 teaspoon of dried oregano, 1 teaspoon of dried basil, salt, and pepper. Mix well and heat for 3-4 minutes.
Baking instructions for perfect results
1. In a large bowl, mix the cooked ziti with the veggie sauce. Add 1 cup of ricotta cheese. Fold gently to coat the pasta.
2. Grease a 9×13 inch baking dish. Pour half of the ziti mixture into the dish. Spread it evenly.
3. Sprinkle half of the shredded mozzarella and half of the grated Parmesan on top.
4. Add the remaining ziti mixture on top. Finish with the rest of the mozzarella and Parmesan cheese.
5. Cover the dish with aluminum foil. Bake for 20 minutes.
6. After 20 minutes, remove the foil. Bake for another 15 minutes. The cheese should be melted, bubbly, and golden brown.
7. Take the ziti out of the oven. Let it cool for 5 minutes. Garnish with fresh basil leaves. Enjoy your tasty Loaded Veggie Baked Ziti!
Tips & Tricks
How to achieve the best flavor
To get the best flavor in your Loaded Veggie Baked Ziti, use fresh ingredients. Fresh herbs like basil and oregano add more taste than dried ones. Cook your vegetables until they are soft and sweet. This brings out their natural flavors. A splash of balsamic vinegar can also enhance the taste. It adds a nice depth and balance.
Cooking tips for vegetables
When cooking your veggies, start with the onions. Sauté them until they are soft and clear. This base gives your dish a lovely flavor. Add garlic right after for a fragrant kick. Next, toss in the bell pepper, zucchini, and mushrooms. Cook them until they just soften. Overcooking can make them mushy. Adding spinach at the end keeps it bright and fresh. This way, it retains its color and nutrients.
Suggestions for avoiding a dry ziti
To prevent a dry ziti, use enough sauce. Our recipe calls for 24 ounces of marinara sauce. Mix it well with the pasta. The ricotta cheese also helps keep the dish moist. Layering cheese on top adds a nice creamy texture. Cover the dish with foil while baking to trap moisture. Removing the foil later allows the cheese to brown without drying out the ziti.
Pro Tips
- Choose the Right Pasta: Opt for whole wheat or gluten-free ziti for a healthier twist that still holds up well in baked dishes.
- Layering is Key: Make sure to layer your ingredients evenly to ensure every bite is packed with flavor and cheese.
- Make Ahead: Prepare the ziti in advance and refrigerate it. Just add 10-15 minutes to the baking time if it’s coming straight from the fridge.
- Experiment with Vegetables: Feel free to swap in your favorite vegetables like eggplant, broccoli, or artichokes for a unique flavor profile.
Variations
Protein additions for a heartier dish
You can add protein to make your baked ziti more filling. Here are some great options:
– Cooked chicken: Shred or chop grilled chicken. Mix it in with the veggies.
– Ground beef or turkey: Brown the meat in the skillet before adding the veggies.
– Italian sausage: Use sweet or spicy sausage for extra flavor. Remove the casing and crumble it in.
– Beans: Black beans or chickpeas can add protein and texture. Just rinse and mix them in.
Adding these proteins will change the dish. This way, it suits different tastes and makes it a full meal.
Different veggie combinations to try
Feel free to mix up the veggies in your ziti. Here are some tasty combinations:
– Broccoli: Adds a nice crunch and color. Chop it small and add it to the mix.
– Carrots: Grate or dice them for sweetness and color.
– Eggplant: Dice it and sauté it for a rich flavor.
– Asparagus: Cut into small pieces and add it for a fresh taste.
Experimenting with different veggies will keep your ziti exciting. You can also use what you have on hand.
Cheese alternatives for a vegan version
If you want a vegan option, swap out the cheese. Here are some ideas:
– Nutritional yeast: Sprinkle this on top for a cheesy flavor without dairy.
– Vegan ricotta: You can find this in stores or make your own using blended tofu, lemon juice, and seasonings.
– Cashew cheese: Soak cashews and blend them for a creamy texture.
– Dairy-free mozzarella: Many brands offer a good melt and taste.
These swaps make the dish vegan-friendly while keeping it creamy and delicious. You won’t miss the dairy at all!
Storage Info
Best storage practices for leftovers
After you enjoy your Loaded Veggie Baked Ziti, store leftovers in a tight container. Let it cool before sealing. This helps keep moisture in and prevents sogginess. You can keep it in the fridge for up to four days. Make sure to label your container with the date. This way, you know when to eat it.
How to reheat Loaded Veggie Baked Ziti
To reheat, preheat your oven to 350°F (175°C). Place the ziti in a baking dish. Add a splash of water or marinara sauce to keep it moist. Cover the dish with foil. Bake for about 20 minutes. For a crispy top, remove the foil and bake for an extra 5 minutes. If you prefer the microwave, heat it in 30-second bursts. Stir in between to heat evenly.
Freezing tips for meal prep
Freezing is a great option for meal prep. Allow the ziti to cool completely. Then, portion it into freezer-safe containers. You can also wrap it tightly in plastic wrap, then foil. This keeps out air and prevents freezer burn. It can stay frozen for up to three months. When ready to eat, thaw it in the fridge overnight. Reheat as mentioned above for the best taste.
FAQs
Can I make Loaded Veggie Baked Ziti ahead of time?
Yes, you can prepare Loaded Veggie Baked Ziti ahead of time. This dish is perfect for meal prep. Just follow the recipe up to the baking step. Then, cover the dish and store it in the fridge. You can bake it the next day. Just remember to add a few extra minutes to the baking time if it’s cold from the fridge.
What is the best way to serve Loaded Veggie Baked Ziti?
For the best serving, dish out individual portions on plates. Garnish with fresh basil leaves and a sprinkle of Parmesan cheese. This makes it look nice and tasty. Pair it with a side salad and some garlic bread for a full meal. The colors and flavors will impress everyone at the table.
Can I use gluten-free pasta for this recipe?
Absolutely! You can use gluten-free pasta for Loaded Veggie Baked Ziti. Just choose a brand you like. Cook it according to the package directions. The taste will still be great, and everyone can enjoy this dish. This makes it a great option for those with dietary needs.
Loaded Veggie Baked Ziti is easy and tasty. It has fresh ingredients, step-by-step cooking, and helpful tips. You can make it your own with protein or veggies. Store the leftovers well for quick meals later. This dish brings flavor and joy to any table. Now, you can enjoy and share this comfort food with friends and family. Try your own twists and make it the perfect dish for you. Enjoy cooking and enjoy eatin


