Korean Pot Roast Hearty and Flavorful Family Dinner

If you’re looking for a hearty and flavorful family dinner, Korean pot roast is the answer! This dish combines tender beef with savory seasonings, creating a meal that warms your heart and fills your stomach. In this guide, I will walk you through all the essential ingredients, from chuck roast to vegetables, and share tips for perfecting this delicious treat. Let’s dive into the world of Korean cuisine and make family dinner a feast to remember!
Why I Love This Recipe
- Bold Flavors: This pot roast is infused with a rich blend of soy sauce, ginger, and gochujang, creating a sweet and savory profile that tantalizes the taste buds.
- Tender & Juicy: The slow-cooking method ensures that the beef becomes incredibly tender, falling apart effortlessly, making every bite a delight.
- Simple Preparation: With minimal prep time and straightforward instructions, this recipe is perfect for both novice and experienced cooks looking for a delicious meal.
- Versatile & Customizable: You can easily adjust the ingredients and spice levels to cater to your preferences, making it a flexible dish for any occasion.
Ingredients
Main Ingredients
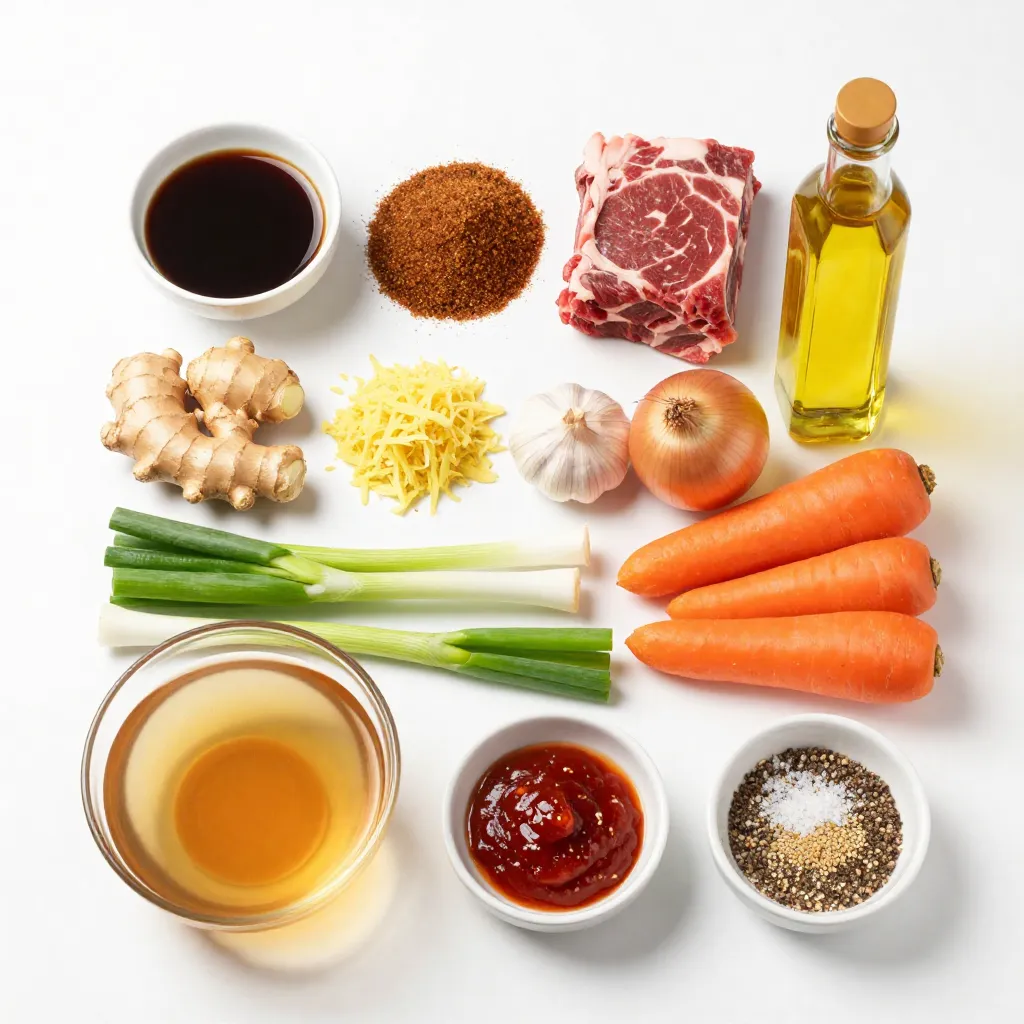
– 2.5 lbs beef chuck roast
– 1 medium onion, chopped
– 3 carrots, cut into 2-inch pieces
– 4 green onions, sliced (separating white and green parts)
– 1/4 cup soy sauce
– 1/4 cup brown sugar
– 2 tablespoons sesame oil
– 1 tablespoon fresh ginger, grated
– 1 tablespoon garlic, minced
Optional Ingredients
– 1 tablespoon gochujang (Korean chili paste)
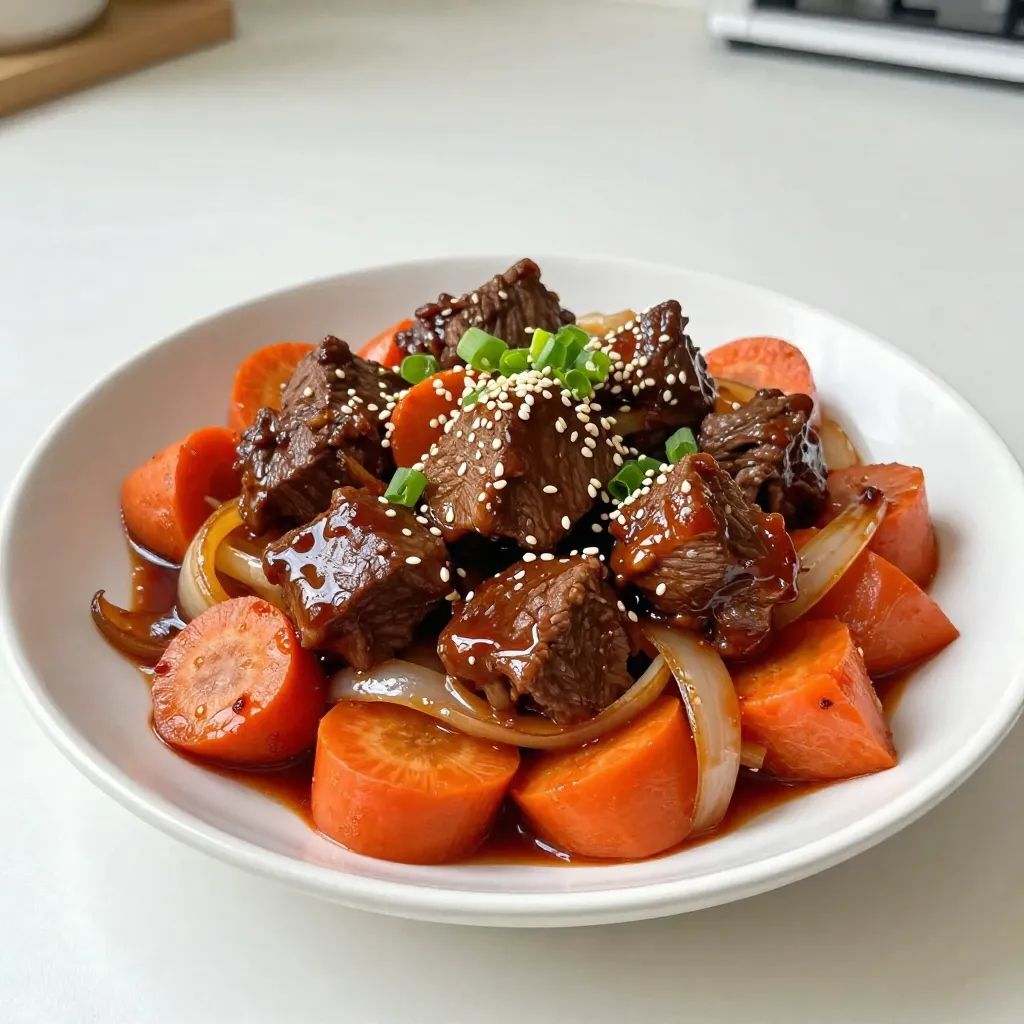
– Sesame seeds for garnish
Cooking Essentials
– 1/2 cup beef broth
– Salt and pepper to taste
These ingredients blend to create a rich, hearty flavor. The beef chuck roast is perfect for this dish. It becomes tender and juicy after a long cook. The onions and carrots add sweetness and texture. Green onions bring a fresh, bright note. The soy sauce and brown sugar balance each other. They create a sweet and salty taste that makes the dish pop.
You might want to add gochujang for heat. It adds a nice kick to the dish. Garnishing with sesame seeds makes it look great. The broth is essential for moisture. Salt and pepper bring out the flavors. Keep these ingredients handy for a tasty family meal that everyone will love.

Step-by-Step Instructions
Preparing the Oven and Ingredients
Start by preheating your oven to 325°F (160°C). This step is key for even cooking. While the oven heats, mix the marinade. In a small bowl, combine 1/4 cup soy sauce, 1/4 cup brown sugar, 2 tablespoons sesame oil, 1 tablespoon grated ginger, 1 tablespoon minced garlic, and 1 tablespoon gochujang. Whisk it all together until smooth. This marinade adds great flavor.
Searing the Roast
Next, prepare your beef chuck roast. Season it well with salt and pepper on all sides. Heat a large Dutch oven over medium-high heat. Once hot, add the roast. Sear it for about 4-5 minutes on each side. You want a rich, brown crust to form. This step helps build deep flavor for your pot roast.
Cooking in the Dutch Oven
After searing, take the roast out and set it aside. In the same pot, add one chopped onion, three carrot pieces, and the white parts of four green onions. Sauté these for about 3-4 minutes. You want the vegetables to soften and the onions to turn translucent.
Now, pour in 1/2 cup beef broth and the marinade mix. Use a wooden spoon to scrape the bottom of the pot. This step lifts all the tasty browned bits.
Return the seared roast to the pot, placing it among the sautéed vegetables. Cover the pot with a lid and place it in the preheated oven. Let it cook for about 3 hours, until the meat is very tender. Check that it easily falls apart with a fork. This slow cooking lets all the flavors blend beautifully.
Tips & Tricks
Perfecting the Roast
Resting the meat is very important. After cooking, let the roast sit for about 10 minutes. This helps keep the juices inside. If you skip this step, the meat might dry out.
To achieve the right tenderness, cook the roast slowly. The low heat breaks down the tough fibers in the beef. Aim for a cooking time of about 3 hours in the oven. You want the meat to pull apart easily with a fork.
Flavor Enhancements
You can enhance the flavor with extra seasonings. Try adding fresh herbs like thyme or rosemary. These add a fresh taste. You can also experiment with more garlic or ginger for a bolder flavor.
For cooking methods, both a slow cooker and oven work well. The slow cooker is great for busy days. It allows for an easy, set-it-and-forget-it approach. The oven gives a nice crust. Choose what fits your style best.
Garnishing Suggestions
Garnishing adds a fun touch to your pot roast. Use sesame seeds for a nutty flavor and a bit of crunch. You can sprinkle them on right before serving.
For side dishes, consider serving rice or mashed potatoes. These complement the roast well. You can also add a simple salad for freshness. These sides make your meal more colorful and appealing.
Pro Tips
- Marinade Time: For even more flavor, marinate the beef roast in the soy sauce mixture for several hours or overnight in the refrigerator.
- Vegetable Variations: Feel free to add other vegetables like potatoes or bell peppers to the pot for a more colorful and hearty dish.
- Resting Period: Always let the roast rest after cooking. This helps the juices redistribute, resulting in a more tender and flavorful meat.
- Serving Suggestions: Serve with steamed rice or noodles to soak up the delicious sauce, making it a complete meal.
Variations
Ingredient Substitutions
You can change the beef cut for your pot roast. Here are a few options:
– Brisket: This cut has nice fat for flavor. It cooks well and stays moist.
– Round roast: This is leaner and can be used if you want less fat.
For a vegetarian version, try these ideas:
– Mushrooms: Use large portobello mushrooms for a meaty texture.
– Jackfruit: This has a similar texture to pulled meat and absorbs flavors well.
Flavor Profile Changes
You can adjust the flavor to fit your taste. Here are some ideas:
– Spices: Add cumin or coriander for a different taste. These spices give warmth and depth.
– Sauces: Try adding hoisin sauce for a sweeter kick. It brings a nice balance to savory.
When you want sweet or savory, you can change the balance:
– Sweet: Add more brown sugar or honey to increase sweetness.
– Savory: Use less sugar and add more soy sauce for a richer flavor.
Cooking Method Variations
You can cook this pot roast in different ways. Here are two popular methods:
– Instant Pot: Sear the roast first, then add all ingredients. Cook on high for about 60 minutes. Let the pressure release naturally for the best results.
– Slow Cooker: After searing the beef, place it in the slow cooker with veggies and broth. Cook on low for about 8 hours or high for 4 hours. This method makes the meat very tender.
Both methods give tasty results, but choose the one that fits your schedule best.
Storage Info
Storing Leftovers
To keep your Korean pot roast fresh, use airtight containers. Allow the roast to cool first. This helps prevent condensation, which can make the meat soggy. Store it in the fridge for up to three days. If you want to enjoy it later, consider freezing portions.
Reheating Instructions
When reheating, you have two main methods: microwave and stovetop. For the microwave, place the meat in a microwave-safe dish. Cover it loosely and heat on medium for 1-2 minutes. Check often to avoid overcooking. For stovetop, heat a skillet over medium-low heat. Add a splash of beef broth to keep it moist. Stir gently until warmed through.
Freezing Guidelines
To freeze your pot roast, slice it into portions. Wrap each portion tightly in plastic wrap, then place it in a freezer bag. Squeeze out the air to prevent freezer burn. It can last up to three months. When ready to use, thaw it overnight in the fridge. Reheat it thoroughly before serving.
FAQs
How do I know when the pot roast is done?
You can tell the pot roast is done by checking its tenderness. The beef should pull apart easily with a fork. Another sign is the meat’s internal temperature. It should reach at least 190°F for the best texture. When you cut into it, the juices should run clear, not pink.
Can I use a different type of meat?
Yes, you can use other meats. Pork shoulder works well for a different flavor. Lamb shanks can also create a rich taste. If you want a lighter option, try chicken thighs. Just adjust the cooking time, as these meats cook faster than beef.
What should I serve with Korean pot roast?
Korean pot roast pairs well with several sides. Steamed rice is a classic choice that soaks up the sauce. Kimchi adds a spicy crunch. For a fresh touch, serve a salad with sesame dressing. You can also include roasted vegetables to round out the meal.
In this post, we explored how to make a mouthwatering Korean pot roast. We covered ingredients, cooking steps, and tips for success. Remember to rest the meat for tender results and try different flavors to make it your own.
Store leftovers properly and reheat for a tasty meal later. With these insights, you’re set to impress with your delicious pot roast. Enjoy your cooking journey and savor every bit


![- 4 medium cucumbers, sliced into rounds - 1 teaspoon sea salt - 1 teaspoon freshly ground black pepper - 1 teaspoon smoky chili powder - 1 tablespoon freshly squeezed lime juice - 1/4 cup crumbled queso fresco (or feta) - 1/4 cup fresh cilantro, finely chopped - 1 jalapeño, finely chopped (optional) - 1 tablespoon extra virgin olive oil When I make Mexican-style cucumbers, I focus on fresh, vibrant ingredients. Each item plays a key role in flavor and texture. The cucumbers are crisp and refreshing. They are the star of this dish. The sea salt enhances their natural taste. Black pepper adds a nice kick, while smoky chili powder gives it depth. Fresh lime juice brings brightness. It balances the flavors perfectly. Queso fresco adds a creamy touch, and cilantro gives a fresh burst. If you like heat, jalapeño adds a nice spicy twist. The extra virgin olive oil ties everything together, making it rich and smooth. - Mixing bowl - Cutting board and knife - Measuring spoons - Serving bowl Using the right tools makes cooking easier. A good knife helps slice cucumbers evenly. A mixing bowl is perfect for combining all the ingredients. Measuring spoons ensure you get the flavors just right. Finally, a nice serving bowl makes your dish look great at the table. You can find the full recipe for Mexican-style cucumbers to guide you through this process. - Rinse cucumbers under cold water. - Trim ends and slice into 1/4 inch rounds. Start by washing your cucumbers. Cold water helps remove dirt and any residue. After rinsing, trim off the ends. Now, slice each cucumber into rounds about 1/4 inch thick. This size gives a nice bite and ensures even seasoning. - Combine cucumber slices with salt, pepper, and chili powder. - Toss gently to coat evenly. In a big bowl, mix the cucumber slices with sea salt, black pepper, and smoky chili powder. The salt enhances the cucumber's natural flavor. The chili powder adds a great kick. Toss the cucumbers gently. You want every slice to be coated well without breaking them. - Drizzle lime juice and olive oil over the cucumbers. - Fold in queso fresco and cilantro. - Optionally add jalapeño for extra spice. - Let marinate for 10 minutes before serving. Next, drizzle fresh lime juice and olive oil over the cucumbers. This adds brightness and richness. Fold in crumbled queso fresco and chopped cilantro. If you like spice, add jalapeño. Mix everything gently so the flavors blend well. Let it sit for at least 10 minutes. This waiting time helps the cucumbers soak up all those delicious flavors. Enjoy your vibrant and tasty dish! For the full recipe, refer back here. To make your Mexican style cucumbers shine, use fresh lime juice. The juice brightens the taste and adds a zesty kick. You can also experiment with different types of peppers. If you like heat, try serrano or habanero peppers. Each pepper brings a unique taste and spice level, making your dish fun and exciting. For a stunning look, serve your cucumbers in a stylish bowl. Top them with lime wedges and fresh cilantro. This not only adds color but also enhances the flavor. You might sprinkle extra chili powder for even more appeal. This small touch can make your dish look gourmet and inviting. Use a mandoline to slice your cucumbers evenly. This tool helps create uniform rounds, making them look professional. You can also prepare your ingredients in advance. Chop everything and store them separately. This way, you can quickly assemble your dish when you're ready. These shortcuts save time and make cooking more enjoyable. For the full recipe, check out the [Full Recipe]. {{image_4}} To add heat to your dish, try these tips: - Increase the jalapeño or add serrano peppers for more spice. - Include chopped red onions for extra crunch and flavor. These changes create a perfect balance of spice and freshness. You can adjust the heat level to match your taste. The spicy version pairs well with grilled meats or tacos. For a rich, creamy twist, consider these ideas: - Add Greek yogurt or sour cream for a smooth texture. - Mix in avocado for added creaminess and nutrition. This creamy variation is great for those who enjoy a thicker dressing. It also makes the dish more filling and satisfying. Serve it with pita chips or as a dip for veggies. Want to try something sweet? Here’s how: - Incorporate diced mango or pineapple for a fruity twist. - Drizzle with honey to create a unique flavor combo. This sweet and tangy version is refreshing and fun. It's perfect for summer gatherings or as a light snack. Each bite bursts with flavor, making it a hit with kids and adults alike. For the full recipe, check out the details above. To store leftover Mexican style cucumbers, place them in an airtight container. This keeps them fresh and safe. You should eat them within 2-3 days for the best taste and crunch. Freezing cucumbers is not a good idea. The texture changes when frozen, making them watery and mushy. Instead, enjoy them fresh! To keep your cucumbers fresh, wait to add dressing until you serve. This prevents them from getting soggy. You can also store them with paper towels. The towels soak up extra moisture, keeping your dish crisp and tasty. Mexican-style cucumbers stand out due to their unique seasoning blends. I use fresh, vibrant ingredients like lime juice, smoky chili powder, and cilantro. These flavors combine to create a refreshing taste that dances on your palate. The mix of spices gives a fun twist to simple cucumbers, making them a delightful dish. Yes, you can easily make this recipe vegan. Just replace queso fresco with a plant-based cheese alternative. This change keeps the dish creamy and delicious while fitting a vegan diet. You can still enjoy all the flavors without dairy. These cucumbers shine as a side dish with grilled meats. They also work well as a standalone salad. Pair them with tacos, chicken, or fish for a complete meal. Their crispness complements rich dishes perfectly. Letting cucumbers marinate for at least 10 minutes is best. This time allows the flavors to meld together. However, if you let them sit longer, the taste gets even better. Just be sure to keep them at room temperature, and they will be ready to serve. Mexican-style cucumbers are low in calories and rich in vitamins. They provide hydration, making them perfect for hot days. This dish is also great for weight loss, as it fills you up without adding many calories. Enjoy the freshness guilt-free! This blog post covered the core ingredients and step-by-step instructions to make delicious Mexican-style cucumbers. We discussed how to enhance flavors and provided tips for presentation. You can easily vary the recipe to suit your taste or dietary needs. Remember to store leftovers properly for the best taste. Enjoy refreshing, healthy cucumbers as a side or salad! Making them at home is simple, fun, and sure to impress anyone you serve. Your kitchen can be a hub of fresh taste!](https://fastmealmate.com/wp-content/uploads/2025/06/eb69b124-1af5-44a9-95ae-72c395866c25-768x768.webp)
. To make crispy zucchini fritters, start by removing excess moisture. This step is crucial. Grate the zucchini and sprinkle it with salt. Let it sit for about ten minutes. Then, use a clean towel to squeeze out the water. The drier your zucchini, the firmer your fritters will be. Next, pay attention to frying temperature. Heat your olive oil over medium heat until it shimmers. If the oil is too hot, the outside will burn before the inside cooks. If it's too cool, the fritters will soak up too much oil and become greasy. Use olive oil for frying. It has a nice flavor and a good smoke point. This oil will help achieve that perfect golden color. Pair your fritters with delicious dips. Greek yogurt or sour cream works great. You can also try tzatziki for a refreshing twist. For a beautiful presentation, arrange the fritters on a colorful platter. Add a sprinkle of fresh herbs, like parsley or dill. This adds color and a fresh taste. If your fritters are falling apart, it might be due to too much moisture. Ensure you've squeezed out all the water from the zucchini. You might also need to add a bit more flour to bind the mix. For more flavor, consider adding spices. Cumin or Italian seasoning can elevate the taste. You can also mix in different cheeses, like feta or cheddar, for a new twist. {{image_4}} For a healthier twist on zucchini fritters, try using whole wheat flour. This choice adds fiber and nutrients. It also gives the fritters a nice, nutty flavor. You can also bake the fritters instead of frying them. Just place them on a baking sheet, brush with a little olive oil, and bake until golden. This method cuts down on oil and keeps the fritters light. To mix things up, consider adding different cheeses. Feta gives a tangy touch, while cheddar brings a sharp flavor. You can also spice things up by incorporating spices. Cumin or Italian seasoning can add depth. A pinch of red pepper flakes can give them a kick too! If you need a gluten-free option, almond flour works well. It keeps the fritters nice and crispy. For those following a vegan diet, you can replace the egg with a flaxseed mixture. Just mix one tablespoon of ground flaxseed with three tablespoons of water. Let it sit for a few minutes until it thickens. This simple swap allows everyone to enjoy these tasty fritters. Don't forget to check the Full Recipe for all the details! To keep your zucchini fritters fresh, place them in an airtight container. Make sure to layer parchment paper between fritters to prevent sticking. Store them in the fridge for up to three days. After this time, the fritters may lose their crispiness. If you notice any off smell or mold, it's best to toss them. When it comes to reheating, the oven is your best friend. Preheat it to 350°F (175°C). Place the fritters on a baking sheet and heat for about 10 minutes. This keeps them crispy. You can use the microwave for quick reheating, but they may turn soft. If you choose this method, heat them on a microwave-safe plate for about 30 seconds. For the best taste, stick to the oven whenever possible. For more tips, you can check the Full Recipe. Zucchini fritters can last up to three days in the fridge. To store them, place them in an airtight container. Check for signs of spoilage like a sour smell or visible mold. If you see either, it's best to toss them. Yes, you can freeze zucchini fritters! To do this, let them cool completely. Then, place them in a single layer on a baking sheet and freeze for about an hour. Once frozen, transfer them to a freezer-safe bag. They will keep for up to three months. Zucchini fritters pair well with a variety of sides. You can serve them with: - Greek yogurt or sour cream - Fresh salsa or marinara sauce - A crisp green salad - Roasted vegetables These options add flavor and help balance the dish. Yes, you can make zucchini fritters ahead of time. Prepare them and store them in the fridge for up to a day. When ready to eat, just heat them in a skillet until warm. This keeps them crispy and delicious. For the full recipe, check out the Crispy Zucchini Bliss Fritters. Zucchini fritters are easy to make and tasty. You learned about key ingredients, step-by-step cooking, and tips for success. You also explored variations for healthy and dietary needs. Remember, removing excess moisture helps keep them crispy. Try different flavors or dips for fun. Store leftovers properly and reheat them well. Enjoy your zucchini fritters as a snack or a meal! Keep experimenting to make them your own. Happy cooking!](https://fastmealmate.com/wp-content/uploads/2025/06/98182d0e-52f3-455d-9b2a-3674903e8280-768x768.webp)

![When making Baked Zucchini Parmesan, you need fresh, simple ingredients. Here’s what you should gather: - 4 medium zucchinis, sliced into ½-inch thick rounds - 1 cup shredded mozzarella cheese - ½ cup freshly grated Parmesan cheese - 1 cup panko breadcrumbs - 2 garlic cloves, finely minced - 1 teaspoon dried oregano - 1 teaspoon dried basil - 1 teaspoon sea salt - ½ teaspoon freshly cracked black pepper - 2 tablespoons extra virgin olive oil - Fresh basil leaves for garnish (optional) These ingredients create a great mix of flavors and textures. The zucchini becomes soft, while the cheese melts beautifully. The panko breadcrumbs add the perfect crunch. Each bite gives you a taste of cheesy goodness! For the full recipe, check out the detailed instructions. Enjoy creating this dish! - Preheat the oven to 400°F (200°C). - Line a baking sheet with parchment paper. - In a bowl, combine: - 1 cup panko breadcrumbs - 2 minced garlic cloves - 1 teaspoon dried oregano - 1 teaspoon dried basil - 1 teaspoon sea salt - ½ teaspoon black pepper - Toss the ingredients well. - Drizzle 2 tablespoons olive oil over the mixture. - Mix again until all the breadcrumbs are coated. - Lay sliced zucchini on the baking sheet in a single layer. - Sprinkle the breadcrumb mixture evenly over the zucchini. - Add 1 cup shredded mozzarella cheese on top. - Finish with ½ cup grated Parmesan cheese for extra flavor. - Place the baking sheet in the oven. - Bake for 25-30 minutes until golden and bubbly. - Let cool for a few minutes. - Garnish with fresh basil leaves if desired. For the full recipe, check out the detailed steps included above. Enjoy your crispy, cheesy zucchini! To make your baked zucchini truly crunchy, adjust the breadcrumb coating. Use panko breadcrumbs for a lighter, crispier texture compared to regular breadcrumbs. If you want even more crunch, mix in some crushed cornflakes or a sprinkle of grated Parmesan into the panko. This combination gives a great bite. Baking technique plays a key role too. Make sure you lay the zucchini slices in a single layer. If they overlap, they will steam instead of bake, and you’ll lose that crunch. Turning the baking sheet halfway through baking can also help ensure even cooking. For more flavor, add spices like smoked paprika or chili powder. These spices bring a warm touch that pairs well with zucchini. Fresh herbs can brighten the dish. Use fresh basil or parsley for a burst of color and taste. If fresh herbs are hard to find, dried herbs like oregano or thyme work well too. You can serve baked zucchini parmesan in many ways. For a delightful appetizer, cut it into small squares and serve with a dipping sauce. As a side dish, pair it with grilled chicken or fish for a healthy meal. You can also serve it over pasta for a heartier option. Feel free to explore these ideas and make the dish your own. Enjoy the process! For the full recipe, check out the [Full Recipe]. {{image_4}} You can make baked zucchini parmesan even more exciting by adding other veggies. Try including bell peppers, tomatoes, or mushrooms. These vegetables add color and taste. You can also mix in some spinach for a healthy twist. Adding protein can turn this dish into a hearty meal. Consider cooked chicken, turkey, or even crumbled sausage. For a vegetarian option, use chickpeas or lentils. They add both flavor and protein. If you need a gluten-free dish, swap panko for gluten-free breadcrumbs. This keeps the crunch while catering to dietary needs. Always check the labels to ensure they are truly gluten-free. For a vegan version, replace cheese with plant-based alternatives. Nutritional yeast gives a cheesy flavor without dairy. You can also use cashew cheese for a creamy texture. Use olive oil to replace any butter in the recipe. Using seasonal herbs can elevate your baked zucchini parmesan. Fresh basil, parsley, or thyme can add unique flavors. You can mix and match herbs based on the season for fresh taste. During holidays, adapt this dish to fit the occasion. Add a layer of roasted garlic or sun-dried tomatoes for a festive flair. These simple changes can make it special for gatherings. For the full recipe, check out the [Full Recipe]. To keep your Baked Zucchini Parmesan fresh, store leftovers in an airtight container. This helps lock in flavor and moisture. You can keep it in the fridge for up to three days. If you want to enjoy it later, make sure it cools completely before sealing. Freezing is a great way to save this tasty dish. Here’s how to do it: 1. Cool Completely: Ensure the dish is fully cooled. 2. Wrap it Up: Use plastic wrap to cover it tightly. Then, place it in a freezer-safe container or bag. 3. Label and Date: Write the date on the bag or container. This helps you remember when you made it. You can freeze it for up to three months. When you’re ready to eat, you can reheat it in the oven or microwave. - Oven Method: Preheat the oven to 350°F (175°C). Place the zucchini on a baking sheet and cover it with foil. Bake for about 15-20 minutes until hot. This keeps it crispy. - Microwave Method: Heat it in a microwave-safe dish. Cover it with a damp paper towel. Heat in short bursts of 30 seconds until warm. Note, this method may make it a bit soggy. Choose the method that works best for you! Enjoy your delicious dish anytime! You can tell when the zucchini is done by checking its color and texture. The cheese should be golden and bubbly. The zucchini should be soft but not mushy. This usually takes about 25-30 minutes in the oven. Keep an eye on it to avoid overcooking. Yes, you can use different cheeses! Cheddar, gouda, or even a spicy pepper jack can work well. Mix and match to find your favorite flavor. Just make sure the cheese melts nicely to create a gooey texture. Baked zucchini parmesan is a healthy choice. Each serving has about 180 calories, with 10 grams of fat and 8 grams of protein. It also provides vitamins A and C, plus calcium from the cheese. This dish is a great way to enjoy veggies! You can prepare the zucchini ahead of time! Slice and layer them with breadcrumbs and cheese. Cover the dish and store it in the fridge for up to 24 hours. Just bake it right before serving for a fresh taste. Yes, the recipe is vegetarian as it uses no meat. It features cheese, zucchini, and herbs, all of which are plant-based. Enjoy this dish as a great meat-free option for any meal. To spice things up, add crushed red pepper flakes to the breadcrumb mix. You can also use spicy cheese or add jalapeños for extra kick. Adjust the heat to your taste for a fun twist! For the full recipe, check out the Cheesy Baked Zucchini Delights. Enjoy your cooking adventure! This blog post shares a simple and tasty baked zucchini parmesan recipe. We covered essential ingredients, step-by-step instructions, and helpful tips to enhance flavor and crunch. You learned how to store leftovers and even make variations for different diets. Now you can confidently whip up this dish as a side or appetizer. Enjoy experimenting with flavors and sharing your creations. Baked zucchini parmesan is a great way to eat healthy and delicious food. Happy cooking!](https://fastmealmate.com/wp-content/uploads/2025/06/6985a322-15fd-4ae0-839d-4317f4e09967-768x768.webp)
