Jalapeno Popper Soup Creamy and Flavorful Delight

Are you ready to dive into a bowl of creamy goodness that packs a punch? This Jalapeno Popper Soup is the perfect blend of rich flavors and spicy heat. In just a few simple steps, you’ll create a delightful dish that will impress your family and friends. Whether you love it mild or fiery, I’ll share tips to personalize your soup just the way you like it. Let’s get cooking!
Why I Love This Recipe
- Bold Flavor Combination: The mix of creamy cheese and spicy jalapeños creates a delightful contrast that’s hard to resist.
- Comfort in a Bowl: This soup is the perfect cozy dish for chilly evenings, providing warmth and satisfaction with every spoonful.
- Easy to Make: With simple ingredients and quick preparation, this recipe fits perfectly into a busy lifestyle without sacrificing flavor.
- Customizable Toppings: You can personalize each bowl with toppings like crispy tortilla strips and fresh cilantro, enhancing both flavor and presentation.
Ingredients
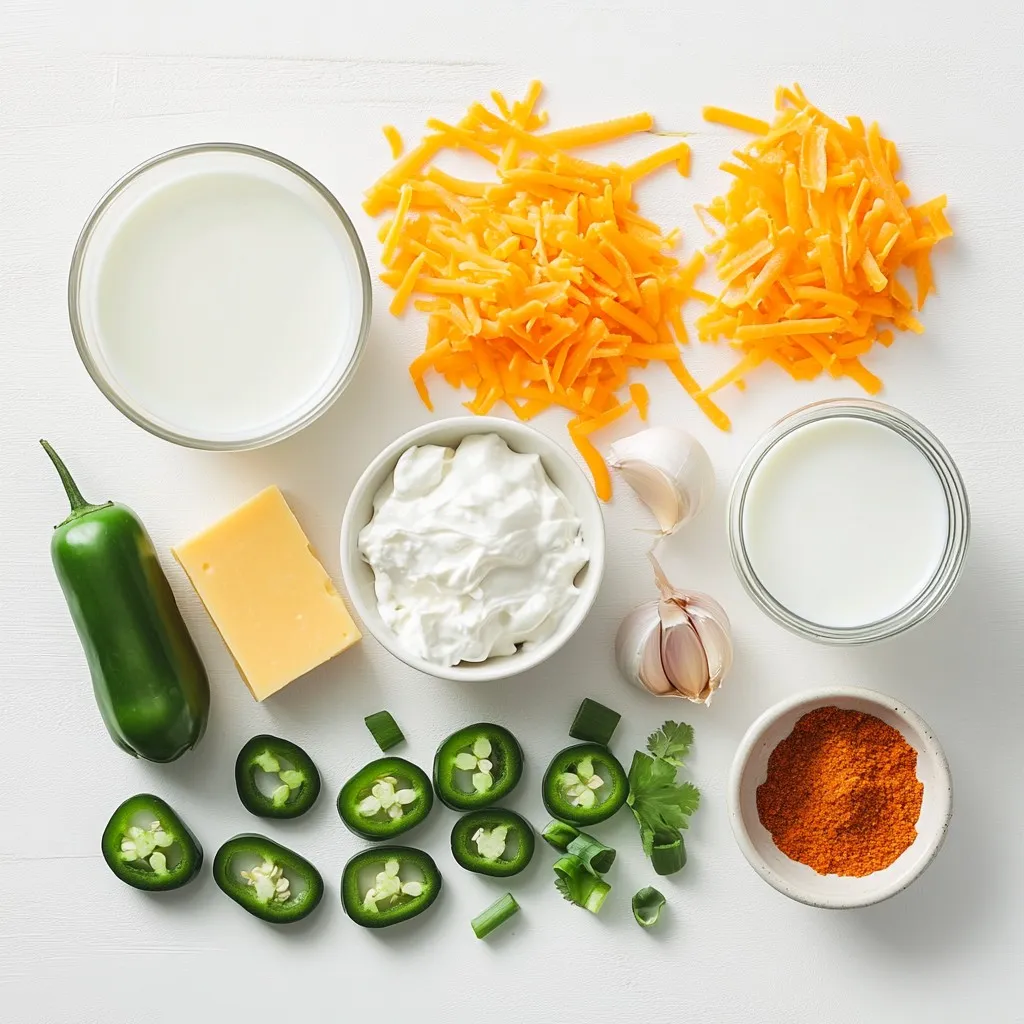
Complete list of ingredients
To make jalapeño popper soup, you will need the following ingredients:
– 4 fresh jalapeños, diced (remove seeds for a milder heat)
– 1 tablespoon extra-virgin olive oil
– 1 medium onion, finely chopped
– 2 cloves garlic, minced
– 2 cups chicken or vegetable broth
– 1 cup cream cheese, softened to room temperature
– 1 cup sharp cheddar cheese, shredded
– 1 cup whole milk
– 1 teaspoon smoked paprika
– 1/2 teaspoon ground cumin
– Salt and freshly cracked black pepper, to taste
– 1/4 cup fresh cilantro, chopped (for garnish)
– Crispy tortilla strips, for topping
Tips for ingredient selection
When choosing jalapeños, look for firm peppers with smooth skin. Bright green is best. For less heat, pick smaller jalapeños and remove the seeds. Use fresh onion and garlic for the best flavor. Choose a good-quality cream cheese and sharp cheddar. These will add to the creaminess and taste.
Ingredient substitutions
You can swap some ingredients if needed. Use vegetable broth for a vegetarian option. If you want a lighter soup, use half-and-half instead of whole milk. If you can’t find sharp cheddar, mild cheddar works too. For a dairy-free version, try cashew cream or vegan cheese.

Step-by-Step Instructions
Preparation and sautéing
Start by heating a large pot over medium heat. Add one tablespoon of extra-virgin olive oil. Once hot, toss in the diced jalapeños, finely chopped onion, and minced garlic. Sauté these ingredients for about 5-7 minutes. Stir them often to keep them from sticking. You want the onion to be soft and clear. This step builds a base of flavor for the soup.
Incorporating cheeses and seasoning
Next, carefully pour in 2 cups of chicken or vegetable broth. Stir to mix everything well. Bring the broth to a gentle simmer. Lower the heat and add 1 cup of softened cream cheese. Stir until the cream cheese melts completely. Then, add 1 cup of shredded sharp cheddar cheese in small amounts. Keep stirring until it’s all melted and mixed. Pour in 1 cup of whole milk along with 1 teaspoon of smoked paprika and 1/2 teaspoon of ground cumin. Mix until the soup is creamy and smooth. Season with salt and freshly cracked black pepper according to your taste.
Final adjustments and serving suggestions
Let the soup simmer for another 5 minutes. This allows all the flavors to blend nicely. If you like, use an immersion blender to make the soup smooth or leave it chunky. Both are tasty! Serve the hot soup in bowls. Top each bowl with a sprinkle of fresh chopped cilantro and crispy tortilla strips. These add a fun crunch and extra flavor to each bite. Enjoy this creamy delight!
Tips & Tricks
How to adjust the spice level
To control the heat in your jalapeño popper soup, you have options. Start by removing the seeds and membranes from the jalapeños. This step cuts down on the spice. If you want more heat, add sliced jalapeños while cooking. For a milder soup, use fewer jalapeños or mix in a sweet pepper.
Suggestions for creaminess
Creaminess is key to this soup’s charm. Use full-fat cream cheese for the best texture. Adding whole milk helps too. If you want an even richer flavor, try adding a bit of sour cream or heavy cream at the end. Blend the soup well to get that smooth, creamy finish.
Cooking time adjustments for different heat sources
Cooking times can change based on your heat source. If you use gas, the soup may cook faster than on electric. Keep an eye on your soup to avoid burning. Stir it often and check for the right simmer. For slower cooking, like in a slow cooker, let it simmer for 4 to 6 hours on low. This method allows the flavors to blend even more.
Pro Tips
- Adjust the Heat: If you prefer a milder soup, be sure to remove the seeds and membranes from the jalapeños before dicing.
- Cheese Selection: For an extra creamy texture, consider using a combination of cream cheese and a blend of your favorite cheeses.
- Texture Preference: Use an immersion blender to puree the soup for a smooth consistency or leave it chunky for a heartier bite.
- Garnish Ideas: In addition to cilantro and tortilla strips, try adding a dollop of sour cream or avocado slices for added richness.

Variations
Vegetarian version
You can easily make this soup vegetarian. Just swap the chicken broth for vegetable broth. This change keeps the flavor rich while making it meat-free. I like to add more veggies for extra depth. Try bell peppers, corn, or even black beans. They add a nice texture and taste.
Spicy enhancement ideas
If you crave more heat, add more jalapeños. Use them fresh or roasted for a smoky taste. You can also stir in some diced chipotle peppers. They bring a nice kick and depth. Another idea is to sprinkle in some cayenne pepper or hot sauce while cooking. Adjust the spice to fit your taste.
Dairy-free alternatives
For a dairy-free version, replace cream cheese and milk with cashew cream. Blend soaked cashews with water until smooth. You can also try coconut milk for a unique flavor. Instead of cheese, use nutritional yeast for a cheesy taste. This keeps your soup creamy while being kind to your diet.
Storage Info
How to store leftovers
To store leftovers, let the soup cool completely. Then, transfer it to an airtight container. This keeps the soup fresh and tasty. You can store it in the fridge for about 3-4 days. Make sure to label the container with the date. This way, you know when to use it.
Reheating methods
When you’re ready to enjoy the soup again, there are a few ways to reheat it. You can use the stove or the microwave. If using the stove, pour the soup into a pot and heat it over medium heat. Stir it often to prevent sticking. If using the microwave, place the soup in a microwave-safe bowl. Heat it in 30-second intervals, stirring in between. This ensures even heating.
Freezing tips for soup
If you want to store the soup for longer, freezing is a great option. First, let it cool completely. Then, pour the soup into freezer-safe bags or containers. Leave some space at the top for expansion. You can freeze it for up to 3 months. When you’re ready to eat, thaw it overnight in the fridge. Then, reheat it as mentioned earlier. Enjoy your creamy jalapeño popper soup again!
FAQs
Can I use frozen jalapeños?
Yes, you can use frozen jalapeños in this soup. They work well and save time. Just thaw them before use. The heat may be less than fresh ones, but the flavor will still shine.
How long does the soup last in the fridge?
This soup lasts about three to four days in the fridge. Store it in an airtight container. Make sure it cools down before putting it in the fridge. If you notice any strange smells or colors, it’s best to toss it.
Can I make this soup in advance?
Absolutely! Making this soup ahead of time is a great idea. The flavors blend better as it sits. Just reheat it on the stove before serving. Add a splash of milk if it seems too thick.
This blog post covers soup ingredients, step-by-step instructions, and handy tips. You learned how to choose the right ingredients and make smart substitutions. I shared ways to adjust spice and creaminess, alongside cooking time for different heat sources. Variations like vegetarian and dairy-free options expand your choices. Finally, storage tips ensure your leftovers last longer. Embrace these ideas, and enjoy creating the perfect soup every time you coo

Jalapeño Popper Soup
Ingredients
- 4 whole fresh jalapeños, diced
- 1 tablespoon extra-virgin olive oil
- 1 medium onion, finely chopped
- 2 cloves garlic, minced
- 2 cups chicken or vegetable broth
- 1 cup cream cheese, softened
- 1 cup sharp cheddar cheese, shredded
- 1 cup whole milk
- 1 teaspoon smoked paprika
- 0.5 teaspoon ground cumin
- to taste salt and freshly cracked black pepper
- 0.25 cup fresh cilantro, chopped
- as needed crispy tortilla strips
Instructions
- In a large, heavy-bottomed pot, heat the olive oil over medium heat. Add the diced jalapeños, chopped onion, and minced garlic. Sauté these ingredients until they are tender and the onion becomes translucent, which should take about 5-7 minutes. Stir occasionally to prevent sticking.
- Gradually pour in the chicken or vegetable broth, stirring to combine, and then bring the mixture to a gentle simmer.
- Reduce the heat to low and incorporate the softened cream cheese into the simmering broth. Stir continuously until the cream cheese is completely melted and well blended into the liquid.
- Add the shredded sharp cheddar cheese to the pot in small amounts, stirring continuously until fully melted. Then pour in the milk, followed by the smoked paprika and ground cumin. Mix everything together until it is well combined and creamy.
- Season the soup with salt and freshly cracked black pepper to your taste. Allow the soup to simmer for an additional 5 minutes, which will help the flavors meld beautifully.
- If desired, use an immersion blender to puree the soup to your preferred consistency—smooth for a creamy base or leave it chunky for added texture and heartiness.
- Ladle the hot soup into bowls and garnish each serving with a sprinkle of fresh chopped cilantro and a handful of crispy tortilla strips on top for a delicious crunch.


. To keep your loaded baked potato salad fresh, store it in an airtight container. Make sure to cover the salad tightly to prevent air from entering. This keeps the flavors intact and stops the salad from drying out. In the refrigerator, your salad stays fresh for up to three days. After three days, the taste and texture start to decline. Reheating loaded baked potato salad can be tricky. The best way to do it is slowly. You can warm it in the microwave on low power. Stir it gently to help the heat spread evenly. Avoid using high heat, as it can make the potatoes mushy. You can also serve it cold for a refreshing twist. Can it be frozen? Yes, but it may change the texture. If you freeze it, store it in a freezer-safe container. When you thaw it, the salad might be a bit watery. To fix this, just stir it well and add a bit of sour cream or mayonnaise to bring back creaminess. Enjoy your loaded baked potato salad, no matter how you choose to serve it! You can prepare this salad up to a day in advance. Just follow all the steps and chill it in the fridge. This makes it perfect for parties or picnics. The flavors will mix together nicely, making it taste even better. Absolutely! You can use any cheese you like. Try mozzarella for a milder taste or pepper jack for some spice. Just make sure your cheese melts well if you bake the potatoes. If you want to cut calories, try Greek yogurt or a mix of sour cream and yogurt. Both options keep the creamy texture but add extra protein. They also help the salad taste fresh and zesty. This potato salad will stay fresh for about 3 to 5 days in the fridge. Just make sure to store it in an airtight container. Check for any changes in smell or texture before serving. Yes! This salad is very flexible. You can add diced tomatoes, jalapeños, or olives. Try mixing in some corn or bell peppers for extra crunch. Get creative and add whatever you enjoy! You can find the full recipe for Loaded Baked Potato Salad in this article. It has all the details you need to create this delicious dish at home. In this blog post, we explored how to make a creamy Loaded Baked Potato Salad. We covered important ingredients, step-by-step prep, and helpful tips. Remember, choosing the right potatoes and mixing well makes a big difference. Feel free to customize with your favorite toppings and seasonings. This dish works great for gatherings or as a side for grilled meats. With these guidelines, you can serve a delicious and satisfying salad any time. Trust me, it’s worth the effort! Enjoy your cooking adventure!](https://fastmealmate.com/wp-content/uploads/2025/06/841684b0-3d76-4995-bccc-748e700eeb02-768x768.webp)


![When making Hot Honey Feta Chicken, you need to gather some key ingredients. Here’s what to prepare: - Chicken breasts - Crumbled feta cheese - Hot honey (store-bought or homemade) - Extra-virgin olive oil - Garlic powder - Smoked paprika - Salt and freshly cracked black pepper - Freshly chopped parsley (for garnish) - Lemon wedges (for serving) These ingredients come together to create a dish that is both simple and packed with flavor. The chicken breasts are the star, providing a juicy base. The crumbled feta cheese adds a creamy and salty touch, while the hot honey brings in that sweet heat. Extra-virgin olive oil ensures the chicken stays moist and flavorful. Each spice plays a role. Garlic powder offers depth, and smoked paprika gives it a warm, smoky flavor. Don’t forget the salt and pepper; they are essential for enhancing all the tastes. Finally, fresh parsley brightens the dish, and lemon wedges add a refreshing twist when served. Make sure to check the Full Recipe to see how each ingredient shines in this delightful dish. - Preheat the oven to 375°F (190°C). - In a medium bowl, mix 1 cup of crumbled feta cheese with 1/3 cup of hot honey. Stir well until it's creamy and smooth. Set this aside for later. - Take 4 boneless, skinless chicken breasts. Drizzle 2 tablespoons of extra-virgin olive oil over them. - Make sure each breast is well coated. Season both sides with 1 teaspoon of garlic powder, 1 teaspoon of smoked paprika, salt, and freshly cracked black pepper to taste. - Place the seasoned chicken in a baking dish, laying them flat. - Spoon the hot honey feta mixture over each breast. Cover them well to keep in moisture and flavor. - Put the baking dish in the oven. Bake for about 25-30 minutes. Check that the chicken reaches an internal temperature of 165°F (74°C). It should look juicy and slightly golden. - Once done, take the dish out and let the chicken rest for 5 minutes. This helps keep it moist. - Finally, sprinkle chopped parsley on top. Serve with lemon wedges for a fresh touch. For the complete recipe, check out the [Full Recipe]. To make your chicken juicy and flavorful, start with fresh chicken breasts. They should be boneless and skinless for the best results. Pat them dry with paper towels before seasoning. This helps the spices stick better. For seasoning, use garlic powder and smoked paprika. These add depth to the flavor. Don’t forget to sprinkle salt and pepper, too. Be generous but don't overdo it. To achieve a golden crust, coat each chicken breast with olive oil. This creates a beautiful, crispy layer. Make sure to bake it in a preheated oven. The heat helps in getting that crust just right. When serving the chicken, presentation matters. Place it on a large platter. Garnish with freshly chopped parsley. This adds color and freshness. Add lemon wedges on the side. They provide a zesty flavor that brightens the dish. For sides, consider serving it with roasted vegetables or a simple salad. Both complement the chicken well. You can also serve it with quinoa or rice for a complete meal. For more detailed steps, refer to the Full Recipe. {{image_4}} If you want to mix things up, consider using different types of cheese. You can try goat cheese or ricotta for a creamy texture. Both add unique flavors. If you are lactose intolerant or prefer dairy-free options, look for plant-based cheeses. Almond or cashew-based cheeses work well and can mimic feta's tangy taste. Adjusting the heat level is easy and fun. You can reduce the amount of hot honey if you prefer a milder dish. Start with less and taste as you go. If you want more heat, try adding crushed red pepper flakes or cayenne pepper. This adds spice without changing the dish too much. Remember, the key is to find a balance that suits your taste. After you enjoy your hot honey feta chicken, you will likely have some leftovers. To keep them fresh, follow these steps: - Refrigeration: Place the chicken in an airtight container. This helps keep moisture in and air out. Store it in the fridge for up to three days. - Reheating: When ready to eat, reheat the chicken in the oven at 350°F (175°C). This helps keep the chicken juicy. Cover it with foil to prevent it from drying out. Heat it for about 10-15 minutes, or until warmed through. If you want to keep some chicken for later, freezing is a great option. Here’s how: - Freezing Portion Sizes: Cut the chicken into portions before freezing. This makes it easy to grab just what you need. Place each piece in a freezer bag. Remove as much air as possible to avoid freezer burn. - Defrosting Tips: When you’re ready to eat your frozen chicken, let it thaw in the fridge overnight. This keeps the taste fresh. You can also use the microwave for faster thawing, but be careful not to cook it. After thawing, reheat as mentioned before to keep the flavors intact. For the complete recipe, check out the [Full Recipe]. Bake the chicken at 375°F (190°C) for 25-30 minutes. This time ensures the chicken cooks evenly. Use a meat thermometer to check. The internal temperature should reach 165°F (74°C). This guarantees juicy chicken that is safe to eat. Yes, you can use chicken thighs! They have more fat and flavor, making them tender. However, chicken thighs may require a bit more time to cook. Bake them for 30-35 minutes, checking the internal temperature, just like with breasts. Hot honey has a sweet and spicy flavor. The heat level varies by brand. Some are mild, while others pack a punch. If you are unsure, taste a small amount first. Adjust the amount you use in the recipe if you prefer less heat. Hot honey adds a unique twist to this dish, balancing sweetness and spice. For the complete recipe, be sure to check the full recipe section. This blog post covered the essentials for making a delicious chicken dish. You learned about the key ingredients, like chicken, feta cheese, and hot honey. I shared step-by-step instructions to help you bake it perfectly. We also explored tips for juicy chicken and creative serving ideas. Variations let you switch up flavors, and I provided storage tips for leftovers. Remember, cooking can be simple and fun. Enjoy making this dish and impressing your friends and family!](https://fastmealmate.com/wp-content/uploads/2025/06/84055c4e-16bd-4803-b39c-56f6143ad9ea-768x768.webp)
