Instant Pot Beef Stew Hearty and Comforting Recipe

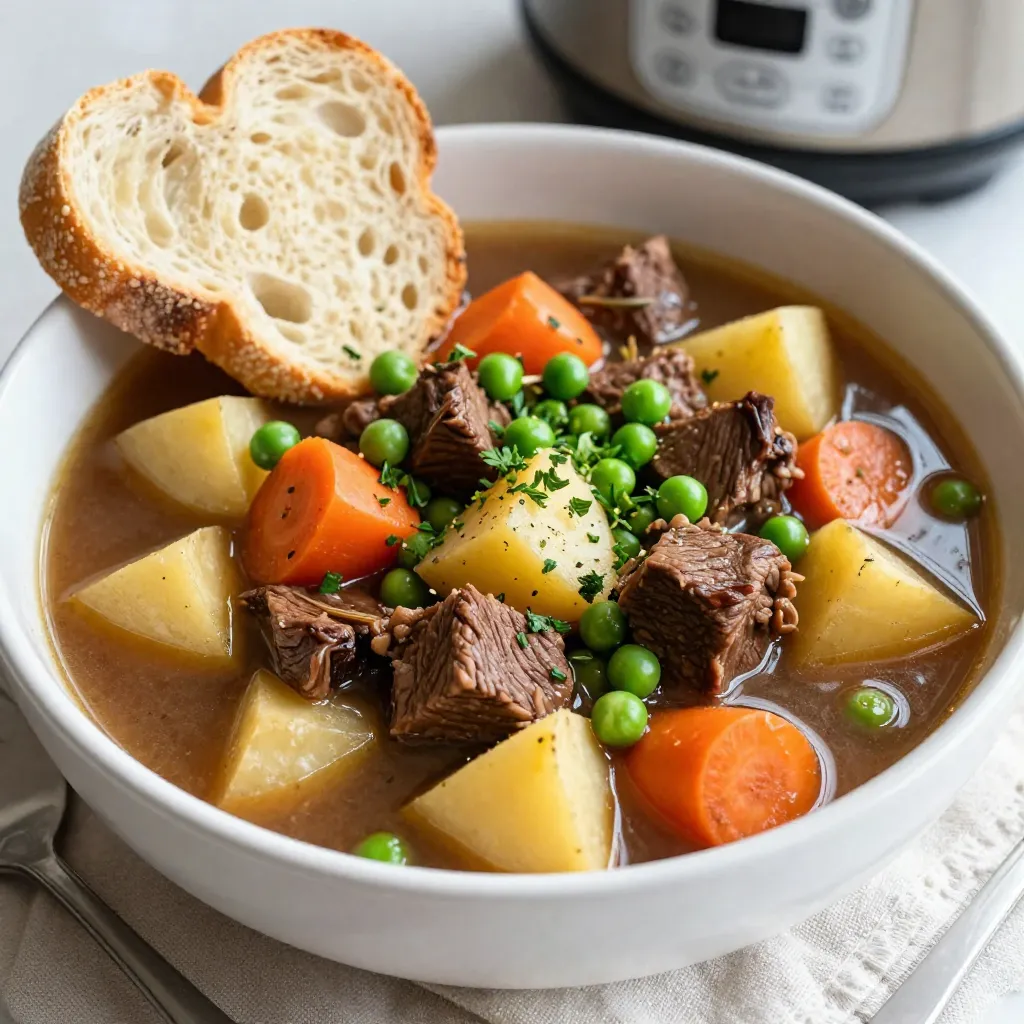
Are you ready to make a warm and filling Instant Pot Beef Stew? This dish is packed with rich flavors and tender beef. In this recipe, I’ll guide you through every step, from picking the perfect meat to making tasty adjustments. Whether you’re new to cooking or a kitchen expert, you’ll find tips and tricks to make this stew a hit. Let’s dive in and create a hearty meal together!
Why I Love This Recipe
- Comforting and Hearty: This beef stew is the ultimate comfort food, packed with tender beef and hearty vegetables that warm you up from the inside out.
- Easy to Prepare: Using the Instant Pot simplifies the cooking process, allowing you to enjoy a delicious meal without spending hours in the kitchen.
- Flavorful Ingredients: The combination of herbs, spices, and fresh vegetables creates a rich and savory flavor profile that everyone will love.
- Perfect for Meal Prep: This stew makes excellent leftovers, so you can easily prepare it in advance and enjoy it throughout the week.
Ingredients
Main Ingredients
– 2 pounds beef chuck, cut into 1-inch cubes
– 3 tablespoons olive oil
– 1 large onion, finely diced
– 4 cloves garlic, minced
– 4 medium carrots, peeled and sliced
– 3 medium potatoes, peeled and diced
– 2 cups beef broth (preferably low sodium)
– 1 cup diced tomatoes (canned or fresh)
– 2 tablespoons tomato paste
Seasoning Ingredients
– 1 teaspoon dried thyme
– 1 teaspoon dried rosemary
– 1 teaspoon smoked paprika
– Salt and freshly ground black pepper, to taste
Optional Garnishes
– 1 cup frozen peas (added at the end)
– Freshly chopped parsley for serving
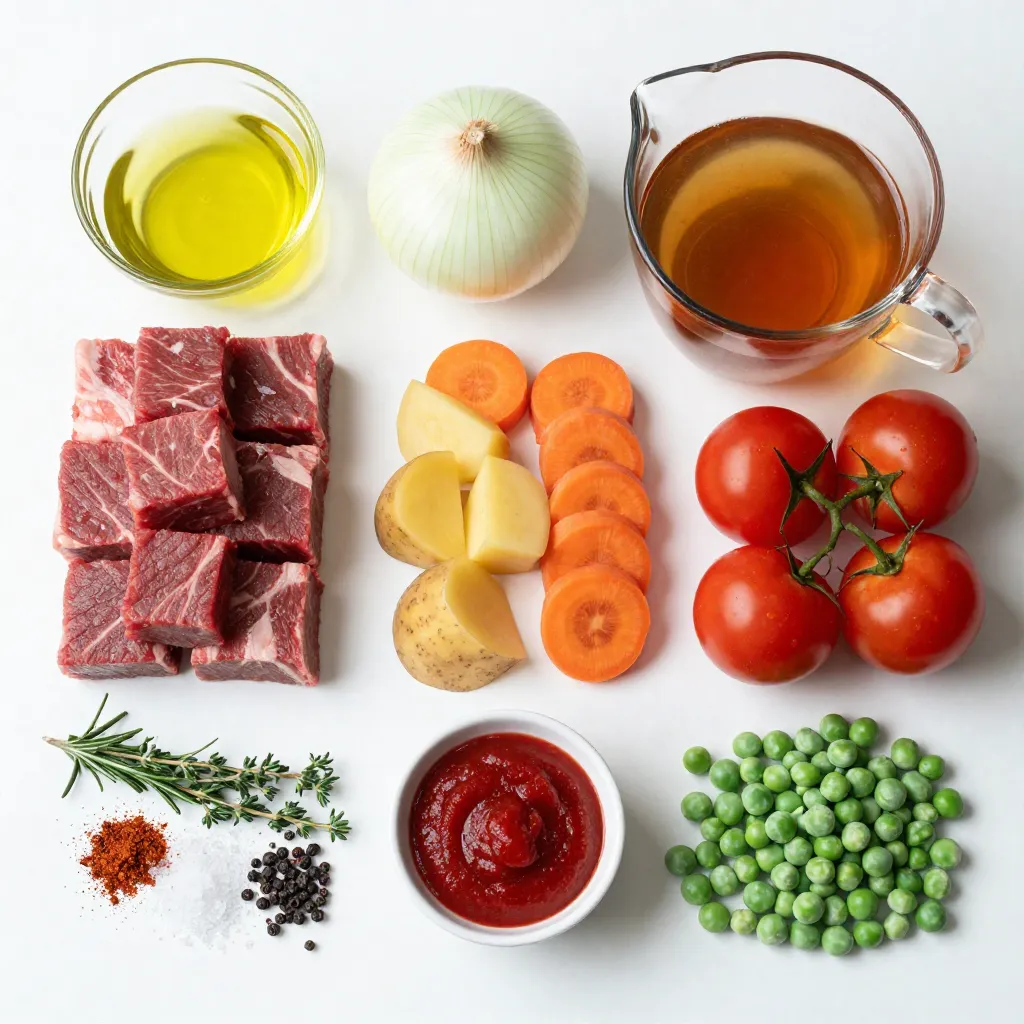
When I make beef stew, I focus on hearty, fresh ingredients. The beef chuck gives a rich flavor. The olive oil helps to brown the meat. Onions and garlic add a sweet base. Carrots and potatoes provide great texture. I love using low-sodium beef broth to control salt levels. Diced tomatoes and tomato paste add depth to the flavor.
I add dried thyme, rosemary, and smoked paprika for a warm taste. Salt and pepper are key. They bring out the best in the stew. Lastly, peas add a pop of color and sweetness. I sprinkle parsley on top for a fresh touch. It looks great and tastes even better!

Step-by-Step Instructions
Preparing the Beef
First, cut 2 pounds of beef chuck into 1-inch cubes. This size helps the beef cook evenly. Next, season the beef well with salt and pepper. Heat 3 tablespoons of olive oil in the Instant Pot on the sauté setting. Once hot, add half of the beef cubes. Sear them for 5-7 minutes until browned. This adds great flavor. Remove the beef and set it aside. Repeat with the rest of the beef.
Sautéing the Vegetables
After cooking the beef, add 1 large diced onion to the pot. Sauté it for 2-3 minutes until it is soft and translucent. Then, add 4 minced garlic cloves and sauté for 30 seconds more. The aroma will fill your kitchen!
Cooking in the Instant Pot
Now, return all the beef to the pot. Add 4 medium sliced carrots and 3 diced potatoes. Pour in 2 cups of low-sodium beef broth and 1 cup of diced tomatoes. Stir in 2 tablespoons of tomato paste, 1 teaspoon dried thyme, 1 teaspoon dried rosemary, and 1 teaspoon smoked paprika. Mix everything well. Close the lid of the Instant Pot and set it to cook on high pressure for 35 minutes. Make sure the pressure valve is sealing.
Final Touches
When the cooking time ends, let the pressure release naturally for 10 minutes. Then, switch to a quick release to let out any extra steam. Carefully open the lid and stir in 1 cup of frozen peas. Let the stew sit for 5 more minutes to warm the peas. Taste the stew and add more salt or pepper if needed. Serve hot in deep bowls and enjoy!
Tips & Tricks
Choosing the Right Cut of Beef
When making beef stew, I always choose beef chuck. This cut has great flavor and tenderness. It breaks down well during cooking. Look for pieces with some fat. Fat adds richness and helps keep the meat juicy. Cut the beef into 1-inch cubes. This size cooks evenly and absorbs the stew’s flavors.
Enhancing Flavor with Herbs and Spices
To make your stew shine, use herbs and spices. I love adding dried thyme and rosemary. These herbs bring warmth and depth to the stew. Smoked paprika adds a nice, smoky note. You can adjust the flavors to your taste. If you like it spicy, add a pinch of cayenne pepper. Always taste as you go. This way, you can find the perfect balance.
Common Mistakes to Avoid
Avoid these common mistakes to make the best stew. First, don’t skip the browning step. Searing the beef adds a rich flavor. Next, don’t overcrowd the pot. Cook the beef in batches for even browning. Lastly, don’t rush the pressure release. Let it release naturally for better texture. These steps help create a hearty and delicious stew.
Pro Tips
- Searing the Beef: Make sure to sear the beef in batches to avoid overcrowding the pot, which can lead to steaming instead of browning.
- Adjusting Thickness: If you prefer a thicker stew, you can mix a tablespoon of cornstarch with cold water and stir it into the stew after cooking, then simmer until thickened.
- Flavor Enhancements: For deeper flavor, consider adding a splash of red wine to the pot after sautéing the onions and garlic, allowing it to simmer for a minute before adding the other ingredients.
- Storage Tips: This stew keeps well in the refrigerator for up to 3 days, and it also freezes beautifully, making it perfect for meal prep.
Variations
Adding More Vegetables
You can add more veggies to your stew. Some great options are:
– Celery: Adds crunch and flavor.
– Parsnips: Offers a sweet taste.
– Bell Peppers: Brings color and freshness.
– Mushrooms: Adds earthy notes.
Feel free to mix and match. Just chop them up and add them with the other veggies.
Alternative Protein Options
If you’re looking for different proteins, try these:
– Chicken: Use boneless thighs for tenderness.
– Pork: Pork shoulder works well with the spices.
– Lentils: A great plant-based option full of protein.
Just adjust the cooking time. Chicken cooks faster, while lentils need less time than beef.
Swapping Out Broth for Different Flavors
You can change the broth for new tastes:
– Chicken Broth: Lighter flavor, but still tasty.
– Vegetable Broth: Perfect for a plant-based stew.
– Red Wine: Adds depth and richness; use half broth and half wine.
Experiment with flavors to make the stew your own. Enjoy the process!
Storage Info
Refrigeration Guidelines
After making beef stew, cool it to room temperature. Transfer it to an airtight container. Store it in the fridge for up to three days. This keeps the stew fresh and tasty. When you’re ready to enjoy it, just pull it out!
Freezing Instructions
If you want to save some for later, freezing is a great option. Let the stew cool completely. Pour it into freezer-safe containers, leaving some space at the top. Seal the containers tightly and label them with the date. The stew can last up to three months in the freezer.
Reheating Tips
To reheat the stew, you have a few options. You can use the stove or the microwave. For the stove, pour the stew into a pot and heat it over medium heat. Stir it often until it’s hot. If using the microwave, place it in a microwave-safe bowl. Heat in short bursts, stirring in between, until it’s warmed through. Make sure to check the temperature before serving. Enjoy your hearty stew again!
FAQs
How do I know when the beef is tender?
You will know the beef is tender when it easily breaks apart with a fork. After cooking in the Instant Pot for 35 minutes, the beef should be soft and juicy. If it still feels tough, it needs more time. You can cook it on high pressure for an extra 5 to 10 minutes. The pressure helps break down the tough fibers in the meat.
Can I use a different type of meat?
Yes, you can use other meats for this stew. Chicken thighs work well and cook faster. You can also try pork shoulder for a different flavor. Just remember to adjust the cooking time based on the meat you choose. Beef chuck is ideal for its rich taste and tenderness when cooked.
Is it possible to make this stew without tomatoes?
Absolutely! You can skip the tomatoes if you prefer. Just add more beef broth to keep the stew moist. You could also add a splash of red wine for depth. The flavor will change, but the stew will still be hearty and delicious.
How do I thicken the stew if it’s too watery?
If your stew is too watery, there are a few easy tricks. You can mix a tablespoon of cornstarch with water and stir it in. Let it cook for a few more minutes until it thickens. Another option is to mash some of the potatoes in the stew. This will naturally thicken the broth.
This blog post covers how to make a great beef stew. We explored key ingredients, step-by-step cooking, and helpful tips. We also shared fun variations and storage advice. Remember, choosing the right beef cut makes a big difference. You can play with flavors by adding various herbs or veggies. Feel free to experiment with proteins, too. Each step is easy to follow, and with practice, you will master this dish. Now, it’s your turn to create a warm, hearty stew that everyone will love. Enjoy your cookin

Hearty Instant Pot Beef Stew
Ingredients
- 2 pounds beef chuck, cut into 1-inch cubes
- 3 tablespoons olive oil
- 1 large onion, finely diced
- 4 cloves garlic, minced
- 4 medium carrots, peeled and sliced
- 3 medium potatoes, peeled and diced
- 2 cups beef broth (preferably low sodium)
- 1 cup diced tomatoes (canned or fresh)
- 2 tablespoons tomato paste
- 1 teaspoon dried thyme
- 1 teaspoon dried rosemary
- 1 teaspoon smoked paprika
- to taste salt and freshly ground black pepper
- 1 cup frozen peas (added at the end)
Instructions
- Begin by setting the Instant Pot to the sauté function. Pour in the olive oil and let it heat for about a minute until shimmering.
- While the pot is heating, season the cubed beef generously with salt and pepper. Add half of the beef cubes to the pot and sear them for 5-7 minutes, turning occasionally, until they are browned on all sides. Once browned, remove the beef from the pot and set it aside on a plate. Repeat the searing process with the remaining beef.
- With the beef removed, add the diced onion to the pot. Sauté for 2-3 minutes until the onion is translucent and softened. Next, stir in the minced garlic and sauté for an additional 30 seconds until fragrant.
- Return all the browned beef back into the pot. Add the sliced carrots, diced potatoes, beef broth, diced tomatoes, tomato paste, thyme, rosemary, and smoked paprika. Stir thoroughly to ensure all ingredients are evenly mixed.
- Close the lid of the Instant Pot securely and set it to cook on high pressure for 35 minutes. Ensure that the pressure valve is set to sealing.
- When the cooking time is complete, allow the pressure to release naturally for about 10 minutes. After this, carefully switch to a quick release to vent any remaining steam, being cautious of the hot steam.
- Open the lid and gently stir in the frozen peas. Allow the stew to sit for an additional 5 minutes; this will warm the peas through. Taste and adjust the seasoning with additional salt and pepper if needed.
- Ladle the hearty stew into deep bowls and serve hot. If desired, garnish each serving with freshly chopped parsley for a touch of brightness.


![- 1 cup grated zucchini - ½ cup unsweetened applesauce - ½ cup brown sugar - ¼ cup white sugar The main ingredients in these brownies are simple and nutritious. Zucchini adds moisture and keeps the brownies soft. The applesauce replaces some fat while adding sweetness. Using both brown and white sugar gives the brownies a rich flavor and a nice texture. - ⅓ cup vegetable oil or melted coconut oil - 2 large eggs - 1 teaspoon vanilla extract - 1 cup all-purpose flour - ⅓ cup unsweetened cocoa powder - ½ teaspoon baking soda - ¼ teaspoon baking powder - ¼ teaspoon salt - ½ cup chocolate chips - Optional: ¼ cup chopped nuts (e.g., walnuts or pecans) The additional ingredients help create a great structure in the brownies. The oil keeps them moist, while the eggs bind everything together. Flour and cocoa powder provide the base, giving that rich, chocolate flavor. Baking soda and baking powder help the brownies rise. The chocolate chips melt into sweet pockets of goodness. If you like nuts, they add a nice crunch and flavor. You can find the complete list of ingredients in the Full Recipe section for more details on how to get started. - Preheat your oven to 350°F (175°C). - Prepare an 8x8 inch baking pan. You can grease it or line it with parchment paper. - In a large bowl, combine the wet ingredients. Mix grated zucchini, applesauce, brown sugar, white sugar, oil, eggs, and vanilla extract until well blended. - In another bowl, mix the dry ingredients. Whisk flour, cocoa powder, baking soda, baking powder, and salt together. - Now, add the dry mixture to the wet ingredients. Stir gently until just combined. Be careful not to overmix. - Pour the brownie batter into the prepared pan. Use a spatula to smooth the top. - Bake in the preheated oven for 25-30 minutes. Check for doneness by inserting a toothpick. It should come out with a few moist crumbs. - Let the brownies cool in the pan for about 10 minutes. Then transfer them to a wire rack to cool completely. You can find the full recipe in the earlier sections. Enjoy your delicious zucchini brownies! To make perfect zucchini brownies, focus on two key tips: - Avoid overmixing: Mix just enough until the dry and wet ingredients blend. Overmixing can make brownies tough. - Drain excess moisture from zucchini: Zucchini holds a lot of water. Grate it, then put it in a clean cloth. Squeeze out the extra moisture. This step helps achieve a fudgy texture. Baking these brownies is simple. Here are two tips to ensure the best results: - Check for doneness with a toothpick: Insert a toothpick into the center. If it comes out with moist crumbs, your brownies are done. If it comes out clean, they might be overbaked. - Cooling suggestions for optimal texture: After baking, let the brownies cool in the pan for about 10 minutes. Then, transfer them to a wire rack to cool completely. This cooling method helps keep the brownies soft and chewy. For more details, check the Full Recipe. {{image_4}} You can make these brownies gluten-free! Just swap regular flour for a gluten-free flour blend. This simple change works well without affecting taste. Look for blends that contain rice flour, almond flour, or coconut flour. These options hold moisture and keep the brownies soft. Want to mix it up? Try different types of chocolate in your brownies. You can use milk chocolate, dark chocolate, or even white chocolate. Each type adds its own unique taste. Adding spices like cinnamon or nutmeg can enhance the flavor too. A pinch of cinnamon gives warmth, while nutmeg adds a hint of sweetness. You can also add dried fruits or seeds for more texture. Try mixing in chopped nuts, like walnuts or pecans, for a nice crunch. Dried cherries or raisins can add a burst of sweetness. These additions make your brownies even more delightful and fun to eat. For the full recipe, check out the Chocolate Zucchini Brownies Full Recipe! To keep your zucchini brownies fresh, use an airtight container. This helps seal in moisture and flavor. Place them in the container after they cool down. You can store them at room temperature for up to four days. If you want them to last longer, keep them in the fridge. They can stay fresh for about a week in the fridge. Just make sure they are well-covered to avoid drying out. Freezing zucchini brownies is a great way to save some for later. First, let the brownies cool completely. Then, cut them into squares. Wrap each square in plastic wrap, and place them in a freezer bag. Make sure to remove as much air as possible from the bag. You can freeze them for up to three months. When you're ready to eat them, simply thaw them in the fridge overnight. This way, they will keep their great taste and soft texture. For the full recipe, check out the Chocolate Zucchini Brownies full recipe. Yes, you can use sugar substitutes. Common options are stevia, erythritol, or monk fruit. These substitutes can make your brownies lower in calories. However, they may change the taste and texture. Some might be sweeter, so adjust the amount. Always check the package for the right measurement. This way, your brownies will still taste great. To check if your brownies are done, look for a few signs. The edges will pull away from the pan. The top should look set and have a slight sheen. You can also use a toothpick. Insert it into the center of the brownies. If it comes out with a few moist crumbs, they are ready. If it has wet batter, bake a few more minutes. Yes, you can make these brownies vegan. Replace eggs with flax eggs or applesauce. Use 1 tablespoon of flaxseed meal mixed with 2.5 tablespoons of water for each egg. For dairy, substitute with plant-based milk or yogurt. You can also use coconut oil instead of butter. These swaps will keep the brownies moist and tasty. Each brownie has about 150 calories. They contain around 6 grams of fat and 20 grams of sugar. The exact numbers can change based on the ingredients used. For example, using less sugar or different oils can lower calories. Adding nuts can increase healthy fats and protein. Always check the recipe for detailed info. Zucchini brownies can last up to a week when stored properly. Keep them in an airtight container at room temperature. If you want them to last longer, freeze them. They can stay fresh in the freezer for up to three months. Just remember to wrap them well in plastic wrap or foil. For the complete recipe, check out the Chocolate Zucchini Brownies [Full Recipe]. Zucchini brownies blend health and taste. We covered key ingredients, easy steps, and tips. Think alternatives like gluten-free flour or added spices for fun flavors. Proper storage keeps them fresh, while freezing maintains taste and texture. With answers to common questions, you now have all you need for success. Try making these tasty brownies soon! You'll enjoy a delicious treat that also sneaks in some veggies.](https://fastmealmate.com/wp-content/uploads/2025/06/6955e8e8-deef-478f-bc92-a4114a14f9ca-768x768.webp)
