Honey Roasted Carrots Flavorful and Easy Side Dish

Looking for an easy side dish that wows? Honey roasted carrots are your answer! With just a few simple ingredients, you can transform ordinary carrots into a sweet and savory delight. This recipe is not only quick but also full of flavor. Whether you’re planning a family dinner or a gathering with friends, these carrots will steal the show. Let’s dive into how to make this tasty dish!
Why I Love This Recipe
- Perfect Balance of Flavors: The sweetness of honey combined with the earthiness of thyme creates a delightful taste experience that elevates the humble carrot.
- Simple Preparation: This recipe requires minimal ingredients and steps, making it an easy addition to any meal without spending hours in the kitchen.
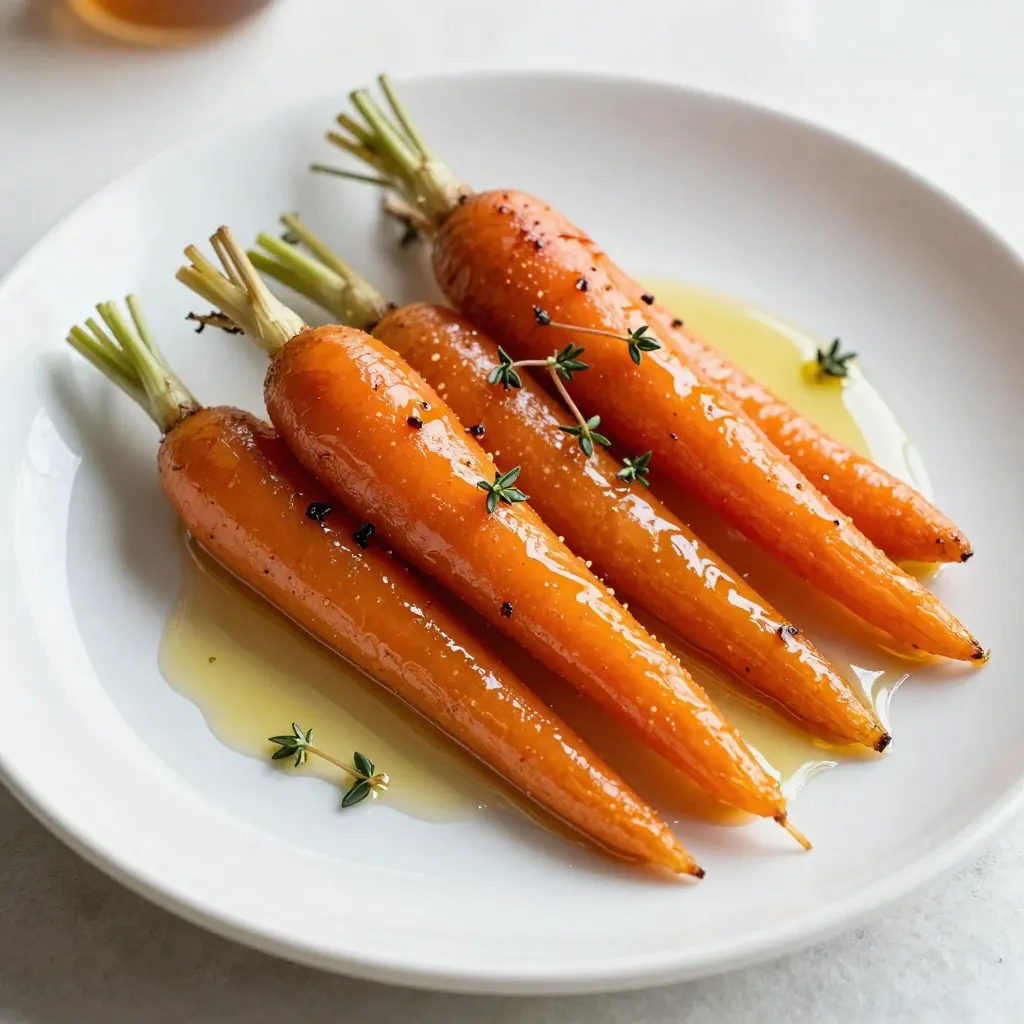
- Visually Stunning: The vibrant color of the roasted carrots, enhanced by the glossy honey glaze, makes for a beautiful presentation on any table.
- Versatile Side Dish: These honey glazed carrots pair well with a variety of main dishes, from roasted meats to vegetarian options, making them a go-to side for any occasion.
Ingredients
Main Ingredients
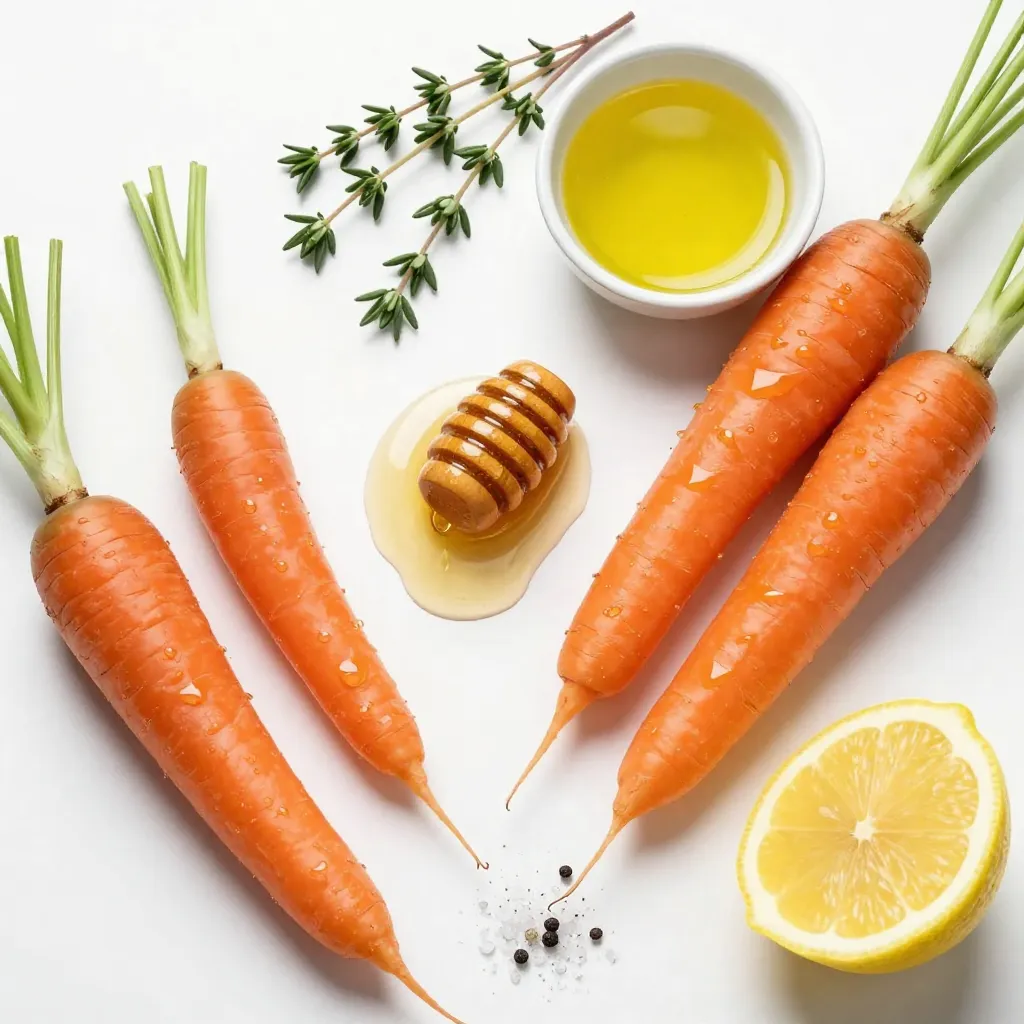
– 1 pound of baby carrots (or sliced regular carrots)
– 3 tablespoons of pure honey
– 2 tablespoons of extra virgin olive oil
Seasoning and Garnish
– 1 teaspoon of fresh thyme leaves (or ½ teaspoon of dried thyme)
– Sea salt and freshly ground black pepper
– 1 tablespoon of freshly squeezed lemon juice
– Fresh thyme sprigs for garnish (optional)
Using these simple ingredients, we create a dish that shines. Baby carrots are sweet and tender, making them perfect for this recipe. If you cannot find baby carrots, sliced regular carrots work just as well. Honey gives a sweet touch, while olive oil helps achieve that nice glaze.
Fresh thyme adds a lovely herbal note. You can use dried thyme if you have it on hand. Sea salt and black pepper bring out the flavors and keep things balanced. A splash of lemon juice brightens the dish and adds a zesty kick. Finally, fresh thyme sprigs on top make your carrots look extra special.
This mix of flavors will make your honey roasted carrots a hit at any meal.

Step-by-Step Instructions
Preheat and Prepare
First, preheat your oven to 425°F (220°C). This helps the carrots roast evenly. In a large bowl, mix together the honey, olive oil, thyme, salt, pepper, and lemon juice. Use a whisk to blend them well. The mixture should look smooth and glossy.
Coat the Carrots
Next, add the carrots to the honey mixture. Toss them gently until they are all coated. Each carrot should shine with that tasty glaze. After coating, arrange the carrots on a lined baking sheet. Make sure they are in a single layer. This spacing helps them cook evenly.
Roasting Process
Now, place the baking sheet in the oven. Roast the carrots for about 20 to 25 minutes. Halfway through cooking, stir the carrots. This ensures they caramelize nicely on all sides. You will know they are ready when they feel tender and have slight crispiness at the edges. Enjoy the sweet aroma filling your kitchen!
Tips & Tricks
Achieving Perfect Roasting
To get honey roasted carrots just right, space them out on the baking sheet. This helps them cook evenly. If they are too close, they may steam instead of roast. You want that golden, caramelized look. Also, use a whisk when mixing your glaze. This helps blend the honey, olive oil, thyme, salt, pepper, and lemon juice smoothly. A well-mixed glaze ensures every carrot gets a nice coating.
Presentation Suggestions
When serving, use a beautiful platter. It makes the dish look special. Drizzle any leftover glaze over the carrots for extra flavor. This adds a shiny finish that is eye-catching and delicious. A sprinkle of fresh thyme on top can add a touch of green and elevate the look.
Flavor Enhancements
Don’t be afraid to get creative! Try adding herbs like rosemary or parsley for a twist. They bring extra depth to the flavor. You can also sprinkle some nuts on top. Nuts like walnuts or pistachios add crunch and a nice contrast to the soft carrots.
Pro Tips
- Use Fresh Thyme: Fresh thyme gives a vibrant flavor to the dish, enhancing the overall taste of the honey glazed carrots.
- Uniform Carrot Size: If using regular carrots, cut them into even sticks to ensure they roast evenly and cook at the same rate.
- Check for Doneness: Keep an eye on the carrots during roasting; they should be tender yet slightly crisp on the edges for the best texture.
- Garnish for Presentation: Adding fresh thyme sprigs as a garnish not only makes the dish visually appealing but also adds a hint of freshness when serving.
Variations
Alternative Sweeteners
You can swap honey for maple syrup. It gives the carrots a rich, earthy taste. Brown sugar is another option. It adds a caramelized touch that tastes amazing.
Carrot Substitutions
If you want to mix it up, try parsnips or sweet potatoes. Both bring a sweet flavor and work well with the honey glaze.
Spice It Up
For a little kick, add cayenne pepper. It gives a nice hint of heat. You can also splash some balsamic vinegar for a tangy twist. This adds great acidity and balances the sweetness of the carrots.
Storage Info
Storing Leftovers
After enjoying your honey roasted carrots, store any leftovers in an airtight container. This keeps them fresh and tasty. Try to eat them within 3-4 days for the best flavor and texture.
Reheating Suggestions
To enjoy your carrots again, reheat them in the oven. This will help keep them crispy. Just set your oven to 350°F (175°C) and place the carrots on a baking sheet for about 10 minutes. If you prefer a quicker option, you can use the microwave. Heat them on low for a minute or two, checking often to avoid overcooking.
Freezing Information
If you want to save some for later, you can freeze the honey roasted carrots. Make sure they cool completely before putting them in a freezer-safe bag. When you’re ready to eat them, thaw in the fridge overnight. Then, reheat them in the oven for the best taste and texture.
FAQs
Can I use regular carrots instead of baby carrots?
Yes, just slice them into sticks or rounds. Regular carrots work well, too. They taste great when roasted and glazed. You will still get that sweet, caramelized flavor.
How can I ensure my carrots are tender?
Roast them until they are soft and slightly crispy, stirring occasionally. This helps them cook evenly. If you want them extra tender, you can roast a bit longer. Just keep an eye on them to avoid burning.
What dishes pair well with honey roasted carrots?
Honey roasted carrots are great as a side for roasted meats or served in salads. They add a nice touch to any dinner plate. Try them with chicken, pork, or even a fresh green salad for a tasty mix.
In this post, we explored how to make honey roasted carrots, from choosing ingredients to roasting them perfectly. You learned about the main ingredients and seasoning, plus helpful tips for getting great results. Experimenting with variations can add personal flair, making each dish unique.
Remember, these carrots pair well with many meals and bring a sweet touch to your table. Enjoy cooking and tasting this simple yet delicious recip

Honey Glazed Carrots with Thyme
Ingredients
- 1 pound baby carrots
- 3 tablespoons pure honey
- 2 tablespoons extra virgin olive oil
- 1 teaspoon fresh thyme leaves
- to taste sea salt
- to taste freshly ground black pepper
- 1 tablespoon freshly squeezed lemon juice
- optional fresh thyme sprigs for garnish
Instructions
- Begin by preheating your oven to 425°F (220°C) to prepare for roasting.
- In a large mixing bowl, combine the honey, olive oil, fresh thyme, salt, black pepper, and lemon juice. Use a whisk to blend the ingredients thoroughly until they form a smooth mixture.
- Introduce the carrots to the honey mixture, gently tossing them until they are all evenly coated. Ensure that every carrot is glistening with the flavorful glaze.
- Next, transfer the coated carrots onto a baking sheet lined with parchment paper. Arrange them in a single layer, making sure they are spaced out to promote even roasting.
- Roast the carrots in the preheated oven for approximately 20-25 minutes. Halfway through the cooking time, stir the carrots to ensure all sides caramelize beautifully. You’ll know they are done when they are tender and slightly crispy on the edges.
- Once roasted to perfection, remove the baking sheet from the oven and allow the carrots to cool for a couple of minutes. This resting period lets the glaze set nicely.
- For an extra touch of presentation and flavor, garnish the glazed carrots with fresh thyme sprigs just before serving.


![- 1 lb (450g) boneless, skinless chicken thighs, cut into bite-sized pieces - 4 tablespoons unsalted butter, divided - 4 cloves garlic, minced finely - 1 large lemon, zested and juiced - 1 teaspoon dried thyme - 1 teaspoon paprika - Salt and freshly ground black pepper to taste - Fresh parsley, chopped (for garnish) These ingredients make the dish shine. The chicken thighs give a tender bite. Garlic adds a strong aroma. Lemon brings brightness and tang. Butter makes everything rich and smooth. Thyme and paprika add depth and warmth. - Red pepper flakes for heat - Fresh herbs like basil or cilantro - A splash of white wine for extra richness - Honey for a touch of sweetness Adding some of these can make your dish unique. Red pepper flakes can spice things up. Fresh herbs can add a pop of freshness. A splash of wine creates a deeper flavor. Honey can balance the tartness of lemon. - Large skillet for cooking - Cutting board for prepping the chicken - Sharp knife for cutting the chicken - Measuring spoons for accuracy - Tongs for turning the chicken These tools will help you cook efficiently. A large skillet allows even cooking. A cutting board keeps the workspace tidy. A sharp knife ensures safe and quick cutting. Measuring spoons keep your flavors balanced. Tongs help with easy flipping and serving. For the detailed cooking steps and more, check the Full Recipe. Start by gathering your ingredients. You will need: - 1 lb boneless, skinless chicken thighs, cut into bite-sized pieces - 4 tablespoons unsalted butter, divided - 4 cloves garlic, minced finely - 1 large lemon, zested and juiced - 1 teaspoon dried thyme - 1 teaspoon paprika - Salt and freshly ground black pepper to taste - Fresh parsley, chopped (for garnish) Next, melt 2 tablespoons of butter in a skillet over medium heat. As it melts, season the chicken thighs with paprika, salt, and pepper. This step adds great flavor. Once the butter is bubbling, add the chicken pieces to the skillet. Spread them out evenly for the best sear. Sear the chicken for 5-7 minutes. Turn the chicken occasionally until it turns golden brown on all sides. This browning adds depth to the dish. When done, remove the chicken and set it aside on a plate. In the same skillet, melt the remaining 2 tablespoons of butter. Add the minced garlic and sauté it for about 30 seconds. Stir constantly to prevent burning. Once fragrant, stir in the lemon juice and zest, along with the dried thyme. Let this simmer for 1-2 minutes. This step melds all the flavors together. Now, return the cooked chicken to the skillet. Toss it in the lemon garlic butter sauce until well coated. Cook everything together for another 2 minutes. This helps the chicken absorb the sauce and heat through completely. Once finished, remove the skillet from the heat. Sprinkle fresh parsley over the chicken bites for a vibrant look. Serve the chicken bites in a large dish or individual bowls. Drizzle any remaining garlic butter sauce over the top. Add lemon wedges and extra parsley for an inviting presentation. For the full recipe, check the earlier section. To get juicy chicken, use boneless, skinless thighs. They cook faster and stay moist. Cut the chicken into even pieces for uniform cooking. Sear the chicken in a hot skillet. This gives a nice brown crust. Cook it for 5-7 minutes, flipping halfway through. Always check for doneness; the chicken should reach 165°F (75°C) inside. For a richer sauce, use high-quality butter. Add fresh herbs like rosemary or basil. If you like heat, toss in red pepper flakes. A splash of white wine adds depth, too. For extra zing, use fresh lemon juice instead of bottled. Don’t forget to taste and adjust seasoning. Every bite should burst with flavor. Prep your ingredients before you start cooking. Chop garlic and zest the lemon ahead of time. Use a sharp knife for quick cutting. Consider using a pre-made garlic butter if you’re short on time. You can also marinate the chicken a few hours before cooking. This step adds flavor and cuts down on cooking time. Feel free to explore the [Full Recipe] for complete instructions! {{image_4}} You can swap chicken thighs for other proteins. Try shrimp for a quick cook. Just sauté until they turn pink. You can use pork tenderloin, cut into small pieces. It cooks fast and absorbs flavor well. Even beef cubes work if you like a heartier bite. Adjust cooking time to match the protein you choose. For a vegetarian version, use mushrooms or tofu. Both soak up flavors like a sponge. Sauté mushrooms until golden brown. For tofu, press to remove water, then cut into cubes. Cook until crispy on all sides. Toss these in the lemon garlic butter sauce just like the chicken. If you have allergies, there are easy swaps. Use olive oil instead of butter for a dairy-free option. You can replace garlic with garlic powder if you're sensitive to fresh garlic. For a low-sodium version, use less salt and a salt substitute. Adjust the recipe to fit your taste and needs. Check out the Full Recipe for more ideas and details! To keep your leftover chicken bites fresh, place them in an airtight container. Make sure to let them cool to room temperature first. Store the container in the refrigerator. They will stay good for up to three days. Label the container with the date for easy tracking. Reheating is simple! You can use a skillet or microwave. For the skillet, heat a little butter over medium heat. Add the chicken bites and stir until warmed through. This keeps the flavors intact. If using a microwave, place the chicken in a microwave-safe dish. Cover it with a damp paper towel and heat in 30-second intervals until hot. If you want to freeze the chicken bites, make sure they are cool first. Place them in a freezer-safe bag or container. Remove as much air as possible to avoid freezer burn. They can last for up to three months in the freezer. When ready to eat, thaw them in the fridge overnight. Then reheat them as mentioned above. Enjoy your Lemon Garlic Butter Chicken Bites again! For the full recipe, check out the earlier section. Yes, you can use chicken breast instead of thighs. Chicken breast is leaner and will cook faster. Just make sure to cut it into similar bite-sized pieces. You may need to adjust the cooking time to keep it juicy. Lemon Garlic Butter Chicken Bites pair well with many sides. Here are a few ideas: - Steamed rice - Pasta with olive oil - Roasted vegetables - A fresh green salad - Garlic bread These options balance the rich flavors of the chicken and add variety to your meal. This recipe is not spicy. It focuses on lemon, garlic, and herbs for flavor. If you want some heat, you can add red pepper flakes. Start with a small amount and taste as you go. To keep the chicken juicy, follow these tips: - Do not overcook the chicken. Use a meat thermometer to check for doneness. - Let the chicken rest for a few minutes after cooking. This helps keep the juices inside. - Use the butter and garlic sauce generously. It adds moisture and flavor. Following these steps will help you achieve tender and juicy chicken bites. For the complete recipe, check out the [Full Recipe]. This blog covered how to make Lemon Garlic Butter Chicken Bites. We looked at key and optional ingredients, as well as the tools you need. I provided step-by-step cooking instructions and tips for perfect chicken. We explored variations, storage methods, and answered common questions. Now, you have all the tools to whip up this dish with ease. Enjoy cooking and share your tasty results!](https://fastmealmate.com/wp-content/uploads/2025/05/97cbb791-292c-4238-a79b-781f43956dc5-768x768.webp)


![- 3 medium apples, peeled, cored, and diced into small cubes - 1 cup walnuts, finely chopped to enhance texture - 1 teaspoon ground cinnamon for warmth - 1/2 cup grape juice (preferably 100% juice for a natural flavor) - 2 tablespoons honey (or agave syrup for a vegan alternative) - 1/4 cup raisins for sweetness and chew - 1 tablespoon fresh lemon juice for brightness To make Passover charoset with grape juice, I focus on using fresh and quality ingredients. Apples are the star here. I love using sweet and crisp varieties like Fuji or Honeycrisp. They bring great flavor and texture. Walnuts give a nice crunch and a bit of richness. Ground cinnamon adds warmth and depth. Grape juice not only sweetens but also ties all the flavors together. - For a vegan option, swap honey for agave syrup. - If nuts are a concern, replace walnuts with sunflower seeds. I enjoy adapting recipes to fit different needs. If you want a vegan charoset, agave syrup works well in place of honey. If you want a nut-free version, sunflower seeds give a similar crunch without the allergens. - Choose firm apples that are not bruised. - Look for grape juice that is 100% juice without added sugars. When selecting apples, feel them in your hand. They should feel firm and solid. For grape juice, read the label. Aim for juices that are pure and natural. This choice enhances the taste of your charoset. For the full recipe, check the details above. Enjoy your cooking! - Dicing Apples and Chopping Walnuts Start by peeling, coring, and dicing three medium apples into small cubes. Use a sharp knife for safety and precision. Next, finely chop one cup of walnuts. This adds a nice crunch to your charoset. Make sure the apples and walnuts are mixed well in a large bowl. - Mixing Cinnamon with Apples and Walnuts Now, sprinkle one teaspoon of ground cinnamon over the apple and walnut mix. Toss everything gently to coat the pieces evenly. The scent of cinnamon will make your kitchen smell warm and inviting. - Whisking Ingredients Together In a small bowl, whisk together half a cup of grape juice, two tablespoons of honey (or agave syrup), and one tablespoon of fresh lemon juice. Make sure the mixture is smooth and well-blended. This juice mix will bring sweetness and tang to the charoset. - Tossing Mixture for Even Coating Carefully pour the grape juice mixture over the apple-walnut blend. Stir gently until everything is well coated. This ensures that each bite is full of flavor. Next, add a quarter cup of raisins to the mix. Give it another gentle stir to evenly distribute the raisins. - Serving Suggestions Cover the bowl with plastic wrap or a lid and place it in the refrigerator. Let it chill for at least one hour. This helps the flavors meld beautifully. For serving, transfer the charoset to a decorative platter or individual bowls. A light sprinkle of cinnamon on top adds visual appeal. You can find the full recipe [here]. To make the best charoset, chill it for at least one hour. This time helps the flavors mix well. The longer it sits, the better it tastes. If you have time, chill it overnight for even more flavor. For flavor enhancements, try adding spices. A pinch of nutmeg adds warmth. You can also mix in a splash of orange juice for a citrus twist. This makes your charoset unique and exciting. When serving, aim for a beautiful look. Place the charoset in a nice bowl. For eye appeal, sprinkle extra cinnamon on top. You can also add whole walnuts or a few raisins for color. These simple touches make your dish stand out. One common mistake is overmixing the ingredients. Mixing too much can turn the apples mushy. Instead, mix gently to keep the cubes intact. This keeps the texture fresh and enjoyable. Another mistake is using the wrong apple varieties. For charoset, use sweet apples like Honeycrisp or Fuji. Avoid tart apples, as they can spoil the flavor balance. Choosing the right apples makes a big difference in taste. {{image_4}} When I think of Passover charoset, I picture the classic blend of apples and nuts. The traditional recipe sticks to simple flavors. It uses just apples, walnuts, and a touch of cinnamon. This mix brings a sweet and nutty taste that feels like home. Modern takes on charoset can be more creative. You can add dried fruits like apricots or figs for a twist. Some people also like to mix in spices like nutmeg or ginger. These small changes can make your charoset unique, while still honoring its roots. If you need a gluten-free charoset, you're in luck! All the main ingredients are naturally gluten-free. Just double-check your walnuts and any additional ingredients for cross-contamination. For vegan options, swap honey with agave syrup. This keeps the sweetness without using animal products. If you want a low-sugar version, use less honey or agave. You can rely more on the natural sweetness of the apples and grapes. Charoset varies across cultures. For example, in Sephardic traditions, you may find charoset made with dates and red wine. This adds a rich, deep flavor. In Ashkenazi traditions, the apple and walnut combo is more common. You can also explore different styles, like adding pomegranate seeds for a fresh taste. Each variation tells a story of its own, connecting us to our heritage. So, feel free to experiment and find what speaks to you! For the full recipe, check out my Passover Charoset Delight. To keep your charoset fresh, refrigerate it right after making it. Place it in an airtight container. This helps keep the flavors strong and the texture nice. If you have leftovers, they will stay tasty in the fridge for several days. You can also freeze charoset if you want to save it for later. Use a freezer-safe container and leave some space at the top. This allows it to expand as it freezes. Just remember to thaw it in the fridge before serving. Charoset lasts about 3 to 5 days in the fridge. If you freeze it, it can last for about 3 months. Always check for any off smells or changes in texture before eating. This way, you can enjoy it at its best. When reheating charoset, do it gently. Use the microwave or a small pot. Heat it on low to keep it fresh. Stir it often to warm it evenly. You want to avoid cooking it too much. This helps maintain the great taste and texture you love. Passover Charoset is a sweet and chunky mix. It usually includes fruits, nuts, and wine or juice. This dish represents the mortar used by the Jewish people when they built in Egypt. It is an important part of the Passover Seder. During the Seder, we eat charoset to remember the hard work of our ancestors. The flavors remind us of the sweetness of freedom and the hope for a bright future. Yes, you can make Passover Charoset ahead of time. It is best to prepare it a day before. This allows the flavors to blend well. You should let it chill in the fridge for at least one hour. For best taste, the longer it sits, the better it becomes. Just cover it tightly to keep it fresh. Charoset pairs well with many foods. It goes nicely with matzah during Passover. You can also serve it with roasted meats or brisket. Some people like to add it to salads for a sweet crunch. Charoset's flavors balance well with savory dishes. Try it with cheese for a unique snack. This blog covered how to make Passover Charoset, from choosing the right ingredients to serving ideas. You learned about essential ingredients like apples and walnuts. I shared tips for easy substitutions and how to select quality items. You got step-by-step instructions, tricks for the best results, and variations to try. Proper storage and reheating tips help keep your Charoset fresh. Embrace this dish's significance and flavors. Enjoy making your own delicious Charoset this Passover!](https://fastmealmate.com/wp-content/uploads/2025/06/25826363-49ff-4690-9ead-27057b46bedc-768x768.webp)
![- 2 ripe mangoes, peeled and diced - 1 cup freshly squeezed lemon juice (approximately 4-5 lemons) - 4 cups cold water - 1/2 cup honey or agave syrup (adjust for sweetness) - 1/4 teaspoon sea salt - Ice cubes - Fresh mint leaves and lemon slices for garnish In this recipe, ripe mangoes are key. They give the drink a rich, sweet flavor. Fresh lemon juice adds a tangy twist that balances the sweetness. I recommend using cold water for a refreshing drink. Honey or agave syrup allows you to control the sweetness level. Adding a pinch of sea salt enhances the taste and brings out the flavors. Don't forget the ice cubes! They keep your drink cool and refreshing. Lastly, fresh mint leaves and lemon slices make a beautiful garnish. They add a nice touch to your glass and make it look appetizing. For the complete recipe, check out the [Full Recipe]. To start, you need ripe mangoes. Peel and dice two mangoes. Place the diced mangoes in a blender. Add 1 cup of cold water. Blend on high until smooth and creamy. This mango puree gives your drink a rich flavor. Next, grab a large pitcher. Pour in 1 cup of freshly squeezed lemon juice. Use about 4-5 lemons for this. Add 3 cups of cold water. Mix in 1/2 cup of honey or agave syrup. Stir until everything is well combined. This mixture will be your refreshing lemonade base. Now, it’s time to combine. Gently pour the mango puree into the pitcher with the lemonade. Stir carefully until everything is mixed. You want the mango and lemonade to blend perfectly for a smooth taste. Take a moment to taste your mixture. If it’s too sweet, add more lemon juice. If you want it sweeter, mix in more honey or agave. Don't forget the salt! Stir in 1/4 teaspoon of sea salt to balance the flavors. Adjust until it tastes just right for you. It’s almost time to serve! Fill your glasses with ice cubes. Carefully pour the mango lemonade over the ice. Each glass should be full of that bright, fruity goodness. For a nice touch, garnish with fresh mint leaves and a lemon slice on the rim. This makes your drink look inviting and fresh. For the full recipe, check out the detailed steps above! To make your mango lemonade sweet, you can adjust the honey or agave syrup. Start with the half cup stated in the recipe. After mixing, taste it. If it’s not sweet enough, add more sweetener a little at a time. This way, you control the flavor. Remember, mangoes also add some natural sweetness. So, your lemonade may not need much more. Want to add some extra flavor? Fresh herbs like mint or basil work great. Just chop them up finely and mix them into the lemonade. You can also try adding a pinch of ginger or a dash of cinnamon. These spices bring a new twist to your drink. They can brighten the mango's flavor and make it even more refreshing. Mango lemonade pairs well with light snacks. Think about serving it with fresh fruit or a light salad. It also goes perfectly with grilled chicken or fish. For a fun twist, try it with spicy tacos. The sweet and tangy lemonade cools down the heat. Serve it over ice for a refreshing treat. Enjoy the colorful look with mint and lemon slices on top, making your table even more inviting. {{image_4}} You can make mango lemonade even better by adding other fruits. Try mixing in fresh berries like strawberries or blueberries. Pineapple also works great. These fruits add extra color and fun flavors. To do this, simply blend the fruits with the mango before mixing with the lemonade. Each fruit brings its own unique taste, making your drink more exciting. Want to spice things up? You can turn mango lemonade into a fun adult drink. Add rum or vodka for a spiked version. Use about 1 to 2 ounces of your favorite spirit per glass. This addition gives the drink a kick, perfect for parties or summer gatherings. Just remember to drink responsibly! Get creative by using flavored teas or herbal infusions in your mango lemonade. You can brew a light green tea or a refreshing mint tea. Once it cools, mix it into your lemonade base. This adds a whole new layer of flavor. You can even try herbal infusions like chamomile for a soothing twist. Explore these options to find your favorite mix. The full recipe will guide you through making this delightful drink. To keep your mango lemonade fresh, store it in an airtight container. A glass jar or a pitcher works well. Make sure to seal it tightly to prevent any odors from the fridge from mixing in. Always place it in the coldest part of the fridge, usually towards the back. This helps keep it cool and refreshing. Your mango lemonade will stay fresh for about 3 to 5 days. After that, the flavors may start to fade. If it starts to taste less vibrant, you might want to add a little more lemon juice or honey to revive it. Always check for any changes in smell or color before drinking. If you want to save some for later, freezing is a great option. Pour the mango lemonade into ice cube trays or freezer-safe bags. Leave a little space at the top, as liquids expand when frozen. When you want to enjoy it again, just thaw it in the fridge overnight. You can also blend the frozen cubes into smoothies for an instant fruity treat. For the full recipe, check out the [Full Recipe]. Mango lemonade is packed with vitamins. Mangoes are rich in vitamin C, which helps boost your immune system. They also contain vitamin A, good for your eyes and skin. The lemon juice adds more vitamin C and antioxidants. Together, they help you stay hydrated and healthy. Drinking mango lemonade can also support digestion due to its natural enzymes. Yes, you can use frozen mangoes! They make a great substitute. When you use frozen mango, it still blends well into a smooth puree. You do not need to thaw them first. Just add them to the blender with some water and blend until smooth. This makes it easy for you to enjoy mango lemonade anytime, even when fresh mangoes aren't available. To make your mango lemonade less tart, add more sweetness. You can increase the honey or agave syrup. Start with a little, then taste and add more if needed. If it’s still too sour, you can add more mango puree. A pinch of salt can also help balance the flavors. This way, you will enjoy a sweeter, more balanced drink. This mango lemonade recipe is sure to refresh you. We covered the ingredients, step-by-step instructions, and variations to try. Don't forget to adjust sweetness and explore fun combos. You can enjoy this drink fresh or store it for later. Whether you sip it by itself or with snacks, it's a bright treat. I hope you’re excited to make this delicious drink and share it with others!](https://fastmealmate.com/wp-content/uploads/2025/07/c517a603-1516-4e83-8a0a-b9bae852f1a0-768x768.webp)