
Craving a fresh and tasty meal? These Honey Lime Chicken & Avocado Rice Bowls are perfect for you! Bursting with flavor, they are easy to make and great for any night. In this article, I will guide you through the simple steps and key ingredients to create this delightful dish. Get ready to impress your taste buds and loved ones with a meal that’s as nutritious as it is delicious!
Why I Love This Recipe
- Flavorful Marinade: The combination of honey and lime creates a sweet and tangy marinade that infuses the chicken with incredible flavor.
- Healthy Ingredients: Packed with fresh ingredients like avocado and cherry tomatoes, this dish is not only delicious but also nutritious.
- Quick to Prepare: With a total time of just one hour, this recipe is perfect for busy weeknights when you want a homemade meal.
- Customizable Bowls: Each bowl can be tailored to your taste with different toppings, making it a versatile meal option for everyone.
Ingredients
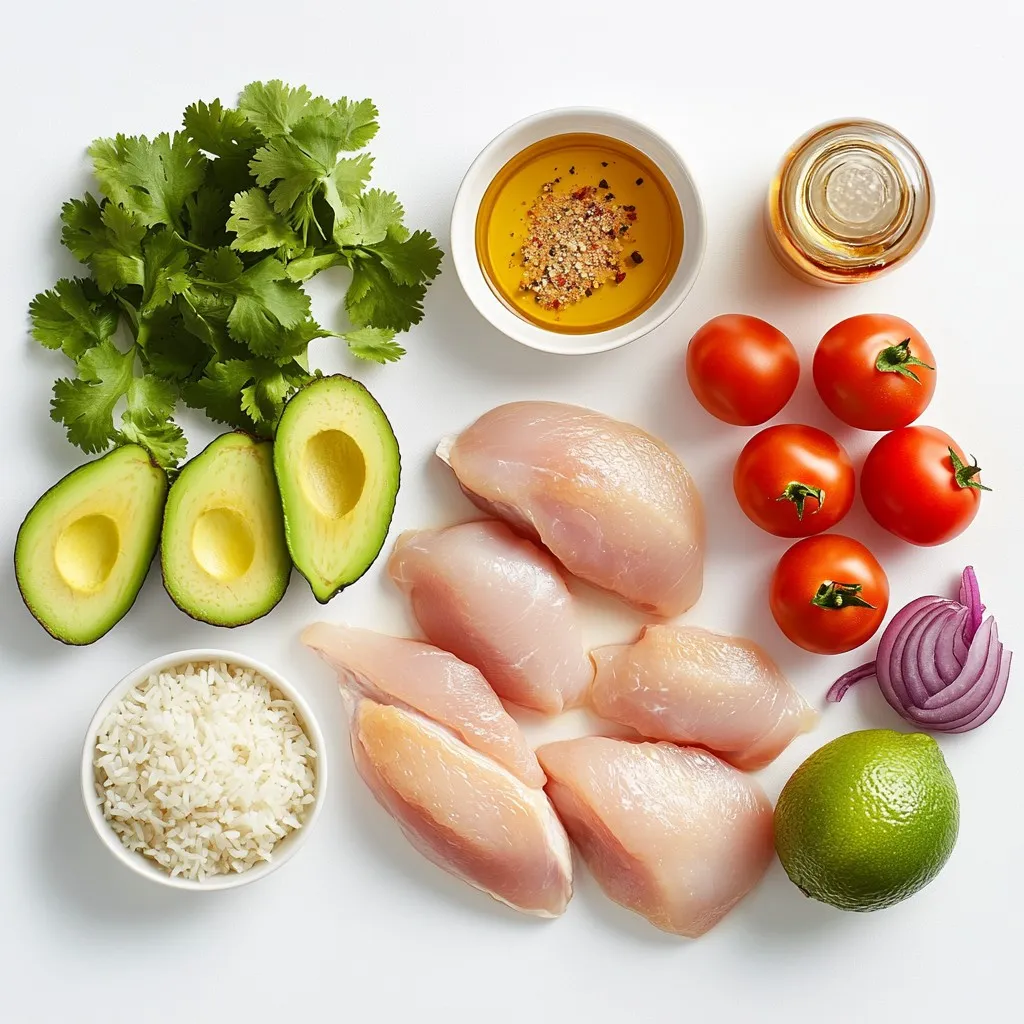
Chicken Ingredients
– 2 boneless, skinless chicken breasts
– 1/4 cup honey
– 2 tablespoons fresh lime juice
– 1 teaspoon lime zest
– 2 tablespoons olive oil
– 1 teaspoon garlic powder
– Salt and pepper, to taste
First, you need fresh, boneless, skinless chicken breasts. They cook evenly and stay tender. The honey and lime juice create a sweet and tangy flavor. Lime zest adds extra zing. Olive oil helps keep the chicken moist. Garlic powder adds depth. Use salt and pepper to your taste.
Rice Ingredients
– 1 cup long-grain white rice
– 2 cups chicken broth (or water)
For the rice, long-grain white rice works best. Rinsing it removes extra starch, making it fluffy. Chicken broth adds flavor, but water is fine too.
Topping Ingredients
– 1 ripe avocado, diced
– 1/2 cup cherry tomatoes, halved
– 1/4 cup red onion, finely chopped
– Fresh cilantro, for garnish
The toppings add freshness and color. Avocado gives creaminess. Cherry tomatoes add sweetness and a pop of color. Red onion brings crunch and sharpness. Fresh cilantro is a great garnish, adding brightness to the dish.
Step-by-Step Instructions
Marinating the Chicken
To start, I mix honey, lime juice, lime zest, olive oil, garlic powder, salt, and pepper. This creates a sweet and tangy marinade. Once mixed, I put the chicken breasts in a plastic bag. I pour half of the marinade over the chicken. Then, I seal the bag tightly, ensuring the chicken is coated well. I let it marinate in the fridge for at least 30 minutes. This allows the flavors to soak in deeply.
Cooking the Rice
Next, I rinse one cup of long-grain white rice. I rinse it under cold water until the water runs clear. This step removes excess starch and helps prevent stickiness. In a medium saucepan, I combine the rinsed rice with two cups of chicken broth. I bring the mixture to a boil over medium-high heat. Once it boils, I reduce the heat to low and cover the pan. I let it simmer for 15 to 20 minutes. The rice should be tender and all the liquid absorbed. Once done, I fluff the rice gently with a fork for a light texture.
Cooking the Chicken
Now, I heat a non-stick skillet over medium heat. I take the chicken out of the marinade, discarding the used marinade. I place the chicken in the hot skillet. I cook it for about 6 to 7 minutes on each side. I check for doneness by using a meat thermometer. The internal temperature should reach 165°F (75°C). After cooking, I let the chicken rest for a few minutes. This helps the juices stay inside. Then, I slice the chicken into strips.
Assembling the Bowls
To assemble each bowl, I start with a base of the cooked rice. I layer the sliced chicken on top. Next, I add diced avocado, halved cherry tomatoes, and finely chopped red onion. To enhance the flavor, I drizzle the remaining marinade over the bowls. Finally, I sprinkle fresh cilantro on top for color and freshness. For a nice touch, I serve the bowls in deep plates. Adding an extra lime wedge makes it even more zesty!
Tips & Tricks
Perfecting the Chicken
Marinating for optimal flavor
Marinating your chicken adds a burst of flavor. Mix honey, lime juice, lime zest, olive oil, garlic powder, salt, and pepper in a bowl. Pour half this mix over the chicken in a bag. Seal the bag and chill it for at least 30 minutes. This helps the chicken soak in the tasty marinade.
Avoiding overcooking
Cook the chicken in a hot skillet for 6-7 minutes on each side. Use a meat thermometer to check the internal temperature. It should reach 165°F (75°C). Let the chicken rest for a few minutes before slicing. This keeps it juicy and tender.
Cooking Rice Successfully
Common mistakes to avoid
Rinsing the rice is key. It removes excess starch and makes it fluffy. Use cold water until it runs clear. Once rinsed, combine the rice with chicken broth in a saucepan. Bring it to a boil, then lower the heat to simmer. Cover it and let it cook for 15-20 minutes.
Enhancing rice flavor
For added taste, use chicken broth instead of water. You can also add a pinch of salt or a dash of lime juice to the rice. Fluff it gently with a fork after cooking. This prevents the rice from becoming mushy.
Serving Suggestions
Best side options
Serve your bowls with fresh sides like a crisp salad or steamed veggies. Roasted corn or black beans also pair well. These side options add nutrition and color to your meal.
Pairing with drinks
This dish goes well with a refreshing drink. Try lemonade, iced tea, or a light beer. These drinks balance the sweet and tangy notes of the chicken. Enjoy your meal with a tasty sip!
Pro Tips
- Marinate Longer for More Flavor: For the best flavor, marinate the chicken for at least 1-2 hours or even overnight if time allows. This gives the honey and lime more time to penetrate the meat.
- Perfect Rice Every Time: Rinse the rice thoroughly to remove excess starch, ensuring it cooks up fluffy and not sticky. This is key for a great rice bowl.
- Rest the Chicken: After cooking, let the chicken rest for 5-10 minutes before slicing. This helps keep the chicken juicy and tender.
- Customize Your Toppings: Feel free to add other toppings like black beans, corn, or jalapeños for extra texture and flavor. Make it your own!
Variations
Dietary Adjustments
For those needing gluten-free options, use tamari instead of soy sauce. This keeps the flavor while avoiding gluten. If you are low-carb, swap the rice for cauliflower rice. This will cut carbs and add veggies to your meal.
For vegan adaptations, replace the chicken with marinated tofu or chickpeas. Use a vegan honey substitute or maple syrup for sweetness. You can also use vegetable broth to cook your rice for added flavor.
Flavor Enhancements
To change up the taste, consider adding spices. A pinch of cumin or smoked paprika gives a nice twist. You could also try chili powder for heat.
Adding other vegetables can brighten your bowl. Bell peppers, corn, or zucchini work well. Just sauté them before adding to your bowl. Fresh herbs, like basil or mint, can also boost flavor and freshness.
Serving Style Variations
Want a fun twist? Use toasted tortillas or lettuce wraps instead of rice. This makes for a great handheld meal.
You can also create salad bowls. Start with greens like spinach or arugula, then layer on the chicken, avocado, and toppings. This option is light and refreshing, perfect for warm days.
Storage Info
Storing Leftovers
To keep your Honey Lime Chicken and Avocado Rice Bowls fresh, store them in airtight containers. This will stop air from getting in and keep flavors strong. You can refrigerate the leftovers for up to three days. If you want to save them longer, freeze the chicken and rice separately. They can last up to three months in the freezer. Just remember to label each container with the date.
Reheating Instructions
When you’re ready to enjoy your leftovers, the best way to reheat chicken and rice is in the microwave. Place the chicken and rice in a microwave-safe bowl. Cover it with a damp paper towel to keep it moist. Heat for 1-2 minutes or until hot. You can also reheat in a skillet over medium-low heat. This method helps keep the chicken juicy. Just add a splash of water or broth to prevent dryness.
Meal Prep Tips
To make meal prep easier, chop your vegetables and marinate your chicken ahead of time. You can marinate the chicken the night before to save time. Cook the rice in large batches, then store it in the fridge. When you are ready to eat, assemble your bowls quickly. Just add the rice, chicken, avocado, and other toppings. This way, you can enjoy a fresh meal in no time!
FAQs
Can I use brown rice instead of white rice?
Yes, you can use brown rice. Brown rice has more fiber and nutrients than white rice. It also has a nuttier flavor. However, it takes longer to cook. Cooking brown rice usually takes about 40-45 minutes. Use the same amount of liquid, but check for doneness.
How spicy is this recipe?
This recipe is not spicy at all. It focuses on sweet and tangy flavors from honey and lime. If you want more heat, you can add chili flakes or diced jalapeños. Adjust the amount to your taste. Start with a little and add more as needed.
What can I substitute for honey?
You can use maple syrup or agave nectar instead of honey. Both give a similar sweetness. If you prefer a lower-calorie option, try using stevia. Each sweetener will change the flavor slightly, so choose what you like best.
Can I make this recipe ahead of time?
Yes, you can prepare many parts ahead. Marinate the chicken the night before. Cook the rice and store it in the fridge for up to four days. You can also chop the veggies in advance. Just keep everything in airtight containers. This helps save time on busy days.
This blog post covered all the key steps for a tasty chicken and rice dish. You learned about the right ingredients and how to marinate chicken for maximum flavor. Cooking the rice correctly is vital for the perfect texture. Also, we shared tips on variations and storage to suit your needs.
In the end, this recipe is easy, flexible, and delicious. Now you can create tasty meals that fit your lifestyle! Enjoy your cooking adventur


