
If you’re craving a sweet treat without the guilt, you’re in the right place! My Healthy No-Bake Cookie Dough Bars are packed with flavor and nutrition. This easy recipe skips the oven and gives you a delightful snack in no time. Plus, I’ll share ingredient swaps and tips to make them fit any dietary need. Get ready to indulge in a treat that’s as good for you as it is tasty!
Why I Love This Recipe
- Healthy Indulgence: These bars are a guilt-free treat packed with protein and fiber, making them a perfect snack for any time of the day.
- No Baking Required: Skip the oven! These no-bake bars are quick and easy to prepare, allowing you to enjoy deliciousness without the heat.
- Customizable Ingredients: You can easily substitute ingredients like almond butter or chocolate chips based on your dietary preferences or what you have on hand.
- Perfect for Meal Prep: These bars store well in the fridge, making them an ideal option for meal prepping healthy snacks for the week ahead.
Ingredients
Complete list of ingredients
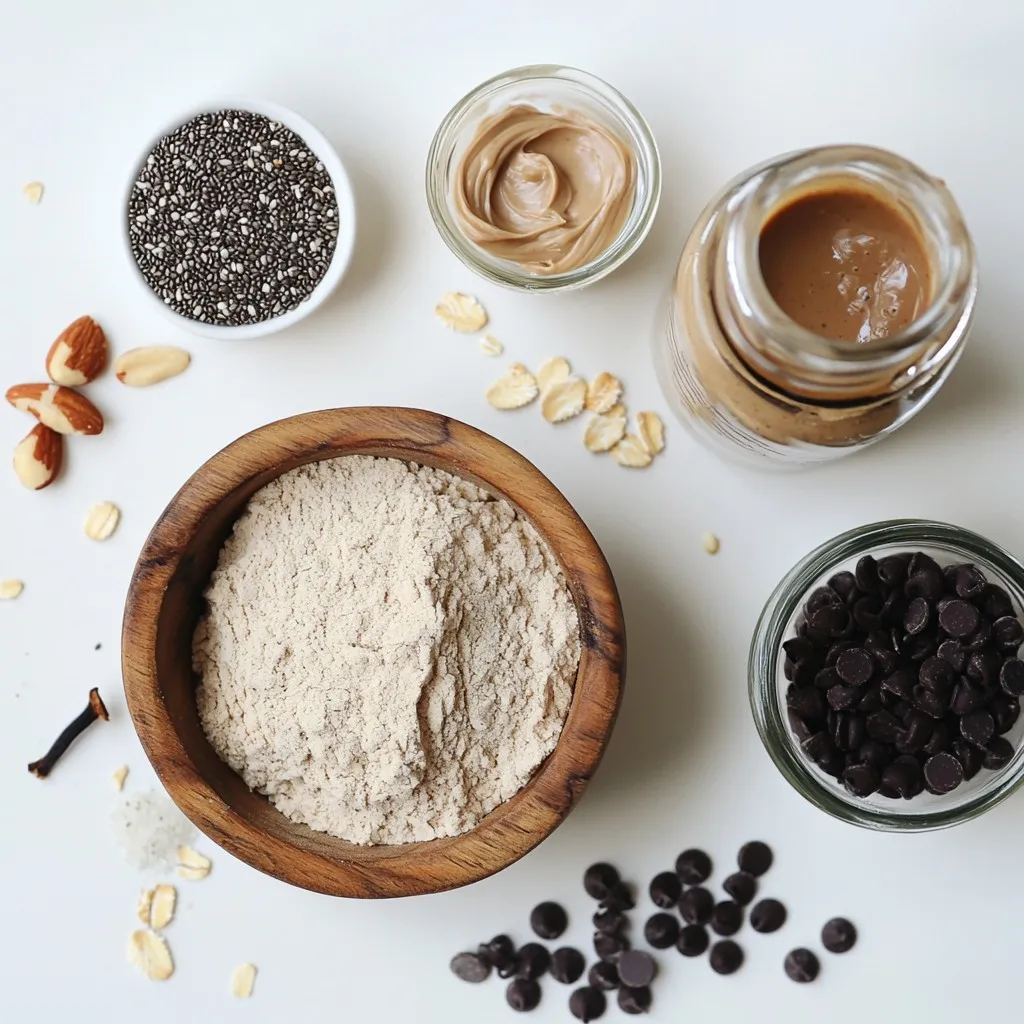
For my Healthy No-Bake Cookie Dough Bars, you will need:
– 1 cup almond flour
– 1 cup rolled oats
– 1/2 cup creamy almond butter (or substitute with peanut butter)
– 1/4 cup pure maple syrup
– 1 teaspoon vanilla extract
– 1/2 teaspoon sea salt
– 1/4 cup mini dark chocolate chips (or opt for carob chips for a twist)
– 2 tablespoons chia seeds (optional, for an extra nutritional boost)
Substitutions for dietary preferences
You can easily change some ingredients to fit your needs:
– Nut allergies: Use sunflower seed butter instead of almond butter.
– Vegan: Stick with maple syrup and use dairy-free chocolate chips.
– Gluten-free: Ensure oats are certified gluten-free.
– Low-carb: Replace almond flour with coconut flour and adjust the liquid.
Nutritional benefits of each ingredient
Each ingredient in these bars packs a punch of nutrition:
– Almond flour: Rich in vitamin E and healthy fats, it helps keep your heart healthy.
– Rolled oats: A great source of fiber, oats aid digestion and keep you full longer.
– Almond butter: This nut butter adds protein and healthy fats, fueling your body.
– Maple syrup: A natural sweetener that contains minerals like manganese and zinc.
– Vanilla extract: It adds flavor and has antioxidant properties.
– Sea salt: A little salt helps balance flavors and provides necessary minerals.
– Mini dark chocolate chips: They offer antioxidants and may improve heart health.
– Chia seeds: These tiny seeds are packed with omega-3s, fiber, and protein.
This combination of ingredients not only creates a tasty treat but also fuels your body with good nutrition.
Step-by-Step Instructions
Detailed preparation steps
1. Start by adding 1 cup of almond flour and 1 cup of rolled oats to a large bowl.
2. Mix these dry ingredients well with a whisk or spoon.
3. In another bowl, combine 1/2 cup of creamy almond butter, 1/4 cup of pure maple syrup, 1 teaspoon of vanilla extract, and 1/2 teaspoon of sea salt.
4. Use a fork or small whisk to blend these wet ingredients until smooth.
5. Pour the wet mixture into the dry mix. Stir everything together well.
6. If needed, use your hands to knead the mixture for a thorough blend.
7. Fold in 1/4 cup of mini dark chocolate chips and 2 tablespoons of chia seeds if you want.
8. Line an 8×8 inch baking dish with parchment paper, leaving some paper hanging over the edges.
9. Place the cookie dough mixture into the dish. Press it down evenly and smooth the top.
10. Refrigerate the dish for at least 1 hour to let the bars firm up.
11. After chilling, lift the bars out using the parchment paper.
12. Place the bars on a cutting board and slice them into squares or rectangles.
Tips for mixing and combining ingredients
– Make sure to mix the dry ingredients well first. This helps distribute the oats and flour evenly.
– When combining wet and dry mixtures, mix them gently but thoroughly. You want everything to stick together.
– Don’t be afraid to use your hands! This helps ensure every part is mixed.
– If the mixture seems too dry, add a bit more almond butter or maple syrup. Adjust to your taste.
How to properly store the finished bars
– Store leftover bars in an airtight container. Keep them in the refrigerator.
– They will stay fresh for up to one week.
– For longer storage, you can freeze the bars. Just wrap them tightly in plastic wrap.
– When you want to eat them, let them thaw in the fridge for a few hours before serving.
Tips & Tricks
Perfecting the texture of the bars
To get the best texture, use fine almond flour. This helps the bars stay soft yet firm. When mixing, make sure the wet and dry ingredients blend well. If the mix is too dry, add a bit more almond butter. If it’s too wet, sprinkle in a bit more almond flour. Press the mixture firmly into the dish. This will help it hold together nicely when you cut it.
Suggestions for healthier alternatives
You can swap almond butter for peanut butter if you prefer. For a lower sugar option, try using sugar-free maple syrup. If you’re looking for extra fiber, add more chia seeds. You can also use rolled oats’ gluten-free version for those who need it. Instead of chocolate chips, consider dried fruit or nuts for a different flavor.
Serving and presentation ideas
To make your bars look great, serve them chilled. A sprinkle of sea salt on top adds a nice touch. You can place a few mini chocolate chips on top for a fun look. For a party, cut the bars into small squares and arrange them on a colorful plate. These little touches make the bars more inviting and fun to eat!
Pro Tips
- Store in the Right Place: Keep the bars in an airtight container in the refrigerator to maintain their freshness and prevent them from becoming too soft.
- Customize Your Sweetness: Adjust the amount of maple syrup based on your sweetness preference or substitute with a sugar-free alternative if desired.
- Experiment with Mix-Ins: Feel free to add nuts, dried fruits, or even protein powder to the mixture for added flavors and nutrients.
- Perfect Chilling Time: Allow the bars to chill in the refrigerator for at least an hour to ensure they set properly and are easier to cut.
Variations
Flavor variations
You can change the flavor of these bars easily. Swap almond butter for peanut butter for a richer taste. You can also try sunflower seed butter for a nut-free option. Add dried fruit like raisins or cranberries for sweetness. For a fun twist, mix in crushed cookies or sprinkles to make it festive. You can also try different chocolate types, like white chocolate or carob chips, for a unique flavor.
Gluten-free options
All the ingredients in this recipe can be gluten-free. Use certified gluten-free oats to ensure your bars are safe for those with gluten issues. Almond flour is naturally gluten-free, making it a great choice for these treats. You can also use coconut flour as a substitute if you like a different texture. Just remember, coconut flour absorbs more moisture, so you may need to adjust the liquid.
Vegan modifications
This recipe is easy to make vegan. Simply replace the honey or maple syrup with agave syrup. Make sure your chocolate chips are dairy-free. You can also use a nut-free butter like sunflower seed butter. These swaps keep your bars delicious and plant-based. The best part? They still taste amazing! Enjoy your healthy no-bake cookie dough bars without worry.
Storage Info
Best practices for keeping bars fresh
To keep your cookie dough bars fresh, store them in an airtight container. This prevents moisture and air from making them soggy. Make sure to place parchment paper between layers if stacking them. This way, you can avoid sticking. Always keep the bars in the refrigerator. This will help them stay firm and tasty for longer.
Freezing recommendations
If you want to enjoy these bars later, freezing is a great option. Cut the bars into pieces first. Wrap each piece in plastic wrap or foil. Then, place them in a freezer-safe bag or container. They can last in the freezer for up to three months. When you’re ready to eat them, just thaw them in the fridge overnight.
Shelf life and signs of spoilage
These cookie dough bars will stay fresh in the fridge for up to one week. After that, they may start to lose their taste and texture. Signs of spoilage include a change in smell or a sticky surface. If you notice any mold, it’s best to throw them away. Always trust your senses when it comes to food safety!
FAQs
Can I use different nut flours?
Yes, you can use different nut flours. Almond flour works well, but you could try cashew or hazelnut flour. Each nut flour adds a unique taste. Just make sure the flour you choose is finely ground. This helps the bars hold together better.
What can I use instead of maple syrup?
If you need a substitute for maple syrup, honey or agave nectar works great. These options provide sweetness and moisture. You can also use brown rice syrup for a thicker consistency. Just remember to adjust the amount based on your taste.
How long do no-bake cookie dough bars last?
No-bake cookie dough bars last about one week in the fridge. Store them in an airtight container to keep them fresh. If you want to enjoy them longer, consider freezing them. They can last for up to three months when frozen. Just thaw in the fridge before serving!
We explored a range of ingredients that make tasty no-bake bars. You learned about substitutions for different diets and the health benefits of each ingredient. The step-by-step guide showed how to prepare these bars, mix them well, and store them properly. I shared tips for perfecting texture and ideas for serving. Various flavor options and storage tips gave you more ways to enjoy these treats.
These bars offer fun and healthy snacks. Experiment with flavors and find what you love. Enjoy making and sharing these delicious treat


