Garlic Parmesan Fries Simple and Flavorful Recipe

If you’re craving a quick and tasty snack, you’ve come to the right place! Garlic Parmesan Fries are a simple way to elevate your potatoes to new heights. Today, I’m here to share an easy recipe that packs big flavor with just a few key ingredients. Whether you’re making them for a game day treat or as a side dish, these fries will impress. Let’s dive into this delicious recipe together!
Why I Love This Recipe
- Delicious Flavor: The combination of garlic and Parmesan creates a savory and irresistible taste that elevates simple fries to gourmet status.
- Easy to Make: This recipe is straightforward and requires minimal ingredients, making it perfect for a quick snack or side dish.
- Customizable: You can easily adjust the spice level or add your favorite herbs and seasonings to make it your own.
- Perfect for Sharing: These fries are great for gatherings and parties, as they can be enjoyed with a variety of dipping sauces.
Ingredients
Complete List of Ingredients
To make these tasty Garlic Parmesan Fries, you will need:
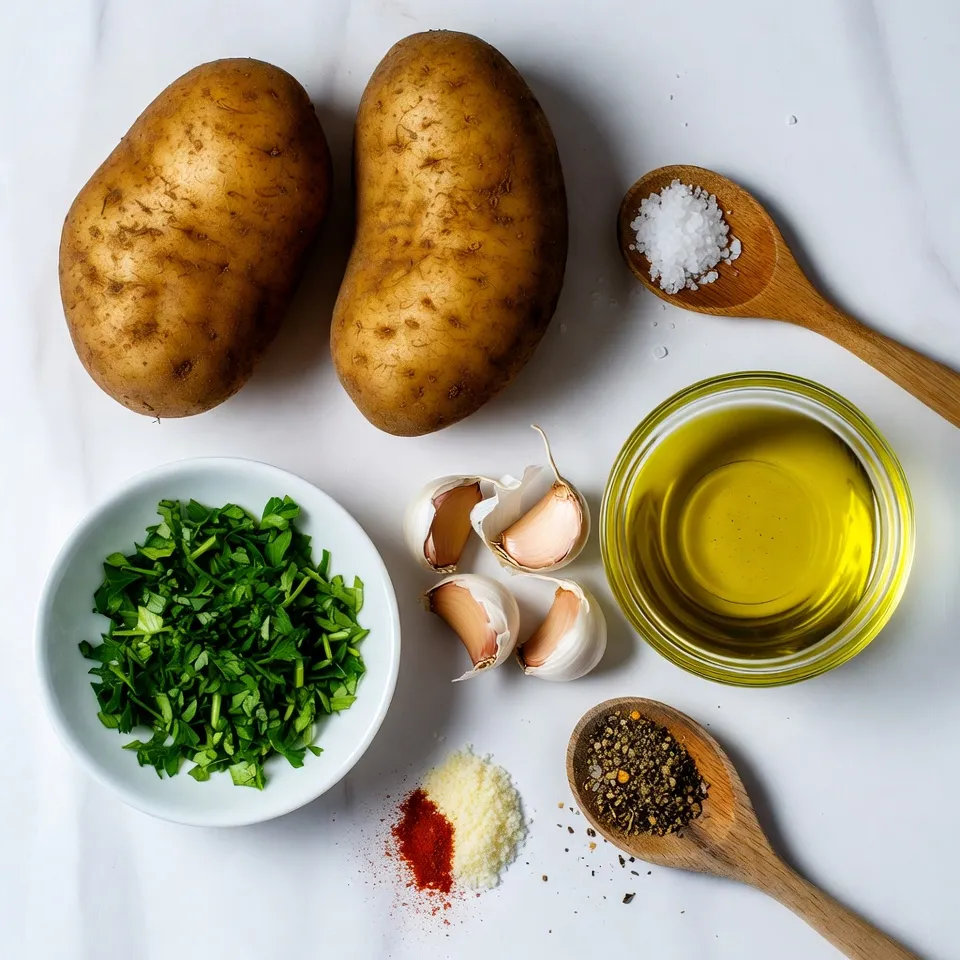
– 4 large russet potatoes
– 4 tablespoons extra virgin olive oil
– 4 cloves of garlic, finely minced
– 1 teaspoon finely ground sea salt
– 1/2 teaspoon freshly cracked black pepper
– 1/2 cup freshly grated Parmesan cheese
– 2 tablespoons fresh parsley, finely chopped
– 1 teaspoon garlic powder
– 1/2 teaspoon red pepper flakes (optional for a spicy kick)
Ingredient Substitutions
You can change some ingredients based on what you have. Here are a few ideas:
– Potatoes: You can use Yukon Gold or sweet potatoes for a different flavor.
– Olive Oil: Canola or avocado oil works well too.
– Parmesan Cheese: Grana Padano or Pecorino Romano can be good choices.
– Garlic: If you don’t have fresh garlic, use garlic powder. Just use less, about 1/2 teaspoon.
– Fresh Parsley: You can try basil or chives for a new twist.
Benefits of Using Fresh Ingredients
Using fresh ingredients brings a lot of benefits. Here’s why I always choose them:
– Flavor: Fresh garlic and herbs taste much better than dried. They add a bright, bold flavor to the fries.
– Nutrition: Fresh ingredients often have more vitamins and minerals. They help keep your body healthy.
– Aroma: Fresh foods smell amazing while cooking. This makes your kitchen feel warm and welcoming.
– Texture: Freshly grated cheese melts better and gives a creamy texture. This makes the fries even tastier.
Using these fresh ingredients really makes a difference in your Garlic Parmesan Fries. Enjoy the process, and get ready for some delicious results!

Step-by-Step Instructions
Preparation of Potatoes
Start with the russet potatoes. Scrub them well under running water. You can peel them if you want. I like to keep the skin for extra flavor. Slice the potatoes into thin fries, about 1/4 inch thick. This size helps them cook evenly. Place your cut fries in a large mixing bowl.
Creating the Garlic Oil Mixture
In a small bowl, mix the minced garlic with olive oil. Add sea salt, black pepper, garlic powder, and red pepper flakes if you like some heat. Stir well to blend all the flavors. This garlic oil mixture is key to making the fries taste amazing.
Baking Instructions and Tips
First, preheat your oven to 425°F (220°C). Line a large baking sheet with parchment paper for easy cleanup. Pour the garlic oil mixture over the sliced fries. Toss them gently so every fry gets coated. Spread the fries in a single layer on the baking sheet. Avoid overcrowding to ensure they get crispy. Bake them for 25-30 minutes. Flip the fries halfway through to get a nice golden-brown color.
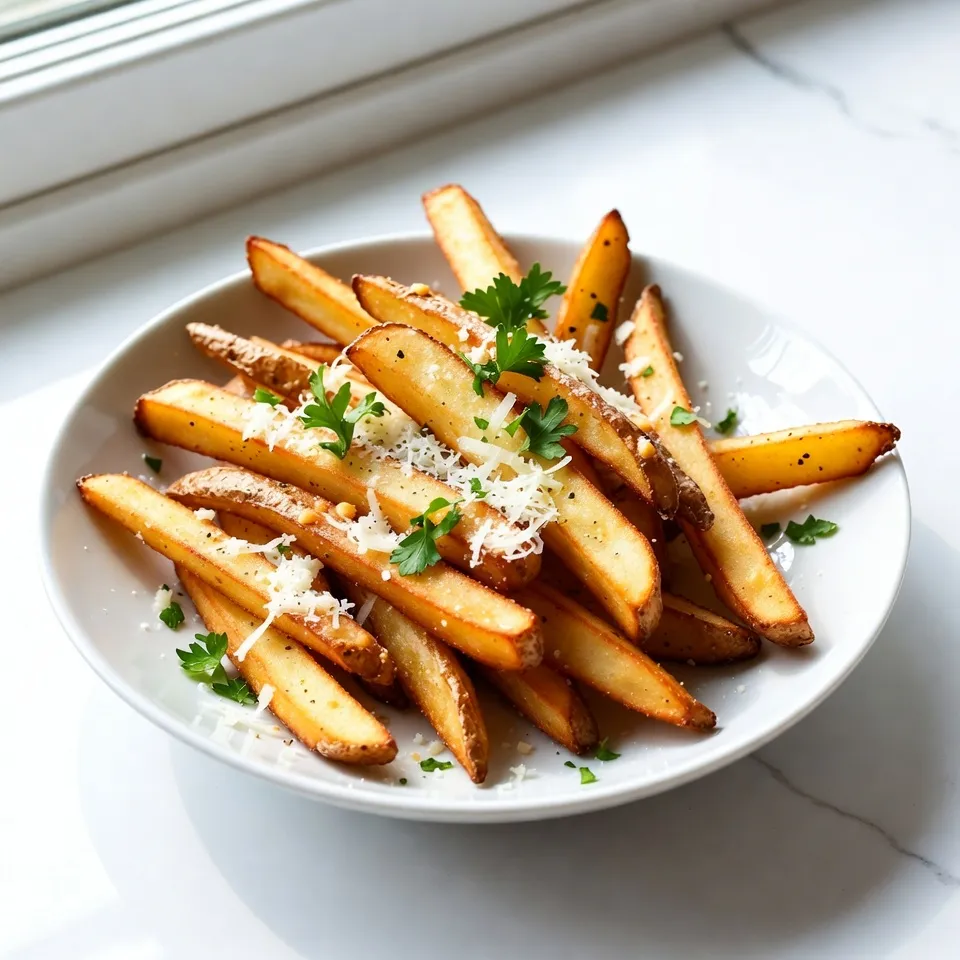
When they are crispy, take them out of the oven. Sprinkle the freshly grated Parmesan cheese over the hot fries. The heat will make the cheese melt just right. Finish by garnishing with parsley for a pop of color. Serve these fries hot and enjoy every bite!
Tips & Tricks
Achieving Perfect Crispiness
To get that ideal crunch, start with the right potato. I love using russet potatoes. They have the perfect starch content. Cut them into thin fries, about 1/4 inch thick. This size ensures even cooking. Always soak the fries in cold water for at least 30 minutes. This step removes excess starch. It helps them become crispier in the oven. Make sure to dry them well before adding oil. Finally, spread them out on the baking sheet. Avoid overcrowding for that golden crisp.
Flavor Enhancements
Want to spice things up? Consider adding different flavors to your fries. Try smoked paprika for a smoky kick. Or add cayenne pepper for heat. You can also mix in some Italian herbs like oregano or thyme. For a cheesy twist, toss in some nutritional yeast. If you enjoy tangy flavors, a splash of lemon juice can brighten the dish. Get creative! Adjust the spices based on your taste.
Serving Suggestions and Dipping Sauces
Serve your Garlic Parmesan Fries hot and fresh. For a fun twist, pile them high on a rustic plate. You can garnish with extra parsley for color. Pair them with tasty dipping sauces like creamy aioli or zesty marinara. Try a spicy sriracha mayo if you’re feeling adventurous. You can even create a cheesy dip with melted cheese and sour cream. These dips add another layer of flavor. Enjoy these fries as a snack or side dish!
Pro Tips
- Choose the Right Potatoes: Russet potatoes are ideal for fries due to their high starch content, which results in a fluffy interior and crispy exterior.
- Don’t Skip the Soak: Soaking the cut fries in cold water for at least 30 minutes before baking helps remove excess starch and enhances crispiness.
- Uniform Sizing Matters: Ensure your fries are cut to the same thickness for even cooking. Consider using a mandoline for consistent results.
- Experiment with Seasonings: Feel free to customize the seasoning blend! Try adding smoked paprika, garlic powder, or even a sprinkle of truffle oil for gourmet flair.

Variations
Spicy Garlic Parmesan Fries
If you like heat, try spicy garlic Parmesan fries. Just add red pepper flakes to the garlic oil mix. Use 1/2 teaspoon for a mild kick or more for extra spice. This twist gives your fries a bold flavor that pairs well with the creamy cheese.
Loaded Garlic Parmesan Fries
For a meal that feels like a treat, make loaded garlic Parmesan fries. After baking, top the fries with cooked bacon, jalapeños, and sour cream. These toppings add richness and crunch. The combination of flavors makes every bite exciting and delicious.
Healthier Alternatives (e.g., air fryer version)
Want a healthier option? Try making garlic Parmesan fries in an air fryer. Cut the potatoes and coat them with the garlic oil mix like before. Preheat your air fryer to 400°F (200°C) and cook the fries for about 15-20 minutes. Shake the basket halfway through for even cooking. This method gives you crispy fries with less oil.
Storage Info
How to Store Leftover Fries
To keep leftover fries fresh, wait for them to cool. Place them in an airtight container. This helps prevent them from getting soggy. Store them in the fridge for up to three days. If you want to keep them longer, freezing is a good option.
Reheating Methods for Optimal Texture
Reheating fries can be tricky. You want them crispy again. The best way to reheat is in the oven. Preheat the oven to 400°F (200°C). Spread the fries on a baking sheet. Bake for about 10-15 minutes. Check often to avoid burning. You can also use an air fryer. This method brings back the crunch!
Freezing Garlic Parmesan Fries
Freezing fries is easy. Start with cooled, cooked fries. Lay them flat on a baking sheet. Freeze them for about an hour. Once frozen, transfer them to a freezer-safe bag. Label it with the date. You can store them for up to three months. When ready to eat, cook them straight from the freezer. Just add a few extra minutes to the baking time.
FAQs
What type of potatoes are best for fries?
Russet potatoes are the best choice for fries. They have a high starch content. This helps make the fries crispy on the outside and fluffy on the inside. You can also use Yukon Gold potatoes. They add a nice buttery flavor, but russets are the classic choice.
Can I make Garlic Parmesan Fries in an air fryer?
Yes, you can make Garlic Parmesan Fries in an air fryer. Simply follow the same prep steps. After coating your fries, place them in the air fryer basket. Cook at 400°F (200°C) for about 15-20 minutes. Shake the basket halfway through for even cooking. This method gives you crispy fries with less oil.
What are some popular dipping sauces for Garlic Parmesan Fries?
Some popular dipping sauces include:
– Creamy aioli
– Zesty marinara
– Spicy ketchup
– Ranch dressing
– Garlic butter sauce
These sauces enhance the flavors of your fries. Feel free to get creative and try new dips!
In this blog post, I covered the key ingredients and step-by-step instructions to make Garlic Parmesan Fries. I shared tips for perfect crispiness and flavor boosts. I also explored fun variations and storage options for your leftovers. Remember, using fresh ingredients makes a big difference. Try these methods to enjoy restaurant-quality fries at home. Your taste buds will thank you, and your friends will be impressed. Enjoy cooking and sharing these tasty treat

Garlic Parmesan Fries
Ingredients
- 4 large russet potatoes
- 4 tablespoons extra virgin olive oil
- 4 cloves garlic, finely minced
- 1 teaspoon finely ground sea salt
- 1/2 teaspoon freshly cracked black pepper
- 1/2 cup freshly grated Parmesan cheese
- 2 tablespoons fresh parsley, finely chopped
- 1 teaspoon garlic powder
- 1/2 teaspoon red pepper flakes (optional for a spicy kick)
Instructions
- Preheat the Oven: Begin by preheating your oven to 425°F (220°C). To make cleanup easier, line a large baking sheet with parchment paper.
- Prepare the Potatoes: Scrub the russet potatoes thoroughly under running water. Peel the potatoes if you prefer, then slice them into thin fries, approximately 1/4 inch thick. Transfer the cut fries to a large mixing bowl.
- Make the Garlic Oil Mixture: In a separate small bowl, combine the minced garlic, olive oil, sea salt, black pepper, garlic powder, and red pepper flakes if you enjoy some heat. Mix well to create a savory garlic-infused oil.
- Coat the Fries: Pour the garlic oil mixture over the sliced potatoes. Toss gently with your hands or a spatula until each fry is evenly coated with the fragrant blend.
- Arrange for Baking: Spread the seasoned fries in a single layer across the prepared baking sheet, making sure not to overcrowd them. This ensures they cook evenly and become crispy.
- Bake the Fries: Place the baking sheet in the preheated oven and bake for 25-30 minutes. Be sure to flip the fries halfway through cooking to achieve a uniform golden-brown color and crispiness.
- Add the Cheese: Once the fries are beautifully golden and crispy, remove them from the oven. Immediately sprinkle the freshly grated Parmesan cheese over the hot fries while they are still sizzling, allowing the cheese to melt slightly.
- Garnish and Serve: After the cheese has melted, remove the fries from the oven and garnish with finely chopped parsley for a burst of freshness and vibrant color.
- Enjoy: Serve the fries hot, accompanied by your choice of dipping sauces, such as creamy aioli or zesty marinara.


. To make crispy zucchini fritters, start by removing excess moisture. This step is crucial. Grate the zucchini and sprinkle it with salt. Let it sit for about ten minutes. Then, use a clean towel to squeeze out the water. The drier your zucchini, the firmer your fritters will be. Next, pay attention to frying temperature. Heat your olive oil over medium heat until it shimmers. If the oil is too hot, the outside will burn before the inside cooks. If it's too cool, the fritters will soak up too much oil and become greasy. Use olive oil for frying. It has a nice flavor and a good smoke point. This oil will help achieve that perfect golden color. Pair your fritters with delicious dips. Greek yogurt or sour cream works great. You can also try tzatziki for a refreshing twist. For a beautiful presentation, arrange the fritters on a colorful platter. Add a sprinkle of fresh herbs, like parsley or dill. This adds color and a fresh taste. If your fritters are falling apart, it might be due to too much moisture. Ensure you've squeezed out all the water from the zucchini. You might also need to add a bit more flour to bind the mix. For more flavor, consider adding spices. Cumin or Italian seasoning can elevate the taste. You can also mix in different cheeses, like feta or cheddar, for a new twist. {{image_4}} For a healthier twist on zucchini fritters, try using whole wheat flour. This choice adds fiber and nutrients. It also gives the fritters a nice, nutty flavor. You can also bake the fritters instead of frying them. Just place them on a baking sheet, brush with a little olive oil, and bake until golden. This method cuts down on oil and keeps the fritters light. To mix things up, consider adding different cheeses. Feta gives a tangy touch, while cheddar brings a sharp flavor. You can also spice things up by incorporating spices. Cumin or Italian seasoning can add depth. A pinch of red pepper flakes can give them a kick too! If you need a gluten-free option, almond flour works well. It keeps the fritters nice and crispy. For those following a vegan diet, you can replace the egg with a flaxseed mixture. Just mix one tablespoon of ground flaxseed with three tablespoons of water. Let it sit for a few minutes until it thickens. This simple swap allows everyone to enjoy these tasty fritters. Don't forget to check the Full Recipe for all the details! To keep your zucchini fritters fresh, place them in an airtight container. Make sure to layer parchment paper between fritters to prevent sticking. Store them in the fridge for up to three days. After this time, the fritters may lose their crispiness. If you notice any off smell or mold, it's best to toss them. When it comes to reheating, the oven is your best friend. Preheat it to 350°F (175°C). Place the fritters on a baking sheet and heat for about 10 minutes. This keeps them crispy. You can use the microwave for quick reheating, but they may turn soft. If you choose this method, heat them on a microwave-safe plate for about 30 seconds. For the best taste, stick to the oven whenever possible. For more tips, you can check the Full Recipe. Zucchini fritters can last up to three days in the fridge. To store them, place them in an airtight container. Check for signs of spoilage like a sour smell or visible mold. If you see either, it's best to toss them. Yes, you can freeze zucchini fritters! To do this, let them cool completely. Then, place them in a single layer on a baking sheet and freeze for about an hour. Once frozen, transfer them to a freezer-safe bag. They will keep for up to three months. Zucchini fritters pair well with a variety of sides. You can serve them with: - Greek yogurt or sour cream - Fresh salsa or marinara sauce - A crisp green salad - Roasted vegetables These options add flavor and help balance the dish. Yes, you can make zucchini fritters ahead of time. Prepare them and store them in the fridge for up to a day. When ready to eat, just heat them in a skillet until warm. This keeps them crispy and delicious. For the full recipe, check out the Crispy Zucchini Bliss Fritters. Zucchini fritters are easy to make and tasty. You learned about key ingredients, step-by-step cooking, and tips for success. You also explored variations for healthy and dietary needs. Remember, removing excess moisture helps keep them crispy. Try different flavors or dips for fun. Store leftovers properly and reheat them well. Enjoy your zucchini fritters as a snack or a meal! Keep experimenting to make them your own. Happy cooking!](https://fastmealmate.com/wp-content/uploads/2025/06/98182d0e-52f3-455d-9b2a-3674903e8280-768x768.webp)
![When making Baked Zucchini Parmesan, you need fresh, simple ingredients. Here’s what you should gather: - 4 medium zucchinis, sliced into ½-inch thick rounds - 1 cup shredded mozzarella cheese - ½ cup freshly grated Parmesan cheese - 1 cup panko breadcrumbs - 2 garlic cloves, finely minced - 1 teaspoon dried oregano - 1 teaspoon dried basil - 1 teaspoon sea salt - ½ teaspoon freshly cracked black pepper - 2 tablespoons extra virgin olive oil - Fresh basil leaves for garnish (optional) These ingredients create a great mix of flavors and textures. The zucchini becomes soft, while the cheese melts beautifully. The panko breadcrumbs add the perfect crunch. Each bite gives you a taste of cheesy goodness! For the full recipe, check out the detailed instructions. Enjoy creating this dish! - Preheat the oven to 400°F (200°C). - Line a baking sheet with parchment paper. - In a bowl, combine: - 1 cup panko breadcrumbs - 2 minced garlic cloves - 1 teaspoon dried oregano - 1 teaspoon dried basil - 1 teaspoon sea salt - ½ teaspoon black pepper - Toss the ingredients well. - Drizzle 2 tablespoons olive oil over the mixture. - Mix again until all the breadcrumbs are coated. - Lay sliced zucchini on the baking sheet in a single layer. - Sprinkle the breadcrumb mixture evenly over the zucchini. - Add 1 cup shredded mozzarella cheese on top. - Finish with ½ cup grated Parmesan cheese for extra flavor. - Place the baking sheet in the oven. - Bake for 25-30 minutes until golden and bubbly. - Let cool for a few minutes. - Garnish with fresh basil leaves if desired. For the full recipe, check out the detailed steps included above. Enjoy your crispy, cheesy zucchini! To make your baked zucchini truly crunchy, adjust the breadcrumb coating. Use panko breadcrumbs for a lighter, crispier texture compared to regular breadcrumbs. If you want even more crunch, mix in some crushed cornflakes or a sprinkle of grated Parmesan into the panko. This combination gives a great bite. Baking technique plays a key role too. Make sure you lay the zucchini slices in a single layer. If they overlap, they will steam instead of bake, and you’ll lose that crunch. Turning the baking sheet halfway through baking can also help ensure even cooking. For more flavor, add spices like smoked paprika or chili powder. These spices bring a warm touch that pairs well with zucchini. Fresh herbs can brighten the dish. Use fresh basil or parsley for a burst of color and taste. If fresh herbs are hard to find, dried herbs like oregano or thyme work well too. You can serve baked zucchini parmesan in many ways. For a delightful appetizer, cut it into small squares and serve with a dipping sauce. As a side dish, pair it with grilled chicken or fish for a healthy meal. You can also serve it over pasta for a heartier option. Feel free to explore these ideas and make the dish your own. Enjoy the process! For the full recipe, check out the [Full Recipe]. {{image_4}} You can make baked zucchini parmesan even more exciting by adding other veggies. Try including bell peppers, tomatoes, or mushrooms. These vegetables add color and taste. You can also mix in some spinach for a healthy twist. Adding protein can turn this dish into a hearty meal. Consider cooked chicken, turkey, or even crumbled sausage. For a vegetarian option, use chickpeas or lentils. They add both flavor and protein. If you need a gluten-free dish, swap panko for gluten-free breadcrumbs. This keeps the crunch while catering to dietary needs. Always check the labels to ensure they are truly gluten-free. For a vegan version, replace cheese with plant-based alternatives. Nutritional yeast gives a cheesy flavor without dairy. You can also use cashew cheese for a creamy texture. Use olive oil to replace any butter in the recipe. Using seasonal herbs can elevate your baked zucchini parmesan. Fresh basil, parsley, or thyme can add unique flavors. You can mix and match herbs based on the season for fresh taste. During holidays, adapt this dish to fit the occasion. Add a layer of roasted garlic or sun-dried tomatoes for a festive flair. These simple changes can make it special for gatherings. For the full recipe, check out the [Full Recipe]. To keep your Baked Zucchini Parmesan fresh, store leftovers in an airtight container. This helps lock in flavor and moisture. You can keep it in the fridge for up to three days. If you want to enjoy it later, make sure it cools completely before sealing. Freezing is a great way to save this tasty dish. Here’s how to do it: 1. Cool Completely: Ensure the dish is fully cooled. 2. Wrap it Up: Use plastic wrap to cover it tightly. Then, place it in a freezer-safe container or bag. 3. Label and Date: Write the date on the bag or container. This helps you remember when you made it. You can freeze it for up to three months. When you’re ready to eat, you can reheat it in the oven or microwave. - Oven Method: Preheat the oven to 350°F (175°C). Place the zucchini on a baking sheet and cover it with foil. Bake for about 15-20 minutes until hot. This keeps it crispy. - Microwave Method: Heat it in a microwave-safe dish. Cover it with a damp paper towel. Heat in short bursts of 30 seconds until warm. Note, this method may make it a bit soggy. Choose the method that works best for you! Enjoy your delicious dish anytime! You can tell when the zucchini is done by checking its color and texture. The cheese should be golden and bubbly. The zucchini should be soft but not mushy. This usually takes about 25-30 minutes in the oven. Keep an eye on it to avoid overcooking. Yes, you can use different cheeses! Cheddar, gouda, or even a spicy pepper jack can work well. Mix and match to find your favorite flavor. Just make sure the cheese melts nicely to create a gooey texture. Baked zucchini parmesan is a healthy choice. Each serving has about 180 calories, with 10 grams of fat and 8 grams of protein. It also provides vitamins A and C, plus calcium from the cheese. This dish is a great way to enjoy veggies! You can prepare the zucchini ahead of time! Slice and layer them with breadcrumbs and cheese. Cover the dish and store it in the fridge for up to 24 hours. Just bake it right before serving for a fresh taste. Yes, the recipe is vegetarian as it uses no meat. It features cheese, zucchini, and herbs, all of which are plant-based. Enjoy this dish as a great meat-free option for any meal. To spice things up, add crushed red pepper flakes to the breadcrumb mix. You can also use spicy cheese or add jalapeños for extra kick. Adjust the heat to your taste for a fun twist! For the full recipe, check out the Cheesy Baked Zucchini Delights. Enjoy your cooking adventure! This blog post shares a simple and tasty baked zucchini parmesan recipe. We covered essential ingredients, step-by-step instructions, and helpful tips to enhance flavor and crunch. You learned how to store leftovers and even make variations for different diets. Now you can confidently whip up this dish as a side or appetizer. Enjoy experimenting with flavors and sharing your creations. Baked zucchini parmesan is a great way to eat healthy and delicious food. Happy cooking!](https://fastmealmate.com/wp-content/uploads/2025/06/6985a322-15fd-4ae0-839d-4317f4e09967-768x768.webp)


