Easy French Toast Casserole Simple and Tasty Dish

Are you looking for a simple and tasty dish to impress your family? This Easy French Toast Casserole is perfect for any meal. With just a few ingredients, you can create a warm and cozy breakfast or brunch. I’ll guide you through every step, from gathering your ingredients to serving tips. Let’s dive into this delicious recipe that makes mornings easier and sweeter!
Why I Love This Recipe
- Perfect for Gatherings: This casserole is a crowd-pleaser, making it an ideal choice for brunches, holidays, or family gatherings.
- Easy Preparation: With minimal prep time and the option to refrigerate overnight, you can save time in the morning while ensuring a delicious breakfast.
- Customizable: Feel free to add your favorite nuts, fruits, or spices to make this dish uniquely yours and cater to different tastes!
- Decadent Flavor: The combination of brioche or challah bread, creamy custard, and the sweetness of maple syrup creates an indulgent treat that’s hard to resist.
Ingredients
List of Ingredients
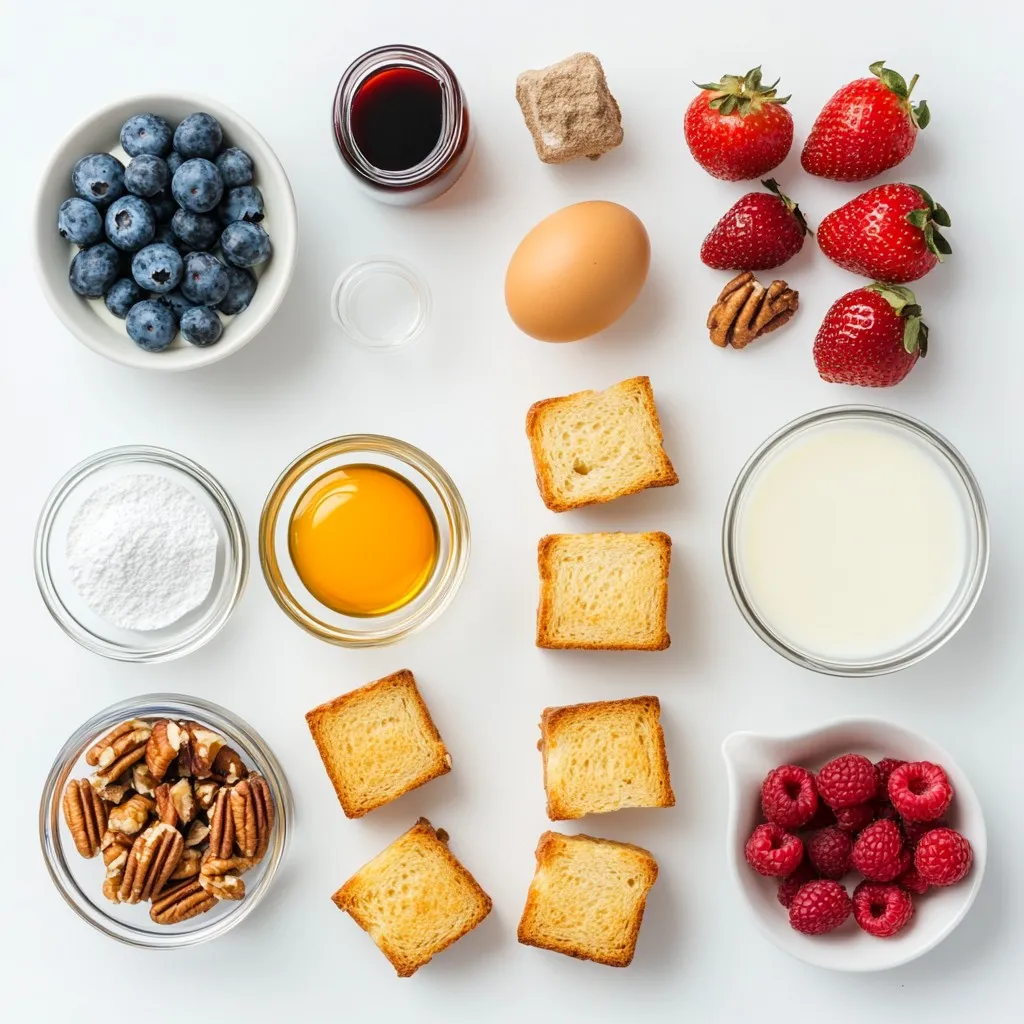
To make this Easy French Toast Casserole, you will need:
– 1 loaf of brioche or challah bread, cut into bite-sized cubes
– 6 large eggs
– 2 cups milk (whole or almond for a dairy-free option)
– 1/2 cup heavy cream
– 1/2 cup pure maple syrup
– 1 tablespoon vanilla extract
– 1 teaspoon ground cinnamon
– Pinch of salt
– 1/2 cup chopped pecans or walnuts (optional for added crunch)
– Powdered sugar for a light dusting (optional)
– Assorted fresh berries for garnish (such as strawberries, blueberries, or raspberries)
Alternative Ingredients (Dairy-Free, Nut-Free, etc.)
You can easily adjust this recipe. If you want a dairy-free version, use almond milk instead of whole milk. You can also swap heavy cream for coconut cream. For a nut-free option, skip the nuts altogether. You can also use sunflower seeds if you want some crunch without nuts.
Recommended Substitutes
If you don’t have brioche or challah, use any soft bread like white bread or French bread. For the eggs, you can use flax eggs for a vegan version. Mix 1 tablespoon of ground flaxseed with 2.5 tablespoons of water for each egg. If you want a sweeter taste, add more maple syrup or use honey.

Step-by-Step Instructions
Preparation Steps
1. Preheat your oven to 350°F (175°C).
2. Grease a 9×13 inch baking dish with cooking spray or butter. This step keeps the casserole from sticking.
3. In a large bowl, whisk together 6 large eggs, 2 cups of milk, and ½ cup of heavy cream.
4. Add ½ cup of pure maple syrup, 1 tablespoon of vanilla extract, 1 teaspoon of ground cinnamon, and a pinch of salt. Mix until smooth.
5. Cut 1 loaf of brioche or challah bread into bite-sized cubes.
6. Gently fold the bread cubes into the egg mixture. Make sure each piece is coated well.
7. If you want some crunch, add ½ cup of chopped pecans or walnuts and fold them in too.
Baking Instructions
1. Pour the mixture into the prepared baking dish. Spread the bread cubes evenly.
2. Cover the dish tightly with plastic wrap. Place it in the fridge for at least 2 hours or overnight. This helps the bread soak up the liquid.
3. Before baking, let the casserole sit at room temperature for about 30 minutes.
4. Bake in the preheated oven for 40-45 minutes. The top should be golden brown and firm in the center.
5. Use a toothpick to check if it’s done; it should come out clean.
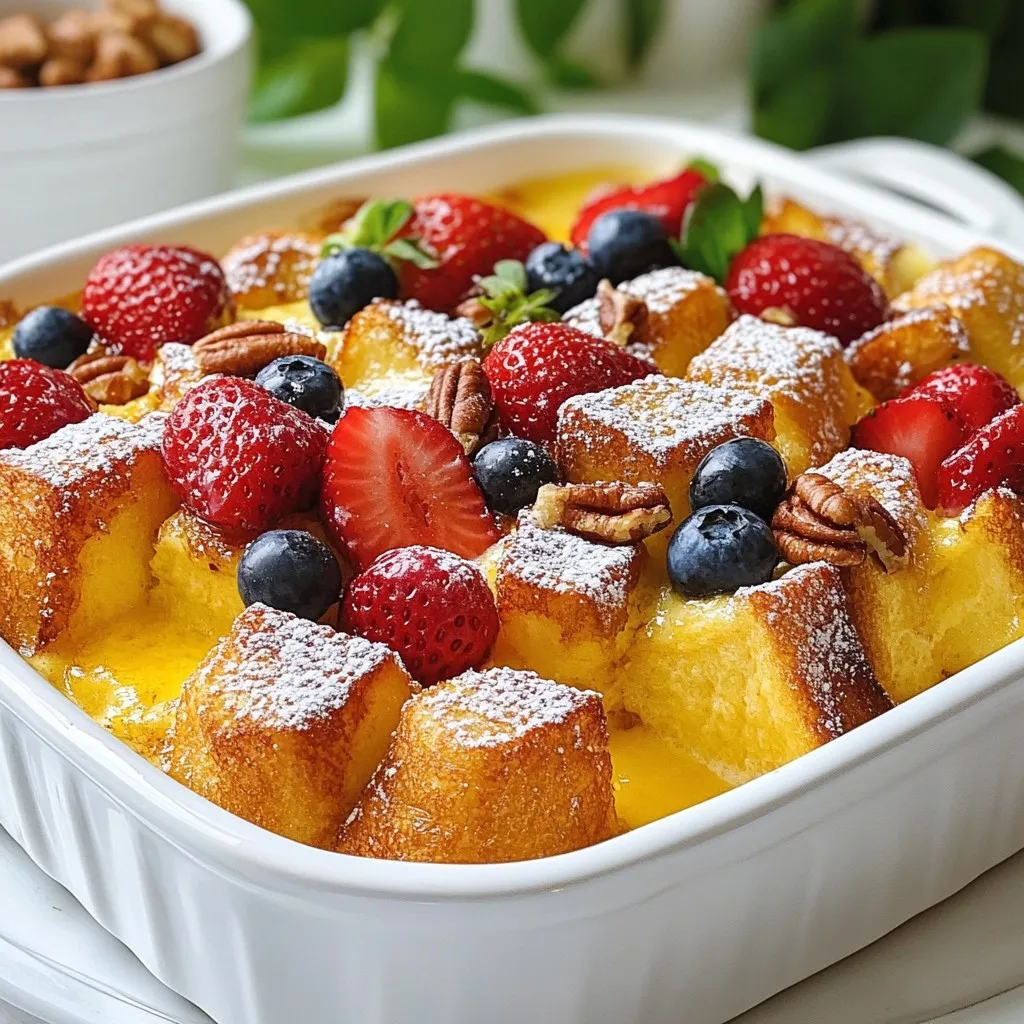
Serving Suggestions
1. Once baked, let the casserole cool for a few minutes.
2. Slice it into squares for serving.
3. Dust each portion lightly with powdered sugar.
4. Top with fresh berries like strawberries, blueberries, or raspberries for color and taste.
Tips & Tricks
Perfecting the Casserole Texture
To get the best texture, use soft bread like brioche or challah. Cut it into small cubes. This helps it soak up the egg mix. Mix the bread gently with the egg mixture. Make sure every piece is coated well. This way, the casserole will bake evenly. To add crunch, sprinkle in nuts like pecans or walnuts. They give a nice texture contrast.
Tips for Overnight Preparation
If you want to prep ahead, cover the dish with plastic wrap and chill it overnight. This helps the bread soak up the custard fully. Remove it from the fridge about 30 minutes before baking. This step warms it slightly. A warmer dish bakes more evenly.
Best Practices for Serving
Once baked, let the casserole cool for a few minutes. This makes slicing easier. Dust it lightly with powdered sugar for a sweet touch. Serve each piece with fresh berries on top. They add color and freshness. Enjoy your delicious creation with family and friends!
Pro Tips
- Use Day-Old Bread: For the best texture, use slightly stale brioche or challah bread. Day-old bread absorbs the custard mixture better, resulting in a creamier casserole.
- Add Flavor Variations: Experiment with different flavors by adding ingredients like orange zest, nutmeg, or even chocolate chips to the custard mixture for a delicious twist.
- Make Ahead: Prepare the casserole the night before and let it soak in the refrigerator overnight. This saves time in the morning and enhances the flavors!
- Serve with Toppings: Elevate your French toast casserole by serving it with a variety of toppings such as whipped cream, yogurt, or a drizzle of extra maple syrup.

Variations
Flavor Variations
You can play with flavors in this dish. Try adding chocolate chips for a sweet touch. You can also use ripe bananas for a fruity twist. Another option is to mix in apples and cinnamon for a cozy feel. Each choice brings a new taste. Don’t be afraid to get creative!
Topping Options
Toppings can make your casserole even better. Fresh fruit like strawberries, blueberries, or raspberries adds bright flavors. Nuts like pecans or walnuts give a nice crunch. You can drizzle maple syrup on top for added sweetness. For a fun finish, sprinkle powdered sugar for a lovely look.
Dietary Variants
If you need gluten-free options, use gluten-free bread. This keeps the taste while meeting your needs. For a vegan version, swap eggs with flaxseed meal or chia seeds. Use almond milk instead of regular milk. These changes make the dish suitable for everyone. Enjoy the same great taste with these simple swaps!
Storage Info
Refrigeration Guidelines
After you cook your Easy French Toast Casserole, let it cool. Cover it well with plastic wrap or foil. Store it in the fridge for up to 3 days. This keeps it fresh and tasty. If you have leftovers, this method helps to keep the flavors strong.
Freezing Instructions
You can freeze this dish, too! Cut it into squares first. Wrap each piece well in plastic wrap and place them in a freezer bag. Squeeze out as much air as you can. This helps prevent freezer burn. You can store it in the freezer for up to 2 months. Just remember to label the bag with the date.
Reheating Tips
To reheat, you can use the oven or microwave. For the oven, preheat to 350°F (175°C). Place the casserole on a baking sheet and cover it with foil. Bake for about 15-20 minutes until warm. If using the microwave, place a square on a plate. Heat for 1-2 minutes or until hot. Enjoy your warm, tasty breakfast!
FAQs
Can I make this casserole ahead of time?
Yes, you can make this casserole ahead! I love prepping it the night before. Just follow the steps until you cover it with plastic wrap. Place it in the fridge overnight. This gives the bread time to soak up the egg mixture. When you are ready to bake, let it sit at room temp for about 30 minutes. This helps it bake evenly and rise nicely.
What type of bread is best for French toast casserole?
I recommend using brioche or challah bread. These breads are soft and sweet. They soak up the egg mixture well. If you like, you can also use other types of bread. Just make sure it is thick and sturdy. Avoid thin bread since it can fall apart when soaking.
How do I know when the casserole is done baking?
To check if your casserole is done, look for a golden brown top. The center should feel firm when you touch it. You can also use a toothpick. Insert it into the center, and if it comes out clean, your casserole is ready. Bake it for about 40-45 minutes to get the best results.
This post covered the key aspects of making a tasty casserole. We explored ingredients, preparation steps, and baking instructions. I shared tips to help you get the perfect texture and serve it well. We also looked at fun variations and storage options.
In closing, I hope you feel ready to make your own delicious casserole. Simple steps and great ingredients lead to a meal everyone will enjoy. Happy bakin

Heavenly French Toast Casserole
Ingredients
- 1 loaf brioche or challah bread, cut into bite-sized cubes
- 6 large eggs
- 2 cups milk (whole or almond for a dairy-free option)
- 1 2 cups heavy cream
- 1 2 cup pure maple syrup
- 1 tablespoon vanilla extract
- 1 teaspoon ground cinnamon
- 1 pinch salt
- 1 2 cup chopped pecans or walnuts (optional for added crunch)
- to taste powdered sugar for a light dusting (optional)
- to taste assorted fresh berries for garnish (such as strawberries, blueberries, or raspberries)
Instructions
- Preheat your oven to 350°F (175°C). Grease a 9x13 inch baking dish with cooking spray or butter to prevent sticking.
- In a large mixing bowl, whisk together the eggs, milk, heavy cream, maple syrup, vanilla extract, ground cinnamon, and a pinch of salt until the mixture is smooth and fully blended.
- Gently fold the bread cubes into the egg mixture, ensuring each piece is thoroughly coated. If you're adding nuts, sprinkle them in at this stage and fold gently to combine.
- Pour the entire mixture into the prepared baking dish, spreading the bread cubes evenly for uniform baking.
- Cover the dish tightly with plastic wrap and place it in the refrigerator for at least 2 hours, or refrigerate overnight for optimal absorption of the custard.
- Before baking, remove the casserole from the refrigerator and let it sit at room temperature for approximately 30 minutes to bring it to a slightly warmer temperature.
- Bake the casserole in the preheated oven for about 40-45 minutes, or until the top is a beautiful golden brown and the center is firm to the touch. A toothpick inserted should come out clean.
- After baking, take the casserole out of the oven and allow it to cool for a few minutes before slicing into squares.
- Serve warm, giving each portion a light dusting of powdered sugar and a generous topping of fresh berries for a burst of color and freshness.


![- 1 cup Biscoff cookie spread - 2 cups whole milk - 1 cup heavy cream - 1/2 cup granulated sugar - 1/4 cup cornstarch - 1 teaspoon vanilla extract - 1/8 teaspoon salt - 3 ripe bananas, sliced - 1 cup crushed Biscoff cookies (for layering and garnish) - Whipped cream (optional, for topping) The Biscoff banana pudding is a treat, but it comes with calories. Each serving has about 350 calories. It has sugar and fat from the cookies and cream. If you want to reduce calories, you can use less sugar or lighter cream. You can also switch to a non-dairy milk for a vegan option. This dessert has a good mix of flavors and textures. You get the creaminess from the pudding and the crunch from the cookies. - Mix Dry Ingredients: In a medium saucepan, combine 1/2 cup granulated sugar, 1/4 cup cornstarch, and 1/8 teaspoon salt. Whisk them until there are no lumps. - Add Milk and Cook Mixture: Slowly pour in 2 cups of whole milk while whisking. This helps to avoid clumps in your pudding. Place the saucepan on medium heat and stir constantly. Cook until the mixture thickens and bubbles, about 5 to 7 minutes. - Incorporate Flavors: Once thickened, remove the saucepan from heat. Stir in 1 teaspoon vanilla extract and 1 cup of Biscoff cookie spread. Mix well until everything is smooth and combined. - Whip the Cream: In a separate bowl, whip 1 cup of heavy cream using an electric mixer. Beat until soft peaks form. Make sure it holds shape but is not too stiff. - Combine with Biscoff Mixture: Gently fold the whipped cream into the Biscoff mixture. Use a spatula and be gentle to keep the airy texture. - Layer the Dessert: In a large dish or individual cups, lay down sliced bananas. Then, spoon a layer of the Biscoff pudding over the bananas. - Add Crushed Cookies: Sprinkle a layer of crushed Biscoff cookies on the pudding. Repeat the layers with the remaining ingredients. Ensure the top layer is the Biscoff pudding. - Finishing Touches: For a nice look, pipe or dollop whipped cream on top. Garnish with extra crushed Biscoff cookies. - Chill the Dessert: Cover the dessert and place it in the fridge for at least 4 hours, or overnight. This helps all the flavors blend together. For the complete recipe, check the [Full Recipe]. Enjoy your cooking! To get the right whipped cream consistency, start with cold heavy cream. Use a clean bowl and beaters for the best results. Whip at medium speed until soft peaks form. This means the cream should hold its shape but still be smooth. Avoid over-whipping, as this can turn it into butter. To prevent lumps in the pudding, whisk the dry ingredients well before adding milk. Pour in the milk slowly while stirring. This helps mix everything evenly. Keep stirring as you cook the mixture over medium heat. This ensures a smooth pudding without any lumps. For the best presentation, use clear glasses or bowls. This shows off the lovely layers of bananas, creamy pudding, and crunchy cookies. You can also add a banana slice or a whole Biscoff cookie on top for a nice touch. This makes each serving look even more inviting. For garnishing ideas, sprinkle extra crushed Biscoff cookies on top. A dollop of whipped cream adds a nice finishing touch. You can also drizzle some melted Biscoff cookie spread over the top for added flavor and flair. The best time to prepare this dessert is a day ahead. This gives the flavors time to blend well. The pudding needs at least 4 hours in the fridge, but overnight is even better. This chilling time lets the pudding set perfectly. For optimal flavor, chill the dessert for at least 4 hours. This helps all the elements come together. The longer you chill, the more delicious it gets! Enjoy your Biscoff banana pudding after the wait; it will be worth it. {{image_4}} You can make this dessert even more fun by adding chocolate layers. Just mix cocoa powder into the Biscoff pudding. This mix creates a rich, sweet flavor. You can also use chocolate pudding as a layer. The blend of chocolate and Biscoff is a match made in dessert heaven. You can easily make a vegan version of Biscoff banana pudding. Use almond milk or coconut milk instead of whole milk. For the cream, try coconut cream. You can replace granulated sugar with maple syrup or agave. These swaps keep the taste yummy while being plant-based. If you need a gluten-free option, use gluten-free cookies. Look for brands that make gluten-free Biscoff-style cookies. Ensure that all other ingredients are gluten-free. This way, everyone can enjoy this delightful dessert without worry. To keep your Biscoff banana pudding fresh, store leftovers in the fridge. Use an airtight container to prevent air and moisture from spoiling it. If you don’t have one, cover the dish tightly with plastic wrap. This keeps the pudding creamy and tasty. In the fridge, this pudding lasts about 3 to 5 days. After that, it may lose its texture and flavor. Always check for any signs of spoilage before enjoying it again. If it smells off or looks strange, it’s best to toss it. Yes, you can freeze this pudding! To freeze, spoon it into a freezer-safe container, leaving room for expansion. Cover tightly with a lid or plastic wrap. When you're ready to eat, thaw in the fridge overnight. Avoid refreezing once thawed, as it may change the texture. Enjoy your creamy treat! For the full recipe, check out the Biscoff banana pudding delight. Can I use other nut butters instead of Biscoff? You can try using almond or peanut butter. However, Biscoff has a unique flavor. It adds a sweet, spiced taste. This makes it hard to replicate. Use other nut butters if you prefer them. The result will be different but still tasty. How do I know when the pudding mixture is thick enough? Stir the mixture while it cooks. It will start to bubble and thicken. When it coats the back of a spoon, it's ready. If it drips off the spoon slowly, you've got the right texture. This usually takes about 5-7 minutes. Can I make this dessert ahead of time? Yes, you can make it a day in advance. It tastes better when the flavors blend. Just cover it well and chill it in the fridge. This way, you save time and enjoy a delicious dessert. Can I use low-fat milk? Low-fat milk works, but it changes the creaminess. The pudding may be less rich. If you choose this option, consider adding a little extra whipped cream for texture. What if I don't have cornstarch? You can use flour as a substitute. It will work to thicken the pudding. Use about twice the amount of flour. Just remember, it might slightly change the taste. What can I pair with Biscoff banana pudding? This dessert pairs well with fresh fruit. Try berries or slices of mango. It also goes great with coffee or tea. The flavors balance nicely. Is it suitable for special occasions? Absolutely! Biscoff banana pudding is perfect for parties. Its layers look stunning in clear cups. Everyone loves a sweet and creamy dessert like this. It's a showstopper that impresses guests! This blog post covered how to make a delicious Biscoff banana pudding. We explored key ingredients and discussed the preparation and assembly steps to perfect the dish. I shared tips for achieving the best texture and serving suggestions to impress guests. You also learned about variations for diet needs and how to store leftovers safely. Enjoying this pudding can bring joy to many occasions. With the right ingredients and care, you can make this treat a family favorite.](https://fastmealmate.com/wp-content/uploads/2025/05/85e9a37f-c50b-46e1-af24-a41950287baa-768x768.webp)

