Easy Chicken Crescent Rolls Delightful Family Meal

Looking for a delicious family meal that’s quick and easy? You’ve found it! My Easy Chicken Crescent Rolls are perfect for busy nights or cozy weekends. With simple ingredients and straightforward steps, you can create a warm dish that your family will love. Join me as we explore how to make this tasty treat that’s sure to become a dinner favorite. Let’s get cooking!
Why I Love This Recipe
- Convenient and Quick: This recipe is incredibly easy to make and can be prepared in just 30 minutes, making it perfect for busy weeknights or last-minute gatherings.
- Deliciously Cheesy: The combination of cream cheese and sharp cheddar creates a rich, creamy filling that is absolutely irresistible.
- Customizable: You can easily modify the filling ingredients to include your favorite vegetables or spices, catering to your taste preferences.
- Perfect for Sharing: These crescent rolls are great as an appetizer or snack, making them ideal for parties, potlucks, or family gatherings.
Ingredients
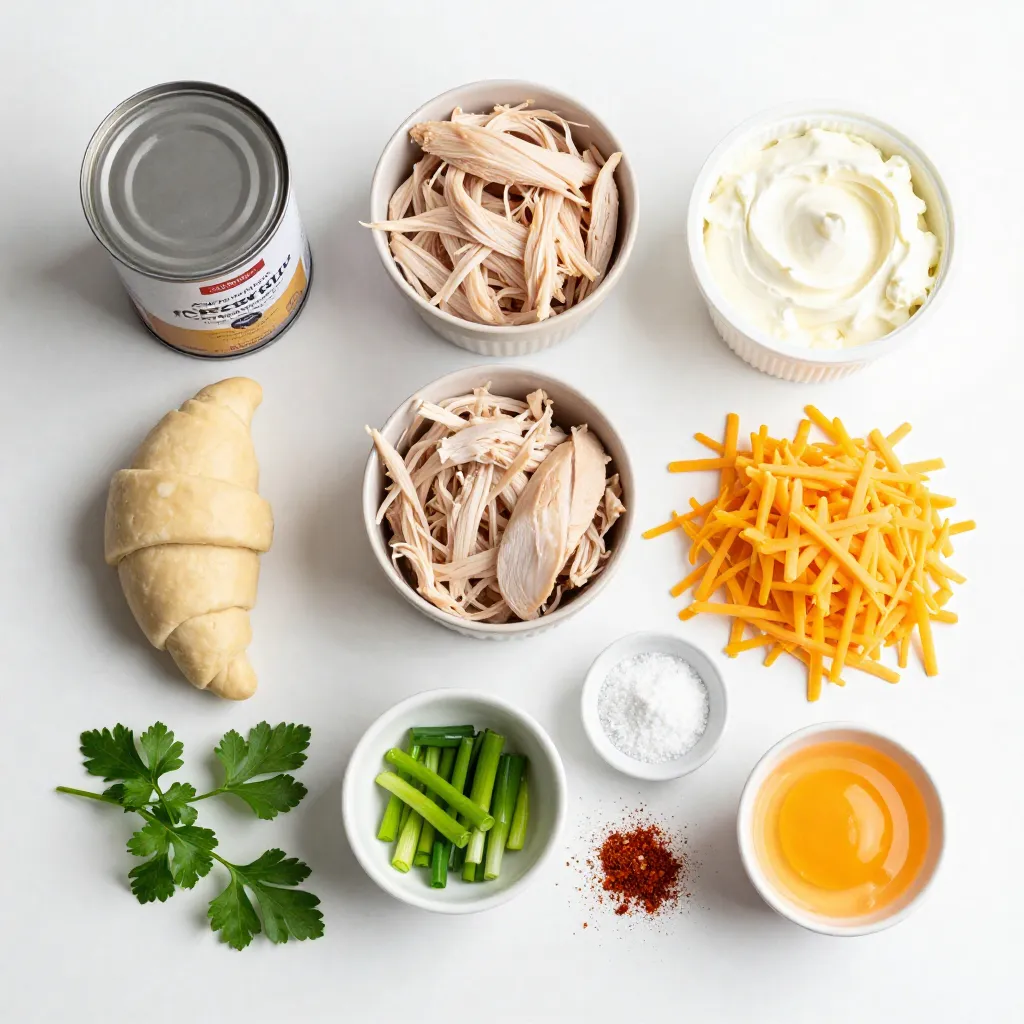
Main Ingredients for Easy Chicken Crescent Rolls
– 1 can (8 oz) refrigerated crescent roll dough
– 2 cups cooked chicken, shredded
– 1 cup cream cheese, softened to room temperature
– 1/2 cup shredded sharp cheddar cheese
– 1/4 cup green onions, finely chopped
– 1 teaspoon garlic powder
– Salt and pepper, to taste
– 1 egg, beaten (for egg wash)
These main ingredients create the tasty filling and flaky dough. The cream cheese keeps the filling creamy and rich. The cheddar adds a sharp flavor that pairs well with chicken. Green onions give a fresh crunch. Garlic powder enhances the overall taste, making each bite delicious.
Optional Garnishes
– Chopped fresh parsley
– A dash of paprika
Garnishes can make your dish look more appealing. Fresh parsley adds color and flavor. Paprika gives a bit of warmth and a pop of red. You can choose one or both to elevate your meal.
Recommended Tools and Equipment
– Baking sheet
– Parchment paper
– Mixing bowl
– Spoon for filling
– Pastry brush
Using the right tools helps the cooking process. A baking sheet lined with parchment paper keeps rolls from sticking. A mixing bowl is needed for the filling. A spoon helps you place the filling in the dough. A pastry brush is perfect for adding the egg wash for that golden finish.

Step-by-Step Instructions
Prepping the Oven and Baking Sheet
First, set your oven to 375°F (190°C). This helps the rolls bake well. While the oven warms, take a baking sheet and cover it with parchment paper. This keeps the rolls from sticking.
Preparing the Chicken Filling
Next, grab a medium bowl. In this bowl, mix together the shredded chicken, cream cheese, cheddar cheese, green onions, garlic powder, and a pinch of salt and pepper. Stir it well until everything is creamy and smooth. This filling is the heart of your rolls.
Rolling the Crescent Rolls
Now, open the can of crescent roll dough. Carefully pull apart the dough into triangle pieces. On the wide end of each triangle, put about one tablespoon of the chicken filling. Start rolling from the wide end and go to the point. Tuck the filling inside as you roll. This keeps it secure.
Baking Instructions
Place the rolled crescents on your prepared baking sheet. Make sure to leave space between each one. Brush the tops with the beaten egg for a nice golden color. Bake them in the oven for 12-15 minutes. Watch for them to turn golden brown and puffed up. Once they look perfect, take them out and let them cool for a few minutes. Enjoy your delightful chicken crescent rolls!
Tips & Tricks
Ensuring a Creamy Filling
To get a smooth and creamy filling, use softened cream cheese. This helps mix well with the chicken and cheese. If your cream cheese is cold, it will not blend right. I suggest leaving it out for about 30 minutes before starting. Mix it with shredded chicken, cheddar cheese, green onions, and garlic powder. Taste the mixture and adjust the salt and pepper to your liking. This step makes a huge difference.
How to Achieve Golden Brown Rolls
To make your rolls golden brown, brush the tops with a beaten egg. This egg wash gives the rolls a shiny and crispy crust. Be sure to coat them evenly. Bake them in a preheated oven at 375°F (190°C) for 12-15 minutes. Keep an eye on them. When they puff up and turn golden, they are ready.
Serving Suggestions for Easy Chicken Crescent Rolls
These rolls taste great warm and are easy to serve. Place them on a colorful plate for a nice look. You can pair them with dips like marinara or ranch. Fresh herbs like parsley can add a nice touch on top. For more fun, try serving with a salad or a soup on the side. This makes for a complete meal that everyone will love!
Pro Tips
- Use Leftover Chicken: This recipe is perfect for using up leftover rotisserie or grilled chicken, saving you time and reducing waste.
- Customize Your Cheese: Feel free to mix in different cheeses like mozzarella or pepper jack for a unique flavor twist!
- Make-Ahead Option: Assemble the rolls ahead of time and refrigerate until ready to bake for a quick meal solution.
- Check for Doneness: Keep an eye on the rolls as they bake; oven temperatures may vary, and you want them perfectly golden brown!
Variations
Different Fillings to Try
You can change the filling to keep things exciting. Try using shredded turkey or ham instead of chicken. For a twist, mix in some spinach and artichokes for a creamy, savory flavor. You can also add diced bell peppers or mushrooms for extra texture. If you love cheese, mix in some mozzarella or feta. Each filling brings a new taste to these rolls!
Vegetarian Option Ideas
You can easily make these rolls vegetarian. Replace the chicken with a mix of veggies. Use chopped broccoli, zucchini, or even roasted red peppers. Adding cream cheese and cheddar will keep them creamy and satisfying. You can also try using a bean spread for protein and flavor. This way, you get a hearty meal that everyone will enjoy!
Spice it Up: Adding Heat
If you like a little heat, there are many ways to spice up your rolls. Add some diced jalapeños or a sprinkle of crushed red pepper flakes to the filling. You can also mix in a spicy cheese, like pepper jack. For a different flavor, try adding hot sauce to the cream cheese. This will give your rolls a kick that will leave your taste buds dancing!
Storage Info
Best Practices for Storing Leftovers
After enjoying your chicken crescent rolls, store any leftovers in an airtight container. Keep them in the fridge for up to three days. If you want to keep them fresh longer, you can wrap them tightly in plastic wrap before placing them in the container. This helps prevent them from drying out.
How to Reheat Chicken Crescent Rolls
To reheat your rolls, preheat your oven to 350°F (175°C). Place the rolls on a baking sheet. Cover them with aluminum foil to keep them moist. Bake for about 10 minutes or until warm. You can also use a microwave, but the oven gives a crispier texture, which I recommend.
Freezing Guidance
If you want to freeze your chicken crescent rolls, first let them cool completely. Then, wrap each roll in plastic wrap and place them in a freezer bag. Make sure to remove as much air as possible before sealing. These can last in the freezer for up to two months. When you’re ready to enjoy them, thaw in the fridge overnight and reheat as mentioned above.
FAQs
Can I use store-bought rotisserie chicken?
Yes, you can use store-bought rotisserie chicken. It saves time and adds flavor. Just shred it and mix it with the other filling ingredients. This shortcut makes the recipe even easier!
How can I make this recipe gluten-free?
To make this recipe gluten-free, use gluten-free crescent roll dough. Many brands offer this option. Ensure all other ingredients are gluten-free, like the cream cheese and cheddar cheese.
What dipping sauces pair well with chicken crescent rolls?
These rolls taste great with many sauces. Consider serving them with marinara sauce, ranch dressing, or barbecue sauce. These flavors complement the cheesy chicken filling nicely.
Can I make these rolls ahead of time?
Yes, you can prepare the rolls ahead of time. Assemble them, then cover and refrigerate. Bake them when you’re ready to serve. Enjoy warm, fresh rolls that your family will love!
You now have all you need to make easy chicken crescent rolls. We covered ingredients, tools, and step-by-step instructions. I shared tips for a creamy filling and golden brown rolls. We also explored fun variations and safe storage methods.
Feel confident in trying different fillings or even making a vegetarian version. These rolls are simple and delicious. Enjoy sharing them with friends or family. Happy bakin

Cheesy Chicken Crescent Rolls Delight
Ingredients
- 1 can refrigerated crescent roll dough
- 2 cups cooked chicken, shredded
- 1 cup cream cheese, softened to room temperature
- 1/2 cup shredded sharp cheddar cheese
- 1/4 cup green onions, finely chopped
- 1 teaspoon garlic powder
- to taste salt and pepper
- 1 egg beaten (for egg wash)
- optional chopped fresh parsley or a dash of paprika for garnish
Instructions
- Begin by preheating your oven to 375°F (190°C). While the oven heats, line a baking sheet with parchment paper to prevent sticking.
- In a medium-sized mixing bowl, combine the shredded chicken, softened cream cheese, shredded cheddar cheese, chopped green onions, garlic powder, and a sprinkle of salt and pepper. Stir the mixture until all ingredients are well blended and the filling is creamy.
- Open the can of crescent roll dough and carefully separate it into individual crescent triangle pieces.
- On the wider end of each triangle, spoon approximately one tablespoon of the chicken mixture.
- Starting at the wide end, roll each triangle towards the pointed tip, tucking the filling in securely as you go to ensure it stays inside during baking.
- Arrange the rolled crescents on your prepared baking sheet, leaving space between each one. Brush the tops with the beaten egg to create a lovely golden crust.
- Bake the crescents in your preheated oven for 12-15 minutes, or until they are golden brown and visibly puffed up.
- Once baked, take them out of the oven and allow them to cool for a few minutes. For an extra touch, garnish with freshly chopped parsley or a dash of paprika if desired.


![- 1 pound ground beef (80/20 blend) - ½ teaspoon salt - ½ teaspoon black pepper - ½ cup cheddar cheese, shredded - ½ cup mozzarella cheese, shredded - 4 large flour tortillas - 4 tablespoons cream cheese, softened - ¼ cup dill pickles, diced - ¼ cup diced tomatoes - ¼ cup onion, minced - 2 tablespoons ketchup - 2 tablespoons mustard - Olive oil, for cooking Creating Cheeseburger Quesadilla Smash Sliders is a fun way to enjoy flavors. With the right ingredients, your sliders burst with taste. First, let’s start with the beef. I like using an 80/20 blend. This mix gives a juicy bite. Next, season it well with salt and pepper. Don't skip this step; flavor is key. For the cheese, I use both cheddar and mozzarella. The cheddar brings a sharp taste, while mozzarella melts beautifully. You can feel the cheese stretch in every bite. The flour tortillas are the base for these sliders. They hold everything together and crisp up nicely when cooked. I recommend using large tortillas for easier assembly. Cream cheese adds richness. Spread it on the tortillas for a creamy layer. Then, top it off with diced dill pickles, tomatoes, and onions. These toppings add crunch and freshness. Finally, drizzle some ketchup and mustard for that classic burger taste. Use olive oil to cook the quesadillas. It helps create a golden brown crust while keeping everything moist inside. For the full recipe, check the details above. This will guide you step by step to create your own Cheeseburger Quesadilla Smash Sliders. Enjoy the flavor explosion! To start, grab a medium mixing bowl. Add 1 pound of ground beef, ½ teaspoon of salt, ½ teaspoon of black pepper, and 1 teaspoon of garlic powder. Use your hands to mix everything gently. Once mixed, divide the beef into small patties, each about 2-3 ounces. Next, heat a skillet on medium heat. Add a drizzle of olive oil. When the pan is hot, place the patties in the skillet. Cook for 3-4 minutes until they turn brown. Flip them over and cook for another 3-4 minutes. Once done, remove the patties and set them aside on a plate. Now it's time to build your quesadilla! Lower the skillet heat to medium-low. Take 4 large flour tortillas and spread 1 tablespoon of softened cream cheese on one side of each tortilla. Place one tortilla in the skillet with the cream cheese-side facing up. Add a generous amount of cheddar cheese, then stack half of the cooked burger patties on top. Next, sprinkle on the diced pickles, diced tomatoes, and minced onions. Drizzle a bit of ketchup and mustard over this. Finish by adding a layer of shredded mozzarella cheese. Carefully place another tortilla on top, cream cheese-side down. Press it gently with a spatula to hold everything together. Cook the quesadilla for about 2-3 minutes. Look for a golden-brown color on the bottom tortilla and melted cheese. Now, flip the quesadilla gently and cook the other side for another 2-3 minutes. When both sides are browned, take the quesadilla off the heat. Let it cool for a minute, then slice it into quarters or sliders. Repeat this for the rest of your tortillas and filling ingredients. Serve the warm cheeseburger quesadilla sliders on a platter. I like to add extra diced pickles and some ketchup and mustard for dipping on the side. Enjoy this flavor explosion! For the full recipe, check out the [Full Recipe]. To make the best burger texture, use ground beef that is 80/20. This mix provides the right fat content for juicy patties. When you form the patties, handle the meat gently. Overworking it can make the burgers tough. Aim for small patties, about 2-3 ounces, for sliders. For seasoning, keep it simple. A mix of salt, black pepper, and garlic powder works great. These flavors enhance the beef without overpowering it. Be sure to season both sides of each patty before cooking. This will help lock in the taste. To get that perfect cheese melt, use a mix of cheeses. Cheddar and mozzarella are my go-tos. Cheddar adds sharpness, while mozzarella brings stretchiness. Spread cheese evenly, so it melts all the way through. For a fun twist, try pepper jack cheese for a spicy kick. You can also experiment with gouda or fontina. These will add richness and depth. Just remember to slice the cheese thinly for quicker melting. Cooking your quesadillas to a perfect golden brown is key. Use medium-low heat for even cooking. This prevents burning while letting the cheese melt fully. When flipping quesadillas, use a large spatula. Slide it under the quesadilla gently to avoid spills. If you're nervous about flipping, consider using a plate. Simply slide one side onto the plate, then flip it back into the pan. This method keeps your fillings intact. {{image_4}} You can switch up the meat in this dish. Ground turkey or chicken works well. Both have a lighter flavor but still taste great. For a plant-based option, try lentils or black beans. These give you a nice texture and flavor. Using these options can help you cater to different diets. To boost taste, add spices like paprika or cumin. These spices add warmth and depth. You can also mix in sauces, like barbecue or sriracha, for a kick. Experimenting with different cheeses can change the flavor too. Pepper jack adds heat, while gouda brings a smoky taste. Topping with fresh herbs, like cilantro or chives, can brighten each bite. You can serve these quesadilla sliders in many ways. They work as a classic quesadilla or as fun sliders. For parties, cut them into smaller pieces. Arrange them on a colorful platter to impress your guests. You might also serve them with dips, like guacamole or salsa, for extra flavor. Each style can make your meal exciting and unique. To keep your cheeseburger quesadilla sliders fresh, place them in an airtight container. This helps lock in flavor and moisture. Store them in the fridge for up to three days. After that, the taste may decline, and the texture could change. If you want to save them longer, freezing is a good option. Wrap each quesadilla slider tightly in plastic wrap. Then, place them in a freezer-safe bag or container. This keeps them safe from freezer burn. You can freeze them for up to three months. When you're ready to eat, let them thaw overnight in the fridge before reheating. For the best taste, reheat using the oven. Preheat it to 350°F (175°C). Place the quesadilla sliders on a baking sheet. Heat for about 10-15 minutes, until warm and crispy. If you use a microwave, put them on a plate. Heat for 30-60 seconds. This method is faster but may not keep the crunch. To restore crunchiness, consider finishing in a hot pan for a minute. Yes, you can prepare these sliders ahead. Make the patties and cook them. Let them cool. Then, store them in the fridge. When ready to serve, assemble the quesadillas. You can use either fresh tortillas or pre-made ones. If you use pre-made tortillas, spread cream cheese and layer the fillings. Cook them quickly in a hot skillet. This way, they stay crispy and warm. You can serve many tasty sides with these sliders. Consider some crispy fries or sweet potato fries. They pair well with the cheesy sliders. A fresh salad can balance the richness. You might also try dipping sauces like ranch or spicy mayo. These add extra flavor and fun. You could even serve a zesty salsa for a fresh kick. To make these sliders vegetarian, swap out the beef for a meat alternative. You could use black beans or lentils as a base. Another option is to use plant-based burger patties. Just season them like the beef. Add your favorite toppings, like cheese and veggies. You can still enjoy the same great flavors without meat. Just make sure all the other ingredients are vegetarian-friendly. You can make tasty Cheeseburger Quesadilla Smash Sliders easily. Start with classic ingredients and follow straightforward steps for delicious results. Don’t forget to try different proteins and toppings to suit your taste. Storing any leftovers is simple, and reheating them will keep them just as good. With these tips, you can impress guests or enjoy a fun meal at home. Making this dish lets you explore flavors while fitting right into your busy day. Enjoy your cooking adventure!](https://fastmealmate.com/wp-content/uploads/2025/07/3ea5f9d6-0f24-4765-99ee-1beab0673b04-768x768.webp)


. - Bring salted water to a boil. - Add rotini pasta and cook until al dente. - This usually takes about 7 to 9 minutes. - Drain the pasta and rinse it under cold water to cool. - Chop the cherry tomatoes in half. - Dice the cucumber and red bell pepper. - Finely chop the red onion. - If you use fresh corn, cook it lightly for 2-3 minutes. - Cool the corn under cold water. - In a bowl, combine olive oil and lemon juice. - Add Dijon mustard and minced garlic. - Whisk the mixture until it is smooth. - Season it with salt and pepper to taste. - In a large bowl, mix the cooled pasta with the chopped vegetables. - Add crumbled feta cheese, basil, and parsley. - Drizzle the lemon vinaigrette over the pasta mixture. - Toss gently to coat all the ingredients evenly. - Cover the salad with plastic wrap. - Chill in the refrigerator for at least 30 minutes. - This helps the flavors blend together nicely. This refreshing summer pasta salad with lemon vinaigrette is perfect for hot days. For the complete recipe, check the [Full Recipe]. - Use fresh, seasonal vegetables for better flavor. Fresh veggies taste brighter and more delicious. They also add color and crunch. Look for ripe tomatoes, crisp cucumbers, and sweet bell peppers. - Adjust dressing ingredients according to personal preference. This salad is flexible. If you like tangy, add more lemon juice. If you prefer creamy, a bit of yogurt can work wonders. - Serve in a chilled bowl and garnish with basil leaves and lemon wedges. This adds a lovely touch and makes your dish pop. - Consider colorful serving dishes to enhance visual appeal. Bright colors make the salad inviting. Use a vibrant bowl to catch the eye and draw people in. {{image_4}} You can make your summer pasta salad even more filling. Adding proteins boosts nutrition and flavor. Grilled chicken, shrimp, or chickpeas work well. Grilled chicken adds a smoky taste. Shrimp gives a fresh ocean flavor. Chickpeas offer a hearty, plant-based option. Each choice makes your salad special and satisfying. While lemon vinaigrette is zesty, you can switch it up. Try balsamic vinaigrette for a sweet-tangy twist. A yogurt-based dressing adds creaminess and a slight tang. Both options change the salad's vibe while keeping it fresh. Feel free to experiment to find your favorite taste. Using seasonal vegetables makes your salad vibrant. Swap in zucchini for a crunchy bite. Asparagus adds a touch of elegance. Bell peppers bring sweetness and color. You can mix and match based on what’s fresh and available. This keeps your salad exciting and full of flavor. For the full recipe, check out the detailed instructions above. After enjoying your summer pasta salad, store any leftovers in an airtight container. This keeps the salad fresh. You can keep it in the refrigerator for up to 3 days. Freezing this pasta salad is not a good idea. The texture of the pasta and vegetables changes when frozen. They become mushy when thawed, which affects the taste. I recommend eating the salad cold straight from the fridge. This keeps the flavors bright and fresh. Don’t reheat it, as it tastes best when chilled. For more details, check out the Full Recipe. Use a gluten-free pasta option available in stores. Many brands offer good choices. Just check the label to ensure it's truly gluten-free. This way, everyone can enjoy the dish without worry. Yes, it’s best to make the salad a few hours before serving for best flavor. This time lets the ingredients blend together. You can chill it in the fridge, which enhances the taste. Just remember to toss it gently before serving. Try goat cheese, mozzarella, or skip cheese entirely for a dairy-free option. Each cheese gives a different flavor. Goat cheese adds creaminess, while mozzarella is mild and stretchy. Picking one that fits your taste makes the salad even better! This summer pasta salad is fresh, simple, and easy to make. You learned how to prepare a tasty dish with rotini pasta, colorful vegetables, and a zesty lemon vinaigrette. We discussed tips to enhance flavor and presentation. Remember, you can add proteins or swap ingredients for variety. This salad makes a great side or light meal. Enjoy making your own version and impress your guests this warm season!](https://fastmealmate.com/wp-content/uploads/2025/07/167fa52b-6c37-4fee-aa24-5fa64edc3341-768x768.webp)
