
Are you ready to satisfy your sweet tooth with a treat that’s simple and fun? My Easy Caramel Popcorn recipe brings you crunchy popcorn coated in rich caramel, all in just a few steps. This homemade snack is perfect for movie nights, parties, or a tasty indulgence anytime. With easy-to-find ingredients and quick instructions, you’ll whip up this crowd-pleaser in no time. Let’s get popping!
Why I Love This Recipe
- Perfect Balance of Flavors: This recipe combines the sweetness of caramel with a hint of salt, creating a delightful contrast that keeps you coming back for more.
- Easy to Make: With simple ingredients and straightforward steps, it’s a fun and quick treat that anyone can whip up in under an hour.
- Customizable: You can easily add your favorite nuts, candies, or spices to the mix, making it a versatile snack for any occasion.
- Great for Sharing: This recipe yields a generous amount, perfect for parties, movie nights, or as a thoughtful homemade gift for friends and family.
Ingredients
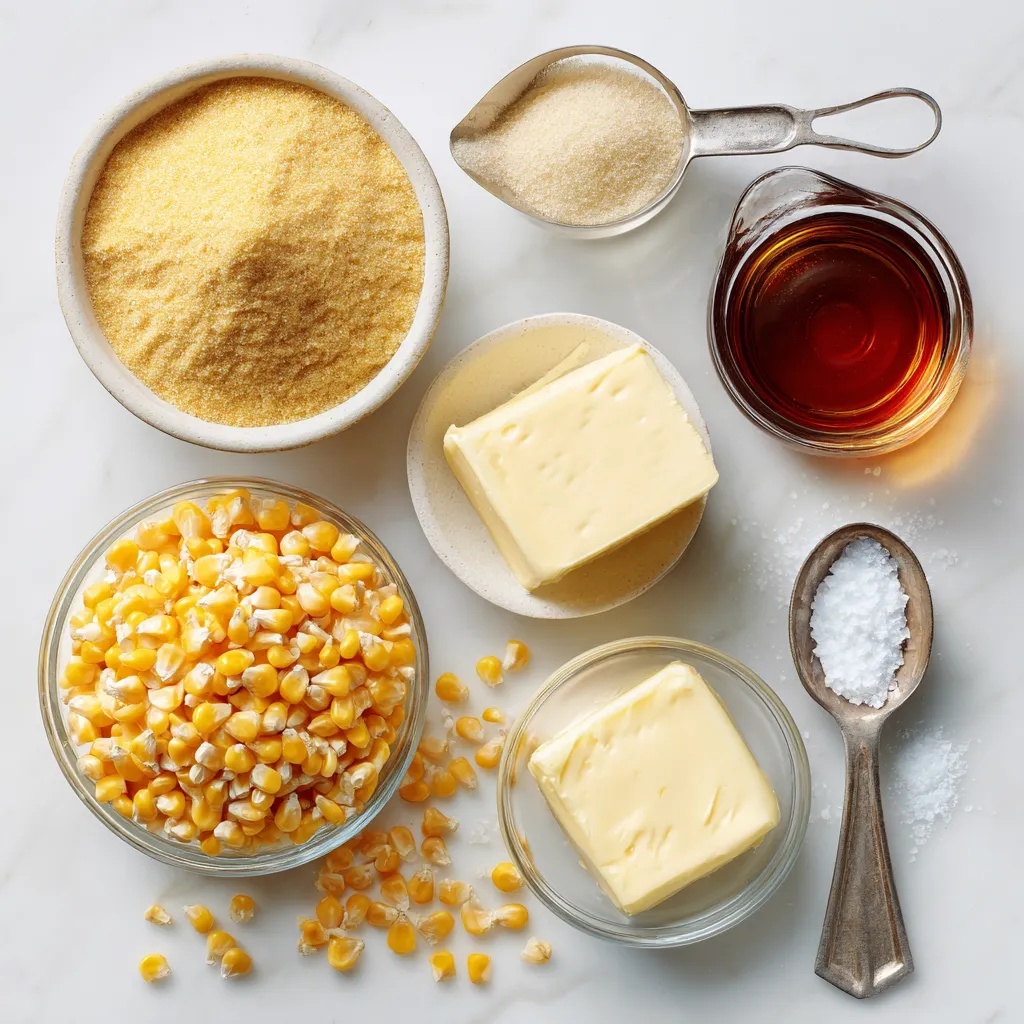
To make easy caramel popcorn, you need a few simple ingredients. Here’s what you’ll need:
– 1 cup popcorn kernels
– 1 cup granulated sugar
– 1/4 cup unsalted butter
– 1/4 cup light corn syrup
– 1/2 teaspoon baking soda
– 1/2 teaspoon pure vanilla extract
– Pinch of sea salt
These ingredients create a perfect balance of sweet and salty flavors. The popcorn provides a fluffy base, while the caramel adds that delicious, sticky sweetness. The butter makes it rich, and the baking soda helps give it a light texture. The vanilla extract adds a nice depth of flavor, and the sea salt enhances everything.
When buying popcorn, choose high-quality kernels. This ensures a better popping experience and a more enjoyable snack. For the sugar, granulated is best as it melts smoothly. Make sure your butter is unsalted, so you control the saltiness.
Feel free to get creative with the ingredients. You can add nuts or chocolate if you want to mix it up!
Step-by-Step Instructions
Popping the Popcorn
To start, you need to pop the popcorn kernels. You can use a large pot with a lid or a popcorn maker. If using a pot, heat it on medium, add the kernels, and cover. Shake it gently until the popping slows down. Once ready, transfer the popcorn to a large mixing bowl. Make sure to check for and discard any unpopped kernels. This step ensures a smooth and tasty snack.
Preparing the Caramel Sauce
Next, let’s make the caramel sauce. In a medium saucepan, combine the granulated sugar, unsalted butter, and light corn syrup. Place it on medium heat. Stir the mix until it starts to boil gently. Keep a close eye on it. After about 4 to 5 minutes, the color will change to a light amber. Be careful! Caramel can burn quickly if left unattended.
Adding Flavorings
Once the caramel reaches the right color, take the saucepan off the heat. Now, carefully add the baking soda and pure vanilla extract. Expect some bubbling, so stir cautiously. This bubbling reaction helps the caramel become light and airy. Make sure everything blends well for a delicious flavor.
Coating the Popcorn
Now it’s time to coat the popcorn. Drizzle the warm caramel sauce evenly over the popped popcorn. Use a spatula or a wooden spoon to gently toss the popcorn. This helps ensure every piece gets a good coating of the sweet caramel. You want to make sure that each bite is packed with flavor.
Baking for Crunchiness
Preheat your oven to 250°F (120°C). While it heats, line a large baking sheet with parchment paper. Spread the caramel-coated popcorn in an even layer on the sheet. Bake it in the preheated oven for 45 minutes. Make sure to stir every 15 minutes. This will give your popcorn a crunchy texture and an even caramel coating.
Cooling and Serving
When the baking time is up, remove the popcorn from the oven. Let it cool on the baking sheet for a bit. Once cooled, break the popcorn into delightful clusters. You can serve it in a large bowl or package it in cute bags for gifts. Enjoy your sweet and salty snack!
Tips & Tricks
Getting the Perfect Caramel
To avoid burning the caramel, stay focused while cooking. Use medium heat to help control the temperature. Stir the mix constantly until it boils. This keeps the sugar from burning. If it starts to smell burned, start over.
Constant stirring is important. It helps mix the sugar, butter, and syrup evenly. Once it boils, stop stirring. Let it cook for 4 to 5 minutes. Watch the color change to light amber. This color means it is ready for the next step.
Achieving the Right Texture
Baking adds crunchiness to your caramel popcorn. After coating the popcorn, spread it on a baking sheet. Preheat the oven to 250°F (120°C). Bake for 45 minutes, stirring every 15 minutes. This makes sure each piece gets crunchy and flavorful.
Keep an eye on the time. If you bake too long, it can get too hard. If you underbake, it may stay soft. Finding the right balance is key to great texture.
Presentation Tips
For a fun touch, serve your popcorn in colorful paper cones. You can also use mason jars for a cute look. Sprinkle extra sea salt on top for added flavor and beauty.
If you want to gift your popcorn, use decorative bags. They add charm and make any gift feel special. People love receiving homemade treats packed with care!
Pro Tips
- Use Fresh Kernels: For the best popping results, ensure your popcorn kernels are fresh. Old kernels may not pop well, resulting in a disappointing snack experience.
- Monitor Caramel Color: When cooking the caramel sauce, keep a close eye on the color. A light amber hue is perfect, while darker shades can indicate burning. Use a candy thermometer if you’re unsure!
- Don’t Skimp on Stirring: Stir the caramel sauce continuously as it cooks to prevent it from sticking to the bottom of the pan and burning. This will ensure a smooth and delicious coating for your popcorn.
- Cool Completely: Allow the popcorn to cool completely before serving or packaging. This helps the caramel harden and ensures a delightful crunch that enhances the overall texture.
Variations
Flavor Enhancements
You can switch up your caramel popcorn with fun flavors. Adding nuts gives a nice crunch. Try almonds, peanuts, or pecans. You can also add chocolate. Drizzle melted chocolate over the cooled popcorn for a sweet twist. You can even mix in chocolate candies for color and sweetness.
If you want to try different sweeteners, use maple syrup or honey instead of corn syrup. These options add unique flavors to the caramel. Just keep in mind that the texture might change a bit.
Dietary Modifications
To make this snack gluten-free, ensure you use certified gluten-free popcorn. Most popcorn kernels are safe, but always check the package. For those who need vegan options, replace butter with coconut oil or a vegan butter substitute. This keeps the caramel rich and tasty without dairy.
Seasonal Variations
You can make your caramel popcorn fit the season. In the fall, add a sprinkle of cinnamon or nutmeg for a cozy flavor. During the holidays, use colored sugar or sprinkles to match the festive spirit. This gives a fun look for parties or celebrations.
Storage Info
Best Storage Practices
To keep your caramel popcorn fresh, use an airtight container. Glass jars or plastic bins work well. Make sure the container is completely dry. Moisture can make your popcorn soggy. Seal the container tight after every use. This helps keep it crunchy and tasty.
Shelf Life
Caramel popcorn lasts for about one week at room temperature. Store it in a cool, dry place. Avoid placing it near heat sources. You can freeze caramel popcorn for up to three months. Just make sure to place it in a freezer-safe bag. When you want to enjoy it again, thaw it in the container. This keeps it crunchy and fresh!
FAQs
How do I make sure my caramel doesn’t burn?
To prevent burning, keep an eye on the heat. Use medium heat and stir often. When it starts to boil, stop stirring. Watch for a light amber color. If it gets too dark, it will taste bitter.
What popcorn kernels should I use for caramel popcorn?
Use fresh popcorn kernels for the best taste. They should pop well and be fluffy. I suggest using high-quality kernels. This ensures a nice bite and an even coating of caramel.
Can I use microwave popcorn instead?
Yes, you can use microwave popcorn. Just make sure it is plain or lightly salted. Avoid flavored popcorn as it may clash with the caramel. Homemade popcorn gives better texture and taste, but microwave works in a pinch.
How can I make my caramel popcorn less sticky?
To reduce stickiness, bake the popcorn longer. The oven helps to dry out the caramel. Make sure you stir every 15 minutes. You can also add a bit more baking soda for a less gooey texture.
Is this recipe adaptable for larger batches?
Absolutely! You can double or triple the recipe. Just make sure you have enough space to mix and coat the popcorn. Use larger pots and bowls to keep everything manageable.
This blog post covered everything you need to make perfect caramel popcorn. We started with the key ingredients and moved through each step, from popping the popcorn to cooling and serving. You learned tips for making great caramel and keeping the right texture. We also shared fun variations and storage tips.
With these easy steps, you can create a tasty treat. Enjoy sharing your caramel popcorn with friends or at events! Happy poppin


