Dragon Fruit Lime Spritzer Refreshing Summer Drink

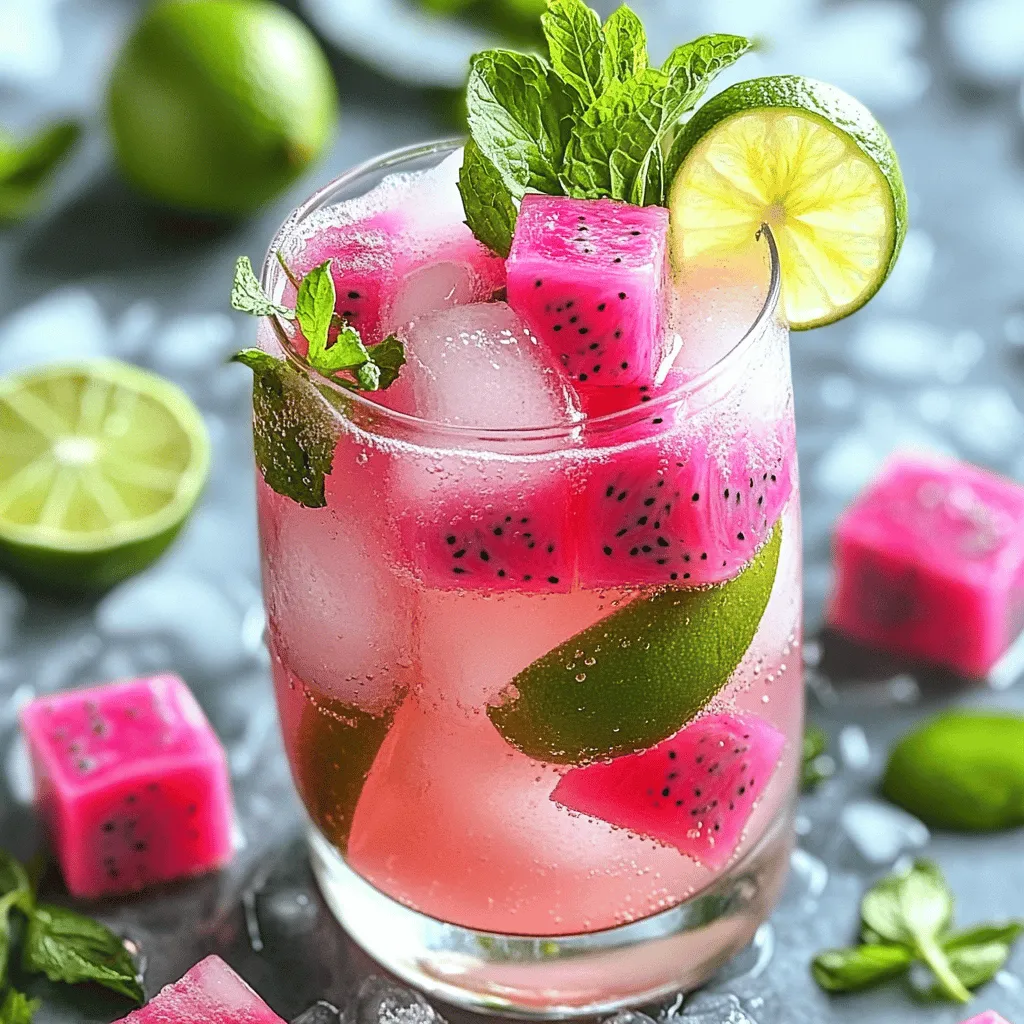
Looking for the perfect drink to cool you down this summer? The Dragon Fruit Lime Spritzer is a delightful choice! With its vibrant colors and refreshing flavors, this drink is sure to impress. You only need a few ingredients. In this post, I’ll show you how to make it step by step. Let’s dive into this tropical treat that will brighten your warm days!
Ingredients
Main Ingredients
– Ripe dragon fruit
– Fresh lime juice
– Sparkling water
Optional Ingredients
– Agave syrup or honey
– Fresh mint leaves
– Lime slices
Equipment Needed
– Mixing jug or large glass
– Muddler or sturdy spoon
– Ice cubes
Fresh ingredients make your Dragon Fruit Lime Spritzer shine. Use a ripe dragon fruit. Look for bright pink skin and a slight give when you press it. The flesh should be soft and sweet. Fresh lime juice adds bright flavor. Squeeze your limes just before using for the best taste.
Sparkling water gives the drink its refreshing fizz. You can use plain or flavored sparkling water. If you like a sweeter drink, consider adding agave syrup or honey. Fresh mint leaves and lime slices are great for garnish and add extra flavor.
You can prepare the spritzer in a mixing jug or large glass. A muddler or sturdy spoon helps mix the fruits and juices well. Ice cubes keep your drink chilly and enjoyable.
Step-by-Step Instructions
Preparing the Dragon Fruit
Slicing the fruit
To start, grab your ripe dragon fruit. Place it on a cutting board. Carefully slice it in half lengthwise. You’ll see the bright pink skin and white flesh inside.
Scooping and dicing
Using a spoon, scoop out the flesh. It should come out easily. Next, cut the flesh into small cubes. Aim for even pieces to mix well later.
Mixing the Ingredients
Combining dragon fruit, lime juice, and sweetener
In a mixing jug, add the diced dragon fruit. Pour in two tablespoons of fresh lime juice. Now, add one tablespoon of agave syrup for sweetness.
Muddling the mixture
Take a muddler or a sturdy spoon. Gently mash the mixture. This helps to release the juicy flavors from the fruit. Mix until it looks like a colorful blend.
Assembling the Spritzer
Adding ice cubes
Fill a glass halfway with ice cubes. This will keep your drink cold and refreshing.
Pouring in sparkling water
Slowly pour one cup of sparkling water over the ice and fruit blend. Be careful to preserve those lovely bubbles.
Stirring gently
With a spoon, stir the mixture gently. This helps combine all the ingredients without losing fizz.Enjoy your homemade Dragon Fruit Lime Spritzer!
Tips & Tricks
Achieving the Best Flavor
To make your Dragon Fruit Lime Spritzer truly shine, you can adjust the sweetness. If you prefer it sweeter, add more agave syrup or honey. Start with one tablespoon and taste as you go. This way, you control the sweetness level.
Next, enhance the lime flavor. Use fresh lime juice for the best taste. If you want a stronger lime kick, add a bit more juice. This extra tang makes the drink bright and refreshing.
Presentation Tips
Garnishing adds a fun touch. Fresh mint leaves bring a nice pop of color and aroma. Place a few leaves on top of your drink. It looks great and smells amazing!
Using creative glassware can also elevate your spritzer. Choose glasses that are tall and clear. This way, you can show off the beautiful pink color of the dragon fruit. You can even use mason jars for a casual vibe.
Making It Ahead of Time
You can prepare components in advance for easy serving. Dice the dragon fruit a few hours before. Keep it in the fridge to stay fresh.
For the best taste, mix the lime juice and sweetener right before serving. This keeps the flavors bright. Add the sparkling water just before you serve, to keep it fizzy.

Variations
Fruit Combinations
You can make your Dragon Fruit Lime Spritzer even more fun by adding other fruits. Try mango, pineapple, or kiwi. These fruits bring extra flavor and color. You can also mix berries for a tart twist. Just remember to choose fruits that complement dragon fruit’s mild taste. Experimenting with flavors is part of the fun!
Alternative Sweeteners
If you want to switch things up, try different sweeteners. Maple syrup or coconut sugar can add unique flavors. For a sugar-free option, use stevia or monk fruit. Adjust the amount based on your taste. Always remember to blend in the sweetener well, so it mixes evenly throughout your drink.
Non-Alcoholic vs. Alcoholic Versions
You can easily turn your spritzer into a cocktail. Add a splash of rum or vodka for a fun twist. If you prefer a mocktail, keep it as is. Both versions are refreshing and perfect for summer. Enjoy them at your next gathering or just for a cozy night in.
Storage Info
Best Practices for Storage
To keep your Dragon Fruit Lime Spritzer fresh, refrigerate any leftovers. Pour the spritzer into a sealed container. This helps keep the bubbles and flavors intact. For best results, consume within two days.
Store prepared ingredients separately. Keep diced dragon fruit and lime juice in airtight containers. This way, they stay fresh longer. You can mix them just before serving for the best flavor.
Shelf Life
How long can it stay fresh? The spritzer is best enjoyed within two days. After this, the sparkling water may lose its fizz.
Signs of spoilage include off-smells or changes in color. If you notice these signs, it’s best to discard the drink. Trust your senses; they guide you well in the kitchen.
Reusing Leftovers
What can you do with any leftover mixture? You can pour it over yogurt or mix into smoothies. It adds a fun twist and flavor.
Another idea is to use it in salad dressings. Blend the leftover spritzer with olive oil and a touch of vinegar for a zesty dressing. Get creative and enjoy your spritzer in new ways!
FAQs
What is dragon fruit and what does it taste like?
Dragon fruit, also called pitaya, is a striking fruit. It has bright pink skin and green scales. Inside, the flesh is white or red with tiny black seeds. The taste is mildly sweet, like a mix of kiwi and pear. The texture is soft and slightly crunchy due to the seeds. This unique flavor makes it a great addition to drinks and desserts.
Can I use bottled lime juice instead of fresh?
Yes, you can use bottled lime juice. However, fresh lime juice gives a brighter taste. Bottled juice often contains preservatives that can dull the flavor. Fresh juice has a lively zing that enhances the spritzer. If you want the best taste, go for fresh limes whenever possible.
How can I make this spritzer more fizzy?
To keep your spritzer fizzy, pour the sparkling water slowly. Try not to stir too much. Stirring can break the bubbles. You can also chill your sparkling water before mixing. This helps preserve the carbonation. Finally, serve the drink immediately after making it for the best fizz.
This blog post covered making a refreshing dragon fruit spritzer. We explored key ingredients, equipment, and step-by-step instructions to bring your drink to life. I shared tips for flavor, presentation, and storage. You can even try fun variations! A dragon fruit spritzer is a healthy, exciting drink for any occasion. With these easy steps, you can impress your friends and enjoy a tasty treat. Now grab your ingredients and get mixing!


![- 4 ripe peaches, sliced into wedges - 1 cup granulated sugar, divided - 1 teaspoon pure vanilla extract - 1 teaspoon ground cinnamon - 1 cup all-purpose flour - 1 tablespoon baking powder - 1/2 teaspoon sea salt - 1 cup whole milk - 1/2 cup unsalted butter, melted and slightly cooled - 1 teaspoon freshly squeezed lemon juice - Optional: Creamy vanilla ice cream for serving You need four ripe peaches for the base. They should be juicy for the best taste. Use one cup of granulated sugar, split in half. One half will sweeten the peaches, and the other half will go into the batter. You will also need one teaspoon each of pure vanilla extract and ground cinnamon for flavor. One cup of all-purpose flour and one tablespoon of baking powder will make the batter rise. Add half a teaspoon of sea salt to balance the sweetness. One cup of whole milk helps create a smooth batter. Lastly, you need half a cup of unsalted butter, melted, and one teaspoon of freshly squeezed lemon juice to brighten the flavor. You can make this dish even better by adding creamy vanilla ice cream when you serve it. The cold ice cream pairs well with the warm cobbler. If you want extra flavor, consider adding a pinch of nutmeg or using brown sugar instead of granulated sugar. These choices can add depth to your peach cobbler. Use the full recipe to explore all the possibilities! Start by gathering 4 ripe peaches. Slice them into wedges. Place the sliced peaches in a large mixing bowl. Add 1/2 cup of granulated sugar to the peaches. Pour in 1 teaspoon of pure vanilla extract. Sprinkle 1 teaspoon of ground cinnamon over the peaches. Squeeze in 1 teaspoon of freshly squeezed lemon juice. Gently toss the peaches until they are well-coated. Set this bowl aside for about 10 minutes. This waiting time allows the peaches to macerate and release their juices. In another bowl, add 1 cup of all-purpose flour. Measure 1 tablespoon of baking powder and add it to the flour. Next, sprinkle in 1/2 teaspoon of sea salt. Finally, add the remaining 1/2 cup of granulated sugar. Whisk these dry ingredients together until they are mixed well. This step ensures even flavor throughout the cobbler. Now, it’s time to mix the wet and dry ingredients. Gradually pour in 1 cup of whole milk into the dry mix. Stir gently until the batter is just combined. Be careful not to overmix; lumps are okay! Next, add 1/2 cup of melted and slightly cooled unsalted butter. Mix until the batter is smooth and free of lumps. Once done, pour the batter into a greased 9x13 inch baking dish. Spread it evenly across the bottom. Then, take your peach mixture and spoon it over the batter carefully. Do not stir. The peaches will sink while baking. Now you’re ready to bake your Easy Peach Cobbler. Check the [Full Recipe] for baking time and tips. To make the best peach cobbler, use ripe peaches. They should be soft to touch. Slice them evenly for a nice look. Mixing in sugar and cinnamon enhances the sweetness and flavor. Letting peaches sit for ten minutes helps them release juices. This makes the filling juicy and tasty. One mistake is overmixing the batter. This can make your cobbler tough. Another common issue is using unripe peaches. They won't have the same flavor. Don’t stir the peach mixture into the batter. This can ruin the layered look. Also, avoid opening the oven door too often. It can cause uneven baking. Always preheat your oven for even cooking. Use a greased baking dish to prevent sticking. Bake until the top is golden brown, checking with a toothpick. Let it cool for ten minutes before serving. This helps the flavors settle. For a treat, top with creamy vanilla ice cream. It adds a rich taste that pairs well with the cobbler. For the full recipe, check the previous sections. {{image_4}} You can swap peaches for other fruits. Try using fresh plums, cherries, or even berries. Each fruit brings its own taste. For example, blueberries add a sweet burst of flavor. Raspberries can give a nice tartness. The method stays the same; just change the fruit. This keeps your dessert fresh and fun! You can make this cobbler gluten-free easily. Just switch out the all-purpose flour for a gluten-free blend. Many brands offer great options that work well in baking. Check the mix for a good rise. You can also use almond flour for a nutty taste. The cobbler will still be delicious and warm. Toppings can make your cobbler even better. Consider adding a sprinkle of oats on top for crunch. You can also mix in nuts like pecans for added flavor. Drizzling honey over your serving can add a sweet touch. Want a dessert with flair? Top your cobbler with whipped cream or ice cream for a special treat. Each topping can change the whole experience! For the full recipe, check out the Peachy Dream Cobbler. To store leftover peach cobbler, let it cool completely. Once cooled, cover the dish tightly with plastic wrap or aluminum foil. You can also transfer it to an airtight container. This will keep it fresh for up to three days in the fridge. When you want to enjoy your cobbler again, preheat your oven to 350°F (175°C). Place the cobbler in an oven-safe dish. Cover it with foil to keep it moist. Heat for about 15-20 minutes, until it’s warm. You can also microwave it for about 30 seconds, but the oven gives a better texture. If you want to freeze peach cobbler, wrap it tightly in plastic wrap. Then, place it in a freezer bag. It can last up to three months in the freezer. To thaw, move it to the fridge overnight. Reheat it in the oven for the best taste. You can also bake it straight from frozen; just add a few extra minutes to the cooking time. Enjoy your peach cobbler again with these easy storage tips! The best peaches for cobbler are freestone peaches. They are sweet and juicy. Their flesh comes off the pit easily, making slicing simple. Yellow peaches work well too. They have a nice balance of sweet and tart flavors. For a unique twist, try ripe white peaches. They are sweeter and less acidic. Yes, you can prep your peach cobbler ahead. Prepare the peach filling and batter separately. Store each in the fridge for up to a day. When ready to bake, combine them and follow the baking steps. If you want to bake it later, just keep it covered. No, peeling peaches is not necessary. The skin adds texture and flavor. Many people enjoy the rustic look. If you prefer a smoother texture, you can peel them. It’s really up to your taste. To achieve a crispier crust, try these tips: - Use cold butter in the batter. - Don’t overmix the batter; lumps are fine. - Bake the cobbler in a preheated oven. - For extra crunch, sprinkle a little sugar on top before baking. You can serve Easy Peach Cobbler with: - Creamy vanilla ice cream - Fresh whipped cream - A drizzle of caramel sauce - A sprinkle of nuts for crunch Each option adds a new layer of flavor to your dessert! Enjoy it warm for the best taste. For the full recipe, check out the details above. In this blog post, we explored how to make an easy peach cobbler. We covered key ingredients, step-by-step prep, and helpful tips for success. We also discussed fun variations and smart storage methods. As you bake your cobbler, remember that fresh peaches shine. Enjoy personalizing your dish with other fruits too. Making peach cobbler can be fun and tasty. With practice, you’ll master this classic dessert.](https://fastmealmate.com/wp-content/uploads/2025/06/359a1da5-912a-4431-92dc-d72eb97db899-768x768.webp)

![- Salmon fillets - Sweet chili sauce - Jasmine rice - Mixed vegetables - Soy sauce - Sesame oil - Avocado - Green onions - Sesame seeds - Fresh cilantro (optional) - Baking sheet - Mixing bowl - Medium pot - Non-stick skillet In this Sweet Chili Salmon Bowl, you need fresh salmon fillets as the star. The sweet chili sauce adds a rich flavor that pairs well with the fish. Jasmine rice provides a soft base. Mixed vegetables add color and crunch to the bowl. For added flavor, include soy sauce and sesame oil. Sliced avocado gives a creamy touch. Green onions and sesame seeds serve as tasty garnishes. If you want, sprinkle fresh cilantro for a pop of freshness. To prepare this dish, you will need a few kitchen tools. Use a baking sheet to cook the salmon. A mixing bowl helps combine the marinade. Cook the rice in a medium pot. Lastly, a non-stick skillet is perfect for sautéing the vegetables. You can find the [Full Recipe] to follow these steps easily! With these ingredients and tools, you are set for a delicious meal. - Combine sweet chili sauce, soy sauce, and sesame oil in a bowl. - Place salmon fillets in the bowl and marinate for 15 minutes. Marinating the salmon gives it a rich flavor. The sweet chili sauce adds a nice sweetness. The soy sauce brings some saltiness, while sesame oil adds a nutty taste. This step is key for a tasty salmon bowl. - Bring vegetable broth or water to a boil in a pot. - Add jasmine rice and let it simmer until fluffy. Using vegetable broth adds extra flavor to the rice. Jasmine rice is fragrant and pairs well with the salmon. Once cooked, it should be light and fluffy. - Sauté mixed vegetables in a non-stick skillet. - Cook until they are tender yet crisp. I like to use bell peppers, snap peas, and carrots. These veggies add color and crunch. Sautéing keeps them bright and fresh, which balances the dish. - Preheat the oven to 400°F (200°C). - Bake marinated salmon for 12-15 minutes. Baking the salmon helps it stay moist. It should flake easily with a fork when done. This cooking method keeps the flavors intact. - Fluff the cooked rice and distribute it into bowls. - Top with vegetables, salmon, and avocado slices. Assembling the bowl is fun and creative. You can layer the ingredients however you prefer. The avocado adds creaminess, making every bite delicious. - Sprinkle green onions and sesame seeds on top. - Drizzle remaining marinade if desired. Adding garnishes makes the dish look pretty. Green onions bring a mild onion flavor, while sesame seeds add crunch. The extra marinade enhances the taste, so don’t skip this step! For the complete recipe, check out the Full Recipe. To get the best salmon, focus on the cooking temperature. Aim for 400°F (200°C) when baking. This heat cooks the fish evenly. It keeps the salmon moist and tender. Use a thermometer to check the internal temperature. It should reach 145°F (63°C) for safe eating. Next, look for flakiness to know when it is done. Gently press the salmon with a fork. If it flakes easily, it is ready. Don't overcook it, as this can make the salmon dry. To boost the taste, try different sauces. You can use teriyaki or garlic sauce instead of sweet chili. Each sauce adds a new twist to the dish. Also, add spices to the vegetables before sautéing. A pinch of garlic powder or ginger can elevate the flavor. This simple step makes your veggies pop. Pair your bowl with side salads or crispy wontons for crunch. This adds a nice texture balance. You can also serve it with extra avocado for creaminess. The creamy avocado complements the salmon well. It makes each bite even better. Feel free to explore the [Full Recipe] for more tips and ideas! {{image_4}} You can swap the salmon for chicken or tofu. Chicken works well with the sweet chili sauce. Marinate it just like you do the salmon. Tofu absorbs flavors nicely, making it a great option, too. You can also try different fish like trout or tilapia. Each fish will give your bowl a unique taste. Seasonal vegetables can really change your bowl. Think fresh corn in summer or pumpkin in fall. You can also add leafy greens like spinach or kale. Broccoli offers a nice crunch and pairs well with the sauce. Mix and match to keep it exciting! Want more kick? Try a spicy chili sauce instead of sweet chili sauce. This will give your bowl a bold flavor. You can also add citrus zest, like lime or lemon, for a fresh twist. These small changes can make a big difference in taste. For the full recipe, check out the details above! After you enjoy your Sweet Chili Salmon Bowl, store any leftovers in airtight containers. This keeps the food fresh and tasty. Place the containers in the fridge. Your meal will stay good for 2-3 days. Make sure to cool the food first before sealing it up. If you want to save your meal for longer, freezing is a great option. Freeze the cooked salmon separately to keep its quality. Salmon can lose its texture if frozen with rice and veggies. Store your rice and mixed vegetables in separate containers. This way, they stay fresh and tasty when you thaw them. When you're ready to eat, reheating is easy. You can use the microwave or stovetop for quick reheating. Just be careful not to overcook the salmon. Overcooking can make it dry and tough. Heat it gently to keep the flavor and texture intact. Enjoy your delicious meal again! Yes, you can prepare the ingredients in advance. Store each item separately in the fridge. This way, you save time when you are ready to cook. Just mix and heat everything when you want to eat. If you want a change, you can substitute jasmine rice with brown rice or quinoa. Both options are healthy and add a nice flavor. Quinoa is a great choice if you want extra protein. Absolutely! You can make this bowl spicy by adding fresh chili peppers or a dash of hot sauce. Adjust the heat to your liking. This adds a fun kick to the dish. To make the Sweet Chili Salmon Bowl healthier, reduce the amount of sauce you use. You can also add more veggies, like leafy greens or broccoli. This boosts nutrition and flavor. Yes, this bowl can be enjoyed cold too! It makes a refreshing salad dish. Just let it cool before serving. Enjoy it as a light meal on a warm day. For the full recipe, check out the detailed steps above. This guide showed how to make a tasty salmon bowl using sweet chili sauce and veggies. You learned about the key ingredients, tools, and steps. Remember, marinating the salmon and choosing the right veggies can boost flavor. Feel free to experiment with proteins and spices. Finally, you can store leftovers for quick meals later. Enjoy making this dish your own!](https://fastmealmate.com/wp-content/uploads/2025/07/c95c4cfe-a415-4c4e-8f12-f828502a92fe-768x768.webp)

![To make a classic Italian zucchini pasta casserole, you will need the following ingredients: - 3 medium zucchinis, sliced into thin, even rounds - 2 cups cooked pasta (choose your favorite like penne or fusilli) - 1 cup marinara sauce (preferably homemade or high-quality store-bought) - 1 cup creamy ricotta cheese - 1 cup shredded mozzarella cheese, plus extra for topping - 1/2 cup grated Parmesan cheese - 1 large egg, lightly beaten - 2 cloves garlic, minced - 1 teaspoon dried oregano - 1 teaspoon dried basil - Sea salt and freshly cracked black pepper, to taste - Olive oil, for drizzling and greasing - Fresh basil leaves, for garnish Each ingredient plays a key role in building flavor and texture. The zucchini adds a fresh crunch, while the pasta provides a hearty base. The cheeses bring creaminess and richness. Marinara sauce ties everything together with its robust flavor. When I make this dish, I focus on using fresh ingredients. It makes a big difference. Quality marinara or homemade sauce enhances the taste. I also love to mix different cheeses for added depth. You can switch up the cheeses based on your preference. Using good olive oil is essential for greasing the dish and drizzling on top. It adds a lovely finish. As for herbs, oregano and basil deliver classic Italian flavor. Feel free to personalize this recipe. Adjust the seasonings to suit your taste. This dish is forgiving, making it easy to put your spin on it. For the full recipe, check out the complete instructions. 1. Preheating the Oven and Sautéing Zucchini - First, set your oven to 375°F (190°C). This temperature works well for baking. - Next, grab a skillet and drizzle some olive oil into it. Heat it over medium heat. - Add the sliced zucchinis and minced garlic to the skillet. Sauté them for about 5-7 minutes. - Keep stirring until the zucchinis become soft and slightly golden. - Season with sea salt, black pepper, oregano, and basil. This adds a punch of flavor. - Once done, remove the skillet from the heat and let it cool for a few moments. 2. Mixing Ingredients for the Casserole - While the zucchini cools, take a large mixing bowl and combine the cooked pasta, marinara sauce, ricotta cheese, and the lightly beaten egg. - Add half of the mozzarella and half of the Parmesan cheese to the bowl. - Stir everything together until well mixed. This will create a creamy base. - Now, gently fold the sautéed zucchini into the pasta mixture. Make sure it blends without mashing the veggies. 1. Assembling the Casserole - Grease a 9x13 inch baking dish with olive oil. This keeps the casserole from sticking. - Pour the pasta and zucchini mixture into the greased dish. Spread it out evenly with a spatula. - To finish, sprinkle the remaining mozzarella and Parmesan on top. This creates a cheesy crust. 2. Baking and Best Practices - Cover the dish tightly with aluminum foil and place it in the preheated oven. - Bake for 20 minutes. This helps all the flavors mix well. - After 20 minutes, carefully take off the foil. Bake for another 10-15 minutes. Watch for the cheese to melt and turn golden brown. - Once it’s done, remove the casserole from the oven. Let it cool for a few minutes before serving. - For a lovely touch, garnish with fresh basil leaves. This adds color and flavor to your dish. For the complete recipe, refer to [Full Recipe]. - Seasoning Suggestions: I love using fresh herbs. Basil and oregano add a lovely taste. Don’t forget to season with sea salt and black pepper. These simple touches make a big difference. Consider adding a pinch of red pepper flakes for a bit of heat. - Achieving the Perfect Cheese Crust: To get that golden crust, use a mix of mozzarella and Parmesan on top. When you bake the casserole, keep it covered for the first part of cooking. This helps the cheese melt nicely. Uncover it towards the end to allow browning. - Sautéing Tips: When sautéing zucchini, cut it into thin, even rounds. This ensures even cooking. Don’t overcrowd the pan; this can lead to steaming instead of browning. Give them enough space to caramelize. - Alternative Pasta Cooking Methods: You can use different pasta shapes, like penne or fusilli. You don’t need to cook it all the way. Make it al dente, as it will cook more in the oven. This keeps the pasta from getting mushy in the casserole. Make sure to check out the Full Recipe for all the steps and details! {{image_4}} Different Cheese Options Cheese makes this dish rich and creamy. You can swap ricotta for cottage cheese if you like. For a sharper taste, use aged provolone or gouda. If you want a bit of tang, try feta cheese. Each cheese brings its unique flavor to the casserole. Meat Additions and Alternatives For meat lovers, ground beef or turkey can add protein. Cook the meat first and mix it with the pasta. If you prefer a lighter option, add cooked chicken or sausage. You can also use plant-based meats for a tasty, hearty dish. Gluten-Free Options To make this casserole gluten-free, choose gluten-free pasta. Many brands offer great options that hold up well in baking. Just check the package for cooking times to ensure perfect texture. Vegan Adaptations For a vegan version, swap all cheeses for cashew cream or tofu ricotta. You can also use a flax egg instead of the beaten egg for binding. Use your favorite marinara sauce that is dairy-free, and you’ll have a delicious vegan casserole. Experimenting with these swaps and modifications can make the Classic Italian Zucchini Pasta Casserole fit any diet or taste. For the full recipe, check out the details above. After enjoying your Classic Italian Zucchini Pasta Casserole, let’s talk storage. First, cool the casserole completely. This helps prevent condensation, which can make it soggy. Once cool, place leftovers in an airtight container. Store them in the fridge for up to three days. If you want to save it for longer, freezing works too. Cut the casserole into portions. Wrap each slice tightly in plastic wrap, then place them in a freezer-safe bag. This way, you can enjoy it for up to three months. When ready to enjoy your casserole again, reheating is key. The best method is using an oven. Preheat it to 350°F (175°C). Place the casserole in a baking dish and cover it with foil. Heat for 20-25 minutes. This helps keep the texture nice and creamy. If you’re in a hurry, a microwave works too. Use a microwave-safe plate and cover it with a damp paper towel. Heat in short bursts, stirring in between, until hot. This method may not keep the texture as good as the oven. For the best flavor and texture, always let it cool slightly before serving. Enjoy! Can I use other vegetables? Yes, you can use other veggies. Try bell peppers, spinach, or mushrooms. Just chop them small so they cook well. Mixing different vegetables adds flavor and color to your dish. How to make it ahead of time? You can make this casserole a day ahead. Just prepare it like normal, but do not bake it. Cover it and store it in the fridge. When ready, bake it as instructed, adding a few extra minutes if needed. What types of pasta work best? I love using penne or fusilli for this dish. Both types hold sauce well and stay firm while baking. You can also use gluten-free pasta if you prefer. How long can it be stored in the fridge? You can keep leftovers in the fridge for about three days. Make sure to cover it well. To reheat, just warm it in the oven or microwave until hot. Recommended Side Dishes Serve this casserole with a fresh salad or garlic bread. A simple mixed greens salad adds a crisp touch. Garlic bread brings a nice crunch and flavor. Pairing Wine with Casserole A light red wine like Chianti pairs well with this dish. It balances the flavors of the zucchini and cheese. If you prefer white, try a crisp Pinot Grigio. How to Garnish and Serve Garnish with fresh basil leaves for a pop of color. You can also sprinkle extra Parmesan on top before serving. This adds flavor and looks great on the table. For the full recipe, check the details above. Enjoy your cooking! In this blog post, we explored a delicious zucchini pasta casserole. We covered ingredients like zucchini, pasta, marinara, and various cheeses. You learned step-by-step instructions for preparation and baking. We included helpful tips for flavor and texture enhancement. You also discovered variations to suit different diets and preferences. In closing, this casserole is versatile and easy to make. Enjoy the cooking process and share it with loved ones.](https://fastmealmate.com/wp-content/uploads/2025/07/1e9eddde-dee0-4a9c-92bd-9b0350c13af8-768x768.webp)
