Are you ready to elevate your dessert game? In this easy step-by-step guide, I'll show you how to make a delicious Black Forest Cheesecake that is rich, creamy, and perfect for any occasion. With quality ingredients and simple instructions, this recipe will impress your friends and family. Let's dive in and create a stunning dessert everyone will love!
Why I Love This Recipe
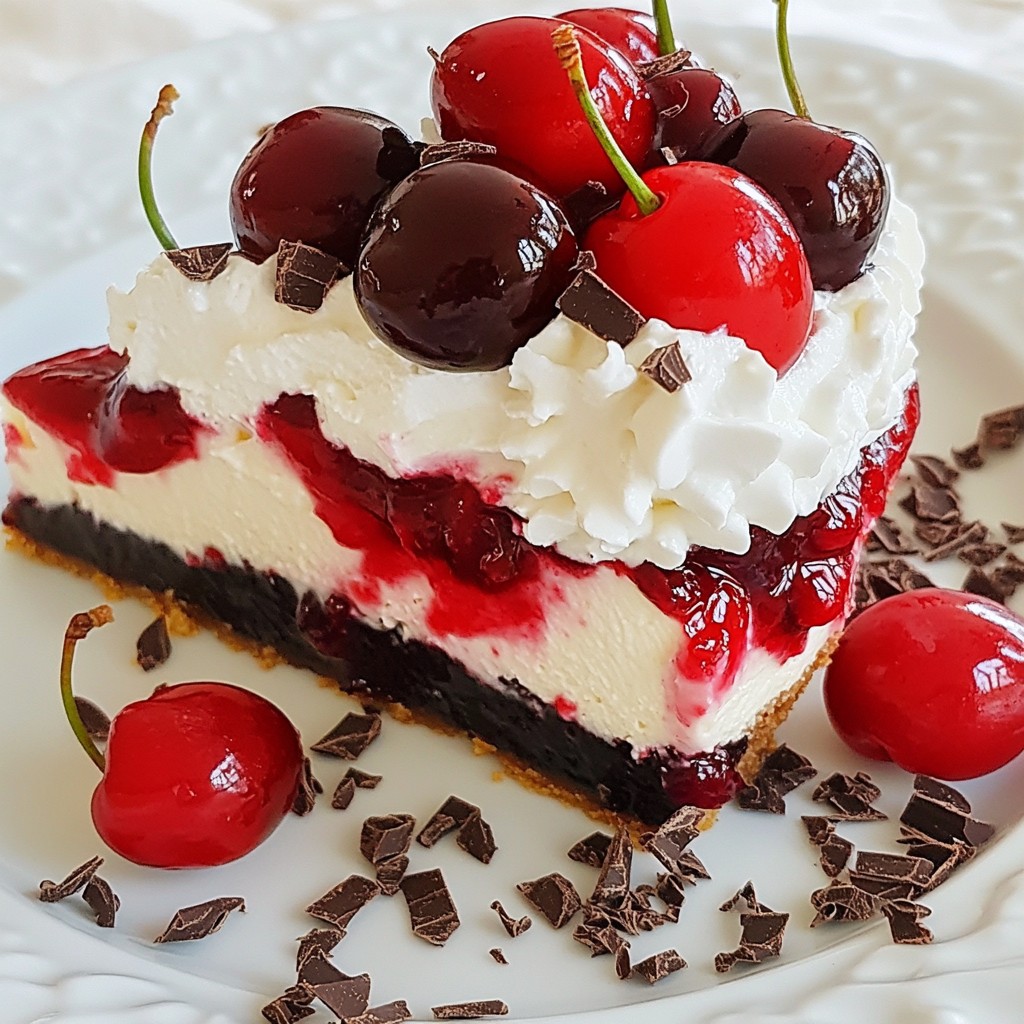
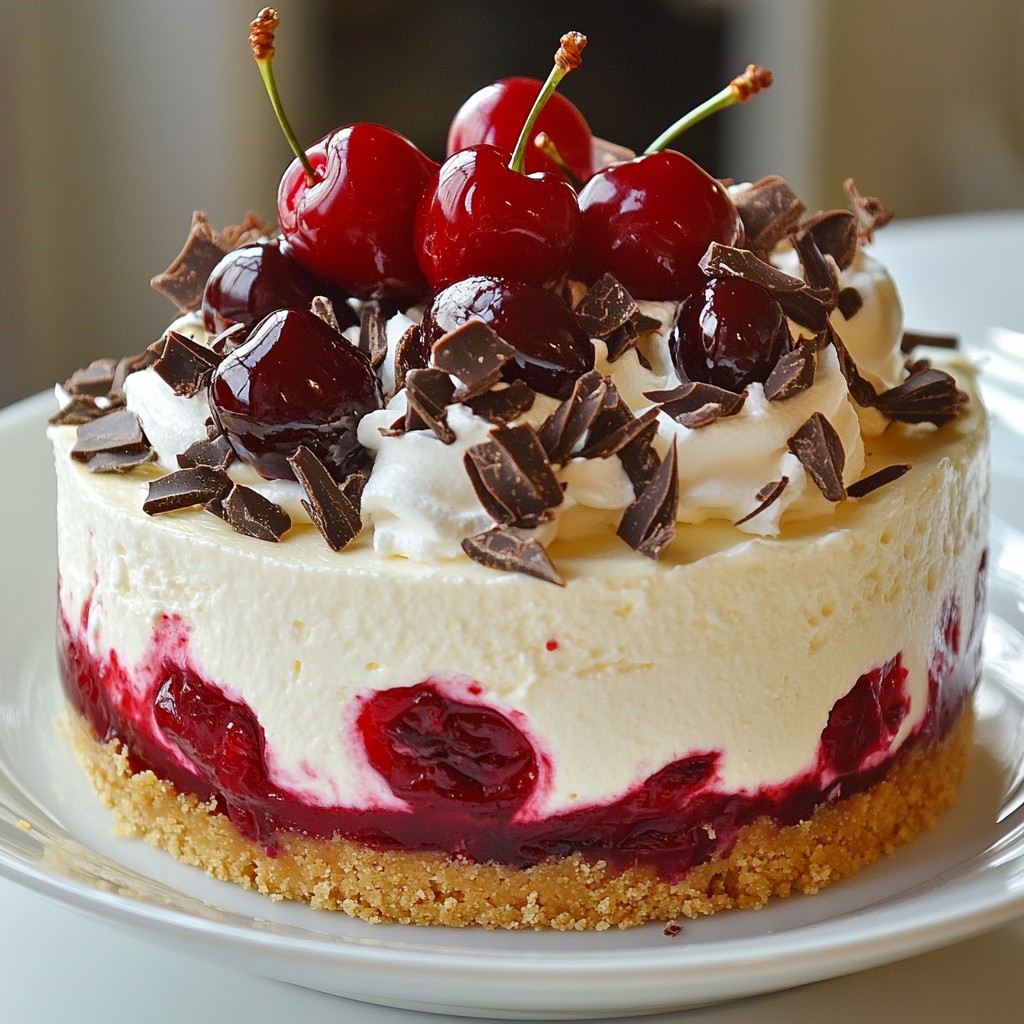
- Indulgent Flavor Combination: This cheesecake perfectly balances rich chocolate, tangy cherries, and creamy layers, creating a decadent dessert that satisfies all cravings.
- Elegant Presentation: The dark chocolate shavings and fresh cherries on top not only enhance flavor but also add a stunning visual appeal, making it perfect for special occasions.
- Versatile Serving Options: This cheesecake can be served as a show-stopping dessert at dinner parties or enjoyed as a special treat at home, making it a versatile addition to any dessert table.
- Make-Ahead Convenience: With a chilling time of at least 4 hours, this recipe allows you to prepare it in advance, freeing up time on the day of your event.
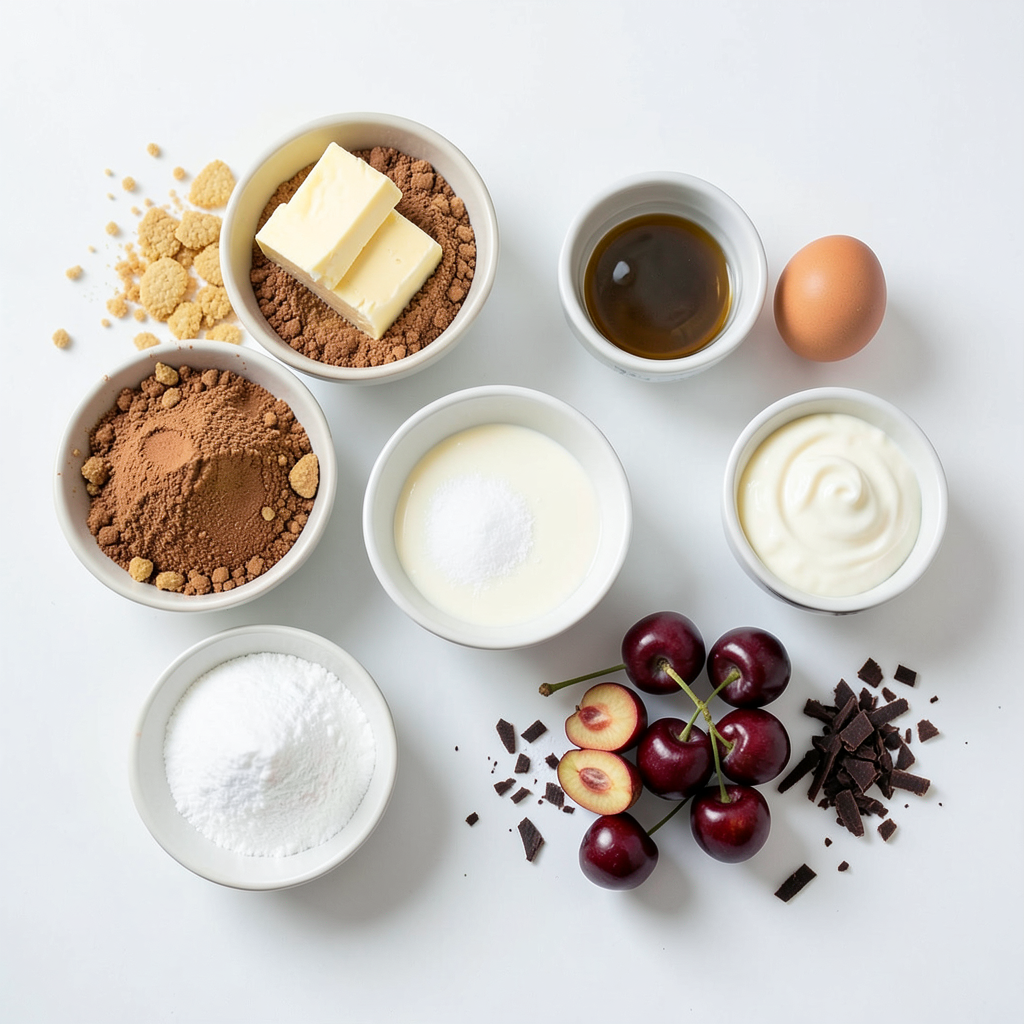
Ingredients
Essential Ingredients for Black Forest Cheesecake
To make a delicious Black Forest cheesecake, you need these key ingredients:
- 1 ½ cups graham cracker crumbs
- ½ cup unsweetened cocoa powder
- ½ cup granulated sugar
- ½ cup unsalted butter, melted
- 2 cups cream cheese, softened to room temperature
- 1 cup powdered sugar
- 1 teaspoon pure vanilla extract
- 3 large eggs, at room temperature
- 1 cup sour cream
- 1 cup heavy whipping cream (plus 2 tablespoons for frosting)
- ¼ cup cherry preserves
- 1 cup fresh cherries, pitted and halved
- Dark chocolate shavings, for garnish
These ingredients come together to create a rich, creamy dessert with layers of flavor. The graham cracker crumbs and cocoa powder form a tasty crust. The cream cheese adds creaminess, while the sour cream balances the sweetness.
Optional Garnishes and Toppings
You can elevate your cheesecake with some fun garnishes:
- Fresh mint leaves for a pop of color
- Extra cherry preserves drizzled on top
- More dark chocolate shavings
These optional toppings enhance the presentation and add extra flavors. Feel free to get creative!
Importance of Ingredient Quality
Using high-quality ingredients makes a big difference. Fresh cream cheese results in a smoother texture. Real vanilla extract gives a deeper flavor. Fresh cherries add vibrant taste and color. Always look for the best ingredients you can find to ensure your cheesecake shines.
Step-by-Step Instructions
Prepping the Springform Pan
Start by preheating your oven to 325°F (160°C). Take a 9-inch springform pan and grease it with unsalted butter. This step helps the cheesecake slide right out later. Set the pan aside as you prepare the crust.
Making the Cheesecake Crust
In a medium bowl, mix together 1 ½ cups graham cracker crumbs, ½ cup unsweetened cocoa powder, and ½ cup granulated sugar. Pour in ½ cup melted butter and stir until it looks like wet sand. Firmly press this mixture into the bottom of your prepared pan. Bake the crust for 10 minutes, then let it cool completely.
Preparing the Cheesecake Filling
In a large mixing bowl, beat 2 cups of softened cream cheese using an electric mixer. Add 1 cup of powdered sugar and 1 teaspoon of pure vanilla extract. Mix until smooth and creamy. Now, add 3 large eggs one at a time, blending well after each. Finally, fold in 1 cup of sour cream until your batter is smooth.
Assembling and Baking the Cheesecake
Pour half of the cheesecake batter over your cooled crust. Take ¼ cup of cherry preserves and dollop it over the batter. Use a knife to gently swirl the preserves into the batter. Pour the remaining batter on top and repeat the swirling with the rest of the cherry preserves. Bake the cheesecake for 50 to 60 minutes. It should be set at the edges but jiggle slightly in the center.
Cooling and Chilling Guidelines
Once baked, turn off the oven and crack the door open. Let the cheesecake cool in the oven for 1 hour. This helps prevent cracks on the surface. After that, move it to the refrigerator. Chill for at least 4 hours, or overnight for the best results.
Adding the Whipped Cream and Garnish
To make the topping, whip 1 cup of heavy cream with 2 tablespoons of cream until stiff peaks form. Spread this whipped cream over the top of your chilled cheesecake. Garnish with halved fresh cherries and sprinkle dark chocolate shavings on top. This adds a beautiful finish to your decadent dessert.
Tips & Tricks
Achieving the Perfect Cheesecake Texture
To get a smooth, creamy cheesecake, room temperature ingredients are key. Use softened cream cheese and eggs. This ensures they blend well without lumps. When you mix, do it gently. Over-mixing can add air and cause cracks. Bake until the edges are set, but the center should wiggle a bit. This slight jiggle indicates a creamy texture.
Common Mistakes to Avoid
One common mistake is not cooling the cheesecake properly. After baking, let it cool in the oven. This slow cooling helps prevent cracks. Another mistake is skipping the chilling time. Chilling overnight makes a big difference in flavor and texture. Also, don't open the oven door while baking. This can cause the cheesecake to sink.
Best Practices for Whipping Cream
For fluffy whipped cream, start with cold heavy cream. Use a clean bowl and beaters to avoid any grease. Whip the cream until stiff peaks form, but don’t over-whip. If you do, it may turn grainy. Add a little powdered sugar for sweetness. This helps stabilize the cream. Use it right away to top your cheesecake for the best results.
Pro Tips
- Room Temperature Ingredients: Ensure that your cream cheese and eggs are at room temperature before mixing. This helps create a smoother batter and prevents lumps in your cheesecake.
- Prevent Cracking: To avoid cracks on the surface of your cheesecake, bake it in a water bath. Wrap the bottom of the springform pan in aluminum foil and place it in a larger pan filled with hot water while baking.
- Flavor Variations: Experiment with different fruit preserves or chocolate swirls. Raspberry or strawberry preserves can give your cheesecake a delightful twist.
- Chill Overnight: For the best flavor and texture, chill your cheesecake overnight. This allows the flavors to meld and the cheesecake to set perfectly.
Variations
Chocolate Black Forest Cheesecake
You can add more chocolate to this recipe. Start with rich dark chocolate. Mix melted chocolate into the cream cheese filling. Use 1 cup of melted dark chocolate instead of cocoa powder. This makes a deeper chocolate flavor. Top it with chocolate shavings, too. You will have a dessert that is both rich and creamy.
Gluten-Free Option
To make this cheesecake gluten-free, use gluten-free graham crackers. Crush them the same way as regular ones. Check labels on sugar and cocoa powder to ensure they are gluten-free. Follow the rest of the recipe as is. You will end up with a delicious dessert for everyone to enjoy.
Vegan Black Forest Cheesecake
For a vegan version, swap cream cheese for vegan cream cheese. Use coconut cream in place of heavy cream. Replace eggs with flax eggs—mix 1 tablespoon of ground flaxseed with 2.5 tablespoons of water. Let it sit for five minutes. You can still have your cherry preserves and chocolate shavings. This version is tasty and fits a plant-based diet.
Storage Info
How to Properly Store Cheesecake
To keep your cheesecake fresh, always store it in the fridge. Use a cake box or cover it well with plastic wrap. This protects it from drying out or absorbing other smells. Make sure to keep it on a flat surface to avoid any damage. If you slice a piece, cover the exposed part to maintain its taste and texture.
Freezing Instructions
You can freeze cheesecake for later enjoyment. First, let it cool completely in the fridge. Once chilled, wrap it in plastic wrap tightly. Then, place it in an airtight container or a freezer bag. This method helps avoid freezer burn. You can freeze it for up to three months. When you want to eat, let it thaw in the fridge overnight.
Shelf Life and Reheating Tips
Cheesecake lasts about 5 to 7 days in the fridge. If you notice any off smells or changes in texture, it’s best to toss it. For reheating, place individual slices in the microwave for about 10-15 seconds. This warms it slightly without cooking it further. Enjoy your decadent black forest cheesecake cold or at room temperature!
FAQs
Can I make this cheesecake in advance?
Yes, you can make this cheesecake a day early. It tastes even better after chilling. Make sure to cover it well with plastic wrap. This keeps it fresh and tasty.
How do I know when my cheesecake is done baking?
Your cheesecake is done when the edges are set. The center should still jiggle a bit. This jiggle means it will be creamy and smooth.
What can I substitute for sour cream?
If you don’t have sour cream, use plain Greek yogurt. It has a similar tangy taste and texture. You can also use cream cheese mixed with a bit of milk.
Is it necessary to use a springform pan?
It’s best to use a springform pan. This type of pan makes it easy to remove the cheesecake. The sides come off, so you avoid breaking it. If you don't have one, you can use a regular pan, but it might be harder to serve.
Can I use frozen cherries instead of fresh?
Yes, frozen cherries work well too! Just make sure to thaw and drain them first. This helps keep your cheesecake from getting too watery. They will still add great flavor and color.
You learned how to make a great Black Forest Cheesecake. We covered key ingredients, step-by-step instructions, and helpful tips. I shared delicious variations like gluten-free and vegan options. Remember, using quality ingredients is key for taste. Store your cheesecake properly to keep it fresh. With practice, you will avoid common mistakes. Now, get ready to impress with your baking skills! Enjoy your cheesecake journey!