Crockpot Garlic Parmesan Chicken & Potatoes Delight

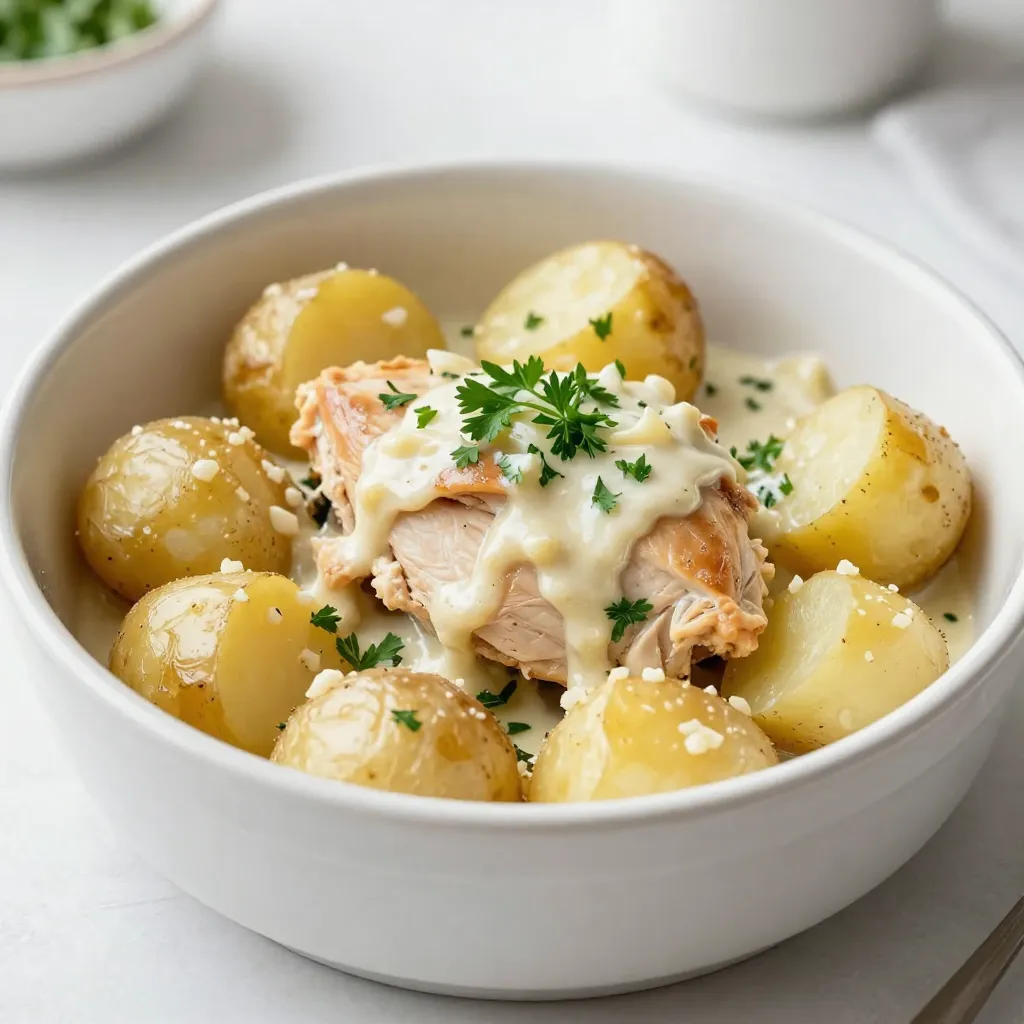
If you’re craving a comforting meal that’s simple to make, you’ll love this Crockpot Garlic Parmesan Chicken & Potatoes Delight. This dish combines tender chicken, creamy Parmesan sauce, and baby potatoes into one flavorful meal. With just a few ingredients and the magic of your crockpot, you can serve up comfort food without the fuss. Let’s dive into this easy recipe that will wow your family at dinner!
Why I Love This Recipe
- Easy Preparation: This recipe requires minimal prep work, making it perfect for busy days when you want a comforting meal with less effort.
- Flavor Packed: The combination of garlic, Parmesan, and Italian seasoning creates a rich and delicious sauce that infuses the chicken and potatoes with amazing flavor.
- One-Pot Wonder: Cooking everything in the crockpot means less cleanup and more time to relax while your meal cooks to perfection.
- Customizable: You can easily swap out the vegetables or add your favorite herbs, allowing you to tailor the dish to your personal taste.
Ingredients
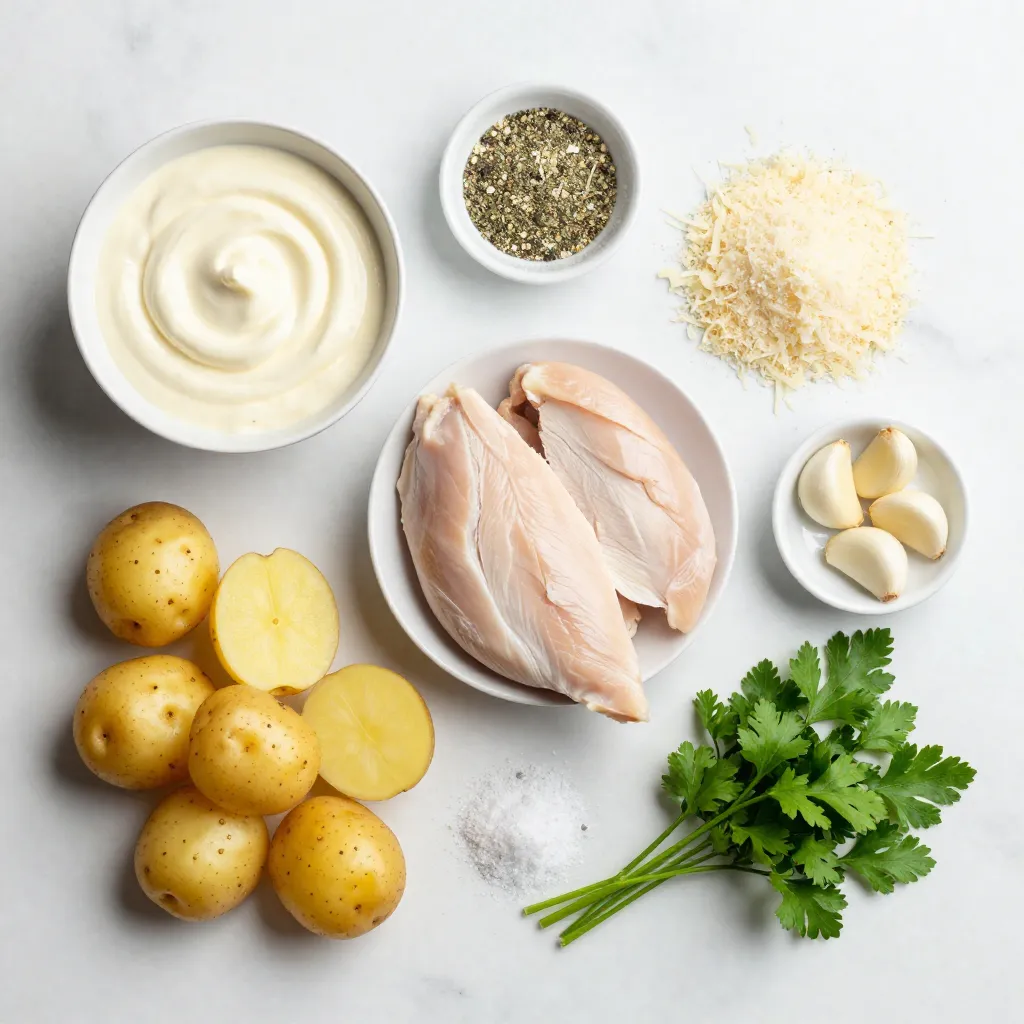
Here’s what you need for Crockpot Garlic Parmesan Chicken & Potatoes:
– Chicken: 4 boneless, skinless chicken breasts
– Baby Potatoes: 1 lb, halved
– Sauce Components: 1 cup heavy cream, 1 cup grated Parmesan cheese
– Seasoning: 5 cloves garlic, minced, 1 teaspoon Italian seasoning, 1 teaspoon onion powder, ½ teaspoon black pepper, salt to taste
– Garnish: 2 tablespoons fresh parsley, chopped
These ingredients create a creamy and rich dish. The chicken stays tender, while the potatoes soak up the flavor. The garlic and Parmesan add a nice touch. Each bite is full of taste.

Step-by-Step Instructions
Preparation Steps
– Rinse and halve baby potatoes.
– Season chicken breasts with salt and pepper.
First, wash the baby potatoes under cool water. This removes any dirt or grit. Then, cut each potato in half. The halves should be similar in size for even cooking.
Next, take your chicken breasts and pat them dry. This helps the seasoning stick. Sprinkle salt and pepper on both sides. This simple step adds a lot of flavor.
Layering in the Crockpot
– Arrange halved potatoes at the bottom.
– Place seasoned chicken on top.
Now it’s time to layer! Place the halved potatoes evenly at the bottom of your crockpot. This creates a nice base. Next, lay the seasoned chicken breasts on top of the potatoes. Make sure they are in a single layer. This helps the chicken cook evenly.
Making the Sauce
– Whisk together heavy cream, Parmesan, garlic, Italian seasoning, and onion powder.
In a mixing bowl, whisk together the heavy cream and grated Parmesan cheese. Add in the minced garlic, Italian seasoning, and onion powder. Mix until the sauce is smooth. This creamy sauce will add richness to the dish.
Cooking Process
– Pour sauce over chicken and potatoes.
– Set crockpot to low for 6-7 hours or high for 3-4 hours.
Carefully pour the garlic Parmesan sauce over the chicken and potatoes. Make sure everything is coated well. Now, secure the lid on the crockpot. Set it to low for 6-7 hours or high for 3-4 hours. The chicken will be tender, and the potatoes will be soft.
Finishing Touches
– Stir mixture after cooking.
– Garnish with fresh parsley before serving.
Once cooking time is up, gently stir everything together. This helps all the flavors mix well. To add color and freshness, sprinkle chopped parsley on top right before serving. Enjoy your meal!
Tips & Tricks
Enhancing Flavor
To boost the taste, you can switch up the seasonings. Try adding smoked paprika for a smoky kick. You can also mix in some fresh herbs like thyme or rosemary for a fresh touch. For creaminess, don’t skimp on the heavy cream. You can add a little more if you like it richer. Mixing in a splash of lemon juice at the end can brighten the dish.
Cooking Tips
Crockpot cooking is simple but needs care. Make sure to layer your ingredients well. Place potatoes at the bottom; they take longer to cook. Always check for doneness. Chicken should read 165°F on a meat thermometer. Potatoes should pierce easily with a fork. If they are not done, let them cook a bit longer with the lid on.
Serving Suggestions
For sides, steamed green beans or a fresh salad pair well with this dish. The bright colors make a good contrast and add freshness. To present your meal nicely, use a large serving platter. Spoon the chicken and potatoes in the center and sprinkle with parsley. This adds color and makes it look gourmet. Enjoy your meal with a nice piece of crusty bread to soak up the tasty sauce!
Pro Tips
- Tip Title: Properly Season Your Chicken: Ensure you season your chicken breasts thoroughly with salt and pepper to enhance the overall flavor of the dish.
- Tip Title: Use Fresh Garlic: Freshly minced garlic will provide a stronger and fresher flavor compared to pre-minced or powdered garlic.
- Tip Title: Adjust Cooking Time: Check the internal temperature of the chicken; it should reach 165°F for optimal safety and tenderness.
- Tip Title: Add Vegetables: Consider adding vegetables like spinach or bell peppers during the last hour of cooking for extra flavor and nutrition.
Variations
Vegetarian Option
You can easily switch this dish to a vegetarian delight. Substitute the chicken with tofu or mushrooms. Tofu works great when it’s pressed and cubed. Mushrooms add a rich, earthy flavor. Both options soak up the tasty sauce well. This keeps the creamy texture while making it plant-based.
Different Flavor Profiles
Want to spice things up? Add paprika or cayenne pepper for some heat. A teaspoon of either will transform the dish. You can also mix in vegetables like carrots or green beans. These veggies not only add color but also boost nutrition. Just chop them into bite-sized pieces for even cooking.
Dietary Alternatives
If you need gluten-free options, use cornstarch in the sauce. This thickens it without any wheat ingredients. For a dairy-free version, swap heavy cream with coconut milk. Use nutritional yeast instead of Parmesan for a cheesy flavor. These simple changes make the dish fit various diets while keeping it delicious.
Storage Info
Refrigeration
To store leftovers safely, let the dish cool first. Place it in an airtight container. Make sure to keep it in the fridge. It will stay fresh for about 3 to 4 days. When you reheat it, make sure it is hot all the way through. This keeps the flavors great and ensures food safety.
Freezing Instructions
For freezing, let the dish cool completely before packing. Use a freezer-safe container or bag. This way, it can last for up to 3 months. When you want to eat it, take it out of the freezer and place it in the fridge overnight. This helps it thaw slowly. To reheat, warm it in a pot on the stove or in the microwave. Make sure it is hot all the way through to enjoy it fully.
FAQs
How long does it take to cook Crockpot Garlic Parmesan Chicken & Potatoes?
It takes about 6 to 7 hours on low heat or 3 to 4 hours on high heat. The chicken should be fully cooked, and the potatoes should be tender. Use a fork to check the doneness of the potatoes; they should pierce easily. This long cook time allows the flavors to meld and the chicken to become juicy.
Can I use frozen chicken?
Yes, you can use frozen chicken in this recipe. Just note that cooking time may increase. If you use frozen chicken, cook it on high heat for around 4 to 5 hours. Ensure the chicken reaches an internal temperature of 165°F for safety.
What can I serve with this dish?
This dish pairs well with many sides. Here are some great options:
– Steamed broccoli
– Garlic bread
– Crisp green salad
– Roasted vegetables
These sides balance the creamy chicken and potatoes well.
Can I make this recipe ahead of time?
You can prepare the ingredients ahead of time. Cut the potatoes and season the chicken the night before. Store them in the fridge. When you are ready, layer them in the crockpot. Set the timer, and let it cook. This makes dinner easy and stress-free.
In this article, we explored a simple, tasty recipe for Crockpot Garlic Parmesan Chicken and Potatoes. You learned about the key ingredients, easy steps, and tips for enhancing flavor. The cooking process takes just a few minutes of prep, with delicious results after hours in the crockpot. Whether you choose a vegetarian option or make adaptations for dietary needs, this dish is flexible. It’s perfect for busy nights and leftovers. Enjoy this meal with friends and family to create happy moments around the tabl

Crockpot Garlic Parmesan Chicken & Potatoes
Ingredients
- 4 pieces boneless, skinless chicken breasts
- 1 lb baby potatoes, halved
- 1 cup heavy cream
- 1 cup grated Parmesan cheese
- 5 cloves garlic, minced
- 1 teaspoon Italian seasoning
- 1 teaspoon onion powder
- 0.5 teaspoon black pepper
- to taste salt
- 2 tablespoons fresh parsley, chopped (for garnish)
Instructions
- Prepare Ingredients: Start by rinsing the baby potatoes under cool water and then slicing them in half. Pat your chicken breasts dry with paper towels, and season both sides generously with salt and black pepper for optimal flavor.
- Layer the Crockpot: Arrange the halved baby potatoes evenly at the bottom of the crockpot to form a sturdy base. Next, place the seasoned chicken breasts on top of the potatoes in a single layer.
- Make the Garlic Parmesan Sauce: In a mixing bowl, whisk together the heavy cream, grated Parmesan cheese, minced garlic, Italian seasoning, and onion powder until the mixture is smooth and all ingredients are thoroughly combined.
- Combine and Cook: Carefully pour the garlic Parmesan sauce over the chicken and potatoes in the crockpot. Use a spatula to ensure everything is evenly coated in the sauce. Place the lid securely on the crockpot.
- Cook: Set your crockpot to low heat and cook for 6-7 hours, or on high heat for 3-4 hours. The chicken should be fully cooked, and the potatoes should be tender when pierced with a fork.
- Finish and Serve: Once cooking is complete, gently stir the mixture to meld the flavors together. To enhance the dish's freshness and color, sprinkle freshly chopped parsley on top right before serving.
- Enjoy: Dish out the creamy chicken and potatoes while they are still warm. You can serve this delightful meal straight from the crockpot for a rustic feel or plate it elegantly to impress your guests.


![- 1 cup grated zucchini - ½ cup unsweetened applesauce - ½ cup brown sugar - ¼ cup white sugar The main ingredients in these brownies are simple and nutritious. Zucchini adds moisture and keeps the brownies soft. The applesauce replaces some fat while adding sweetness. Using both brown and white sugar gives the brownies a rich flavor and a nice texture. - ⅓ cup vegetable oil or melted coconut oil - 2 large eggs - 1 teaspoon vanilla extract - 1 cup all-purpose flour - ⅓ cup unsweetened cocoa powder - ½ teaspoon baking soda - ¼ teaspoon baking powder - ¼ teaspoon salt - ½ cup chocolate chips - Optional: ¼ cup chopped nuts (e.g., walnuts or pecans) The additional ingredients help create a great structure in the brownies. The oil keeps them moist, while the eggs bind everything together. Flour and cocoa powder provide the base, giving that rich, chocolate flavor. Baking soda and baking powder help the brownies rise. The chocolate chips melt into sweet pockets of goodness. If you like nuts, they add a nice crunch and flavor. You can find the complete list of ingredients in the Full Recipe section for more details on how to get started. - Preheat your oven to 350°F (175°C). - Prepare an 8x8 inch baking pan. You can grease it or line it with parchment paper. - In a large bowl, combine the wet ingredients. Mix grated zucchini, applesauce, brown sugar, white sugar, oil, eggs, and vanilla extract until well blended. - In another bowl, mix the dry ingredients. Whisk flour, cocoa powder, baking soda, baking powder, and salt together. - Now, add the dry mixture to the wet ingredients. Stir gently until just combined. Be careful not to overmix. - Pour the brownie batter into the prepared pan. Use a spatula to smooth the top. - Bake in the preheated oven for 25-30 minutes. Check for doneness by inserting a toothpick. It should come out with a few moist crumbs. - Let the brownies cool in the pan for about 10 minutes. Then transfer them to a wire rack to cool completely. You can find the full recipe in the earlier sections. Enjoy your delicious zucchini brownies! To make perfect zucchini brownies, focus on two key tips: - Avoid overmixing: Mix just enough until the dry and wet ingredients blend. Overmixing can make brownies tough. - Drain excess moisture from zucchini: Zucchini holds a lot of water. Grate it, then put it in a clean cloth. Squeeze out the extra moisture. This step helps achieve a fudgy texture. Baking these brownies is simple. Here are two tips to ensure the best results: - Check for doneness with a toothpick: Insert a toothpick into the center. If it comes out with moist crumbs, your brownies are done. If it comes out clean, they might be overbaked. - Cooling suggestions for optimal texture: After baking, let the brownies cool in the pan for about 10 minutes. Then, transfer them to a wire rack to cool completely. This cooling method helps keep the brownies soft and chewy. For more details, check the Full Recipe. {{image_4}} You can make these brownies gluten-free! Just swap regular flour for a gluten-free flour blend. This simple change works well without affecting taste. Look for blends that contain rice flour, almond flour, or coconut flour. These options hold moisture and keep the brownies soft. Want to mix it up? Try different types of chocolate in your brownies. You can use milk chocolate, dark chocolate, or even white chocolate. Each type adds its own unique taste. Adding spices like cinnamon or nutmeg can enhance the flavor too. A pinch of cinnamon gives warmth, while nutmeg adds a hint of sweetness. You can also add dried fruits or seeds for more texture. Try mixing in chopped nuts, like walnuts or pecans, for a nice crunch. Dried cherries or raisins can add a burst of sweetness. These additions make your brownies even more delightful and fun to eat. For the full recipe, check out the Chocolate Zucchini Brownies Full Recipe! To keep your zucchini brownies fresh, use an airtight container. This helps seal in moisture and flavor. Place them in the container after they cool down. You can store them at room temperature for up to four days. If you want them to last longer, keep them in the fridge. They can stay fresh for about a week in the fridge. Just make sure they are well-covered to avoid drying out. Freezing zucchini brownies is a great way to save some for later. First, let the brownies cool completely. Then, cut them into squares. Wrap each square in plastic wrap, and place them in a freezer bag. Make sure to remove as much air as possible from the bag. You can freeze them for up to three months. When you're ready to eat them, simply thaw them in the fridge overnight. This way, they will keep their great taste and soft texture. For the full recipe, check out the Chocolate Zucchini Brownies full recipe. Yes, you can use sugar substitutes. Common options are stevia, erythritol, or monk fruit. These substitutes can make your brownies lower in calories. However, they may change the taste and texture. Some might be sweeter, so adjust the amount. Always check the package for the right measurement. This way, your brownies will still taste great. To check if your brownies are done, look for a few signs. The edges will pull away from the pan. The top should look set and have a slight sheen. You can also use a toothpick. Insert it into the center of the brownies. If it comes out with a few moist crumbs, they are ready. If it has wet batter, bake a few more minutes. Yes, you can make these brownies vegan. Replace eggs with flax eggs or applesauce. Use 1 tablespoon of flaxseed meal mixed with 2.5 tablespoons of water for each egg. For dairy, substitute with plant-based milk or yogurt. You can also use coconut oil instead of butter. These swaps will keep the brownies moist and tasty. Each brownie has about 150 calories. They contain around 6 grams of fat and 20 grams of sugar. The exact numbers can change based on the ingredients used. For example, using less sugar or different oils can lower calories. Adding nuts can increase healthy fats and protein. Always check the recipe for detailed info. Zucchini brownies can last up to a week when stored properly. Keep them in an airtight container at room temperature. If you want them to last longer, freeze them. They can stay fresh in the freezer for up to three months. Just remember to wrap them well in plastic wrap or foil. For the complete recipe, check out the Chocolate Zucchini Brownies [Full Recipe]. Zucchini brownies blend health and taste. We covered key ingredients, easy steps, and tips. Think alternatives like gluten-free flour or added spices for fun flavors. Proper storage keeps them fresh, while freezing maintains taste and texture. With answers to common questions, you now have all you need for success. Try making these tasty brownies soon! You'll enjoy a delicious treat that also sneaks in some veggies.](https://fastmealmate.com/wp-content/uploads/2025/06/6955e8e8-deef-478f-bc92-a4114a14f9ca-768x768.webp)


![To make Greek Chickpea Cucumber Feta Salad, you will need: - 1 can (15 oz) chickpeas, thoroughly drained and rinsed - 1 medium cucumber, diced into bite-sized pieces - 1 cup cherry tomatoes, halved - 1/2 medium red onion, finely chopped - 1 cup feta cheese, crumbled - 1/4 cup Kalamata olives, pitted and halved - 1/4 cup fresh parsley, finely chopped - 3 tablespoons extra virgin olive oil - 2 tablespoons red wine vinegar (or substitute with apple cider vinegar) - 1 teaspoon dried oregano - Salt and freshly ground black pepper to taste You can swap out some ingredients based on what you have. No feta cheese? Use goat cheese or a dairy-free option. If you don’t like Kalamata olives, green olives work well too. For a crunchier salad, add bell peppers or radishes. You can also mix in some avocados for a creamy twist. Don't have red wine vinegar? Use lemon juice or apple cider vinegar instead. Fresh ingredients make this salad shine. When you use ripe tomatoes and crisp cucumbers, you enhance the flavor and texture. Fresh herbs like parsley brighten the dish. They add a pop of color and a burst of flavor. The quality of your olive oil matters too. A good extra virgin olive oil brings depth to the dressing. Using fresh produce not only boosts taste but also adds vital nutrients. Enjoying this salad means savoring the vibrant flavors of the Mediterranean. Start by gathering all your ingredients. You will need: - 1 can (15 oz) chickpeas, thoroughly drained and rinsed - 1 medium cucumber, diced into bite-sized pieces - 1 cup cherry tomatoes, halved - 1/2 medium red onion, finely chopped - 1 cup feta cheese, crumbled - 1/4 cup Kalamata olives, pitted and halved - 1/4 cup fresh parsley, finely chopped In a large mixing bowl, add the chickpeas, cucumber, cherry tomatoes, and red onion. Stir gently to mix everything well. Next, it’s time to add flavor and texture. Carefully fold in the crumbled feta cheese, Kalamata olives, and fresh parsley. Use a gentle hand to keep the feta intact. This adds creaminess to the salad. Now, let’s whip up the dressing. In a small bowl, combine: - 3 tablespoons extra virgin olive oil - 2 tablespoons red wine vinegar (or apple cider vinegar) - 1 teaspoon dried oregano - Salt and freshly ground black pepper to taste Whisk these ingredients together until the mixture is smooth and well blended. The dressing will enhance the salad's taste. Drizzle the dressing over the salad mixture in the large bowl. Using a gentle folding motion, toss everything together. You want all the ingredients to be nicely coated. Let the salad sit at room temperature for 10-15 minutes. This resting time allows the flavors to meld beautifully. For the full recipe, check the Mediterranean Chickpea Cucumber Feta Delight. To keep your Greek Chickpea Cucumber Feta Salad fresh, choose the best ingredients. Use ripe cherry tomatoes and crisp cucumbers. Look for bright green, firm cucumbers. Always rinse canned chickpeas well to remove any canning liquid. This step helps reduce sodium and enhances flavor. Store leftover salad in an airtight container in the fridge. This will help maintain its freshness for up to 2 days. Serve your salad at room temperature for the best taste. This allows the flavors to shine. If you store it in the fridge, take it out about 20 minutes before serving. Letting it warm slightly helps enhance the taste and makes for a more enjoyable meal. To boost the flavor of your salad, try adding fresh herbs. Basil or mint can add a nice twist. A squeeze of fresh lemon juice can brighten the dish even more. For a spicy kick, add a pinch of red pepper flakes. Mixing in different olives can also create a unique taste. If you want to change the dressing, add a touch of honey or Dijon mustard for extra depth. These small changes can make your salad even more exciting. For the full recipe, check out the Mediterranean Chickpea Cucumber Feta Delight. {{image_4}} You can easily boost the protein in your Greek chickpea cucumber feta salad. Grilled chicken, shrimp, or even tofu work well. Just cut them into bite-sized pieces. Mix them in with the chickpeas. This adds flavor and makes the salad more filling. If you want a vegan version, swap the feta cheese for avocado or a plant-based cheese. Avocado gives a creamy texture and healthy fats. You can also add hemp seeds for more protein. This keeps the salad fresh and tasty without any animal products. Feel free to change up the ingredients based on the season. In spring, add fresh radishes for a crunchy bite. In summer, diced bell peppers add sweetness. In fall, try roasted butternut squash for warmth. Each swap keeps your salad exciting and full of flavor. Explore the [Full Recipe] for more ideas on how to make this dish your own! To keep your Greek chickpea cucumber feta salad fresh, store it in an airtight container. This will help keep the flavors strong and the ingredients crisp. If you have leftovers, it’s best to separate the dressing from the salad. This way, the salad won’t get soggy. Just toss the dressing in when you’re ready to enjoy it again. When stored properly, the salad lasts about 3 to 5 days in the fridge. The chickpeas and feta cheese hold up well. However, the cucumber and tomatoes start to lose their crunch after a couple of days. Make sure to check for any signs of spoilage, like a funky smell or slimy texture. I do not recommend freezing this salad. The textures change, and the fresh ingredients do not thaw well. If you want to prep ahead, consider freezing the chickpeas separately. They can last up to 3 months in the freezer. Just thaw them in the fridge overnight before mixing them back into your salad. For the best taste, always enjoy your salad fresh! For the full recipe, refer back to the Mediterranean Chickpea Cucumber Feta Delight. Yes, you can make this salad the night before. Just keep it in the fridge. The flavors will blend well overnight. However, the salad may lose some crunch. To keep it fresh, add the cucumber and feta just before serving. If you don’t have feta, try using goat cheese or ricotta. Both options bring a creamy taste. You can also use a dairy-free cheese for a vegan twist. Just choose a cheese that crumbles well to mimic feta. To spice up your salad, add chopped jalapeños or red pepper flakes. You can also mix in a spicy dressing. Try adding a dash of hot sauce to the olive oil and vinegar mix. This will give your salad a nice kick. Yes, this salad is gluten-free! All the ingredients are naturally free of gluten. Chickpeas, cucumber, tomatoes, and feta are all safe for a gluten-free diet. It's a great choice for those with gluten sensitivity. Enjoy this fresh and tasty salad without worry. In this blog post, I covered the core ingredients and their importance. We explored how to prepare, mix, and dress the salad. I also shared tips for freshness and serving. You learned about different variations to suit your taste and how to store your salad properly. Eating fresh, tasty food is fun and easy. Enjoy your Greek Chickpea Cucumber Feta Salad, and don’t be afraid to experiment with new flavors!](https://fastmealmate.com/wp-content/uploads/2025/07/24431354-d8c0-436c-9845-ce85b88e9160-768x768.webp)
