Crispy Chicken Wonton Tacos Flavorful and Easy Meal

Looking for a fun and tasty meal? Crispy Chicken Wonton Tacos are your answer! These crunchy bites blend juicy chicken with fresh veggies, all wrapped in crispy wonton skins. In this post, I’ll show you how to make this easy and flavorful dish that’s perfect for dinner or a snack. Let’s dive into the delicious world of wonton tacos together!
Why I Love This Recipe
- Crispy Texture: These wonton tacos are fried to perfection, offering a satisfying crunch that contrasts beautifully with the tender chicken filling.
- Flavor Packed: The combination of garlic, ginger, and soy sauce infuses the chicken with a rich flavor, making each bite a delightful experience.
- Customizable Filling: You can easily adapt the filling to include your favorite vegetables or spices, creating a taco that suits your taste preferences.
- Fun to Make: Assembling these tacos is a fun activity, perfect for cooking with family or friends, making it a great interactive meal option.
Ingredients
Main Ingredients
– 1 pound ground chicken
– Wonton wrappers
– 1 cup shredded green cabbage
– 1/2 cup shredded carrots
Condiments and Seasonings
– Soy sauce
– Sesame oil
– Fresh ginger
– Garlic
Additional Garnishes
– Fresh cilantro leaves
– Lime wedges
– Salt and freshly ground pepper
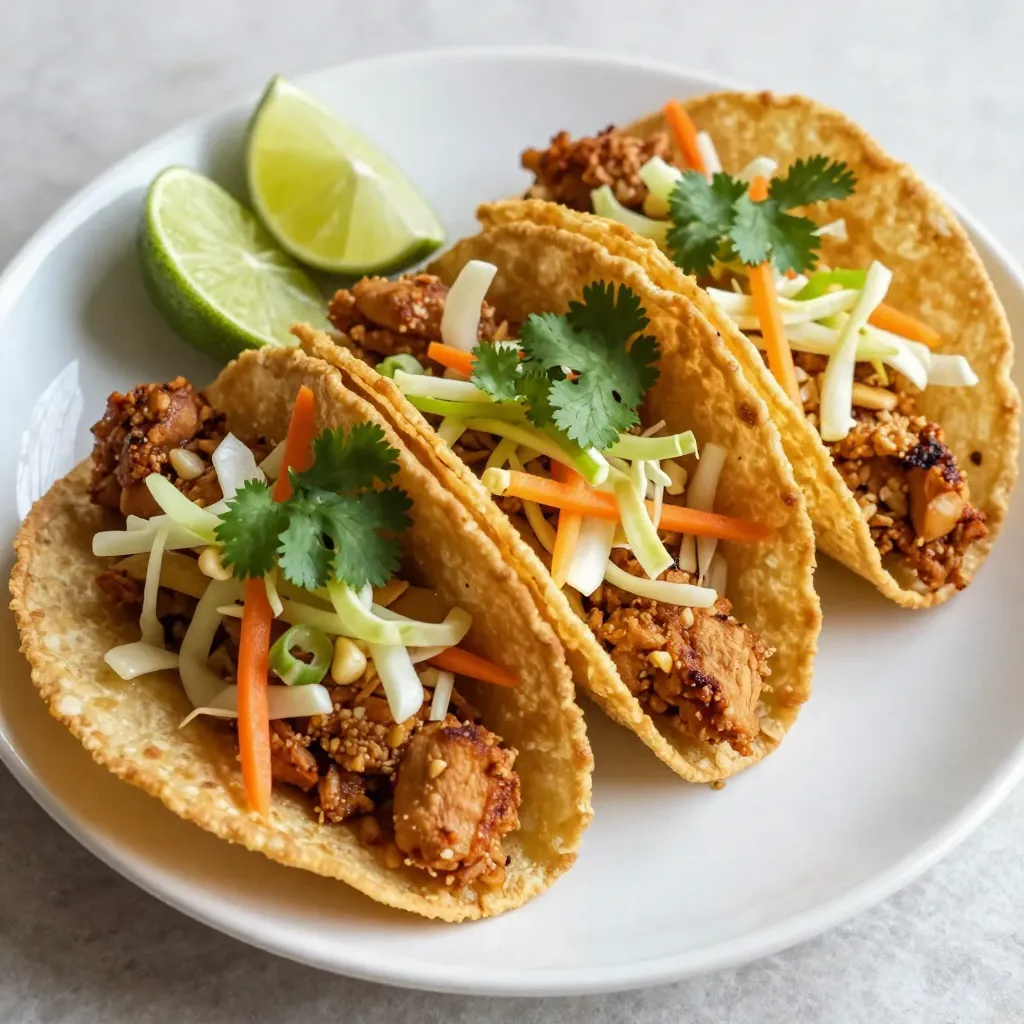
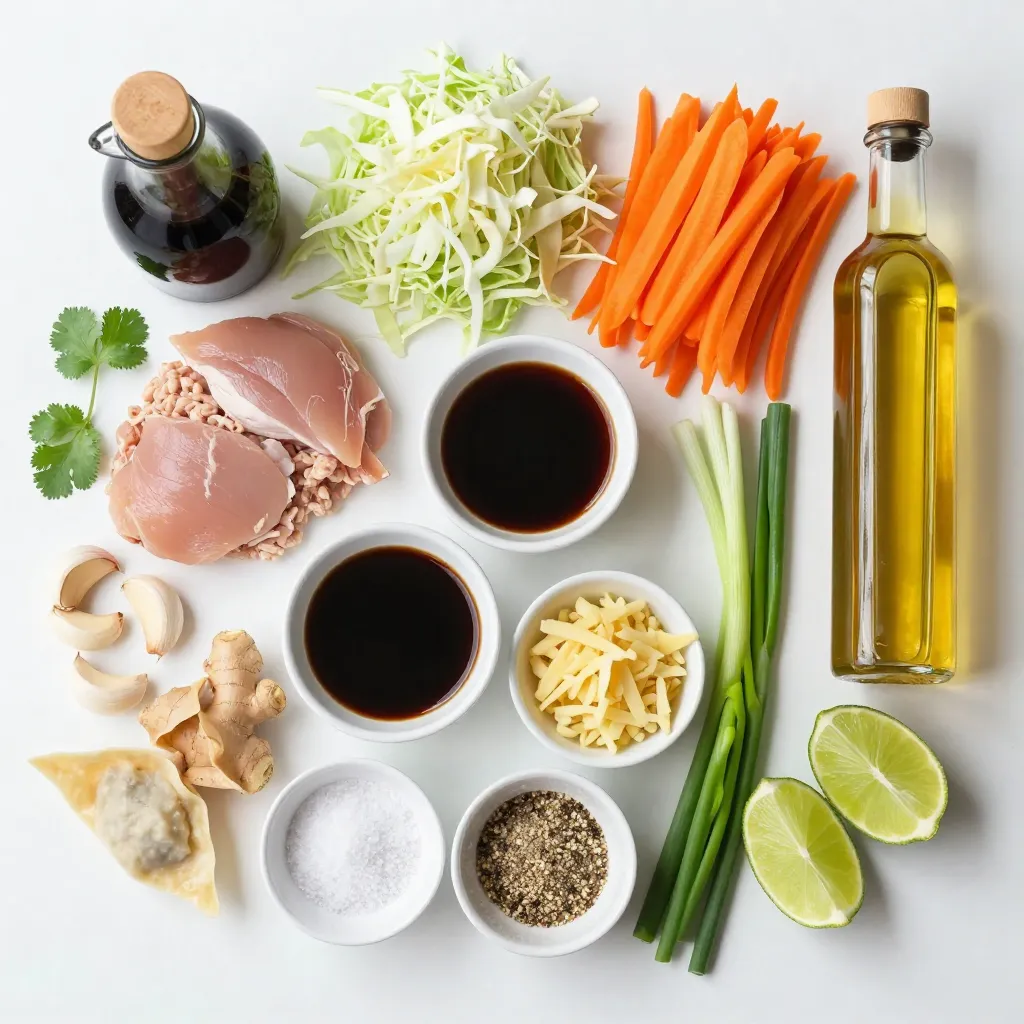
Gather these ingredients to make crispy chicken wonton tacos. You need ground chicken for the filling. Wonton wrappers give you that crunchy shell. Shredded green cabbage and carrots add freshness and color.
For flavor, soy sauce and sesame oil bring richness. Fresh ginger and garlic add a nice kick. Don’t forget to season with salt and pepper. When serving, fresh cilantro and lime wedges brighten the dish.
These ingredients come together to create a tasty meal. The crispy texture and savory filling make each bite enjoyable. Plus, the bright garnishes enhance the plate’s look and taste. You can also mix in your favorite veggies or spices for a unique twist.

Step-by-Step Instructions
Preparing the Chicken Filling
First, heat sesame oil in a medium skillet over medium heat. When the oil shimmers, add minced garlic and grated ginger. Sauté them for about 1 minute until they smell great. Next, increase the heat slightly and add ground chicken. Break up the meat with a spatula as it cooks. Cook it until browned and no longer pink, about 5-7 minutes. Once cooked, stir in soy sauce, salt, and freshly ground pepper for seasoning. Add shredded cabbage, shredded carrots, and sliced green onions. Cook everything for another 2-3 minutes until the veggies soften. Remove the skillet from heat and let the filling cool a bit.
Combining Ingredients
After the filling cools, it’s time to mix in the veggies and seasonings. This step adds extra flavor and nutrients to your tacos. Stir well to ensure every bite is tasty. Allow the filling to cool down completely before assembling the tacos. This makes the wrapping easier and prevents soggy wrappers.
Assembling Wonton Tacos
Now, prepare your wonton wrappers. Take one wrapper and place about 1 tablespoon of the chicken filling in the center. Moisten the edges of the wrapper with a few drops of water. Fold it over to create a taco shape. Use your fingers to press and crimp the edges firmly to seal. Make sure it’s secure to avoid spilling during frying. Repeat this until you fill all the wrappers.
Frying the Tacos
Next, heat oil in a pot or deep skillet over medium-high heat until it reaches about 350°F (175°C). Carefully place a few wonton tacos in the hot oil. Fry them for about 2-3 minutes on each side until they turn crisp and golden brown. Use a slotted spoon to remove the tacos from the oil. Place them on paper towels to soak up any extra oil. Enjoy your crispy chicken wonton tacos hot and fresh!
Tips & Tricks
Frying Tips
– Heat the oil to 350°F (175°C) for best results.
– To avoid soggy tacos, do not overcrowd the frying pot. Fry in small batches.
Flavor Enhancements
– Try adding a pinch of cayenne for heat.
– Pair your tacos with a fresh cucumber salad or avocado dip.
Presentation Tips
– Arrange tacos on a bright platter for eye-catching appeal.
– Garnish with fresh cilantro and lime wedges for color and flavor.
Pro Tips
- Frying Temperature: Ensure the oil is at 350°F (175°C) for crispy tacos. If the oil is too hot, the tacos may burn; too cool, and they’ll absorb excess oil.
- Seal Efficiently: Moisten the edges of the wonton wrappers well to ensure they seal properly, preventing the filling from leaking during frying.
- Fill Evenly: Use a consistent amount of filling for each taco to ensure even cooking and a balanced flavor in every bite.
- Garnish Smartly: Add a squeeze of fresh lime over the tacos just before serving for a burst of flavor that complements the filling beautifully.
Variations
Alternative Proteins
You can switch things up by using ground turkey or beef instead of chicken. Ground turkey is lean and still tasty. Ground beef adds a rich flavor that many enjoy. For a vegetarian twist, try using tofu or mushrooms. Tofu absorbs flavors well and gives a nice texture. Mushrooms add a meaty feel, perfect for veggie lovers.
Different Flavor Profiles
Want more heat? Add jalapeños to your filling for a spicy kick. You can also create an Asian-inspired taste by using hoisin sauce or chili sauce. These sauces add depth and sweetness. Mix and match until you find what you love.
Serving Suggestions
These crispy tacos work great as an appetizer or main dish. Serve them at parties or family dinners. For a fun twist, offer creative dipping sauces like sweet chili sauce or peanut sauce. This adds excitement and lets everyone customize their meal.
Storage Info
Storing Leftovers
To keep your crispy chicken wonton tacos fresh, follow these steps:
– Refrigerating: Place any leftover tacos in an airtight container. Keep them in the fridge for up to 3 days. This helps retain flavor and texture.
– Freezing: For longer storage, wrap each taco tightly in plastic wrap. Then, store them in a freezer bag. They can last up to 2 months in the freezer.
Reheating Instructions
When you want to enjoy your tacos again, here’s how to do it right:
– Oven vs. Microwave: The oven is best for keeping tacos crispy. Preheat it to 350°F (175°C). Place tacos on a baking sheet for about 10 minutes. The microwave can make them soft, so it’s not ideal.
– Tips for Crispiness: If using the microwave, add a paper towel under the tacos. This absorbs moisture and helps keep them crispy. You can also re-fry them in hot oil for a few minutes, which restores their crunch.
FAQs
Can I make these tacos in advance?
Yes, you can prep these tacos ahead of time! Make the filling and store it in the fridge. Here’s how:
– Cook the chicken filling and let it cool.
– Place it in an airtight container.
– Store in the fridge for up to two days.
– You can also prepare the wonton wrappers. Keep them covered with a damp cloth to prevent drying out.
When you’re ready, assemble and fry them fresh for the best taste.
How do I know when the oil is hot enough?
To check the oil temperature, use these simple methods:
– Drop a small piece of bread into the oil. If it sizzles and turns golden in about 60 seconds, it’s ready.
– Use a kitchen thermometer. The oil should reach 350°F (175°C) for frying.
– You can also test with a tiny drop of water. If it sizzles, the oil is hot enough.
What are good side dishes to serve with crispy chicken wonton tacos?
These tacos pair well with many sides! Here are some tasty options:
– A fresh cucumber salad adds crunch.
– Serve with a side of fried rice for a filling meal.
– You could also try a spicy dipping sauce for added flavor.
– A light coleslaw balances the richness of the tacos.
Choose sides that complement the crispy texture and savory filling!
This blog post covered how to make crispy chicken wonton tacos. We discussed the main ingredients, like ground chicken and wonton wrappers. You learned the step-by-step process, from preparing the chicken filling to frying the tacos. We shared tips for perfect frying, flavor enhancements, and serving suggestions.
With these insights, you can create your delicious wonton tacos. Enjoy experimenting with variations and find your favorites. Cooking can be fun, and these tacos are a great way to star

Crispy Chicken Wonton Tacos
Ingredients
- 1 pound ground chicken
- 1 cup shredded green cabbage
- 0.5 cup shredded carrots
- 3 pieces green onions, thinly sliced
- 2 cloves garlic, finely minced
- 1 tablespoon soy sauce
- 1 tablespoon sesame oil
- 1 teaspoon fresh ginger, grated
- 1 package wonton wrappers
- as needed oil for frying (vegetable or canola)
- as needed leaves fresh cilantro for garnish
- as needed wedges lime for serving
- to taste salt and freshly ground pepper
Instructions
- Begin by heating the sesame oil in a medium skillet over medium heat. Once the oil shimmers, add the minced garlic and grated ginger, sautéing for about 1 minute until they become fragrant.
- Increase the heat slightly and add the ground chicken into the skillet. Use a spatula to break up the meat, cooking it thoroughly until it is browned and no longer pink, approximately 5-7 minutes.
- Once the chicken is cooked, stir in the soy sauce, along with salt and freshly ground pepper to season. Then, add the shredded cabbage, shredded carrots, and sliced green onions. Cook everything together for an additional 2-3 minutes until the vegetables have softened just a bit. Remove the skillet from heat and allow the filling to cool slightly.
- While the filling cools, heat oil for frying in a separate pot or deep skillet over medium-high heat until it reaches about 350°F (175°C).
- Prepare your wonton wrappers by taking one and placing about 1 tablespoon of the chicken filling in the center. Moisten the edges of the wrapper with a few drops of water, and then fold it over to create a taco shape. Use your fingers to press and crimp the edges firmly to seal. Repeat this process until all the wrappers and filling have been used.
- Carefully place a few wonton tacos into the hot oil, frying them for about 2-3 minutes on each side or until they are crisp and golden brown. Use a slotted spoon to remove them from the oil, transferring them onto paper towels to absorb any excess oil.
- Serve the crispy chicken wonton tacos hot from the fryer, garnished with fresh cilantro leaves and lime wedges on the side for an added burst of flavor.


. - Bring salted water to a boil. - Add rotini pasta and cook until al dente. - This usually takes about 7 to 9 minutes. - Drain the pasta and rinse it under cold water to cool. - Chop the cherry tomatoes in half. - Dice the cucumber and red bell pepper. - Finely chop the red onion. - If you use fresh corn, cook it lightly for 2-3 minutes. - Cool the corn under cold water. - In a bowl, combine olive oil and lemon juice. - Add Dijon mustard and minced garlic. - Whisk the mixture until it is smooth. - Season it with salt and pepper to taste. - In a large bowl, mix the cooled pasta with the chopped vegetables. - Add crumbled feta cheese, basil, and parsley. - Drizzle the lemon vinaigrette over the pasta mixture. - Toss gently to coat all the ingredients evenly. - Cover the salad with plastic wrap. - Chill in the refrigerator for at least 30 minutes. - This helps the flavors blend together nicely. This refreshing summer pasta salad with lemon vinaigrette is perfect for hot days. For the complete recipe, check the [Full Recipe]. - Use fresh, seasonal vegetables for better flavor. Fresh veggies taste brighter and more delicious. They also add color and crunch. Look for ripe tomatoes, crisp cucumbers, and sweet bell peppers. - Adjust dressing ingredients according to personal preference. This salad is flexible. If you like tangy, add more lemon juice. If you prefer creamy, a bit of yogurt can work wonders. - Serve in a chilled bowl and garnish with basil leaves and lemon wedges. This adds a lovely touch and makes your dish pop. - Consider colorful serving dishes to enhance visual appeal. Bright colors make the salad inviting. Use a vibrant bowl to catch the eye and draw people in. {{image_4}} You can make your summer pasta salad even more filling. Adding proteins boosts nutrition and flavor. Grilled chicken, shrimp, or chickpeas work well. Grilled chicken adds a smoky taste. Shrimp gives a fresh ocean flavor. Chickpeas offer a hearty, plant-based option. Each choice makes your salad special and satisfying. While lemon vinaigrette is zesty, you can switch it up. Try balsamic vinaigrette for a sweet-tangy twist. A yogurt-based dressing adds creaminess and a slight tang. Both options change the salad's vibe while keeping it fresh. Feel free to experiment to find your favorite taste. Using seasonal vegetables makes your salad vibrant. Swap in zucchini for a crunchy bite. Asparagus adds a touch of elegance. Bell peppers bring sweetness and color. You can mix and match based on what’s fresh and available. This keeps your salad exciting and full of flavor. For the full recipe, check out the detailed instructions above. After enjoying your summer pasta salad, store any leftovers in an airtight container. This keeps the salad fresh. You can keep it in the refrigerator for up to 3 days. Freezing this pasta salad is not a good idea. The texture of the pasta and vegetables changes when frozen. They become mushy when thawed, which affects the taste. I recommend eating the salad cold straight from the fridge. This keeps the flavors bright and fresh. Don’t reheat it, as it tastes best when chilled. For more details, check out the Full Recipe. Use a gluten-free pasta option available in stores. Many brands offer good choices. Just check the label to ensure it's truly gluten-free. This way, everyone can enjoy the dish without worry. Yes, it’s best to make the salad a few hours before serving for best flavor. This time lets the ingredients blend together. You can chill it in the fridge, which enhances the taste. Just remember to toss it gently before serving. Try goat cheese, mozzarella, or skip cheese entirely for a dairy-free option. Each cheese gives a different flavor. Goat cheese adds creaminess, while mozzarella is mild and stretchy. Picking one that fits your taste makes the salad even better! This summer pasta salad is fresh, simple, and easy to make. You learned how to prepare a tasty dish with rotini pasta, colorful vegetables, and a zesty lemon vinaigrette. We discussed tips to enhance flavor and presentation. Remember, you can add proteins or swap ingredients for variety. This salad makes a great side or light meal. Enjoy making your own version and impress your guests this warm season!](https://fastmealmate.com/wp-content/uploads/2025/07/167fa52b-6c37-4fee-aa24-5fa64edc3341-768x768.webp)

![- 1 pound fresh okra, thoroughly washed and chopped into small bite-sized pieces - 1/4 cup fresh cilantro, finely chopped - 1/4 cup green onions, finely sliced The fresh okra gives these fritters their unique texture and flavor. Look for firm, green okra pods. They should not be too large, as larger okra can be tough. Fresh cilantro and green onions add brightness and enhance the flavor. - 1 cup chickpea flour (also known as besan) - 1/2 cup cornmeal for added texture - 1 teaspoon cumin powder - 1 teaspoon coriander powder - 1/2 teaspoon turmeric powder for color - 1 teaspoon red chili powder (adjust per your spice preference) - 1 teaspoon baking powder for fluffiness - Salt, to taste Chickpea flour is the base for the batter. It gives a nice crunch and a nutty taste. Cornmeal adds extra texture that makes each bite satisfying. The spices bring warmth and depth, while baking powder ensures the fritters puff up nicely. You can consider adding a pinch of garlic powder or onion powder for a savory kick. A splash of lemon juice can brighten the dish. If you enjoy heat, diced jalapeños can add a spicy twist. Experiment with these options to find your favorite flavor combination. For the complete recipe, check out the [Full Recipe]. Start with fresh okra. Wash it well under cool water. Make sure to remove all dirt. Pat the okra dry using a paper towel. This step is key for crispiness. Once dry, chop the okra into small pieces. Aim for uniform sizes to ensure even cooking. In a large bowl, mix the dry ingredients. Combine chickpea flour, cornmeal, cumin, coriander, turmeric, red chili powder, baking powder, and salt. Use a whisk to blend them thoroughly. This ensures all the spices mix evenly. Next, add the chopped okra, cilantro, and green onions. Gently toss to coat the okra with the flour mix. Be careful not to break the okra pieces. Slowly add water to the bowl. Stir until you reach a thick batter. The batter should cling to the okra pieces. Heat vegetable oil in a deep frying pan. Use enough oil to cover the fritters by about 1-2 inches. Get the oil hot over medium heat. To test, drop a small amount of batter in the oil; it should sizzle. Use a tablespoon to drop spoonfuls of the batter-coated okra into the hot oil. Don’t overcrowd the pan. This helps keep the oil hot and ensures crispiness. Fry the fritters for 3-4 minutes. They should turn golden brown and crisp. When done, remove them with a slotted spoon. Place them on paper towels to drain excess oil. Enjoy them hot for the best flavor and crunch! For the full recipe, check out the section above. To make crispy okra fritters, start with fresh okra. Moist okra makes the fritters soggy. Make sure to wash and dry the okra well. Chop the okra into small, even pieces. This helps them cook evenly. When mixing the batter, aim for a thick consistency. It should cling to the okra without running off. If the batter is too thin, your fritters will not be crispy. To boost flavor, use fresh herbs like cilantro and green onions. The spices are key too. Cumin, coriander, and red chili powder add depth. You can adjust the spice level to your taste. For a vibrant look, add turmeric too. This gives the fritters a lovely golden color. And don't forget the baking powder! It makes the fritters light and airy. One common mistake is overcrowding the pan. This lowers the oil temperature and leads to soggy fritters. Fry in small batches for the best results. Another mistake is not letting the oil heat enough before frying. A good test is to drop a small spoonful of batter in the oil. If it sizzles, the oil is ready. Lastly, skip the excess water when mixing the batter. Too much water makes for a runny mix, which is not ideal. For my detailed cooking process, check the Full Recipe. {{image_4}} To make crispy okra fritters gluten-free, use rice flour instead of chickpea flour. Rice flour gives a light crunch. You can also try almond flour for a nutty flavor. Adjust the amount of water to keep the batter thick. For a spicy kick, add diced jalapeños or chopped green chilies to the batter. You can also increase the red chili powder for extra heat. Another option is to mix in a tablespoon of hot sauce to give a zesty flavor. Feel free to mix in other veggies like corn, spinach, or bell peppers. Chopped carrots can add a sweet crunch. You could also add cheese for a creamy texture. Experiment with herbs like dill or parsley for fresh flavor. For the full recipe, check out the instructions above. Store leftover crispy okra fritters in an airtight container. This keeps them fresh and crispy. If you have more than you can eat, allow them to cool completely first. Then, place them in the container. To keep them from getting soggy, avoid stacking them directly on top of each other. To reheat, use an oven or an air fryer. Preheat your oven to 375°F (190°C). Place the fritters on a baking sheet. Heat for about 10-15 minutes until they are hot and crispy again. If using an air fryer, set it to 350°F (175°C) and heat for 5-7 minutes. Avoid microwaving as it makes them soft. You can freeze the fritters for later. Allow them to cool completely, then place them in a single layer on a baking sheet. Freeze until solid, then transfer to a freezer bag. This way, they won’t stick together. When you’re ready to eat them, follow the reheating steps above. Enjoy the crispy goodness later! For the full recipe, check out the detailed instructions provided earlier. To make crispy okra fritters from scratch, start with fresh okra. Wash and chop it into small pieces. Mix chickpea flour, cornmeal, and spices in a bowl. Toss in the chopped okra and herbs. Gradually add water to create a thick batter. Heat vegetable oil in a pan. Drop spoonfuls of the batter into the hot oil. Fry until golden brown and crisp. Drain on paper towels. Enjoy hot! For more detailed steps, check the Full Recipe. Crispy okra fritters pair well with many sides. I love serving them with tangy yogurt sauce or spicy chutney. You can also try them with a fresh salad or pickles. These sides add flavor and balance the dish. Serve them as a snack or an appetizer. They also complement grilled meats nicely. Yes, you can bake the fritters instead of frying them. Preheat your oven to 400°F (200°C). Use a baking sheet lined with parchment paper. Lightly coat the fritters with oil for crispiness. Bake them for about 20-25 minutes, flipping halfway through. This method is healthier and still delicious, though they may not be as crispy as fried ones. Crispy okra fritters are a tasty snack made with fresh ingredients and dry spices. I shared steps to prepare and fry them for that perfect crunch. Plus, I included tips to avoid common mistakes and ideas for fun variations. Remember to store leftovers correctly and reheat for best results. Making these fritters is simple and rewarding. Enjoy your cooking journey and taste the crunch!](https://fastmealmate.com/wp-content/uploads/2025/06/a8f815b1-ce7d-4f81-9471-c6052c40d9a8-768x768.webp)