Creamy Garlic Tuscan Chicken Flavorful Dinner Recipe

Looking for a delicious dinner that’s easy to make? You’ll love this Creamy Garlic Tuscan Chicken recipe! Packed with fresh ingredients, it offers rich flavors that will impress your family. I’ll guide you through every step, from selecting the best chicken to creating a sauce that sings. Let’s turn your dinner into a tasty feast everyone will enjoy—without the fuss! Are you ready to cook? Let’s dive in!
Why I Love This Recipe
- Deliciously Creamy: The combination of heavy cream and Parmesan cheese creates a rich, velvety sauce that coats the chicken beautifully.
- Quick and Easy: This recipe comes together in just 30 minutes, making it perfect for busy weeknights or last-minute dinner parties.
- Flavorful Ingredients: The garlic, cherry tomatoes, and spinach not only add vibrant colors but also provide a burst of flavor that elevates the dish.
- Versatile Dish: This creamy Tuscan chicken pairs wonderfully with a variety of sides, from pasta to a fresh salad, making it a versatile addition to any meal.
Ingredients
Main Ingredients List
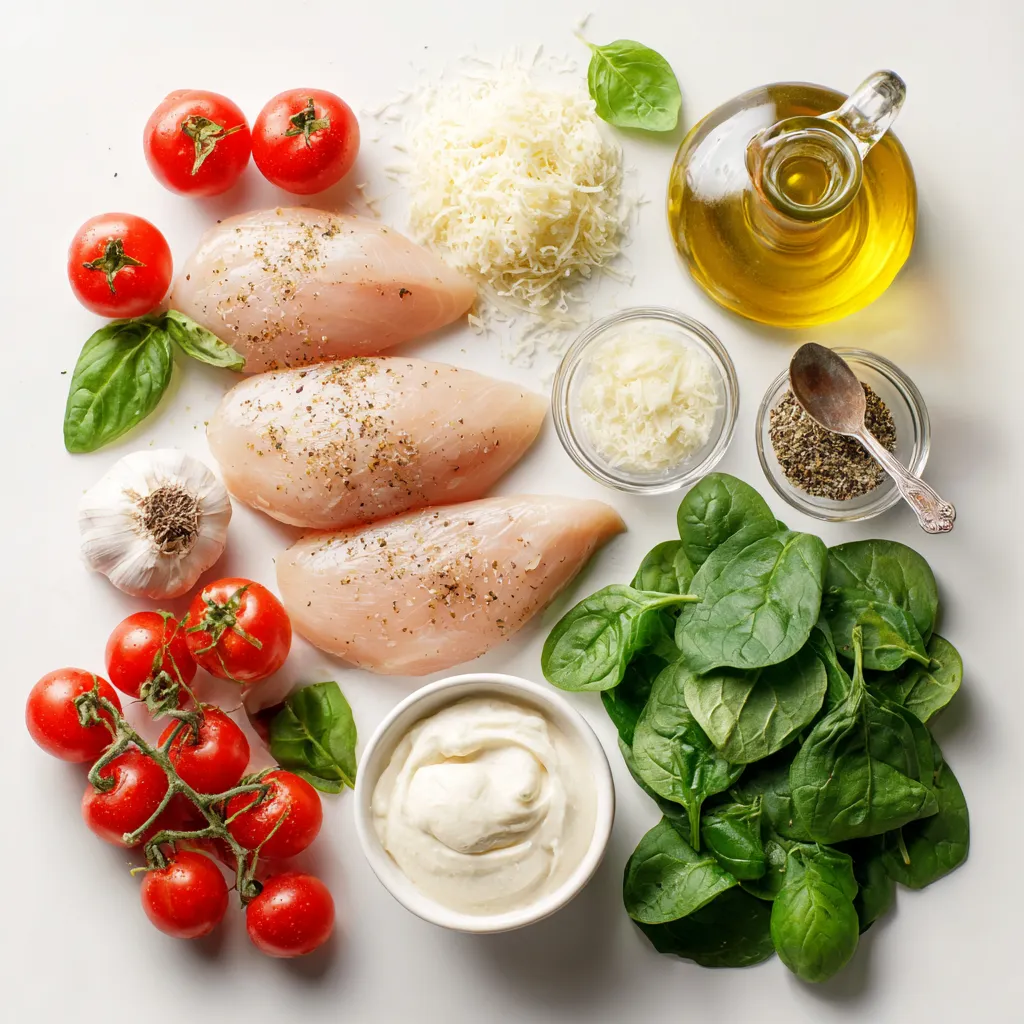
– 4 boneless, skinless chicken breasts
– Salt and freshly ground pepper, to taste
– 2 tablespoons extra-virgin olive oil
– 4 cloves garlic, finely minced
– 1 cup cherry tomatoes, halved
– 1 cup fresh baby spinach, washed and dried
– 1 cup heavy cream
– 1/2 cup freshly grated Parmesan cheese
– 1 teaspoon Italian seasoning blend
– Fresh basil leaves, for a vibrant garnish
Recommended Quality of Ingredients
Choosing Fresh Chicken: Always pick chicken that looks moist and has no bad smell. Fresh chicken makes your dish taste better.
Selecting the Right Olive Oil: Use high-quality extra-virgin olive oil. It adds richness to your sauce. Look for oils with a fruity or peppery flavor.
Garlic Varieties for Best Flavor: Fresh garlic is key for this recipe. Choose firm, plump cloves. Avoid dry or sprouted garlic, as it lacks flavor.
Optional Ingredients for Added Flavor
Additional Herbs: You might add thyme or oregano for extra depth. Fresh herbs can lift the dish.
Alternative Cheese Options: Instead of Parmesan, try Pecorino Romano or goat cheese. Each option brings a different taste.

Step-by-Step Instructions
Preparing the Chicken
Seasoning the Chicken
First, take your chicken breasts. Season both sides well with salt and freshly ground pepper. This step adds flavor to the chicken. Make sure to cover every part.
Cooking the Chicken in the Skillet
Next, heat 2 tablespoons of extra-virgin olive oil in a large skillet over medium heat. Once the oil is hot, add the seasoned chicken breasts. Cook them for about 6-7 minutes on each side. You want a golden-brown color and an internal temperature of 165°F. After cooking, place the chicken on a plate and cover it loosely to keep it warm.
Making the Sauce
Sautéing Garlic
In the same skillet, use the leftover oil and juices. Add 4 cloves of finely minced garlic. Sauté it for about 30 seconds until it’s fragrant and golden. Watch it closely to avoid burning.
Cooking Tomatoes and Spinach
Add 1 cup of halved cherry tomatoes to the skillet. Stir gently for 2-3 minutes until they soften. Next, introduce 1 cup of fresh baby spinach. Stir frequently until it wilts, which should take about 1-2 minutes.
Combining and Finishing
Adding Cream and Cheese
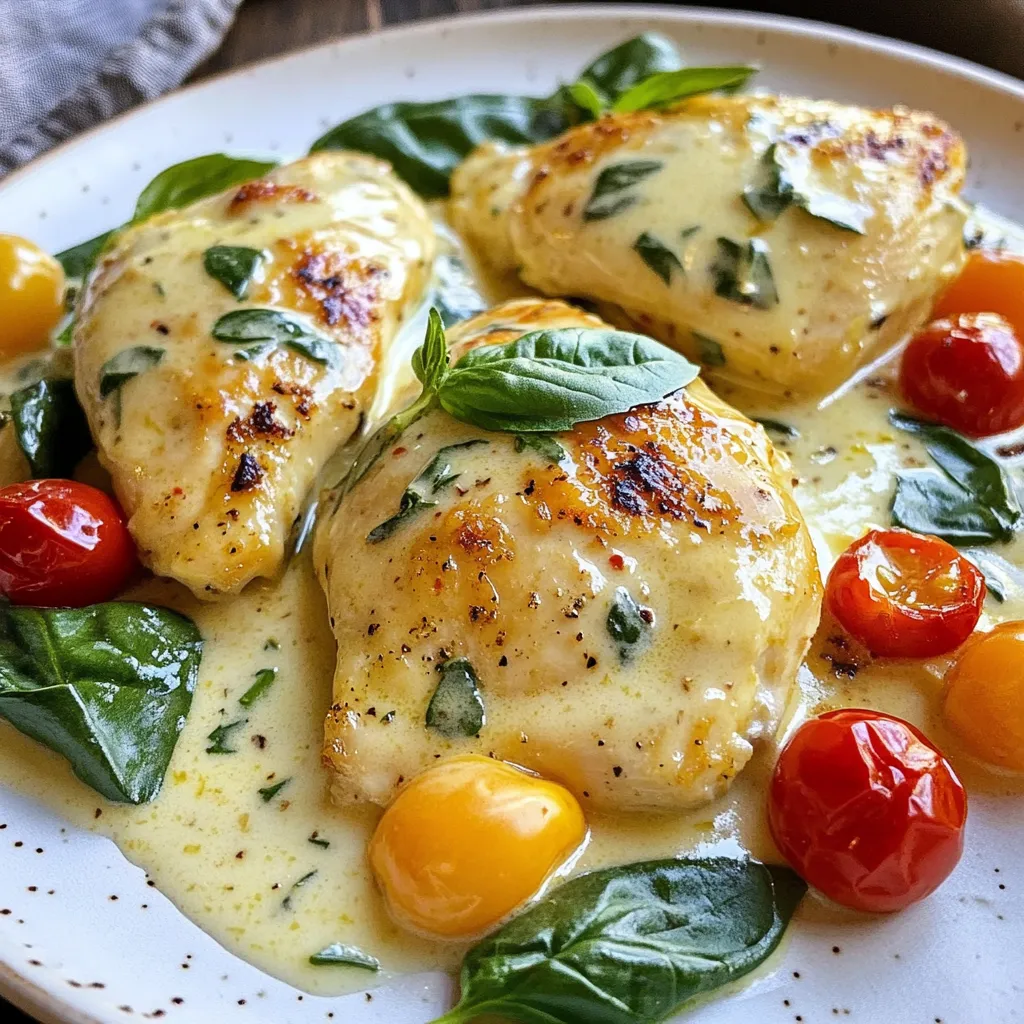
Lower the heat to a gentle simmer. Pour in 1 cup of heavy cream, stirring to mix it with the tomatoes and spinach. Let it simmer for one minute to create a rich sauce. Now, sprinkle in 1/2 cup of freshly grated Parmesan cheese and 1 teaspoon of Italian seasoning. Stir until the cheese melts and the sauce turns velvety.
Returning Chicken to Sauce
Finally, return the cooked chicken breasts to the skillet. Spoon the creamy sauce over the chicken. Let it cook for an additional 2-3 minutes. This allows the chicken to soak up all the wonderful flavors.
Tips & Tricks
Cooking Tips for Perfect Chicken
– Ensuring Proper Cooking Temperature: Always cook chicken to an internal temperature of 165°F. Use a meat thermometer to check this. This ensures the chicken is safe to eat and juicy.
– Avoiding Overcooking: Cook the chicken for about 6-7 minutes on each side. If you cook it too long, it may dry out. Keep an eye on the color; golden-brown means it’s time to flip.
Enhancing the Flavor Profile
– Suggested Spice Adjustments: Feel free to add more Italian seasoning or even some crushed red pepper for a kick. A dash of lemon zest can also brighten the flavors.
– Using Fresh Herbs: Fresh basil makes a big difference! Add it at the end to keep its bright taste. You can also try fresh parsley or thyme for different flavors.
Presentation Tips
– Garnishing Ideas: Fresh basil leaves add color and flavor. You can also sprinkle extra Parmesan on top for a nice finish.
– Best Serving Suggestions: Serve this dish on a large platter. Pair it with garlic bread or a bright salad. This adds texture and balances the creamy sauce.
Pro Tips
- Perfectly Seasoned Chicken: Always season your chicken breasts liberally with salt and pepper before cooking to enhance the flavor throughout the dish.
- Don’t Overcook the Garlic: Sauté the garlic just until fragrant. Overcooking can lead to a bitter taste, which can affect the overall flavor of the sauce.
- Thickness of the Sauce: If you prefer a thicker sauce, let it simmer a bit longer after adding the cream and cheese, allowing it to reduce and become more luscious.
- Fresh Herbs for Garnish: Always opt for fresh basil or parsley to garnish your dish. It adds a burst of color and freshness that elevates the presentation.

Variations
Ingredient Substitutions
You can switch up the chicken for other proteins. Shrimp or pork work great. For shrimp, cook it until it turns pink. For pork, use thin cutlets. Both will soak up the sauce well.
If you want a dairy-free dish, use coconut cream instead of heavy cream. It adds a slightly sweet taste. Nutritional yeast can replace Parmesan cheese for a cheesy flavor.
Flavor Variants
Add some red pepper flakes for a spicy kick. Just a pinch can elevate the dish. The heat balances well with the creaminess of the sauce.
For a Mediterranean twist, toss in some olives and feta cheese. The briny olives and creamy feta add great depth. This variation gives your dish a fresh, vibrant taste.
Cooking Methods
You can also bake this dish in the oven. Sear the chicken first, then transfer it to a baking dish. Pour the sauce over the top and bake until the chicken is done.
A slow cooker is another option. Brown the chicken in a skillet first. Then, place it in the slow cooker with the sauce. Cook on low for a few hours for a tender, flavorful meal.
Storage Info
Storing Leftovers
To keep your creamy garlic Tuscan chicken fresh, store it properly.
– Refrigeration Tips: Place the leftover chicken in an airtight container. This keeps the chicken moist and prevents odors. Store it in the fridge within two hours of cooking. It stays fresh for up to three days.
– Freezing Guidelines: If you want to keep it longer, freeze the chicken. Use a freezer-safe container or a heavy-duty freezer bag. Remove as much air as possible. This dish can last up to three months in the freezer.
Reheating Instructions
When you are ready to enjoy your leftovers, reheating is key.
– Best Practices for Maintaining Texture: To keep the chicken tender, reheat it slowly. You can use low heat on the stove or in the oven. Add a splash of cream or broth to keep it moist.
– Microwave vs. Stove Recommendations: The microwave is quick but may dry out the chicken. If you use it, cover the dish with a damp paper towel. The stove is better for even heating and better texture.
Shelf Life Information
Knowing how long your dish lasts is important.
– How Long It Lasts in the Fridge: The creamy garlic Tuscan chicken stays good for about three days in the fridge. Always check for freshness before eating.
– Signs of Spoilage: Look for changes in color or smell. If the chicken feels slimy or has an off odor, it’s best to throw it away. Always prioritize your safety when it comes to food.
FAQs
Can I use frozen chicken for this recipe?
Yes, you can use frozen chicken. Just remember to thaw it first. I suggest taking it out the night before. Place it in the fridge to defrost. If you’re in a hurry, you can use the microwave. Just be careful, as it can cook unevenly. Once it’s thawed, follow the same cooking steps. Make sure the chicken reaches 165°F for safety.
What can I serve with Creamy Garlic Tuscan Chicken?
Creamy Garlic Tuscan Chicken pairs well with many sides. I love serving it with garlic bread. It soaks up the sauce nicely. A mixed salad with fresh veggies adds a nice crunch. You can also serve it over pasta or rice. These options make it a hearty meal. Feel free to add your favorite sides to make it your own.
How do I adjust the recipe for fewer servings?
To adjust for fewer servings, you can cut the ingredients in half. Use two chicken breasts instead of four. Keep the same seasoning ratios for flavor. If you want to make just one serving, use one breast. The cooking time may be shorter, so check it often. You want to keep that juicy texture.
Can I make this dish ahead of time?
Yes! This dish can be made ahead. Cook it fully and let it cool. Store it in an airtight container in the fridge. It will last for 3-4 days. When you’re ready to eat, reheat it on low heat. This way, you keep the creamy texture. You can also freeze it, but the sauce may change. Just add a splash of cream when you reheat.
This blog post covered everything you need for Creamy Garlic Tuscan Chicken. We discussed quality ingredients, cooking steps, and helpful tips to make it great. I shared options for flavor and storage, making it easy to adapt. Whether you choose fresh chicken or try different proteins, you can create a tasty dish. Remember, cooking is fun, and experimenting is part of the process. Enjoy your meals and share them with friend

Creamy Garlic Tuscan Chicken Delight
Ingredients
- 4 pieces boneless, skinless chicken breasts
- to taste Salt and freshly ground pepper
- 2 tablespoons extra-virgin olive oil
- 4 cloves garlic, finely minced
- 1 cup cherry tomatoes, halved
- 1 cup fresh baby spinach, washed and dried
- 1 cup heavy cream
- 0.5 cup freshly grated Parmesan cheese
- 1 teaspoon Italian seasoning blend
- for garnish Fresh basil leaves
Instructions
- Generously season both sides of the chicken breasts with salt and freshly ground pepper, ensuring even coverage.
- In a large skillet, heat the extra-virgin olive oil over medium heat. Carefully add the seasoned chicken breasts to the skillet, cooking for approximately 6-7 minutes on each side, or until they develop a golden-brown color and are fully cooked through (internal temperature reaches 165°F). Once done, remove the chicken from the skillet and place it on a plate, covering it loosely to keep warm.
- In the residual oil and juices remaining in the skillet, add the minced garlic, sautéing for about 30 seconds or until it becomes fragrant and golden—keeping a close watch to prevent burning.
- Introduce the halved cherry tomatoes to the skillet, stirring gently for another 2-3 minutes until they begin to soften and release their juices.
- Next, add the fresh baby spinach, stirring frequently until it wilts down, which should take about 1-2 minutes.
- Lower the heat to a gentle simmer and pour in the heavy cream, stirring continuously to blend it with the tomatoes and spinach. Allow the cream to simmer slightly for about one minute, creating a rich sauce.
- Sprinkle the freshly grated Parmesan cheese and the Italian seasoning into the skillet, stirring until the cheese melts completely and the sauce reaches a velvety texture.
- Return the cooked chicken breasts back into the skillet, spooning the luscious creamy sauce over the top. Let it cook for an additional 2-3 minutes, allowing the chicken to absorb the wonderful flavors of the sauce.
- Plate your delicious chicken, generously drizzling the creamy sauce over each piece, and finish with a scattering of fresh basil leaves for a pop of color and fresh flavor.


![To make Spicy Honey BBQ Sausage Pasta Skillet, you need some key items. Here’s what you will use: - 8 oz penne pasta - 2 tablespoons olive oil - 1 lb spicy Italian sausage, casings removed - 1 medium onion, diced - 3 cloves garlic, minced - 1 bell pepper (red or yellow), diced - 1 cup corn kernels (fresh or frozen) - 1 cup cherry tomatoes, halved - 1/2 cup BBQ sauce - 2 tablespoons honey - 1 teaspoon crushed red pepper flakes - Salt and pepper to taste You can add extra flavor or texture with these ingredients: - Chopped fresh parsley for garnish - Grated Parmesan cheese for serving To prepare this dish, you will need a few handy tools: - Large pot for boiling pasta - Large skillet for cooking sausage and veggies - Colander for draining pasta - Spatula for mixing and breaking up sausage Start by boiling a large pot of salted water. Once it reaches a rolling boil, add 8 oz of penne pasta. Cook it for about 8-10 minutes until it is al dente. Drain the pasta in a colander and set it aside for later. In a large skillet, heat 2 tablespoons of olive oil over medium heat. When the oil shimmers, add 1 lb of spicy Italian sausage. Break the sausage apart with a spatula. Cook until it browns nicely, which should take around 5-7 minutes. Add 1 diced medium onion and 1 diced bell pepper to the skillet. Stir everything together and sauté for about 3-4 minutes. This will help the veggies soften. Then, add 3 minced garlic cloves and cook for another 1-2 minutes until the garlic smells amazing. Next, stir in 1 cup of corn kernels and 1 cup of halved cherry tomatoes. Pour in 1/2 cup of BBQ sauce and 2 tablespoons of honey. Sprinkle in 1 teaspoon of crushed red pepper flakes for heat. Mix it all well and let it simmer for about 5 minutes. This helps the flavors blend together. Once the sauce is bubbling, add the cooked penne pasta to the skillet. Toss everything gently until the pasta is coated with the sauce. Taste it, and adjust the seasoning with salt and pepper as you like. Take the skillet off the heat. Garnish your dish with chopped fresh parsley for a burst of color. If you want, add some grated Parmesan cheese on top. Serve hot and enjoy your Spicy Honey BBQ Sausage Pasta Skillet! For the full recipe, check [Full Recipe]. To get the right heat, start with the crushed red pepper flakes. I suggest using one teaspoon first. You can always add more if you want extra kick. Taste as you go. This dish should be spicy but not overpowering. Adjust it to suit your taste buds. Seasoning is key. Use salt and pepper to bring out the flavors. I often add a dash of garlic powder for extra depth. Fresh herbs like parsley can brighten the dish. Don’t forget to taste before serving. A little tweak can make a big difference. Cooking times can vary based on your stove. When cooking the sausage, look for a golden brown color. For the veggies, aim for a soft texture without losing crunch. The pasta should be al dente. Always keep an eye on your skillet. This way, you won’t overcook any ingredients. For the full recipe, check out the complete list of steps. {{image_4}} You can easily switch out ingredients in this dish. If you can't find spicy Italian sausage, use any sausage you like. Chicken sausage or turkey sausage works well too. For a lighter option, try ground turkey or beef. If you're vegan, use plant-based sausage. Honey can be swapped for maple syrup for a different sweet touch. You can also use low-sugar BBQ sauce if you're watching your sugar intake. Penne pasta is great, but many other options exist. Try fusilli or rigatoni for fun shapes. Gluten-free pasta works too if you need it. You can also use whole wheat pasta for added fiber. Just keep an eye on cooking times, as they may vary. Want to boost the nutrition? Add more veggies! Spinach or kale can wilt nicely into the dish. You can toss in zucchini or mushrooms for added flavor. Carrots or peas can add sweetness too. Feel free to get creative with what you have on hand. Each choice adds color and nutrients, making the meal even better. For the full recipe, check out the Spicy Honey BBQ Sausage Pasta Skillet! After you enjoy your Spicy Honey BBQ Sausage Pasta Skillet, let any leftovers cool. Transfer them to an airtight container. You can keep it in the fridge for up to three days. Make sure to seal the container well. This keeps the flavors fresh and tasty. To reheat, simply take the pasta out of the fridge. Place it in a skillet over medium heat. Add a splash of water or broth to keep it moist. Stir often until it’s heated through. You can also use a microwave. Heat it in short bursts, stirring in between. This way, it warms evenly. If you want to store the dish for longer, freezing is a great option. Let the pasta cool completely first. Then, put it in a freezer-safe container. You can also use freezer bags. Just remove as much air as possible. It can last up to three months in the freezer. When you're ready to eat, thaw it overnight in the fridge before reheating. It makes for a quick meal later! For the full recipe, check out the details above. Yes, you can use different types of sausage. If you prefer mild flavors, use sweet Italian sausage. Chicken or turkey sausage also works well. You can even try smoked sausage for a unique twist. Just make sure to cook it fully before mixing it with the pasta. To kick up the heat, add more crushed red pepper flakes. You can also use spicy BBQ sauce instead of regular BBQ sauce. Adding diced jalapeños or a splash of hot sauce will give your dish extra spice. Adjust the heat to match your taste. This dish pairs well with a simple green salad. Garlic bread is great for sopping up the sauce. You can also serve it with roasted vegetables or a side of coleslaw for a crunchy contrast. Each adds a nice touch to your meal. Yes, you can make a vegetarian version easily. Substitute sausage with plant-based sausage or diced mushrooms. Use vegetable broth instead of meat-based sauces. You can also add more veggies like zucchini or spinach for extra flavor. This keeps the dish hearty and satisfying. For the full recipe, visit the section above. Now you know how to make a tasty Spicy Honey BBQ Sausage Pasta Skillet. We covered essential and optional ingredients, cooking tools, and step-by-step instructions. You learned tips for spice levels and enhancing flavors. We also explored variations, storage info, and common questions. I hope you'll try this dish at home. Enjoy experimenting with the flavors and making it your own! Happy cooking!](https://fastmealmate.com/wp-content/uploads/2025/07/3417b746-2870-404b-8959-e56c3fc8d9c9-768x768.webp)
![To make Easy Roasted Tomato Soup, gather these key ingredients: - 2 pounds of ripe, juicy tomatoes, halved - 1 medium onion, cut into quarters - 4 cloves of garlic, left unpeeled - 2 tablespoons of extra virgin olive oil - Sea salt and freshly cracked black pepper, to taste - 1 teaspoon of dried basil - 1 teaspoon of sugar (optional, to counterbalance acidity) - 4 cups of rich vegetable broth - 1/2 cup of heavy cream (optional, for a luscious finish) - Fresh basil leaves, for a lovely garnish These ingredients create a base that bursts with flavor. The tomatoes give the soup its rich taste. The onion adds sweetness, while garlic brings depth. You can add optional ingredients to boost the flavor: - A splash of balsamic vinegar for acidity - A pinch of red pepper flakes for heat - A teaspoon of smoked paprika for a smoky taste These extras can transform the soup into something special. Feel free to experiment and find your favorite combination. To prepare this soup, you’ll need a few handy tools: - A large baking sheet for roasting - A pot for cooking the soup - An immersion blender or a standard countertop blender - A cutting board and sharp knife for prep Having the right tools makes cooking easier. With these, you’ll create a smooth, tasty soup that warms the soul. For the complete recipe, check out the [Full Recipe]. To start, gather all your ingredients. You need: - 2 pounds of ripe, juicy tomatoes, halved - 1 medium onion, cut into quarters - 4 cloves of garlic, left unpeeled - 2 tablespoons of extra virgin olive oil - Sea salt and freshly cracked black pepper, to taste - 1 teaspoon of dried basil - 1 teaspoon of sugar (optional) - 4 cups of rich vegetable broth - 1/2 cup of heavy cream (optional) - Fresh basil leaves for garnish First, wash the tomatoes well. Cut them in half and place them on a baking sheet. Next, quarter the onion and add it to the sheet. Toss in the unpeeled garlic cloves. Now, drizzle the olive oil over the veggies. Sprinkle sea salt, black pepper, and dried basil on top. If you want to balance the soup's acidity, add sugar now. Preheat your oven to 400°F (200°C). Once the oven is ready, slide in your baking sheet. Roast the vegetables for 25-30 minutes. The tomatoes should soften and caramelize. After roasting, take the sheet out and let the veggies cool. Once cool enough to handle, peel off the garlic skins. In a large pot, combine the roasted tomatoes, onion, and garlic. Add the vegetable broth and place the pot over medium heat. Bring the mixture to a gentle simmer. Use an immersion blender to puree the soup until smooth. If you don’t have one, carefully transfer the soup to a blender. Make sure to leave space for steam to escape. If you want a rich finish, stir in the heavy cream now. Taste the soup and adjust the seasoning. Heat until hot throughout. Finally, serve the soup in bowls. Garnish with fresh basil leaves for color and flavor. Enjoy your delicious, comforting bowl of roasted tomato soup! To get a smooth soup, use an immersion blender. It makes blending easy. If you prefer, you can blend in batches with a regular blender. Just leave space for steam. For a thicker texture, add less broth. If you like it thinner, add more broth. You can also stir in heavy cream for extra richness. It adds a nice velvety feel. One mistake is not roasting the tomatoes long enough. They need time to caramelize and develop flavor. Don’t skip the sugar if your tomatoes are very acidic. It balances the taste. Also, remember to peel the garlic after roasting. Skins can affect the smoothness of your soup. Finally, taste your soup before serving. Adjust salt and pepper to match your flavor. Serve your soup hot, garnished with fresh basil leaves. They add color and flavor. Pair it with a grilled cheese sandwich for a classic combo. You can also serve it with crusty bread for dipping. For a twist, add a drizzle of balsamic glaze on top. This adds a sweet tang that enhances the soup. For the full recipe, check the details above. {{image_4}} You can easily make this soup vegan. Just skip the heavy cream. Use more vegetable broth instead. This keeps the soup rich and tasty. The roasted tomatoes give it a great flavor. You won’t miss the cream at all. Add a splash of coconut milk for creaminess if you like. It adds a nice twist! Want to spice things up? Add a pinch of red pepper flakes for heat. A dash of smoked paprika gives a warm flavor. Fresh herbs like thyme or oregano enhance the soup, too. You can also stir in a tablespoon of balsamic vinegar. It adds depth and a little sweetness. Don't forget to taste as you go! This soup is naturally gluten-free. You don’t need any flour or wheat. Just use certified gluten-free vegetable broth. This way, everyone can enjoy it. If you want to thicken the soup, use blended potatoes or a cornstarch slurry. It keeps the soup smooth without gluten. Enjoy this comforting bowl without worries! To store leftover soup, let it cool first. Pour it into an airtight container. Make sure to seal it well. Place it in the fridge. It will stay fresh for about three days. If you want to keep it longer, freezing is better. Freezing is a great way to prepare meals ahead. Use freezer-safe containers or bags. Fill them with soup, leaving some space at the top. This allows for expansion. Label the containers with the date. It can last up to three months in the freezer. When you’re ready to use it, just thaw it in the fridge overnight. To reheat your soup, use a pot on the stove. Heat it gently over medium-low. Stir often to avoid burning. If the soup is too thick, add a splash of broth or water. You can also use a microwave. Heat it in short bursts, stirring in between. Always taste before serving to check the flavor. Adjust seasoning if needed for that perfect bowl of comfort. The best tomatoes for this soup are ripe, juicy varieties. I love using Roma or vine-ripened tomatoes. They have great flavor and are less watery. You can also mix in some heirloom tomatoes for extra depth. Their sweetness adds a lovely touch to the soup. Yes, you can make this soup ahead of time. It keeps well in the fridge for up to four days. Just make sure to cool it completely before storage. You can also freeze it for up to three months. For the best taste, reheat the soup gently on the stove. To make roasted tomato soup without cream, simply skip the heavy cream. Instead, you can add a splash of vegetable broth for richness. For added creaminess, blend in some cooked white beans or cashews. They blend smoothly and give a nice texture without dairy. You’ll still enjoy a flavorful bowl of comfort. For the full recipe, check out the detailed instructions above. In this post, we explored how to make easy roasted tomato soup. We discussed key ingredients, optional flavors, and tools you need. Following the step-by-step instructions ensures success every time. I shared tips for the perfect consistency and common mistakes to avoid. You can even try vegan and gluten-free options. Lastly, I covered storage and reheating for later enjoyment. Enjoy making this warm soup and share it with others.](https://fastmealmate.com/wp-content/uploads/2025/07/8c50acbe-b26b-4fce-9348-24a1062b636d-768x768.webp)


![Here is everything you need for this tasty dish: - 8 oz spaghetti or fettuccine pasta - 1 lb fresh scallops, cleaned and patted dry - 1 lb shrimp, peeled and deveined - 6 tablespoons unsalted butter - 4 cloves garlic, finely minced - 1 teaspoon red pepper flakes (optional for heat) - 1 cup cherry tomatoes, halved - 1 medium lemon, zested and juiced - 1/4 cup fresh parsley, chopped - Salt and freshly ground black pepper to taste - Grated Parmesan cheese, for serving Fresh, quality ingredients make a big difference. The pasta forms the base and gives the dish its heart. Scallops and shrimp add a rich flavor that makes each bite special. Garlic brings out the best in seafood, while the lemon brightens everything. Don't forget the fresh parsley for a pop of color and taste. For those who like a little kick, red pepper flakes can be a nice touch. Using these ingredients, you can create a beautiful meal that impresses friends and family. Check the [Full Recipe] for detailed steps to follow. Enjoy cooking! To make perfect pasta, start with a big pot of salted water. Bring it to a rolling boil. Add 8 oz of spaghetti or fettuccine and cook it until al dente. This usually means cooking it for about 1-2 minutes less than the package says. Before you drain the pasta, save 1 cup of the starchy pasta water. This water helps the sauce stick later. After reserving the water, drain the pasta and set it aside. For great seared scallops, use a hot skillet. Melt 3 tablespoons of unsalted butter over medium-high heat. Season 1 lb of cleaned scallops with salt and pepper. When the butter is sizzling, gently add the scallops. Sear them for 2-3 minutes on each side. They should be golden brown and opaque. Once done, take them out and place them on a plate. In the same skillet, lower the heat to medium and add the rest of the butter. Wait until it melts, then add 4 cloves of finely minced garlic and 1 teaspoon of red pepper flakes if you like heat. Sauté for about 30 seconds until the garlic smells great. Now, toss in 1 lb of peeled and deveined shrimp. Cook for 2-3 minutes, stirring often, until the shrimp turn pink. Next, add 1 cup of halved cherry tomatoes to the skillet. Cook for another minute until the tomatoes soften. Return the seared scallops to the pan. Squeeze the juice from 1 medium lemon over everything, and add the lemon zest. Stir gently to mix the flavors well. Now for the fun part! Add the cooked pasta to the skillet. Toss everything together so the pasta gets coated in the garlic butter sauce. If the sauce feels too thick, add some of the reserved pasta water slowly until you like the consistency. Make sure the pasta is evenly coated. Fold in 1/4 cup of chopped fresh parsley. Taste your dish and adjust the salt and pepper if needed. Serve the pasta hot. For an elegant touch, sprinkle grated Parmesan cheese on top. You can also add a sprig of parsley and a lemon wedge for a nice look. Enjoy this meal that combines so many amazing flavors! Check out the Full Recipe for detailed steps. - Recommended cooking times: For scallops, cook 2-3 minutes per side. Shrimp need about 2-3 minutes until pink. Pasta should be al dente, usually around 8-10 minutes. - Adjusting spice levels: If you like heat, add more red pepper flakes. For milder flavor, leave them out or reduce the amount. - Best pans for searing: Use a large skillet with a heavy bottom or cast iron. These help get a good sear on scallops and shrimp. - Essential tools for pasta preparation: A large pot for boiling pasta and a colander for draining are key. Tongs work great for tossing pasta with sauce. - Suggested wines to pair: A crisp white wine, like Sauvignon Blanc, complements the seafood well. You can also try a light Pinot Grigio. - Additional herbs and spices to try: Fresh basil or thyme can add a nice twist. A touch of smoked paprika gives a unique flavor boost. For the full recipe, check out the details above. {{image_4}} You can easily swap the seafood in this dish. Try using fish like cod or halibut. These options give a nice, flaky texture. You can also use lobster or crab for a more luxurious feel. If you prefer a lighter dish, switch to shrimp and scallops only. For a vegan or vegetarian twist, use mushrooms instead of seafood. Portobello or oyster mushrooms can add a meaty texture. You can also use firm tofu. This change keeps the dish flavorful while being plant-based. Cheese can change the flavor of this pasta. Adding feta cheese gives a tangy taste. Creamy goat cheese adds richness, while a sharp blue cheese brings boldness. Each cheese will create a unique twist. Incorporating seasonal vegetables can also enhance the dish. Fresh asparagus or zucchini adds crunch and color. You can toss in spinach or arugula for a touch of green. These veggies make the pasta healthier and more vibrant. If gluten is a concern, try gluten-free pasta. Options like brown rice or quinoa pasta work well. They will absorb the garlic butter sauce nicely without losing flavor. You can also switch up the noodles. Instead of spaghetti or fettuccine, use penne or linguine. Each type of noodle will give a different eating experience. Just make sure to adjust cooking times as needed. For the full recipe, check the section above! To keep your garlic butter scallop and shrimp pasta fresh, follow these steps: - Refrigeration: Place leftovers in an airtight container. Store them in the fridge for up to 3 days. This keeps the flavors intact and prevents spoilage. - Freezing: If you want to freeze, use a freezer-safe container. This dish can stay frozen for up to 2 months. However, scallops and shrimp may lose some texture when thawed. To enjoy your pasta again, use these reheating methods: - Best Method: Heat the pasta in a skillet over low heat. Add a splash of water or broth to prevent sticking. Stir gently until warmed through. - Refreshing Flavors: To boost the taste, add a little fresh garlic or a squeeze of lemon juice while reheating. This brings back the vibrant flavors of the dish. For the full recipe and more cooking tips, refer to the Full Recipe provided above. Garlic butter scallop and shrimp pasta can last up to three days in the fridge. Store it in an airtight container to keep it fresh. Always check for any off smells or changes in texture before eating. Yes, you can make garlic butter scallop and shrimp pasta ahead of time. Cook the pasta and seafood, then store them separately. Mix them together right before serving for the best taste and texture. You can serve garlic butter scallop and shrimp pasta with: - A simple green salad - Garlic bread - Roasted vegetables - A light white wine, like Sauvignon Blanc These sides balance the rich flavors of the pasta. To reheat the pasta, use a skillet over low heat. Add a splash of water or broth to keep it moist. Stir gently until heated through. This method helps maintain the dish's creamy texture. You can enhance garlic butter scallop and shrimp pasta with these spices: - Fresh basil for a sweet touch - Thyme for earthiness - Oregano for a hint of warmth - Black pepper for a little kick - A pinch of paprika for color and depth These spices can boost flavor and create a unique twist. For the full recipe, check the section above. This dish of garlic butter scallop and shrimp pasta combines fresh seafood with rich flavors. We covered the key ingredients, tips for cooking pasta, and how to perfect your dish. Remember to adjust spice levels to suit your taste. You can try different seafood or pasta types for fun twists. This recipe is easy to follow and great for impressing guests. Enjoy every bite and share it with family and friends for a delightful meal experience. Happy cooking!](https://fastmealmate.com/wp-content/uploads/2025/06/494cb207-4638-4860-b24c-000c711884e6-768x768.webp)