Creamy Garlic Shrimp Pasta Quick and Flavorful Meal

Looking for a quick, delicious meal? This Creamy Garlic Shrimp Pasta recipe takes just 20 minutes. You’ll impress your family with its rich flavors and creamy sauce. Plus, it’s easy to make with just a few simple ingredients. In this post, I’ll guide you through each step. Get ready to enjoy a satisfying dish that can become a weeknight favorite. Let’s dive in and start cooking!
Ingredients
List of Ingredients
– 8 oz linguine or fettuccine pasta
– 1 lb large shrimp, peeled and deveined
– 4 cloves garlic, finely minced
– 2 tablespoons extra virgin olive oil
– 1 cup heavy cream
– 1 cup freshly grated Parmesan cheese
– 1 teaspoon lemon zest (from about half a lemon)
– Salt and freshly ground black pepper, to taste
– 1 tablespoon chopped fresh parsley (for garnish)
– ½ teaspoon red pepper flakes (optional, to add a kick)
Equipment Needed
– Large pot for boiling pasta
– Large skillet for making the sauce
– Measuring cups and spoons
– Colander for draining pasta
– Wooden spoon or spatula for stirring
– Knife and cutting board for garlic and parsley
Tips for Ingredient Quality
Use fresh shrimp for the best taste. Look for shrimp that smell clean and sweet. Choose high-quality extra virgin olive oil. This adds flavor to the dish. Always use freshly grated Parmesan cheese. Pre-grated cheese may not melt as well. Fresh garlic brings a strong, savory flavor. Avoid pre-minced garlic. For lemon zest, use a microplane for the best results. This brightens the sauce and adds freshness.
Step-by-Step Instructions
Cooking the Pasta
First, grab a big pot. Fill it with 4-5 quarts of water and add salt. Bring the water to a rolling boil. Once it bubbles, add 8 oz of linguine or fettuccine. Cook it according to the package instructions, usually about 8-10 minutes. You want it to be al dente. Before draining, remember to save ½ cup of the pasta water. Drain the pasta and set it aside.
Sautéing the Garlic
Next, take a large skillet and place it on medium heat. Pour in 2 tablespoons of extra virgin olive oil. Wait until it shimmers. Then, add 4 cloves of minced garlic. Sauté the garlic for about 30 seconds. You want it to smell amazing, but be careful not to let it brown. If it burns, it can taste bitter.
Cooking the Shrimp
Now, it’s shrimp time! Add 1 lb of peeled and deveined large shrimp to the skillet. Season them with salt, pepper, and optional red pepper flakes for some heat. Cook the shrimp for 2-3 minutes on each side. They should turn pink and opaque. Once cooked, take them out and place them on a plate.
Preparing the Creamy Sauce
In the same skillet, pour in 1 cup of heavy cream. Slowly bring it to a gentle simmer over medium-low heat. Then, add 1 cup of freshly grated Parmesan cheese and 1 teaspoon of lemon zest. Stir it all together until the cheese melts and the sauce becomes thick and creamy.
Combining and Serving the Dish
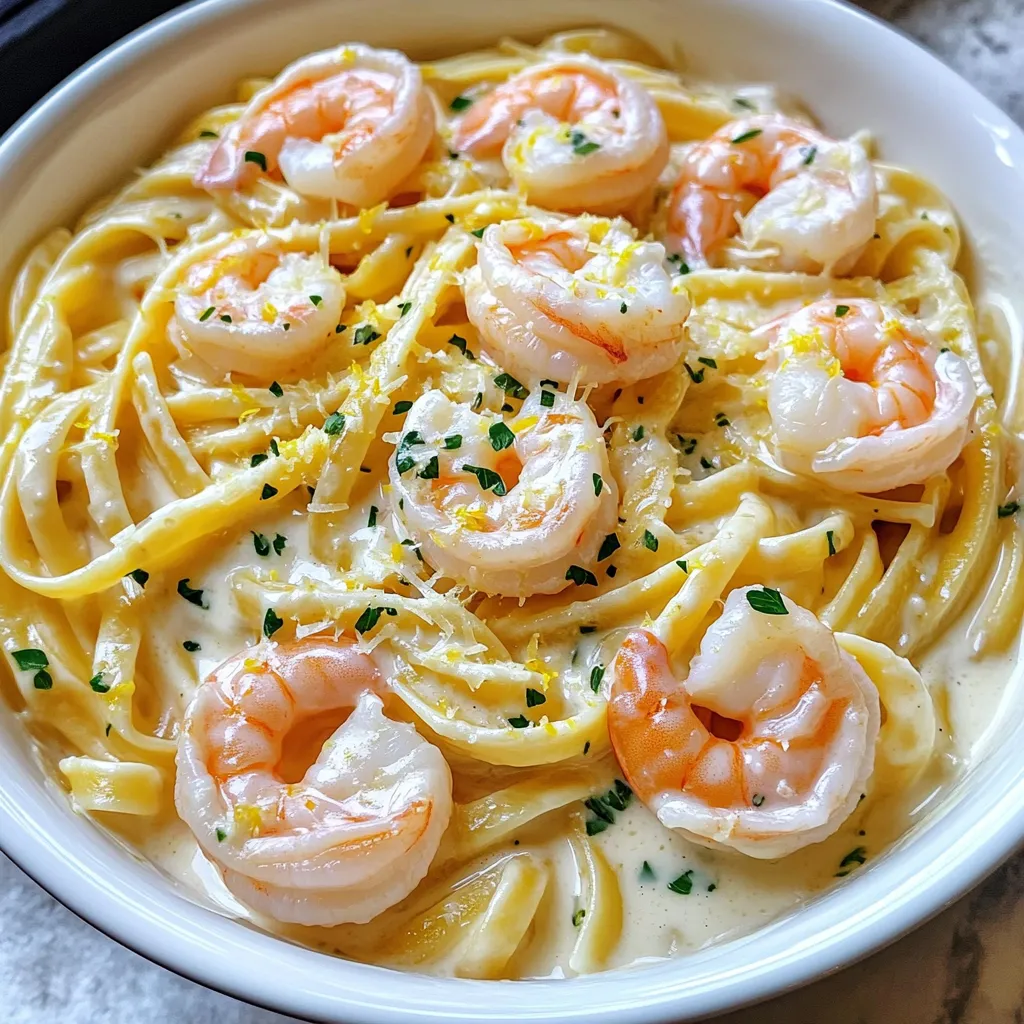
Return the cooked shrimp to the skillet along with the drained pasta. Toss everything together well. This helps the pasta soak up that creamy sauce. If the sauce is too thick, add a splash of the reserved pasta water until it reaches the creaminess you like. Finally, garnish with 1 tablespoon of chopped fresh parsley. Serve it right away, ensuring each plate looks delicious and inviting.
Tips & Tricks
Cooking Tips for Perfect Pasta
To cook perfect pasta, use a large pot with plenty of water. Add salt to the water; it helps the pasta taste good. Stir the pasta occasionally while it cooks. This keeps it from sticking together. Cook until it is al dente, which means it should be firm to the bite. Remember to save some pasta water before draining. This starchy water adds flavor and thickness to your sauce.
Adjusting Sauce Consistency
If your sauce is too thick, don’t stress! Just add a bit of the reserved pasta water. Stir it in slowly until you reach the right creaminess. If the sauce seems thin, let it simmer for a few more minutes. This helps it thicken up. You want a sauce that coats the pasta well but isn’t too heavy.
Enhancing Flavor with Seasonings
Seasoning is key to great flavor. Use fresh garlic for the best taste. You can add salt and pepper to suit your taste. Red pepper flakes bring a nice kick if you like spice. For a brighter flavor, lemon zest is a great addition. Fresh herbs, like parsley, also brighten up the dish. Don’t be afraid to try new spices to find your favorite flavor!

Variations
Adding Vegetables
You can easily add vegetables to your creamy garlic shrimp pasta. Vegetables boost flavor and nutrition. Here are some great options:
– Spinach: Toss in fresh spinach just before serving. It wilts quickly and adds vibrant color.
– Cherry Tomatoes: Halve and add them while cooking the shrimp. They bring sweetness and freshness.
– Zucchini: Slice zucchini into thin rounds. Sauté it with the shrimp for a light crunch.
– Bell Peppers: Dice any color bell pepper and cook with the garlic. They add a nice crunch and sweetness.
These veggies not only enhance taste but also make the dish more colorful and fun.
Alternative Proteins
If shrimp isn’t your thing, you can swap it out for other proteins. Here are some tasty alternatives:
– Chicken: Use bite-sized pieces of chicken breast. Cook them until golden before adding to the sauce.
– Salmon: Flake cooked salmon into the pasta for a rich, buttery flavor.
– Tofu: For a plant-based option, marinate and sauté firm tofu until golden. Toss it in with the pasta.
– Scallops: These tender bites are great with the creamy sauce. Sear them until golden before mixing.
These options let you enjoy a new twist on the classic recipe.
Different Pasta Types
You don’t have to stick with linguine or fettuccine. There are many pasta types you can use:
– Spaghetti: A classic choice that works well with creamy sauces.
– Penne: The tube shape holds sauce nicely, making each bite flavorful.
– Farfalle: The bowtie shape adds a fun touch and is great for holding sauce.
– Whole Wheat: For a healthier option, whole wheat pasta adds fiber and a nutty taste.
Mixing up the pasta can change the dish’s texture and feel. Enjoy exploring new shapes!
Storage Info
How to Store Leftovers
To store leftovers, let the pasta cool. Place it in an airtight container. You can keep it in the fridge for up to three days. Make sure to seal it well to avoid drying out.
Reheating Instructions
Reheat the pasta gently. Use a skillet over low heat. Add a splash of water or cream to help it warm evenly. Stir often to prevent sticking. You can also microwave it in short bursts, stirring in between.
Freezing Creamy Garlic Shrimp Pasta
Freezing this dish is possible, but keep in mind that the texture may change. Let it cool completely. Place it in a freezer-safe container. Label it with the date. You can freeze it for up to two months. When ready to eat, thaw it overnight in the fridge before reheating.
FAQs
How can I make this recipe gluten-free?
To make this recipe gluten-free, use gluten-free pasta. Many brands offer great alternatives. Look for options made from rice, chickpeas, or quinoa. These will cook well and taste good with the creamy sauce. Always check labels to ensure they are certified gluten-free.
Can I substitute heavy cream with a lighter option?
Yes, you can substitute heavy cream with half-and-half or whole milk. These options will make the dish lighter. However, the sauce may not be as thick or rich. If you use milk, consider adding a bit of cornstarch to thicken it.
What other herbs can I add for flavor?
You can add fresh basil, thyme, or oregano for extra flavor. These herbs pair well with garlic and shrimp. Chop them finely and stir them into the sauce. You can also try dill or tarragon for a unique twist.
In this blog post, we covered how to make creamy garlic shrimp pasta. You learned about the key ingredients, needed equipment, and tips for choosing quality items. We also shared step-by-step instructions for cooking the dish. Cooking tips helped you make perfect pasta, while variations let you explore new flavors. We wrapped up with storage info and answers to common questions.
Now, you can create a delicious meal that everyone will love. Enjoy your cooking journey!


![- 2 boneless, skinless chicken breasts - 4 cups frozen sweet corn - 1 medium onion, finely diced - 2 cloves garlic, minced - 2 medium-sized potatoes, peeled and diced - 3 cups chicken broth (low-sodium if preferred) - 1 teaspoon dried thyme - 1 teaspoon smoked paprika - 1 teaspoon salt (adjust to taste) - 1/2 teaspoon black pepper - 1 cup heavy cream - 1 tablespoon fresh parsley, finely chopped (for garnish) - Chicken Breasts: These give the chowder its protein and heartiness. Boneless and skinless cuts work best for easy shredding. - Frozen Sweet Corn: This adds natural sweetness and a nice texture. Frozen corn saves time and adds flavor. - Onion and Garlic: These aromatics enhance the overall taste. They create a flavorful base for your chowder. - Potatoes: Diced potatoes add creaminess and body. They also soak up all the lovely flavors. - Chicken Broth: This liquid forms the chowder's base. Low-sodium broth lets you control the salt. - Heavy Cream: This ingredient adds richness and smoothness. It makes the chowder feel indulgent. - Dried Thyme and Smoked Paprika: These spices give depth and warmth. They create a lovely, savory taste. - Chicken: You can use turkey or tofu for a different protein. - Corn: Fresh corn works instead of frozen if you have it. - Cream: Swap heavy cream for coconut milk for a dairy-free option. - Potatoes: Cauliflower can replace potatoes for a lower-carb choice. - Broth: Use vegetable broth for a vegetarian version. - Herbs and Spices: Feel free to mix in your favorite seasonings or herbs. This recipe is flexible, allowing you to create a chowder that fits your taste and needs. Check out the Full Recipe for cooking instructions and enjoy making this hearty meal! To start, gather all your ingredients. You’ll need chicken, corn, onion, garlic, potatoes, and broth. Place the chicken breasts at the bottom of the crockpot. Next, add the corn, onion, garlic, and potatoes on top of the chicken. This order helps the chicken cook well. Pour the broth over everything, covering the ingredients completely. Sprinkle in the thyme, paprika, salt, and pepper. Use a spoon to mix them gently. Set your crockpot to cook on low for 6-8 hours or high for 4 hours. The low setting gives the best taste and texture. The chicken will be very tender when done. You can check for doneness by cutting into the chicken; it should be white and juicy. About 30 minutes before serving, take the chicken out of the pot. Use two forks to shred it into small pieces. This will help it absorb more flavors. After shredding, return the chicken to the chowder. Mix it well. This step adds heartiness to your meal. Enjoy the rich, creamy goodness of this chowder! For the complete recipe, refer to the [Full Recipe]. To boost the flavor of your chowder, try using fresh herbs. Fresh thyme or basil can add a bright touch. You can also add a squeeze of lemon juice before serving. This gives a fresh and zesty kick. For a smoky flavor, increase the smoked paprika. If you like heat, add a pinch of cayenne pepper. This will make your chowder more exciting without overpowering it. One common mistake is not seasoning enough. Always taste your chowder before serving. Adjust the salt and pepper to your liking. Another mistake is overcooking the chicken. If you leave it in too long, it can become dry. Remember to shred the chicken about 30 minutes before serving. This keeps it juicy and flavorful. Lastly, don’t skip the cream. It adds richness and a nice texture to your chowder. Garnishing can make your chowder look appealing. I love using fresh parsley for color and freshness. Chopped green onions also add a nice crunch. A dollop of sour cream can enhance creaminess and flavor. For a fun twist, sprinkle some crispy bacon bits on top. This adds a salty crunch that contrasts well with the smooth chowder. Serve with warm bread for a complete meal. {{image_4}} You can boost the health of your chowder by adding more veggies. Carrots, bell peppers, or zucchini work great. Chop them into small pieces so they cook well. You can add them when you put in the corn and potatoes. This way, they cook together and soak up all the yummy flavors. If you need a gluten-free dish, this chowder is already a great choice. Just make sure the chicken broth you use is gluten-free. Most store-bought broths are, but it's always good to check the label. This chowder is warm and filling without any gluten. Want to add some heat? You can make your chowder spicy! Add diced jalapeños or a pinch of cayenne pepper. Start with a little and taste it. You can always add more if you like it hot. This twist will give your chowder a fun kick and make it even more exciting. For more ideas and a complete guide, check out the Full Recipe. After you finish your meal, let the chowder cool. Store it in an airtight container. It will stay fresh in the fridge for about 3 to 4 days. If you want to keep it longer, consider freezing. To freeze your chowder, first cool it completely. Then, pour it into freezer-safe bags or containers. Make sure to leave some space for expansion. You can freeze it for up to 3 months. When ready to eat, just thaw it overnight in the fridge. When it’s time to enjoy your chowder again, reheat it gently. You can use the stove or microwave. If using the stove, heat it on low and stir often. If it seems too thick, add a splash of chicken broth or water. This will help bring back the creamy texture. Enjoy your warm and hearty meal! You can store leftover chowder in the fridge for up to four days. Keep it in an airtight container. If you want to keep it longer, freeze it. It can last up to three months in the freezer. Just make sure to thaw it overnight in the fridge before reheating. Yes, you can use fresh corn! Just cut the kernels off the cob. You will need about four ears of corn to replace the frozen version. Fresh corn adds a lovely crunch and sweetness. Just add it to the crockpot at the same time as the other ingredients. Crockpot Chicken Corn Chowder goes well with many sides. Here are some great options: - Crispy bread - Buttered rolls - Green salad - Garlic bread - Cornbread These sides add texture and complement the chowder's flavors. To make this chowder vegetarian, replace chicken with firm tofu or chickpeas. Use vegetable broth instead of chicken broth. You can also add more veggies, like bell peppers or zucchini. This way, you keep the chowder hearty and tasty without meat. This chowder is rich and filling. A serving has about: - 350 calories - 15 grams of fat - 30 grams of carbs - 20 grams of protein These values can change based on the ingredients you use. Check the labels for exact numbers if you substitute items. For the full recipe, refer to the earlier section. This blog post covered all you need to make tasty Crockpot Chicken Corn Chowder. We explored key ingredients, helpful cooking steps, and tips to enhance flavor. I shared variations to fit your diet and storage info to keep leftovers fresh. Remember, making chowder can be fun and easy. Experiment with flavors and enjoy your meal. Happy cooking!](https://fastmealmate.com/wp-content/uploads/2025/07/7342804b-764e-40da-bca1-0102f439c2b1-768x768.webp)
![To make Tie Dye Funfetti Cake Pops, you need a few simple ingredients. Here’s what you’ll need: - 1 box Funfetti cake mix - 3 large eggs - 1 cup water - 1/2 cup vegetable oil - 1 cup icing (store-bought or homemade) - 1 cup white chocolate or candy melts - Food coloring (red, blue, yellow, green) - Sprinkles (for decoration) - Lollipop sticks These ingredients come together to create a fun, colorful treat. The Funfetti cake mix adds a sweet flavor and a joyful look. Eggs and water help bind the cake mix for a soft texture. Icing brings sweetness and moisture, while white chocolate adds a smooth coat. You can customize your colors with food coloring. This makes each pop look unique! Finally, sprinkles add that extra sparkle. To see the full process, check out the Full Recipe. Baking the Funfetti Cake First, preheat your oven to 350°F (175°C). In a large bowl, mix the Funfetti cake mix with three eggs, one cup of water, and half a cup of vegetable oil. Stir until the batter is smooth. Pour the batter into a greased 9x13 inch baking pan and bake for 25 to 30 minutes. Check with a toothpick; it should come out clean. Once done, let the cake cool completely in the pan. Crumbling the Cake After the cake is cool, break it apart into a large bowl. Use your hands to crumble the cake into fine pieces. Make sure there are no large chunks left. This step is key for good texture. Incorporating Icing Next, add half a cup of icing to your crumbled cake. Use your hands or a spatula to mix it all together. The cake crumbs should be moist and hold together when squeezed. If it feels dry, add a bit more icing. Dividing and Coloring the Mixture Now, split the moist cake mixture into four bowls. Add a few drops of food coloring to each one—red, blue, yellow, and green. Mix well until the colors are bright and even. This is where the fun begins! Rolling Cake Balls Take a tablespoon of each colored mixture and roll it into a ball. Alternate the colors to create a tie-dye look. Place the cake balls on a baking sheet lined with parchment paper. Make sure they look fun and colorful. Chilling the Cake Pops Put the baking sheet with the cake balls in the fridge for at least 30 minutes. This helps them firm up and hold their shape. While they chill, you can prepare the chocolate for coating. For the complete instructions, check the Full Recipe. Mixing Techniques To get that fun tie-dye look, I recommend using a swirling method. Take small amounts of each color and gently mix without fully blending. This keeps the colors distinct. Use a spoon or your hands, and be gentle. If you mix too hard, you lose the fun swirls. Color Combination Ideas For vibrant pops, try red, blue, yellow, and green. These colors stand out well together. You can also experiment with pastel shades for a softer look. Imagine a light pink, mint green, and baby blue blend. The key is to choose colors that excite you. Best Practices for Melting When melting chocolate or candy melts, use a microwave-safe bowl. Heat in short bursts of 20 seconds, stirring in between. This prevents burning. If the chocolate is too thick, add a small amount of coconut oil. This will help it coat the pops smoothly. Alternate Coating Options If you want a twist, try using dark or milk chocolate instead of white. You can also use colored candy melts for a fun effect. Each option adds a unique flavor and look. Don't forget to sprinkle on some fun toppings right after dipping while the chocolate is still wet! For the full recipe, check out the instructions above. {{image_4}} You can switch up the flavor of your Tie Dye Funfetti Cake Pops. Here are some ideas: - Different Cake Mixes: Try other cake mixes like vanilla or chocolate. Each mix gives a unique taste. You can even find gluten-free options to suit different diets. Experiment with flavors that you love. - Alternative Icing Flavors: Use different icing flavors for fun twists. Chocolate, cream cheese, or even peanut butter can add a delightful kick. Choose flavors that match your cake mix for the best taste. Making your cake pops look great is just as fun as eating them. Here are some ways to jazz them up: - Themed Sprinkles: Choose sprinkles that match your event. Use holiday-themed sprinkles for parties or bright colors for birthdays. You can mix and match to create a fun look. - Decorative Wrapping Options: Wrap each cake pop in colorful cellophane. Tie with a ribbon for a nice touch. You can also use clear bags for a simple, yet stylish look. These make great gifts or party favors. For the full recipe, check out the [Full Recipe]. You want your tie-dye funfetti cake pops to stay fresh and tasty. Here’s how to store them properly: - Room Temperature vs. Refrigeration: You can keep cake pops at room temperature for up to two days. Just place them in an airtight container. If it’s warm outside, it’s best to keep them in the fridge. They can last in the fridge for up to a week. - Freezing Cake Pops for Later: If you want to save some for later, freezing is a great option. Wrap each cake pop in plastic wrap or foil. Then, place them in a freezer-safe bag. They can stay in the freezer for up to three months. When you’re ready to eat them, let them thaw in the fridge overnight. - How Long They Last: Tie-dye funfetti cake pops can last about 5 to 7 days in the fridge. If you freeze them, they can last up to three months. - Signs of Spoilage: Check for any changes in smell or appearance. If they smell off or have a strange texture, it’s time to toss them. Mold is a clear sign they should not be eaten. Always trust your senses! To keep your cake pops moist, add more icing. Start with half a cup and mix until the crumbs hold together. If the mix feels dry, add more icing, a little at a time. Baking time also matters. Bake the cake for 25 to 30 minutes. Check with a toothpick; it should come out clean. Overbaking can dry out your cake, so keep an eye on it. Yes! You can use any colors you like. I recommend gel food coloring. It gives bright and bold colors without making the batter too runny. To create unique palettes, mix colors. For example, mix blue and yellow for green. Let your imagination run wild! If you want alternatives to icing, consider cream cheese or whipped cream. Both add flavor and moisture. For healthier options, try yogurt or a fruit puree. They can keep your cake pops moist while reducing sugar content. You now know how to make fun Tie-Dye Funfetti Cake Pops. We discussed the simple ingredients needed, from cake mix to chocolate. I shared step-by-step instructions to guide you through baking and shaping. You learned tips for a great tie-dye effect and how to melt chocolate properly. We explored fun variations, storage tips, and answered common questions. Now, get creative and enjoy making these tasty treats for any occasion. Let your imagination run wild with flavors and colors!](https://fastmealmate.com/wp-content/uploads/2025/07/83373fa8-848b-4df7-80a1-d15ce22469bd-768x768.webp)


