
Are you ready to transform dinner time with a simple, delicious dish? My Creamy Cheesy Cauliflower Delight will make your meals easier and tastier! Packed with cheesy goodness and a hint of garlic, this recipe is perfect for busy weeknights. Whether you're cooking for yourself or your family, you’ll love how quickly it comes together. Let's dive into the creamy, cheesy joy of this easy recipe!
Why I Love This Recipe
- Comforting Flavor: This dish combines the rich creaminess of cheese with the mild taste of cauliflower, creating a comforting and satisfying meal.
- Easy Preparation: With straightforward steps and minimal ingredients, this recipe is perfect for both novice cooks and busy weeknights.
- Versatile: Whether as a side dish or a main course, this cheesy delight fits seamlessly into any meal plan.
- Healthier Indulgence: Using cauliflower as a base allows you to enjoy a cheesy dish while incorporating more vegetables into your diet.
Ingredients
Main Ingredients
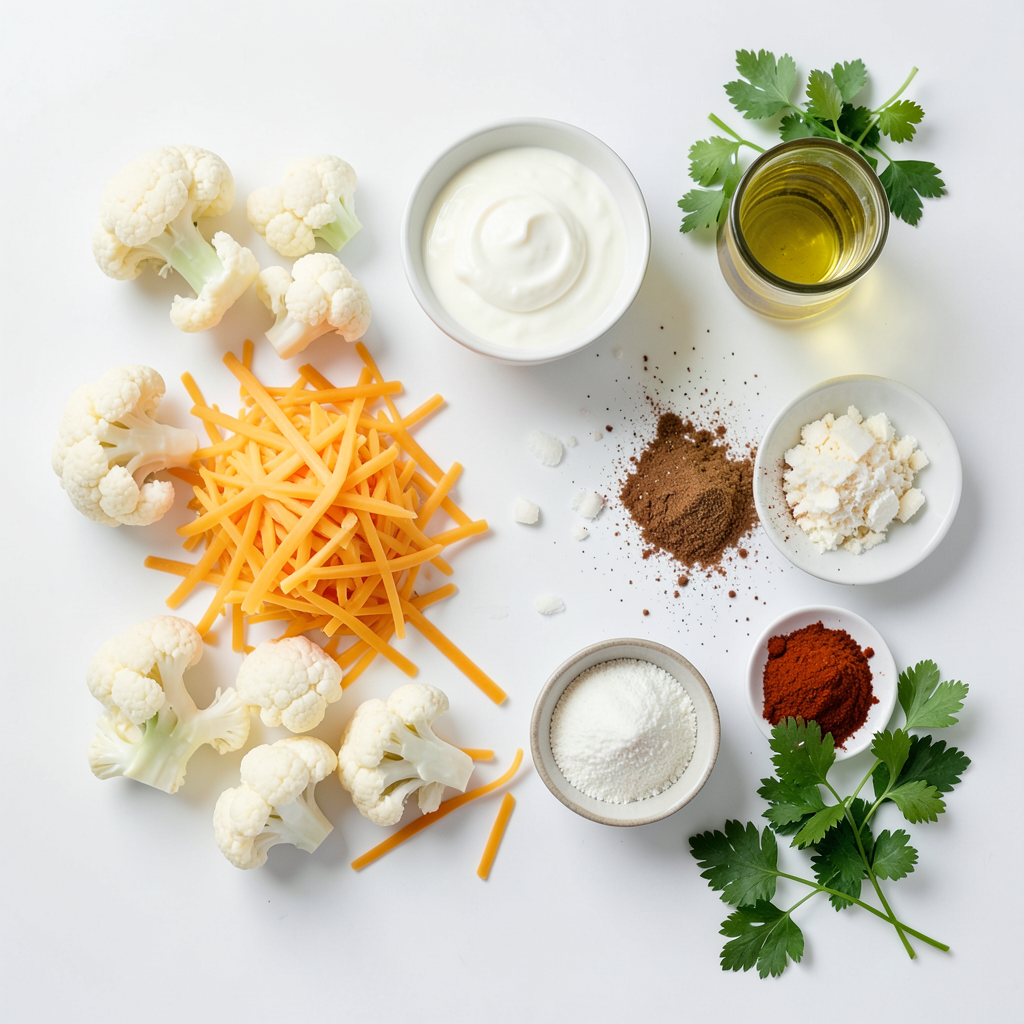
- 1 large head of cauliflower
- 1 cup shredded sharp cheddar cheese
- ½ cup cream cheese
Additional Ingredients
- ½ cup milk or plant-based milk
- 2 cloves garlic
- 1 teaspoon onion powder
Seasonings
- ½ teaspoon paprika
- Salt and freshly ground black pepper
- 2 tablespoons extra-virgin olive oil
When I make creamy cheesy cauliflower, I always start with fresh, quality ingredients. A large head of cauliflower works best. It should be bright white with no brown spots. The sharp cheddar cheese brings a bold flavor, while cream cheese adds a rich texture. You can also use plant-based milk if you prefer a vegan option.
Garlic and onion powder add depth to the dish. I love using fresh garlic, as it enhances the creamy mixture. For seasonings, paprika brings in a warm, subtle heat. Salt and black pepper help balance the flavors. Finally, a drizzle of extra-virgin olive oil adds a nice touch of richness.
To make this dish even better, I recommend using freshly grated Parmesan cheese on top. It melts beautifully and adds a deliciously cheesy crust. You can garnish with fresh parsley for a pop of color and freshness.
Step-by-Step Instructions
Prepping the Oven and Cauliflower
- Preheat your oven to 375°F (190°C).
- Blanch the cauliflower florets in salted water for about 5 minutes. This keeps them tender yet crunchy. Drain them well, and set aside.
Making the Creamy Mixture
- In a bowl, combine softened cream cheese, milk, minced garlic, onion powder, paprika, salt, and pepper.
- Whisk these together until smooth and creamy. Make sure there are no lumps.
Baking the Dish
- Gently add the blanched cauliflower to the creamy mixture.
- Use a spatula to fold the cauliflower in until it’s fully coated.
- Transfer the mixture to a greased baking dish. Spread it out evenly.
- Top with shredded cheddar and grated Parmesan cheese.
- Drizzle a little olive oil over the top for extra flavor.
- Bake for 20-25 minutes. Look for melted, bubbly cheese and a golden crust.
Tips & Tricks
Achieving the Perfect Creaminess
- Use room temperature cream cheese. This helps it blend easily.
- Adjust milk for desired consistency. Add more for thinner sauce, less for thick.
To make your creamy cheesy cauliflower delight extra smooth, the cream cheese must be soft. Cold cream cheese can create lumps. Always let it sit out for a bit before mixing. When adding milk, think about how thick you want the sauce. A thicker sauce sticks to the florets better.
Enhancing Flavor
- Consider adding herbs or spices. Try garlic powder, thyme, or basil for extra taste.
- Experiment with different cheese types. Mix cheddar with mozzarella or gouda for a unique twist.
You can easily change the flavor of your dish. Adding fresh herbs like thyme or rosemary can brighten it up. Spices like garlic powder and paprika add depth. Cheese is another area to switch it up. Mixing various cheeses can create a richer taste.
Presentation Tips
- Serve in the baking dish or individual plates. A rustic look invites everyone to dig in.
- Garnish with parsley for color. Fresh parsley adds a nice pop of green.
How you serve this dish can make it more appealing. Presenting it in the baking dish gives a homey feel. Using individual plates can make it feel fancy. Don’t forget to add parsley on top. It adds color and a fresh touch!
Pro Tips
- Choose Fresh Cauliflower: Selecting a fresh, firm cauliflower will enhance the flavor and texture of your dish. Look for bright white florets without any brown spots for the best results.
- Experiment with Cheeses: Feel free to mix different types of cheeses like mozzarella or gouda with cheddar for a unique flavor profile. This can elevate the creaminess and taste of the dish.
- Adjust Seasonings: Taste the creamy mixture before incorporating the cauliflower. Adjust the salt, pepper, and spices to your liking to ensure a balanced flavor throughout the dish.
- Let it Rest: Allow the creamy cheesy cauliflower to rest for a few minutes after baking. This helps the flavors meld together and makes it easier to serve without falling apart.
Variations
Cheesy Cauliflower with Bacon
You can easily add cooked bacon bits to this dish. The bacon gives a nice smoky flavor that pairs well with the creamy cheese. Just sprinkle it on top before baking. It adds a crunch and extra taste.
Vegan Version
If you want a plant-based option, swap the cream cheese and cheddar for vegan cheese. Many brands offer great substitutes. Use plant-based milk too. This way, everyone can enjoy creamy cheesy cauliflower without dairy.
Spicy Cheesy Cauliflower
Want some heat? Add diced jalapeños or a splash of hot sauce. This will give your dish a spicy kick. It’s perfect if you love bold flavors. Just mix it in with the creamy mixture before adding the cauliflower.
Storage Info
Leftover Storage
After enjoying your creamy cheesy cauliflower, let it cool first. Once it’s cool, store it in an airtight container. This helps keep it fresh for later. I often use glass containers because they don’t stain and are easy to clean. You can keep it in the fridge for about 3 to 5 days.
Reheating Instructions
When you’re ready to enjoy your leftovers, reheat them for the best taste. Use the oven for even heating. Preheat your oven to 350°F (175°C). Place the cauliflower in a baking dish and cover with foil. This helps retain moisture. Bake for about 15-20 minutes. If you’re in a hurry, the microwave works too. Heat it in short bursts, stirring in between, until warm.
Freezing Tips
If you want to save some for a later date, freezing works well. First, let the dish cool completely. Portion it into freezer-safe containers. Be sure to leave some space at the top because food expands when frozen. You can freeze it for up to 2 months. When you're ready to eat, thaw it in the fridge overnight. Reheat it as mentioned above for a delicious meal.
FAQs
Can I make this dish ahead of time?
Yes, you can prepare creamy cheesy cauliflower in advance. Here’s how:
- Blanch the cauliflower: Do this a day early, then let it cool.
- Make the creamy mixture: Mix cream cheese, milk, garlic, and spices. Store it in the fridge.
- Combine and bake: When you are ready to serve, combine the cauliflower and creamy mix in a baking dish. Top with cheese and bake as directed.
- Store leftovers: If you have any, cool and put them in an airtight container.
How can I make this recipe gluten-free?
To make this recipe gluten-free, follow these tips:
- Check the cream cheese: Most brands are gluten-free, but always read the label.
- Use gluten-free milk: Any plant-based milk is a safe choice.
- Onion powder and paprika: These are usually gluten-free, but check for any added ingredients.
- Cheese options: Stick with certified gluten-free cheese brands for safety.
What can I serve with creamy cheesy cauliflower?
You can pair this dish with many great options:
- Grilled chicken: The flavors mix well, and it adds protein.
- Roasted vegetables: Carrots or broccoli can brighten the meal.
- Salad: A fresh green salad can balance the richness of the dish.
- Quinoa or rice: These grains make a filling side and soak up the sauce.
This blog post showed how to make a creamy cheesy cauliflower dish. We discussed main and additional ingredients, plus seasonings for flavor. I provided step-by-step instructions to guide you through prepping, mixing, and baking. You learned tips for perfect creaminess and how to present the dish well. I also shared fun variations for every taste and storage tips for leftovers.
Try this recipe to enjoy a tasty and versatile dish. A few simple tweaks can make this meal your own. Happy cooking!