Cranberry Orange Relish Tasty and Refreshing Recipe

If you’re looking for a quick and tasty addition to your meals, try making Cranberry Orange Relish! This recipe combines the tartness of fresh cranberries with the bright flavor of orange, creating a refreshing dish perfect for holidays or everyday meals. In just a few simple steps, you can whip up a vibrant and flavorful relish that will impress your family and friends. Let’s dive into the delicious details!
Why I Love This Recipe
- Bright and Flavorful: The combination of fresh cranberries and orange provides a burst of brightness that elevates any dish.
- Easy to Prepare: With just a few simple ingredients and steps, you can whip up this delightful relish in no time.
- Versatile Accompaniment: This relish pairs beautifully with turkey, ham, or even as a topping for desserts like cheesecake.
- Make Ahead Option: It can be prepared in advance, allowing the flavors to meld beautifully for a more delicious experience.
Ingredients
List of Ingredients
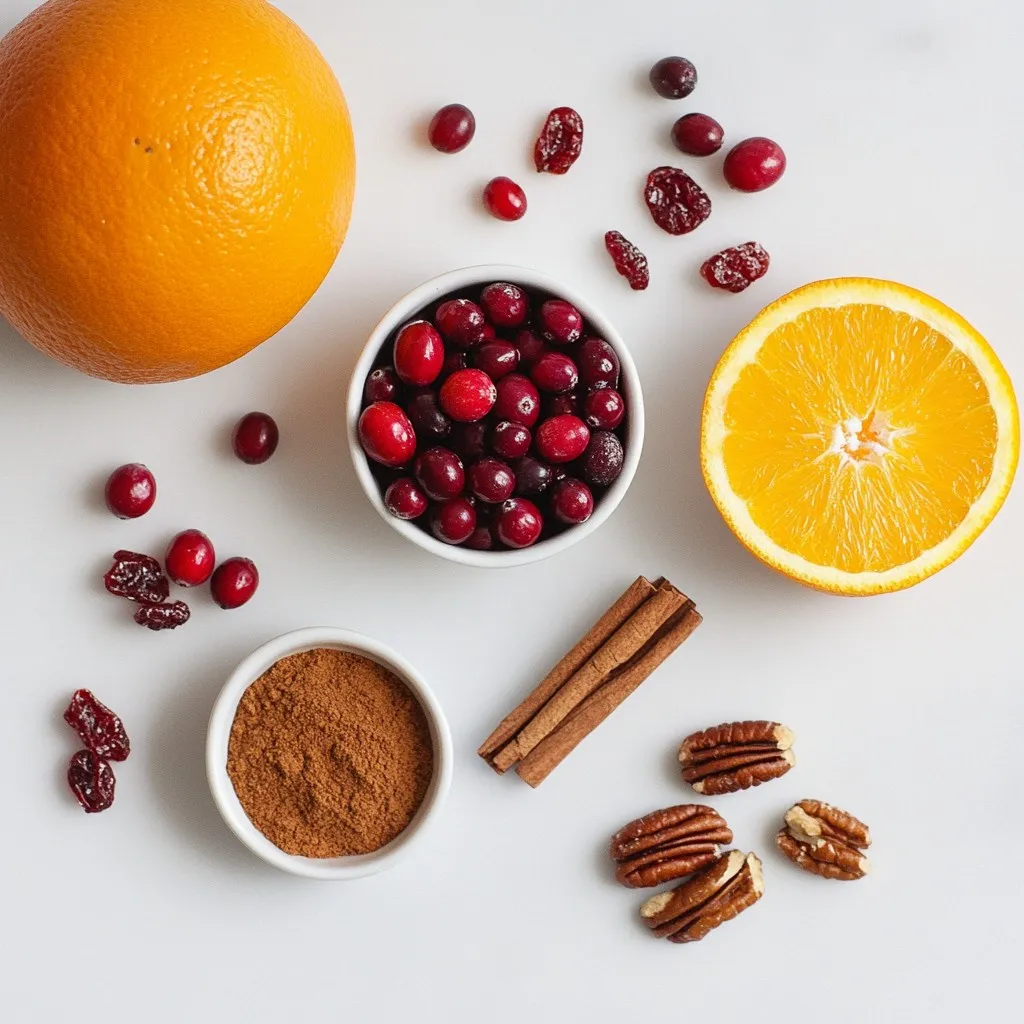
– 2 cups fresh cranberries, thoroughly rinsed
– 1 large orange, zested and juiced
– 1 cup granulated sugar
– 1/2 teaspoon ground cinnamon
– 1/4 teaspoon ground nutmeg
– 1/4 cup chopped pecans or walnuts (optional)
– 1/4 cup dried cranberries (optional)
Cranberry orange relish is bright and tasty. The fresh cranberries give it a tart kick. The orange zest and juice add sweetness and freshness. I love using ground cinnamon and nutmeg for warmth. You can add nuts for crunch and dried cranberries for extra texture. This recipe is simple, quick, and perfect for any meal.
When you gather your ingredients, wash the cranberries well. Make sure they are fresh. Look for ones that are firm and shiny. The orange should be juicy and fragrant. Zest it gently, avoiding the white pith. It can be bitter.
This relish is fun to make. You can mix and match the nuts and dried fruit. Each change brings a new flavor. Enjoy creating your own version!

Step-by-Step Instructions
Preparing the Base
– First, grab a medium-sized saucepan.
– Combine 2 cups of fresh cranberries, the juice of 1 large orange, and 1 cup of granulated sugar.
– Mix well to coat the cranberries in sugar.
– Place the saucepan on medium heat.
– Bring the mixture to a gentle boil while stirring occasionally.
– Cook for about 10 minutes, or until most cranberries burst open.
Flavor Development
– Once the mixture thickens, remove it from the heat.
– Let it cool slightly at room temperature.
– Now, stir in the zest of the orange, 1/2 teaspoon of ground cinnamon, and 1/4 teaspoon of ground nutmeg.
– Mix until all the spices blend into the relish.
Final Touches
– If you want, fold in optional ingredients like 1/4 cup of chopped pecans or walnuts and 1/4 cup of dried cranberries.
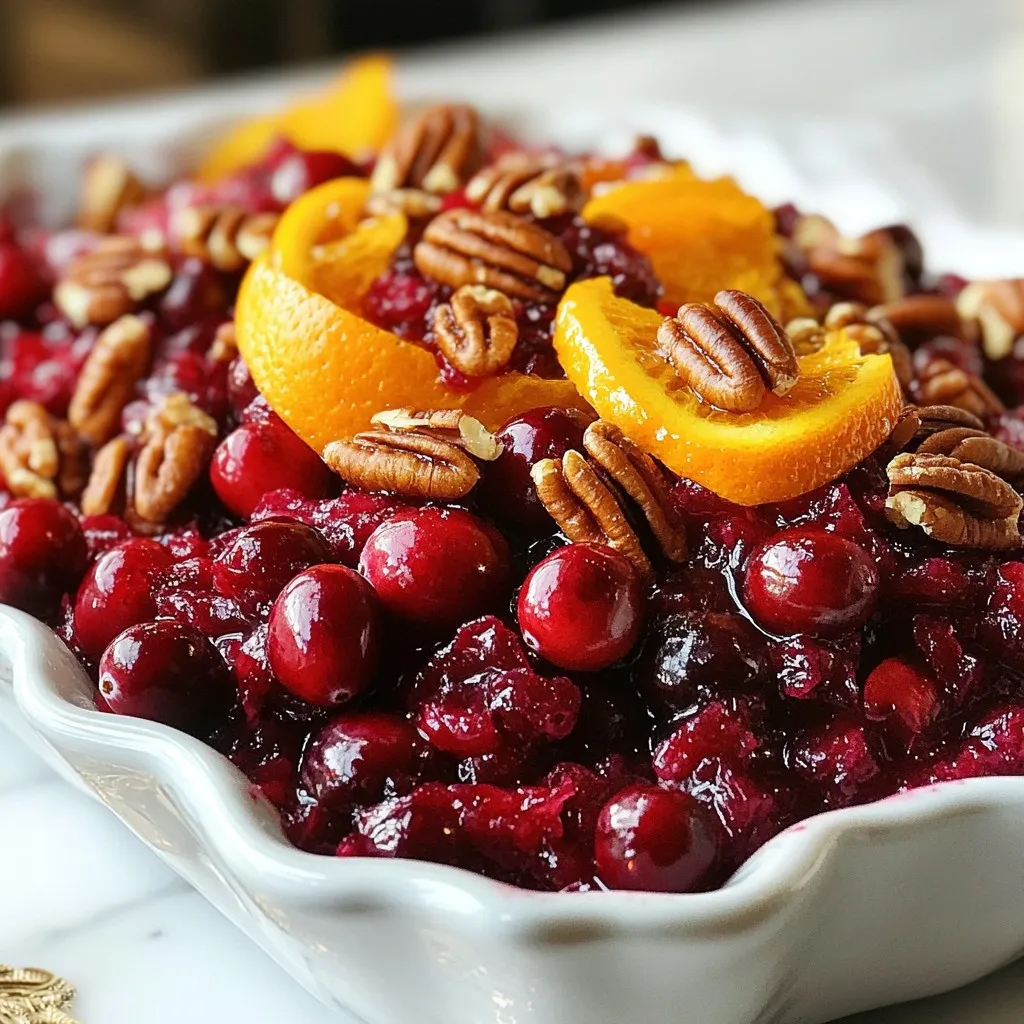
– Transfer your relish to a decorative serving bowl.
– Allow it to cool completely before refrigerating.
– For the best flavor, cover the bowl and chill for at least 2 hours.
Tips & Tricks
Enhancing Flavor
To make your cranberry orange relish pop, layer flavors well. Start with fresh cranberries and fresh orange juice. Always taste as you go. Add spices like cinnamon and nutmeg to boost warmth. For a crunchy twist, mix in chopped pecans or walnuts. This gives a nice texture and fun bite. If you like sweet, adjust sugar to your taste.
Serving Suggestions
Cranberry orange relish pairs well with turkey and ham. It can also brighten up simple meals. Serve it over cream cheese on crackers for a quick snack. For gatherings, present it in a clear bowl. This lets the bright colors shine. Add a mint sprig or orange slice on top for flair.
Storage Information
Store your cranberry orange relish in a tight, sealed container. It will stay fresh in the fridge for up to one week. For longer storage, freeze it. In the freezer, it can last up to three months. Just thaw it overnight in the fridge when you’re ready to use it.
Pro Tips
- Fresh Cranberries are Key: Always use fresh cranberries for the best flavor and texture. Avoid using canned cranberries as they can be overly sweet and mushy.
- Adjust Sugar to Taste: Depending on the sweetness of your orange and personal preference, you may want to adjust the amount of sugar in the recipe.
- Chill for Best Flavor: Allow the relish to chill in the refrigerator for at least two hours. This resting time helps the flavors meld together beautifully.
- Experiment with Spices: Feel free to experiment with additional spices like ginger or allspice to give your relish a unique twist.

Variations
Alternative Ingredients
You can change the sugar in the recipe. Try using honey or maple syrup. They add a nice flavor. If you prefer nuts, you can swap pecans for almonds or leave them out. Adding spices can also change the taste. Consider using ginger for a warm kick or cardamom for a sweet note.
Dietary Modifications
If you want to make this relish vegan, simply make sure to use maple syrup instead of sugar. This way, you keep it sweet without using animal products. For a sugar-free option, try a sugar substitute like stevia or erythritol. If gluten is a concern, this recipe is naturally gluten-free. Serve it with gluten-free dishes for a safe choice.
Seasonal Twists
You can mix in seasonal fruits like apples or pears. They add a fun twist to the flavor and texture. For holidays beyond Thanksgiving, consider using spices like allspice or clove for a festive touch. Adding a splash of cranberry juice or a hint of lemon can also brighten the dish for year-round enjoyment.
Nutritional Information
Serving Size and Nutrients
Each serving of cranberry orange relish has about 80 calories. This dish offers a mix of vitamins and minerals. Cranberries are rich in vitamin C and fiber, while oranges boost your intake of folate and potassium. Both fruits also have antioxidants, which can help fight disease.
Dietary Considerations
This relish fits many dietary needs. It is naturally low in fat and can be low-sugar if you adjust the sugar amount. It is nut-free unless you choose to add nuts. If you prefer a vegan option, just skip the sugar or use a sugar substitute. Ingredients like cranberries and oranges promote good health. They help keep your heart strong and your immune system working well.
FAQs
How long can I store cranberry orange relish?
You can store cranberry orange relish in the fridge for up to two weeks. Make sure to keep it in a sealed container. This helps keep it fresh and tasty.
Can I use frozen cranberries?
Yes, you can use frozen cranberries. They work well in this recipe. Just rinse them before use. Frozen cranberries may need a few more minutes to cook down.
Is cranberry orange relish good for you?
Cranberry orange relish is quite healthy. Cranberries are full of vitamins and antioxidants. Oranges add vitamin C and fiber. The sugar can be reduced for a lighter option.
What can I serve with cranberry orange relish?
Cranberry orange relish pairs well with meats like turkey or chicken. It also works great on sandwiches or with cheeses. Use it to add a zesty touch to your meal.
Can I make this relish ahead of time?
Yes, making this relish ahead of time is a great idea. It tastes better after chilling for a few hours. Make it the day before your event for the best flavor.
You’ve learned how to make a vibrant cranberry orange relish. We covered all the ingredients, detailed step-by-step instructions, and shared useful tips. Remember, you can adjust flavors and even cater to different dietary needs. This relish is perfect for Thanksgiving or any meal. With its fresh taste and health benefits, it is a fantastic addition to your table. Enjoy creating your own version and share it with friends and famil

Cranberry Orange Delight
Ingredients
- 2 cups fresh cranberries, thoroughly rinsed
- 1 large orange, both zested and juiced
- 1 cup granulated sugar
- 1/2 teaspoon ground cinnamon
- 1/4 teaspoon ground nutmeg
- 1/4 cup chopped pecans or walnuts (optional)
- 1/4 cup dried cranberries (optional)
Instructions
- In a medium-sized saucepan, combine the rinsed fresh cranberries, freshly squeezed orange juice, and granulated sugar. Mix well to ensure the sugar is distributed evenly among the cranberries.
- Place the saucepan over medium heat and bring the mixture to a gentle boil, stirring occasionally to prevent sticking. Allow it to cook for approximately 10 minutes, or until you notice most cranberries have burst open, resulting in a thickened sauce.
- Once the mixture thickens, remove the saucepan from heat and let it cool slightly at room temperature.
- After cooling, stir in the orange zest, ground cinnamon, and ground nutmeg. Mix until all spices are evenly incorporated throughout the relish.
- If desired, gently fold in the optional chopped pecans or walnuts and the dried cranberries for an additional layer of texture and taste.
- Carefully transfer the relish into a decorative serving bowl. Let it cool completely to room temperature before refrigerating.
- For the best flavor development, cover the bowl and refrigerate the cranberry orange delight for at least 2 hours prior to serving.


![This Chocolate Tres Leches Cake uses simple ingredients. Each one works together to create a rich flavor. - 1 cup all-purpose flour - 1/2 cup unsweetened cocoa powder - 1 1/2 teaspoons baking powder - 1/2 teaspoon baking soda - 1/4 teaspoon salt - 1/2 cup unsalted butter, softened - 1 cup granulated sugar - 3 large eggs, at room temperature - 1 teaspoon vanilla extract - 1/2 cup buttermilk, at room temperature - 1 cup sweetened condensed milk - 1 cup evaporated milk - 1 cup whole milk - 1 cup heavy cream, chilled - 2 tablespoons powdered sugar (for whipped cream) - Chocolate shavings or cocoa powder for garnish (optional) These ingredients create a soft cake soaked in a sweet milk mixture. The heavy cream topping adds a light and airy touch. Using room temperature ingredients helps everything mix well. I recommend using fresh milk for the best taste. For a unique twist, sprinkle chocolate shavings on top before serving. Enjoy making this delicious treat! For the complete recipe, check the [Full Recipe]. Start by preheating your oven to 350°F (175°C). Grab a 9x13 inch baking pan. Grease it with butter to make sure your cake won’t stick. Dust the pan lightly with flour. This quick step helps the cake come out clean and perfect. In a medium bowl, sift together the all-purpose flour, cocoa powder, baking powder, baking soda, and salt. This helps mix everything well. In a large bowl, use an electric mixer to beat the softened butter and sugar until it is light and fluffy. This takes about 3-5 minutes. Then, add the eggs one at a time. Mix well after each egg. Finally, stir in the vanilla extract. Slowly fold the dry ingredients into the wet mixture. Alternate with the buttermilk. Start and finish with the dry mix. Be gentle; mix until you see no flour streaks. Pour the batter into your prepared pan. Smooth the top with a spatula. Bake for 30-35 minutes. Check if it’s done by inserting a toothpick into the center; it should come out clean. Let it cool for 10 minutes, then turn it out onto a wire rack. In a separate bowl, mix the sweetened condensed milk, evaporated milk, and whole milk. Whisk this mixture until blended. This will soak into your cake, making it rich and moist. Once the cake is cool, poke holes in the top with a fork. Pour the tres leches mixture evenly over the cake. This helps the cake absorb the milk. Cover it with plastic wrap and let it soak for at least one hour. This step is key for flavor. In a large bowl, beat the chilled heavy cream with powdered sugar until stiff peaks form. Spread this whipped cream over the soaked cake. For a nice touch, sprinkle chocolate shavings or cocoa powder on top. Refrigerate the cake for at least 2 hours before serving. This waiting time mixes the flavors and makes each bite delicious. For the full recipe, check the details in the earlier sections. To get a moist cake, follow a few simple steps. Start by using room temperature ingredients. This helps the batter mix well. Next, do not overmix the batter. Mix until just combined. Overmixing adds air, which can dry the cake out. Finally, bake the cake just until a toothpick comes out clean. If you bake too long, the cake will dry out. Soaking the cake properly is key. First, let the cake cool completely before soaking it. This helps the cake absorb the milk mixture better. Use a fork to poke holes all over the top of the cake. This allows the milk to seep in. Then, pour the tres leches mixture evenly over the cake. Let it sit for at least one hour. For best results, cover it with plastic wrap and refrigerate. This ensures the cake soaks up all the flavor. Whipped cream adds a light touch to the cake. Start by chilling your mixing bowl and beaters. This keeps the cream cold and helps it whip better. Beat the heavy cream until it forms stiff peaks. This means it should hold its shape when you lift the whisk. Add the powdered sugar gradually for sweetness. Spread the whipped cream gently over the soaked cake. For a fun twist, add chocolate shavings or a sprinkle of cocoa powder on top. For the complete recipe, check the Full Recipe section. {{image_4}} You can make a gluten-free version of this cake easily. Just swap the all-purpose flour for a gluten-free flour blend. Look for a blend that works well for baking. This change keeps the cake moist and delicious. You may also add a pinch of xanthan gum to help the texture. To create a vegan chocolate tres leches cake, replace the eggs with flax eggs. Mix 1 tablespoon of ground flaxseed with 2.5 tablespoons of water for each egg. For the milk mixture, use coconut milk, almond milk, or any plant-based milk. Use coconut cream instead of heavy cream for topping. This way, you keep the rich flavor while going dairy-free. You can also play with flavors to make this cake unique. For a minty twist, add mint extract to the batter and whipping cream. Just a teaspoon will do. If you love coffee, add espresso powder to the batter for a rich, coffee flavor. You can also fold in chocolate chips for more texture and taste. Each variation brings a new fun experience to this classic dessert. For the full recipe, check the source to get all the details you need. To keep your Chocolate Tres Leches Cake fresh, always store it in the fridge. Use an airtight container to prevent it from drying out. If you have not yet topped it with whipped cream, store the cream separately. This keeps the cake moist and the cream fluffy. When stored properly, the cake lasts about 3 to 5 days in the fridge. The flavors will continue to blend, making each bite even better. Always check for any signs of spoilage, like a strange smell or changes in texture. You can freeze the cake if you want to keep it longer. Wrap it tightly in plastic wrap, then place it in a freezer-safe bag. This way, it can last up to 3 months in the freezer. When you're ready to enjoy it, let it thaw in the fridge overnight. Add the whipped cream topping just before serving for the freshest taste. For the complete recipe, you can refer to the Full Recipe section. Yes, you can! This cake is great for planning ahead. You can bake the cake, soak it, and then chill it in the fridge. It tastes even better after a day. Just cover it well so it stays fresh. Tres leches cake is soaked in three types of milk. Regular cake usually has no soaking. Tres leches is moist and rich. Regular cake is often lighter. The extra milk makes tres leches creamy and sweet. To keep the cake from being too soggy, let it cool completely first. After soaking, cover the cake and chill it. Serve it within a few days. This way, it stays moist without getting overly wet. Yes, you can use cake mix. Just follow the package instructions for baking. Make sure to adjust the milk mixture. This way, you get the rich flavor of tres leches without starting from scratch. You can use sweetened condensed milk, evaporated milk, and whole milk. If you want, you can try alternatives like almond milk or oat milk. Each choice will give a different taste, but they will still work well. For the full recipe, check out the Heavenly Chocolate Tres Leches Cake recipe above! In this post, we covered the essential steps to make a Chocolate Tres Leches Cake. You learned about the key ingredients and how to mix them. We detailed how to bake the cake and prepare the soaking mix. You got tips on keeping your cake moist and explored tasty variations. Finally, we discussed storing leftovers to enjoy later. Baking is fun and rewarding. Try this recipe to impress friends and family. Enjoy every delicious bite!](https://fastmealmate.com/wp-content/uploads/2025/06/83784e58-e7f6-4d4b-aebc-0bf8177d26de-768x768.webp)


![For the dry mix, gather these items: - 1 ½ cups all-purpose flour - 1 teaspoon baking powder - 1 teaspoon baking soda - ½ teaspoon salt - 1 teaspoon ground cinnamon - ½ teaspoon ground nutmeg - ¼ teaspoon ground ginger These ingredients help create the loaf's structure and flavor. The spices add warmth and depth. Next, collect these wet items: - 1 cup granulated sugar - ½ cup packed brown sugar - 1 cup vegetable oil - 3 large eggs - 1 teaspoon vanilla extract These components bring moisture and sweetness. The combination of sugars gives a rich taste. Now, let's spice it up with these add-ins: - 2 cups finely shredded carrots (approximately 4 medium carrots) - ½ cup crushed pineapple, well-drained - ½ cup chopped walnuts (optional) These add-ins bring texture and flavor. The carrots keep the loaf moist, while the pineapple adds a touch of sweetness. If you like crunch, toss in the walnuts. For the full recipe, you can explore the step-by-step instructions in [Full Recipe]. - Preheat the oven to 350°F (175°C). - Prepare your 9x5-inch loaf pan. Use non-stick spray or line it with parchment paper. This helps the loaf come out easily after baking. - In a medium bowl, combine the dry ingredients. Whisk together the flour, baking powder, baking soda, salt, and spices. Set this mixture aside for later. - In a large bowl, mix the sugars and oil. Beat them together until smooth. - Add the eggs one at a time to the sugar mixture. Mix well after each addition. Stir in the vanilla extract. - Gradually blend the dry ingredients with the wet ingredients. Stir gently until just combined. Avoid overmixing to keep your loaf tender. - Carefully fold in the finely shredded carrots, well-drained crushed pineapple, and chopped walnuts if you’re using them. Make sure they are evenly spread throughout the batter. - Pour the batter into your prepared loaf pan. Use a spatula to smooth the top. - Place the loaf pan in the oven. Bake for 50-60 minutes. Check for doneness by inserting a toothpick in the center. It should come out clean. If the top browns too fast, cover it loosely with aluminum foil. Use freshly grated carrots for the best flavor and moisture. Fresh carrots add a sweet crunch. You can also adjust the sugar based on your taste. If you prefer a sweeter cake, add a bit more sugar. If you want it less sweet, cut back. Mixing just until combined keeps the cake tender and moist. If you overmix, the loaf can turn out dense. When you add dry ingredients to the wet mix, stir gently. The batter should look slightly lumpy; that’s okay! To get a smooth cream cheese frosting, start with room temperature cheese and butter. Cold ingredients can lead to lumps. Beat the cream cheese and butter until creamy. Gradually add powdered sugar to avoid a cloud of sugar. Remember to mix until smooth, and then add a pinch of salt for flavor. For the full recipe, check out the [Full Recipe]. {{image_4}} You can easily change the flavor of your carrot cake loaf with different add-ins. If you want to swap nuts, try using raisins or shredded coconut instead. Both options add a sweet, chewy texture that pairs well with the spices. You can also adjust spices for a unique flavor. Add a little more cinnamon for warmth or some cardamom for a fragrant twist. This way, you can create a taste that fits your mood. If you need gluten-free options, consider almond or oat flour. Both flours work well and keep the loaf moist. For vegan substitutions, use flax eggs instead of regular eggs. Just mix one tablespoon of ground flaxseed with three tablespoons of water for each egg. You can also replace the cream cheese with a vegan cream cheese spread. These small changes keep the cake delicious while meeting your dietary needs. Pair your carrot cake loaf with a warm cup of coffee or tea. The rich flavors balance perfectly with a hot drink. To make your loaf look fancy, arrange slices on a beautiful platter. You can sprinkle chopped walnuts on top and add edible flowers for color. This makes your dessert not just tasty but also a feast for the eyes. For a fun touch, serve it with a scoop of vanilla ice cream for a delightful contrast. Make sure to check out the Full Recipe for more details on creating this delicious treat! To keep your carrot cake loaf fresh, store it in the fridge. Place it in an airtight container. This helps keep moisture in and prevents it from drying out. The cream cheese frosting also needs special care. To keep the frosting fresh, cover it with plastic wrap. This stops air from making it hard or crusty. You can freeze the carrot cake loaf both ways. First, freeze it before frosting. Wrap it in plastic wrap and then foil. This helps keep the cake moist. If you already frosted it, freeze the loaf on a plate. Once frozen, wrap it tightly. To thaw the loaf, place it in the fridge overnight. This helps keep the texture nice and soft. The carrot cake loaf can last about three days at room temperature. Keep it in a cool, dry place. If you see any mold or smell a sour scent, it’s best to throw it away. Always trust your senses when checking if food is safe to eat. Enjoy your delicious treat while it's fresh! For the full recipe, check the complete guide. Baking a carrot cake loaf takes about 50-60 minutes at 350°F (175°C). To test for doneness, insert a toothpick into the center. If it comes out clean, your loaf is ready. If the top browns too quickly, cover it with foil. This tip helps keep the top soft and moist. Yes, you can prepare this loaf ahead of time. You can mix the dry ingredients and store them in an airtight container. The wet ingredients can also be combined a day before. Just keep them in the fridge. Bake the loaf when you are ready. It keeps well and tastes fresh. If you need a dairy-free option, use vegan cream cheese. Another choice is to blend silken tofu with a bit of vanilla and powdered sugar. This gives you a smooth frosting that still tastes great. You can also try coconut cream for a tropical twist. Yes, this carrot cake loaf is great for kids. It contains nutritious carrots and pineapple, which add vitamins. The loaf is moist and flavorful, making it appealing to young eaters. Just be sure to watch for any nut allergies if you use walnuts. To check if the loaf is done, look for a golden brown top. You can also gently press the top; it should spring back. Use a toothpick to test the center. If it comes out clean, your carrot cake loaf is perfect. These cues help ensure a delicious result. This blog post covered all the essential steps to make a delicious carrot cake loaf. We explored the key ingredients, from dry and wet components to tasty add-ins. I shared tips to keep your cake moist and flavorful, along with ways to customize your loaf. Lastly, we discussed storage and FAQs to help you perfect your baking. Embrace your baking journey and enjoy each slice of your creation!](https://fastmealmate.com/wp-content/uploads/2025/06/8b09a955-a057-4b29-b3fd-380f10cea1b9-768x768.webp)

