
Are you ready to impress at dinner? My Cranberry Brie Stuffed Chicken is a flavorful delight that’s easy to make. This dish combines the tangy taste of cranberries with creamy brie, wrapped in juicy chicken. Whether you’re hosting friends or enjoying a family meal, this recipe will wow everyone at the table. Let’s dive into the simple steps and tips to create this tasty masterpiece!
Why I Love This Recipe
- Flavor Fusion: The combination of tart cranberries and creamy Brie creates a delightful contrast that elevates the chicken to a whole new level.
- Impressive Presentation: When sliced, the vibrant colors of the filling make for a stunning dish that’s perfect for entertaining or special occasions.
- Simple Preparation: With straightforward steps and minimal ingredients, this recipe is easy enough for weeknight dinners yet elegant enough for guests.
- Versatile Ingredients: Feel free to swap out cranberries for cranberry sauce or experiment with different cheeses, making it adaptable to your taste.
Ingredients
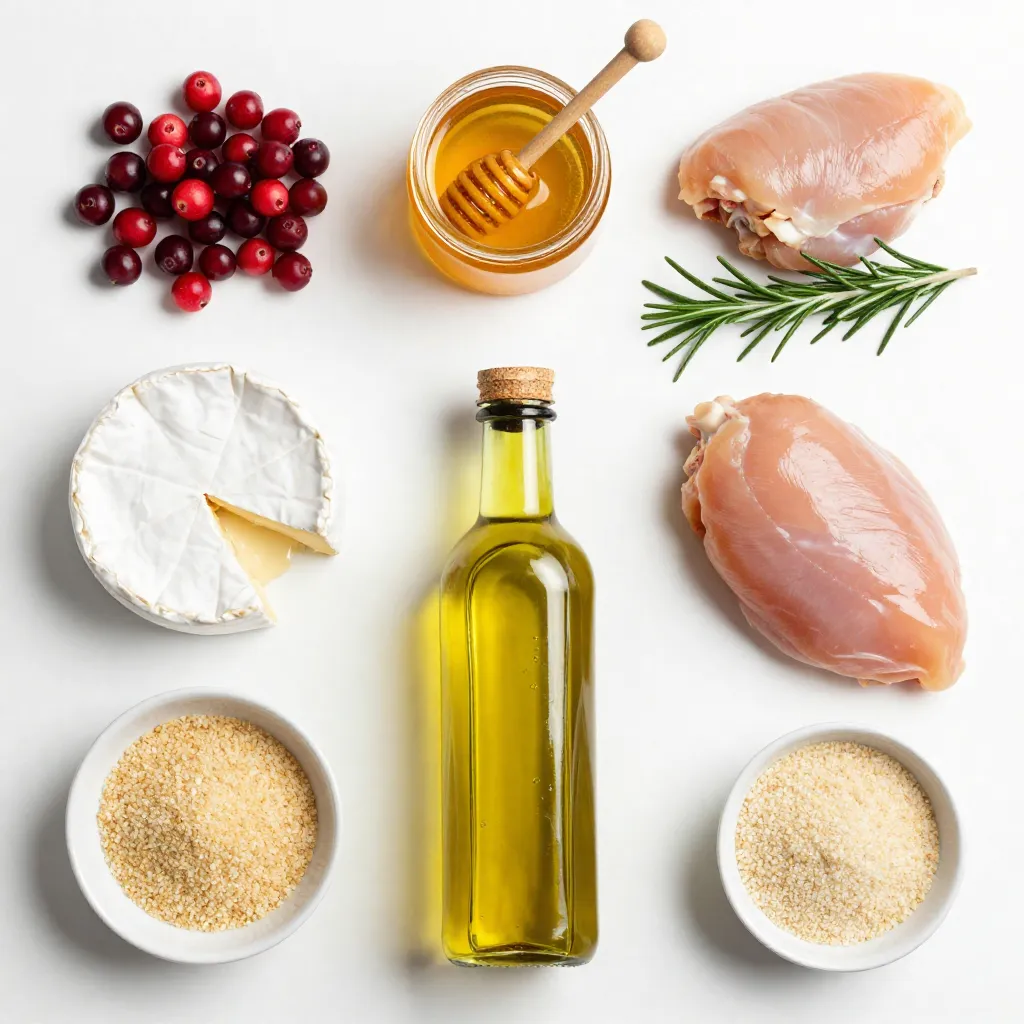
Main Ingredients for Cranberry Brie Stuffed Chicken
– 4 boneless, skinless chicken breasts
– 1 cup fresh cranberries (or substitute with 1/2 cup cranberry sauce)
– 8 oz Brie cheese, rind removed and cut into small chunks
– 1 tablespoon honey
– 1 teaspoon fresh rosemary, finely chopped (or substitute with 1/2 teaspoon dried rosemary)
– Salt and pepper, to taste
– 1 tablespoon olive oil
The main ingredients give the dish its rich flavor. The chicken breasts are tender and juicy. Fresh cranberries add tartness, while Brie cheese brings creaminess. Honey balances the flavors and adds a hint of sweetness. Rosemary adds a fresh herbal note.
Optional Ingredients for Topping
– 1/2 cup breadcrumbs (optional, for a crispy topping)
Breadcrumbs can give the dish a nice crunch. They add texture to the soft chicken and filling. If you love a crispy bite, sprinkle these on top before baking.
Suggested Substitutions
– For cranberries, you can use 1/2 cup of cranberry sauce.
– If you don’t have fresh rosemary, dried rosemary works fine. Use less since dried herbs are stronger.
– You can swap Brie for other soft cheeses like Camembert or goat cheese if you prefer.
These substitutions keep the dish flexible. You can adjust based on what you have at home. Each change will give a unique twist to the flavor.
Step-by-Step Instructions
How to Prepare the Cranberry Filling
To start, take a medium saucepan and set it over medium heat. Add 1 cup of fresh cranberries and 1 tablespoon of honey. Cook this mixture for about 5 minutes. Stir it now and then. You want the cranberries to soften and burst. If you choose to use cranberry sauce, you can skip this step. Once the cranberries are ready, remove the pan from the heat. Stir in 1 teaspoon of finely chopped fresh rosemary. Let the filling cool a bit while you get the chicken ready.
Preparing the Chicken Breasts
Next, grab your chicken breasts. Place each one between two sheets of plastic wrap or parchment paper. Using a meat mallet or a rolling pin, gently pound the chicken. Aim for an even thickness of about 1/2 inch. This helps the chicken cook evenly. It also makes stuffing easier.
Stuffing and Securing the Chicken
Now, it’s time to stuff the chicken. Season the inside of each breast with salt and pepper. Take 1-2 tablespoons of the cranberry filling and spoon it into the center of each breast. Add a few chunks of Brie cheese on top of the cranberry mix. Carefully fold the chicken over to cover the filling. Use toothpicks to secure the edges if needed. This keeps the filling from leaking during cooking.
Searing and Baking the Chicken
Heat a large, oven-safe skillet over medium-high heat. Add 1 tablespoon of olive oil to the skillet. Once the oil is hot, place the stuffed chicken breasts in the skillet. Sear them for about 3-4 minutes on each side. You want a nice, golden-brown crust. If you like a crispy topping, sprinkle 1/2 cup of breadcrumbs over the chicken. Then, transfer the skillet to a preheated oven at 375°F (190°C). Bake the chicken for 20-25 minutes. Check the internal temperature; it should be 165°F (75°C).
Resting and Serving Suggestions
After baking, remove the skillet from the oven. Let the chicken rest for 5 minutes. This helps the juices stay inside. Carefully take out the toothpicks before slicing the chicken into medallions. For a beautiful presentation, arrange the slices on a platter. You can garnish with fresh rosemary sprigs or a drizzle of honey. Serve it warm, along with a simple green salad or roasted vegetables. Enjoy your flavorful dinner delight!
Tips & Tricks
How to Ensure Juicy Chicken
To keep your chicken juicy, start with even thickness. Pound the chicken to about 1/2 inch thick. This helps it cook evenly. Season the chicken well with salt and pepper before stuffing. Avoid overcooking the chicken. Use a meat thermometer to check for 165°F (75°C). Let the chicken rest for five minutes after baking. This allows the juices to settle back in.
Flavor Enhancements and Pairings
You can enhance the flavor by adding spices. Try garlic powder or thyme for extra taste. Pair this dish with simple sides like green salad or roasted veggies. A drizzle of honey can add sweetness to the plate. If you enjoy crunch, sprinkle breadcrumbs on top before baking. This gives a nice texture contrast.
Cooking Equipment Recommendations
Use a large, oven-safe skillet for searing and baking. A meat mallet will help pound the chicken evenly. Make sure you have toothpicks handy to secure the chicken. A good meat thermometer is essential for checking doneness. Keep a medium saucepan ready for the cranberry filling. This will make the cooking process smooth and fun.
Pro Tips
- Use Fresh Ingredients: Whenever possible, opt for fresh cranberries and herbs to enhance the flavor of your dish.
- Ensure Even Cooking: Pound the chicken breasts to an even thickness to help them cook uniformly and prevent drying out.
- Experiment with Cheese: While Brie is delicious, feel free to experiment with other soft cheeses like Camembert or goat cheese for a different flavor profile.
- Let It Rest: Allowing the chicken to rest after baking helps the juices redistribute, resulting in a juicier bite.
Variations
Alternative Cheeses to Use
You can swap Brie for other cheeses. Cream cheese works well, offering a smooth texture. Goat cheese adds a tangy flavor that pairs nicely with cranberries. Cheddar gives a sharp bite and melts beautifully. If you’re feeling adventurous, try gorgonzola for a rich and bold taste.
Different Fruit Fillings
While cranberries shine in this dish, you can explore other fruit fillings. Cherries make a sweet and tart option. Sliced apples mixed with cinnamon add warmth and comfort. For a tropical twist, try mango or pineapple. Each fruit brings a unique flavor to the chicken.
Low-Carb or Gluten-Free Options
For a low-carb meal, skip the breadcrumbs. You can use crushed nuts as a topping instead. Almonds or pecans give a nice crunch and flavor. If you need gluten-free options, check the labels on your breadcrumbs. Many brands offer gluten-free versions now. You can also use crushed pork rinds for a crispy topping that fits your needs.
Storage Info
How to Store Leftover Stuffed Chicken
After you enjoy your delicious cranberry brie stuffed chicken, store any leftovers properly. Let the chicken cool down first. Place it in an airtight container. It will stay fresh in the fridge for up to three days. Make sure to keep the chicken sealed to avoid drying out. If you want to keep it longer, consider freezing it.
Freezing Instructions
To freeze the stuffed chicken, wrap each piece tightly in plastic wrap. You can also use aluminum foil for extra protection. Place the wrapped chicken in a freezer bag or a container. Label the bag with the date. The stuffed chicken can last in the freezer for up to three months. When you are ready to eat it, thaw it overnight in the fridge.
Reheating Tips
Reheating is simple and helps keep the chicken tasty. You can use the oven or microwave. If using the oven, preheat it to 350°F (175°C). Place the chicken in a baking dish and cover it with foil. Heat for about 20 minutes or until warm. If using a microwave, place the chicken on a microwave-safe plate. Heat in short bursts, checking every minute until warm. Always ensure the chicken reaches an internal temperature of 165°F (75°C) before serving again.
FAQs
Can I use chicken thighs instead of breasts?
Yes, you can use chicken thighs. They are juicier and more flavorful. Thighs also have more fat, which adds richness. Just be sure to adjust the cooking time. Thighs may need a bit longer to cook through. Aim for an internal temperature of 165°F (75°C) like the breasts.
What other sauces pair well with this dish?
Several sauces complement this dish well. Consider a balsamic glaze for a sweet and tangy kick. A light lemon butter sauce adds brightness. You can also try a simple garlic and herb sauce. These sauces enhance the flavors of the chicken and filling.
How can I make this dish ahead of time?
You can prepare the stuffed chicken ahead. Stuff the chicken and store it in the fridge for up to a day. This keeps the flavors fresh. You can also make the cranberry filling the day before. Just reheat it before stuffing the chicken. Cook the chicken when you’re ready for a quick meal.
What sides go well with Cranberry Brie Stuffed Chicken?
This dish pairs nicely with several sides. A simple green salad adds freshness. Roasted vegetables like carrots or Brussels sprouts work well too. Creamy mashed potatoes or garlic rice can round out the meal. Don’t forget some crusty bread to soak up any sauce!
This blog post covered how to make Cranberry Brie Stuffed Chicken. We discussed the key ingredients and optional toppings, along with suggested substitutions. I provided step-by-step instructions, tips for juicy chicken, and various ways to adjust the recipe. Storing leftovers and reheating tips were also included.
In conclusion, you now have everything needed to make this tasty dish. Enjoy exploring different flavors and variations. Your creativity can turn this meal into something special. Happy cookin


