Cotton Candy Ice Drink Delightful and Easy Recipe

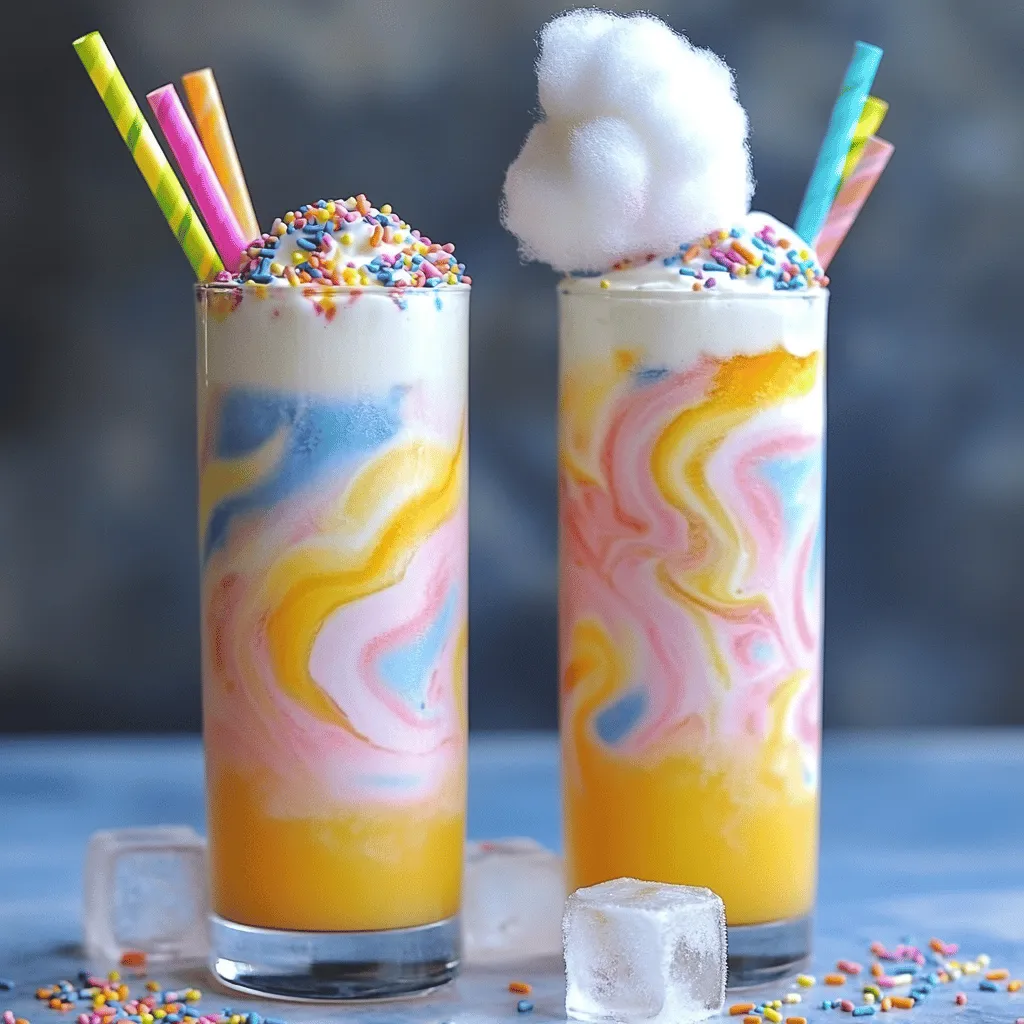
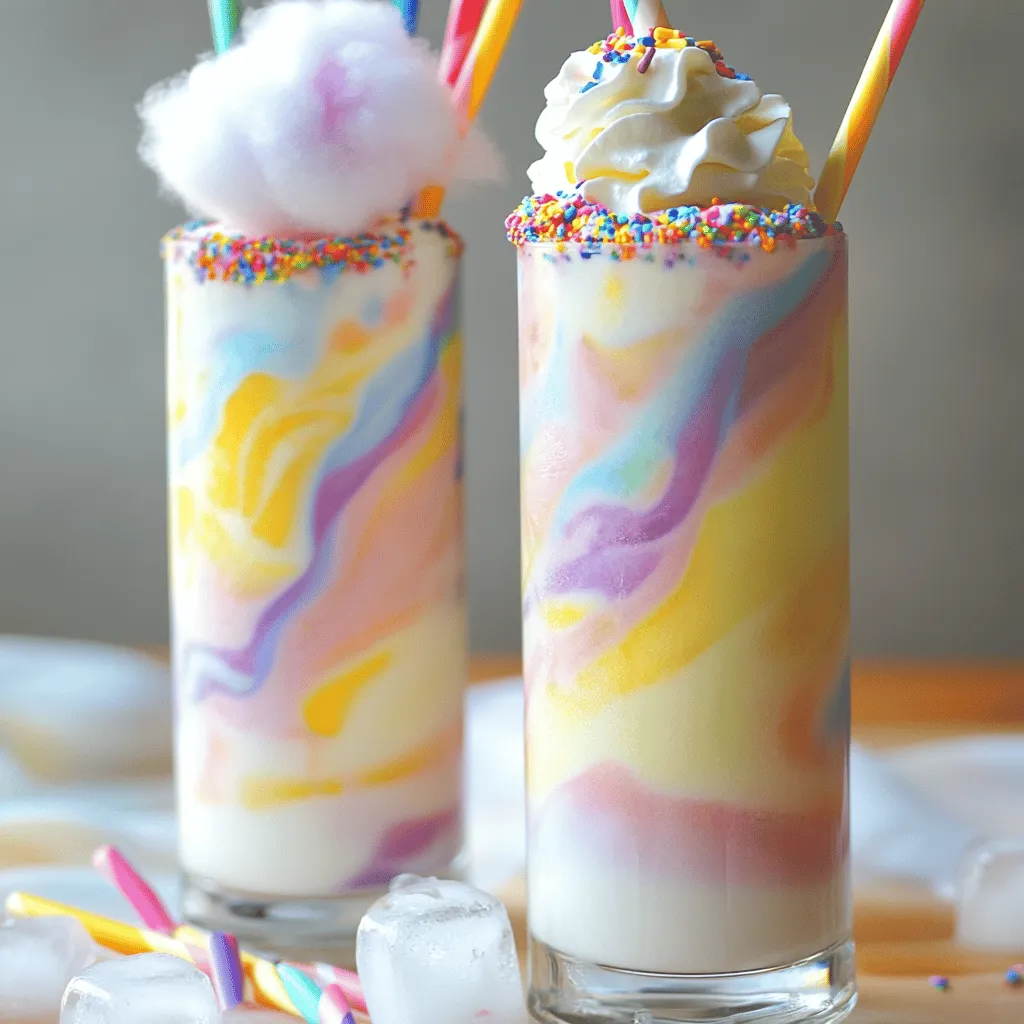
Are you ready to make a fun, sweet treat that cools you down? This Cotton Candy Ice Drink is a delightful way to enjoy a classic carnival flavor right at home. In just a few simple steps, you can whip up this colorful drink that will wow your friends and family. Follow along as I share easy recipes, tips, and cool variations that make this drink a must-try for any occasion!
Ingredients
Detailed List of Ingredients
To make the Cotton Candy Ice Drink, gather these items:
– 2 cups cotton candy (mix of colors for visual appeal)
– 1 cup milk (or a dairy-free option like almond milk)
– 1/2 cup whipped cream (for topping)
– 1 tablespoon vanilla extract
– 1 cup ice cubes
– Rainbow sprinkles (for a fun garnish)
– Optional: Food coloring (to enhance the drink’s vibrancy)
Suggested Substitutions
You can swap ingredients based on your taste or needs:
– Use coconut milk instead of almond milk for a tropical twist.
– Use heavy cream instead of whipped cream for a richer topping.
– Try flavored extracts like almond or hazelnut in place of vanilla for a unique taste.
Seasonal Variations
The Cotton Candy Ice Drink can change with the seasons:
– In summer, add fresh fruit like strawberries or blueberries for a fruity kick.
– In fall, mix in pumpkin spice for a cozy, seasonal flavor.
– During winter, use peppermint extract to create a festive treat.
This drink is all about fun and creativity! Explore different colors and flavors to make it your own.
Step-by-Step Instructions
Preparation of Cotton Candy
Start by tearing the cotton candy into small pieces. You need about 2 cups. Mix different colors for a bright look. This makes your drink fun and playful. The fluffy texture adds to the drink’s charm.
Blending the Drink
In a blender, combine the torn cotton candy, milk, and vanilla extract. If you want, add a few drops of food coloring for extra brightness. Blend on high speed until the cotton candy fully dissolves. The result should be a sweet and colorful mix. Next, add the ice cubes and blend again. This will make the drink smooth and frothy, just like a creamy milkshake.
Serving and Garnishing
Pour the vibrant drink into tall glasses. Top each glass with a generous swirl of whipped cream. Then, sprinkle rainbow sprinkles on top for a fun finish. For a cute touch, place a small piece of cotton candy on the whipped cream. You can also use it as a stirrer. This adds to the cotton candy fun!
Enjoy your Cotton Candy Ice Drink!
Tips & Tricks
Enhancing Flavor and Texture
To boost the flavor of your cotton candy ice drink, try using flavored milk. Strawberry or chocolate milk can add a fun twist. You can also mix in some fruit puree. This adds a fresh taste. For a richer flavor, use heavy cream instead of regular milk. It will make your drink extra creamy.
Presentation Ideas
Make your drink look amazing. Use tall, clear glasses to show off those bright colors. Add colorful straws for extra flair. You can sprinkle some edible glitter on top. This adds a magical touch. Don’t forget to put a small piece of cotton candy on the whipped cream. It makes the drink more fun!
Using Leftover Cotton Candy
If you have extra cotton candy, don’t waste it! You can use it in other treats. Try adding it to cupcakes or cookies for a sweet surprise. You can even mix it into yogurt or ice cream. This keeps your cotton candy fun and tasty for longer.

Variations
Different Flavor Combinations
You can mix things up with flavor combinations for your Cotton Candy Ice Drink. Try using flavored milk, like strawberry or chocolate. This gives a unique twist. You can also add fruit purees, like berry or mango, for a fresh touch. To bring in some zing, a splash of lemon or lime juice works wonders. Each mix creates a new taste adventure!
Dietary Adaptations
If you want a healthier version, use low-fat milk or a nut milk. This keeps it light yet creamy. For those who avoid sugar, sugar-free cotton candy is a great choice. You can also use natural sweeteners like honey or agave syrup. These swaps make the drink fit many diets without losing fun.
Kids’ Party Themes
This drink fits perfectly into many kids’ party themes. For a circus theme, serve it with popcorn and colorful balloons. A rainbow theme is also fun—use different colored cotton candy. You can even make it a DIY drink station. Let kids mix their own flavors and toppings. This adds excitement and creativity to the party.
Storage Info
Best Practices for Leftover Ingredients
If you have leftover cotton candy, store it in a cool, dry place. Keep it in an airtight container. This helps it stay fluffy and fresh. Avoid moisture, as it can make cotton candy sticky and hard.
Storing in the Refrigerator
You can store the Cotton Candy Ice Drink in the refrigerator. Use a sealed container to keep it chilled. Drink it within one day for the best taste. The whipped cream may lose its texture, so add fresh cream before serving.
Reusing Ingredients in Other Recipes
You can get creative with leftover ingredients! Use extra cotton candy to top cupcakes or ice cream. The milk can be added to smoothies or cereal. Whipped cream is great on pies or hot cocoa. This way, nothing goes to waste!
FAQs
How can I make a sugar-free version?
To make a sugar-free version, skip the cotton candy. Use sugar-free syrup instead. Choose a flavor you like, such as vanilla or raspberry. Blend this syrup with your milk and ice. You’ll still enjoy a sweet drink without the sugar.
Where can I buy cotton candy?
You can find cotton candy at many stores. Look in candy shops, grocery stores, or fairs. Some online shops also sell it. Choose a mix of colors for a fun look in your drink.
Can this drink be made vegan?
Yes, you can make it vegan! Use almond milk or any other non-dairy milk. Ensure your cotton candy is vegan, as some brands may use animal products. This way, you can enjoy a delicious vegan treat.
What other toppings can I use?
You can get creative with toppings! Try chopped nuts, chocolate sauce, or fruit. Use mini marshmallows or even flavored whipped cream. Each topping adds a new taste and fun look to your cotton candy ice drink.
How do I achieve the best texture?
To get the best texture, blend well. Ensure the cotton candy dissolves fully in the milk. Add ice last and blend until smooth. This gives you a creamy, frothy drink. For extra fun, serve it with colorful straws!
You now know how to make a fun cotton candy drink. We explored the ingredients, substitutions, and seasonal choices. I shared easy steps for preparation, blending, and serving. You learned tips to enhance flavor and keep your drink fresh. We also talked about fun variations and storage ideas. Each step adds joy to your drink-making. Remember, you can get creative with flavors and themes. Enjoy making your cotton candy drinks and share them with others!


![- 2 large cucumbers, peeled and thinly sliced - 1 medium red onion, thinly sliced - 1/4 cup apple cider vinegar - 2 tablespoons honey - 1 tablespoon olive oil - 1 teaspoon salt - 1/2 teaspoon freshly ground black pepper - 1/4 teaspoon red pepper flakes (optional, for a hint of heat) - Fresh dill or chopped parsley for garnish Cucumbers are refreshing and hydrating. They contain vitamins A and K. Red onions add a sweet and mild flavor. They also have antioxidants that may help reduce inflammation. Apple cider vinegar provides a tangy taste. It may help with digestion. Honey adds sweetness and balances flavors. Olive oil not only adds richness but is also heart-healthy. Salt enhances all the flavors, while black pepper adds a slight kick. Fresh herbs like dill or parsley brighten up the dish. If you can’t find red onions, try using white or yellow onions. Both will work well. You can swap apple cider vinegar with white wine vinegar for a different taste. If you prefer, maple syrup can replace honey for a vegan option. For a lighter touch, use lemon juice instead of vinegar. If you want a different herb, mint or basil can add a unique flavor twist. For those who dislike spice, leave out the red pepper flakes altogether. You can find the full recipe above for a detailed guide on making this crisp salad! To make a fresh cucumber and onion salad, start with two large cucumbers. Peel them and slice them thinly. Use a sharp knife or a mandolin slicer for even slices. Next, take one medium red onion and slice it thinly as well. Add both slices to a large mixing bowl. In a small bowl, whisk together 1/4 cup of apple cider vinegar and 2 tablespoons of honey. Add 1 tablespoon of olive oil, 1 teaspoon of salt, 1/2 teaspoon of freshly ground black pepper, and 1/4 teaspoon of red pepper flakes if you like some heat. Mix until the honey is dissolved. Drizzle this dressing over the cucumbers and onions. Toss everything gently with two big spoons or salad tongs. Cover the bowl and place it in the fridge for at least 30 minutes. This helps the flavors meld together. When you are ready to serve, toss the salad again. Taste it, and adjust the seasoning if needed. Finally, add fresh dill or chopped parsley on top for garnish. To slice cucumbers and onions well, aim for thin and even pieces. This helps them blend in the salad. Use a mandolin slicer if you have one; it gives uniform slices. If you use a knife, keep your fingers tucked in. This helps prevent cuts. Chill your knife in the fridge before slicing. This can keep your vegetables crisper. Mixing the salad well is key to great flavor. Use two large spoons or salad tongs to toss the ingredients. Be gentle to avoid crushing the vegetables. Make sure every slice gets coated in dressing. Let the salad sit in the fridge for at least 30 minutes. This allows the flavors to soak in. Before serving, always taste and adjust the seasoning. This ensures the salad is just right for you. For a fun twist, consider adding other fresh herbs like basil or cilantro! To boost the taste of your Cucumber and Onion Salad, think about adding fresh herbs. Chopped dill or parsley brings a bright flavor. You can also add a squeeze of lemon juice for zest. If you like heat, try adding a pinch of cayenne pepper. This will give your salad a nice kick. Always taste as you go. Adjust the flavors to fit your own liking. For the best dressing, whisk the ingredients well. Mix the vinegar, honey, and olive oil until smooth. The honey needs to dissolve fully. If the dressing is too thick, add a little water or more vinegar. This will help it coat the veggies better. You want a nice balance between tangy and sweet. One common mistake is not letting the salad chill. Allowing it to sit in the fridge helps the flavors blend. Another mistake is cutting the cucumbers too thick. Thin slices absorb the dressing well. Lastly, don’t forget to taste your salad before serving. Adjust the salt and pepper to make it just right. Remember, the key is to keep it fresh and crisp. For a full recipe, check out the Crisp Cucumber & Sweet Onion Delight. {{image_4}} You can make this salad even better by adding other veggies. Try bell peppers for crunch. You can also add tomatoes for a sweet touch. Radishes bring a nice bite and color. Grated carrots can add a fun twist. Mix and match to find your favorite blend! While I love the apple cider vinegar dressing, you can switch it up. Try a creamy dressing like ranch or yogurt. Lemon juice can add a fresh zing. You can also use balsamic vinegar for a sweeter flavor. Experiment with herbs like basil or cilantro to change the taste. Seasonal ingredients can make your salad shine. In summer, add fresh herbs like mint or basil. In fall, sliced apples can give a sweet crunch. Winter might call for roasted veggies like squash. Use what’s fresh at the market to keep it exciting! For the complete recipe, check out the [Full Recipe]. To keep your cucumber and onion salad fresh, store it in an airtight container. This helps keep the crispness intact. Make sure to place the salad in the fridge. The cold temperature slows down spoilage. If you have a lot of salad left, divide it into smaller containers. When stored properly, this salad lasts about 3 to 5 days in the fridge. To maintain freshness, avoid adding dressing until you are ready to eat. The vinegar can cause the cucumbers to become soggy over time. If you notice any signs of wilting or change in color, it’s best to discard the salad. I do not recommend freezing cucumber and onion salad. The freezing process makes cucumbers watery and soft, ruining their crunch. If you want to use cucumbers later, consider pickling them instead. Pickled cucumbers can last for months and taste great in many dishes. For fresh enjoyment, stick to the fridge for this salad. You can find the Full Recipe to enjoy this dish fresh. For this salad, I recommend using English cucumbers. They are long, thin, and have fewer seeds. Their skin is also tender, which means no peeling is needed. If English cucumbers are not available, you can use Persian cucumbers. They are small and sweet, making them a great choice too. Yes, you can make this salad ahead of time. In fact, chilling it for a few hours helps the flavors blend. I suggest preparing it up to a day in advance. Just remember to toss it again before serving to mix the dressing well. To add some heat, you can increase the red pepper flakes in the dressing. You can also add sliced jalapeños or a dash of hot sauce for an extra kick. Start with a small amount and taste as you go to find the right spice level for you. This salad pairs well with grilled meats like chicken or fish. It also makes a great side for sandwiches and wraps. For a light meal, serve it alongside quinoa or rice. The fresh flavors complement many dishes beautifully. If you want to explore more, check out the Full Recipe for ideas on how to enhance your meal. Cucumber and Onion Salad is fresh and easy to make. You learned the best ingredients, helpful tips for slicing and mixing, and ways to enhance flavor. I shared options for variations, storage, and common mistakes to avoid. In the end, this salad is great any time of year. Enjoying it can brighten any meal. Keep experimenting and find what flavors you love best!](https://fastmealmate.com/wp-content/uploads/2025/06/e5e61b33-6e6d-48c4-8abd-5090a0f7425b-768x768.webp)


![For a tasty creamy chicken stroganoff, gather these key ingredients: - 500g boneless chicken breast, sliced into thin strips - 2 cups mushrooms, sliced (button or cremini work well) - 1 medium onion, finely chopped - 3 cloves garlic, minced - 1 tablespoon olive oil - 1 tablespoon unsalted butter - 2 cups chicken broth - 1 cup sour cream - 1 tablespoon Dijon mustard - 1 teaspoon smoked paprika - Salt and freshly ground black pepper to taste - Fresh parsley, finely chopped (for garnish) - 300g egg noodles or pasta of your choice Each ingredient plays a role in making the dish creamy and flavorful. The chicken adds protein, while the mushrooms bring earthy notes. The onion and garlic create a sweet base when cooked. For a garnish, fresh parsley brightens up the dish. You can serve the stroganoff with a side of steamed vegetables or crusty bread. This adds more texture and flavor to your meal. Check [Full Recipe] for all the details on how to put this comfort food together! To start, fill a big pot with water. Add a pinch of salt and bring it to a boil. Once the water is boiling, drop in 300g of egg noodles. Cook them according to the package instructions. This usually takes around 8-10 minutes. You want them al dente, which means they should be tender but still firm. After they are cooked, carefully drain the noodles in a colander. To stop them from sticking, drizzle a bit of olive oil on them. Toss gently to coat. Now, grab a large skillet and heat it over medium heat. Add 1 tablespoon of olive oil. Once hot, add the sliced chicken breast. Season it well with salt and pepper. Cook the chicken for about 5-7 minutes. Stir it often to ensure it cooks evenly. You want that nice golden-brown color. When it is done, remove the chicken from the skillet and place it on a plate. In the same skillet, add 1 tablespoon of unsalted butter. Let it melt over medium heat. Once melted, toss in the chopped onion. Sauté it for about 3-4 minutes until it turns translucent. Next, add 3 cloves of minced garlic and 2 cups of sliced mushrooms. Cook this mixture for around 5-6 minutes. Stir it often until the mushrooms soften and release their moisture. Then, sprinkle in 1 teaspoon of smoked paprika. Mix it well. Gradually pour in 2 cups of chicken broth and bring it to a gentle simmer. Let it cook for about 5 minutes to enhance the flavor. Now it’s time to bring it all together! Return the cooked chicken to the skillet. Stir in 1 cup of sour cream and 1 tablespoon of Dijon mustard. Mix everything until it is well combined and heated through, about 2-3 minutes. Taste the sauce and adjust the seasoning with more salt and black pepper if needed. Finally, add the cooked noodles to the sauce, tossing gently until they are fully coated. If you prefer a fancier look, you can plate the noodles first and then ladle the sauce over them. Don’t forget to garnish with some fresh parsley for a burst of color and flavor. Enjoy this comforting meal! When making creamy chicken stroganoff, avoid a few common mistakes. - Overcooking chicken or noodles: Overcooked chicken can become dry. Noodles can turn mushy. Keep an eye on cooking times. - Insufficient seasoning: Under-seasoned dishes lack flavor. Always taste your sauce and adjust the salt and pepper. You can easily boost the taste of your stroganoff with a few simple changes. - Suggestions for additional spices: Try adding thyme or rosemary for extra depth. A pinch of cayenne adds a nice kick. - Using homemade vs. store-bought broth: Homemade broth gives a richer taste. Store-bought is convenient and still works well. If you or your guests have special diets, there are great options. - Gluten-free alternatives: Use gluten-free pasta or rice instead of egg noodles. This ensures everyone can enjoy the dish. - Dairy-free options: Substitute sour cream with coconut cream or a dairy-free yogurt. These keep the creaminess without the dairy. For the full recipe, check out the complete guide to making creamy chicken stroganoff. Enjoy! {{image_4}} You can switch up the protein in this creamy chicken stroganoff. Beef, pork, or tofu work well. For beef, use tender cuts like sirloin. Cook it for about 10 minutes until browned. For pork, tenderloin is great. Cook it for 7-8 minutes. If you choose tofu, press it first to remove moisture. Sauté it for 5-6 minutes until golden. To add a twist to your dish, consider using wine or mustard. A splash of white wine adds depth to the sauce. Just remember to let it simmer for a few minutes to cook off the alcohol. If you like mustard, try using whole grain or spicy mustard. It brings a unique flavor. You can also add more veggies. Peas, bell peppers, or spinach can enhance the dish. Just sauté them with the onions and mushrooms. This not only adds color but also boosts nutrition. Each variation makes your creamy chicken stroganoff special and fits your taste. For the full recipe, check the linked instructions above. To keep your creamy chicken stroganoff fresh, store it in proper containers. Use airtight containers to prevent moisture loss. It stays good in the fridge for up to three days. Make sure the dish cools down before sealing it. This helps maintain the best flavor and texture. If you want to save some for later, freezing is a great option. Let the stroganoff cool completely before transferring it to freezer-safe containers. Use heavy-duty bags or containers to prevent freezer burn. It can last in the freezer for up to three months. To thaw, place it in the fridge overnight. This slow thawing keeps flavors intact. When ready to eat, reheat it on the stove over low heat. Stir occasionally to ensure even heating. You can also add a splash of broth or water to restore creaminess. Enjoy your stored creamy chicken stroganoff like it’s fresh! You can serve creamy chicken stroganoff with many sides. Here are a few great options: - Steamed green beans - Garlic bread - A fresh green salad - Mashed potatoes These sides add color and balance to your meal. Yes, you can make creamy chicken stroganoff ahead of time. Simply cook the dish, let it cool, and store it in the fridge. It will stay fresh for about three days. When ready to eat, reheat it gently on the stove. Add a splash of chicken broth if it seems too thick. If your sauce is too thin, you can thicken it easily. Here are some methods: - Simmer the sauce longer to reduce it. - Mix a bit of cornstarch with water and stir it in. - Add more sour cream for a richer texture. These tips help you achieve the perfect creamy sauce. Yes, you can make a vegetarian version! Use mushrooms and tofu instead of chicken. Replace chicken broth with vegetable broth. This keeps the flavor while making it meat-free. You can still enjoy that creamy texture with sour cream or a plant-based alternative. Absolutely! You can use different types of noodles for creamy chicken stroganoff. Here are some options: - Egg noodles - Fettuccine - Penne - Gluten-free pasta Each type brings its own texture, making the dish fun and varied. Check the cooking time for each type to ensure they cook perfectly. For the full recipe, refer to the earlier section in this article. You learned how to make Creamy Chicken Stroganoff with fresh ingredients and simple steps. Remember the key points: cook noodles properly, achieve golden-brown chicken, and adjust flavors to your taste. Avoid common mistakes like overcooking and under-seasoning. You can also explore variations with different proteins and flavors. With proper storage, enjoy this dish later too. Now, you have all the tools to create a delicious meal that suits your needs and preferences. Enjoy cooking and sharing this tasty dish with others!](https://fastmealmate.com/wp-content/uploads/2025/06/35ebe0d3-ac06-4ed6-8d84-88d4bff41ffa-768x768.webp)