
Cinnamon Twist Pastries are the perfect treat to satisfy your sweet tooth. These flaky delights will fill your kitchen with warm, inviting scents. I’ll guide you through the step-by-step process of making them, from ingredients to baking tips. Whether you want to keep it classic or add a twist, this recipe offers options for everyone. Let’s dive in and create these delicious pastries together!
Why I Love This Recipe
- Easy to Make: This recipe is simple and quick, making it perfect for both beginners and experienced bakers alike.
- Delicious Flavor: The combination of cinnamon and cream cheese creates a rich and indulgent taste that everyone will love.
- Versatile: These pastries can be enjoyed as a breakfast treat, snack, or even a dessert, perfect for any occasion.
- Impressive Presentation: The twisted shape and drizzled glaze make these pastries look stunning, ideal for impressing guests.
Ingredients
List of Ingredients for Cinnamon Twist Pastries
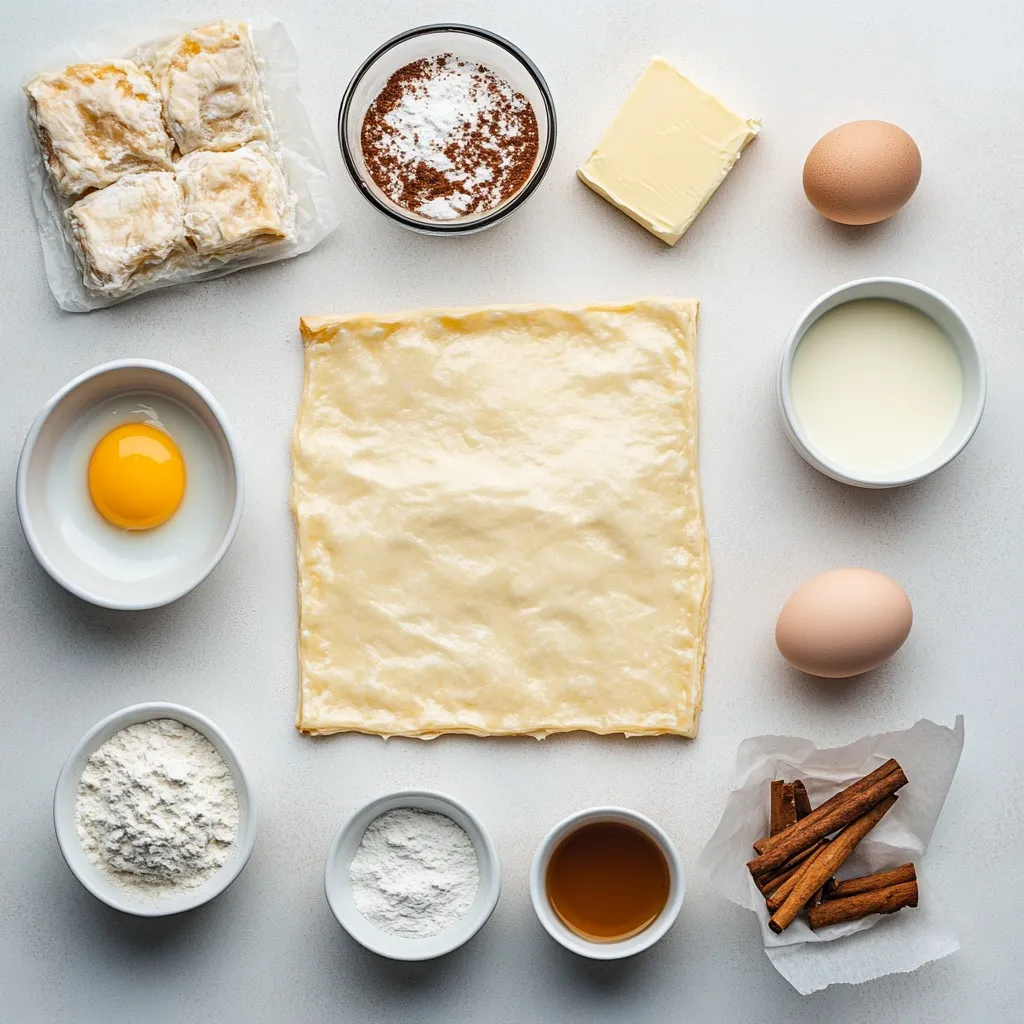
To make these tasty treats, you’ll need:
– 1 sheet of puff pastry (thawed)
– 1/2 cup granulated sugar
– 2 teaspoons ground cinnamon
– 1/4 cup unsalted butter, melted
– 1/2 cup cream cheese, softened
– 1/2 cup powdered sugar
– 1 tablespoon milk
– 1/2 teaspoon vanilla extract
– 1 egg (for egg wash)
Optional Add-ins
You can jazz up your pastries with some fun add-ins:
– Chopped nuts (like pecans or walnuts) add crunch.
– Chocolate chips bring a sweet twist.
– Dried fruit, like raisins or cranberries, adds a fruity flavor.
Homemade vs. Store-bought Options
You can choose between homemade or store-bought puff pastry.
– Homemade: Making your own takes time but gives a fresh taste. Use flour, butter, and water to create layers.
– Store-bought: This option saves time. Look for high-quality brands. They are easy to find in most grocery stores.
Both options yield delicious pastries. It’s all about what fits your schedule and skill.
Step-by-Step Instructions
Prepping Your Workstation
First, gather all your tools. You need a clean surface, a rolling pin, and a sharp knife. Make sure to have a baking sheet ready, lined with parchment paper. This helps keep your pastries from sticking.
Rolling Out Puff Pastry
Take your thawed puff pastry and lay it on the floured surface. Use your rolling pin to flatten it into a rectangle. Aim for about 10 by 12 inches. This size works best for the twists. Keep an even thickness for a nice rise.
Creating the Cinnamon-Sugar Mixture
In a small bowl, mix the granulated sugar and ground cinnamon. Combine them well until they look uniform. Set aside a couple of tablespoons for later. This mixture gives your pastries a sweet, warm flavor.
Assembling and Twisting the Pastries
Brush the melted butter over the entire pastry surface. Then, sprinkle the cinnamon-sugar mixture evenly across it. Cut the pastry into 1-inch wide strips. Grab each strip and twist it several times to form a spiral. Place them on your baking sheet with space in between.
Baking Instructions
Preheat your oven to 400°F (200°C). Once ready, bake the pastries for 15-20 minutes. Keep an eye on them as they turn golden brown. That’s when you know they are done.
Preparing the Cream Cheese Glaze
While the pastries bake, focus on the glaze. In a bowl, mix the softened cream cheese with powdered sugar, milk, and vanilla extract. Stir until smooth and creamy. This glaze adds a rich finish to your pastries.
Tips & Tricks
How to Achieve Flaky Pastries
To create flaky pastries, keep your ingredients cold. Use cold butter and chilled puff pastry. This helps form layers as the pastries bake. Be gentle when rolling out the dough. Overworking can make it tough. Aim for even thickness, about 1/8 inch. This ensures even baking and a light texture.
Common Mistakes to Avoid
One common mistake is not preheating the oven. Always preheat to 400°F (200°C) before baking. Another mistake is using too much filling. This can cause the pastries to leak. Ensure you sprinkle the cinnamon-sugar mix evenly. Lastly, don’t skip the egg wash. It gives a nice golden finish.
Best Practices for Egg Wash Application
For the egg wash, beat one egg in a bowl until mixed. Use a pastry brush to apply it gently. Cover the tops of pastries, but avoid letting it drip down the sides. The wash helps pastries rise and adds shine. For extra flavor, you can add a splash of milk to the egg. This gives a richer color when baked.
Pro Tips
- Chill the Pastry: Keeping the puff pastry cold before baking helps it puff up better, resulting in a flakier texture.
- Even Twists: Ensure you twist each strip evenly to maintain a uniform shape and even baking throughout.
- Experiment with Flavors: Try adding different spices like nutmeg or cardamom to the cinnamon-sugar mixture for a unique twist.
- Serve Fresh: These pastries are best enjoyed fresh out of the oven when they are still warm and flaky.
Variations
Nutty Cinnamon Twist Pastries
To make nutty cinnamon twist pastries, add nuts to the mix. You can use chopped pecans or walnuts. Sprinkle them over the cinnamon-sugar mixture before twisting. This adds a crunchy texture and rich flavor.
Chocolate-Stuffed Variants
For a chocolate twist, use chocolate chips. After you spread the butter, add a layer of chocolate chips before the cinnamon-sugar. Twist the strips as usual. The melted chocolate will make each bite a sweet delight.
Seasonal Flavors (e.g., pumpkin spice)
In the fall, try pumpkin spice! Replace the cinnamon with pumpkin pie spice. Mix in a bit of pumpkin puree into the cream cheese glaze. This gives your pastries a festive flavor that everyone will enjoy.
Storage Info
How to Store Leftover Pastries
To keep your leftover Cinnamon Twist Pastries fresh, place them in an airtight container. This will help prevent them from getting stale. You can store them at room temperature for up to two days. If you want to keep them longer, refrigeration is a good option. Just make sure to wrap them well in plastic wrap or foil before placing them in the fridge.
Freezing Instructions for Cinnamon Twist Pastries
If you want to freeze your pastries, here’s what to do. Allow them to cool completely after baking. Then, place them in a single layer on a baking sheet. Put the sheet in the freezer for about an hour. Once frozen, transfer the pastries to an airtight container or zip-top bag. They can stay frozen for up to three months. Remember to label your container with the date.
Reheating Tips for Optimal Freshness
To enjoy your pastries again, reheat them properly. Preheat your oven to 350°F (175°C). Place the pastries on a baking sheet. Heat them for about 10 minutes. This will help restore their flaky texture. If you prefer a microwave, heat them for about 15-20 seconds. However, the oven gives better results.
FAQs
How can I make Cinnamon Twist Pastries gluten-free?
You can make these pastries gluten-free by using a gluten-free puff pastry. Many brands offer this option. Check for one that fits your needs. You can also replace all-purpose flour with a gluten-free blend when rolling out dough. This keeps the texture light and flaky.
Can I use homemade puff pastry instead?
Yes, you can use homemade puff pastry. Making it from scratch can give you fresh flavors. Just keep in mind that it can take more time. Follow your favorite recipe for puff pastry. Ensure it is chilled before you roll it out.
What are the best substitutions for cream cheese in the glaze?
If you want to switch cream cheese, consider using Greek yogurt or mascarpone. Both give a nice creamy texture. You can also try cottage cheese, but blend it well to make it smooth. These options will still taste great in the glaze.
How do I know when the pastries are fully baked?
Look for a golden brown color on the top. The pastries should puff up and look flaky. You can also gently tap the bottom of a pastry. If it sounds hollow, they are ready. Keep an eye on them while baking to avoid overcooking.
You learned how to make delicious cinnamon twist pastries. We covered ingredients, step-by-step tips, and fun variations. You also discovered how to store extras for later.
While trying out these recipes, keep your kitchen organized for the best results. Make sure to avoid common mistakes to get flaky, tasty pastries. Enjoy experimenting with flavors, and have fun! Your baking journey can bring joy to everyone around yo


