Christmas Tree Deviled Eggs Festive Holiday Treat

Are you ready to impress your family and friends with a fun twist on a classic dish? Christmas Tree Deviled Eggs are not only delicious but also a festive way to brighten up your holiday table. In this post, I’ll guide you through the easy steps to create these charming appetizers that everyone will love. Let’s dive in and start making your holiday gatherings more special!
Why I Love This Recipe
- Festive Appearance: These deviled eggs are not only delicious but also visually appealing, making them a perfect addition to any holiday gathering.
- Easy to Make: The recipe is straightforward, requiring minimal ingredients and steps, making it accessible for cooks of all skill levels.
- Customizable: You can easily modify the filling or decorations to suit your taste or dietary preferences, allowing for creativity in presentation.
- Healthy Option: With fresh spinach and the option to control the amount of mayonnaise, these deviled eggs are a nutritious holiday snack.
Ingredients
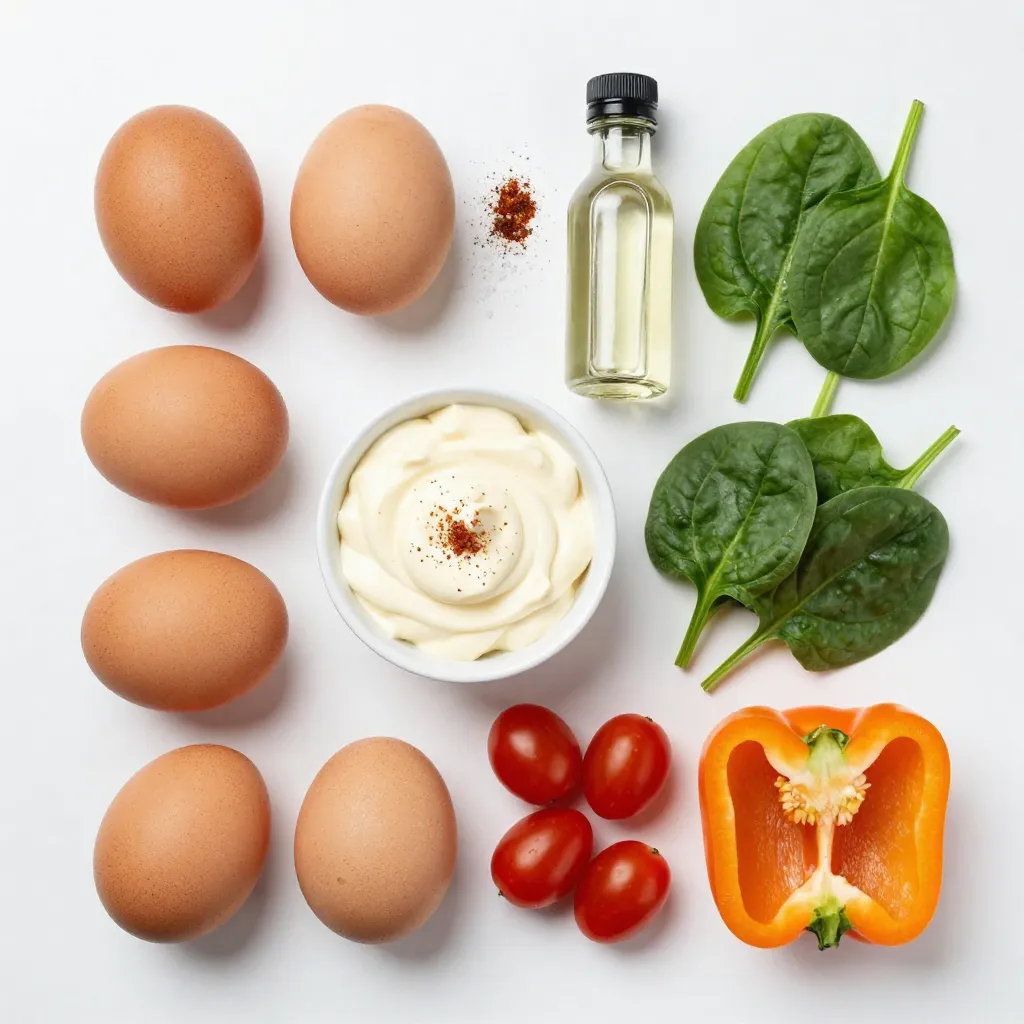
To make Christmas Tree Deviled Eggs, you will need a few key ingredients. Here’s the list:
– 6 large eggs
– 3 tablespoons mayonnaise
– 1 teaspoon Dijon mustard
– 1 teaspoon white vinegar
– Salt and pepper to taste
– 1/4 teaspoon smoked paprika
– 1/4 cup finely chopped fresh spinach
– 1/4 cup mini cherry tomatoes
– 2 small slices of bell pepper
These ingredients create a tasty filling and a festive look. The eggs provide a rich base. Mayonnaise adds creaminess, while Dijon mustard gives a bit of zing. White vinegar helps brighten the flavors.
The smoked paprika adds a hint of smokiness. Fresh spinach brings a vibrant green color. Mini cherry tomatoes serve as the ornaments on your Christmas tree. Lastly, the bell pepper slices act as the trunk.
With these ingredients, you can create a fun and tasty dish that kids and adults will love. You can easily find these items at your local grocery store. Enjoy the process of gathering and preparing these ingredients!

Step-by-Step Instructions
Hard Boil the Eggs
Start by placing six large eggs in a pot. Cover them with cold water, making sure there’s an inch above the eggs. Heat the pot on medium-high until the water boils. Once boiling, cover the pot and take it off the heat. Let the eggs sit for 12 minutes. After that, move the eggs to an ice bath. This cools them fast and helps with peeling.
Prepare the Egg Filling
When the eggs cool, tap each one gently on a hard surface. Peel them under running water to help remove the shell. Cut each egg in half lengthwise and take out the yolks. Put the yolks in a mixing bowl.
Pipe the Filling into Egg Whites
Mash the yolks with a fork until they are crumbly. Add three tablespoons of mayonnaise, one teaspoon of Dijon mustard, and one teaspoon of white vinegar. Season with salt and pepper. Mix until smooth. Fold in 1/4 cup of finely chopped spinach for color. Transfer this mixture to a piping bag or a zip-top bag with one corner cut off. Pipe the filling into the egg whites, making a nice mound.
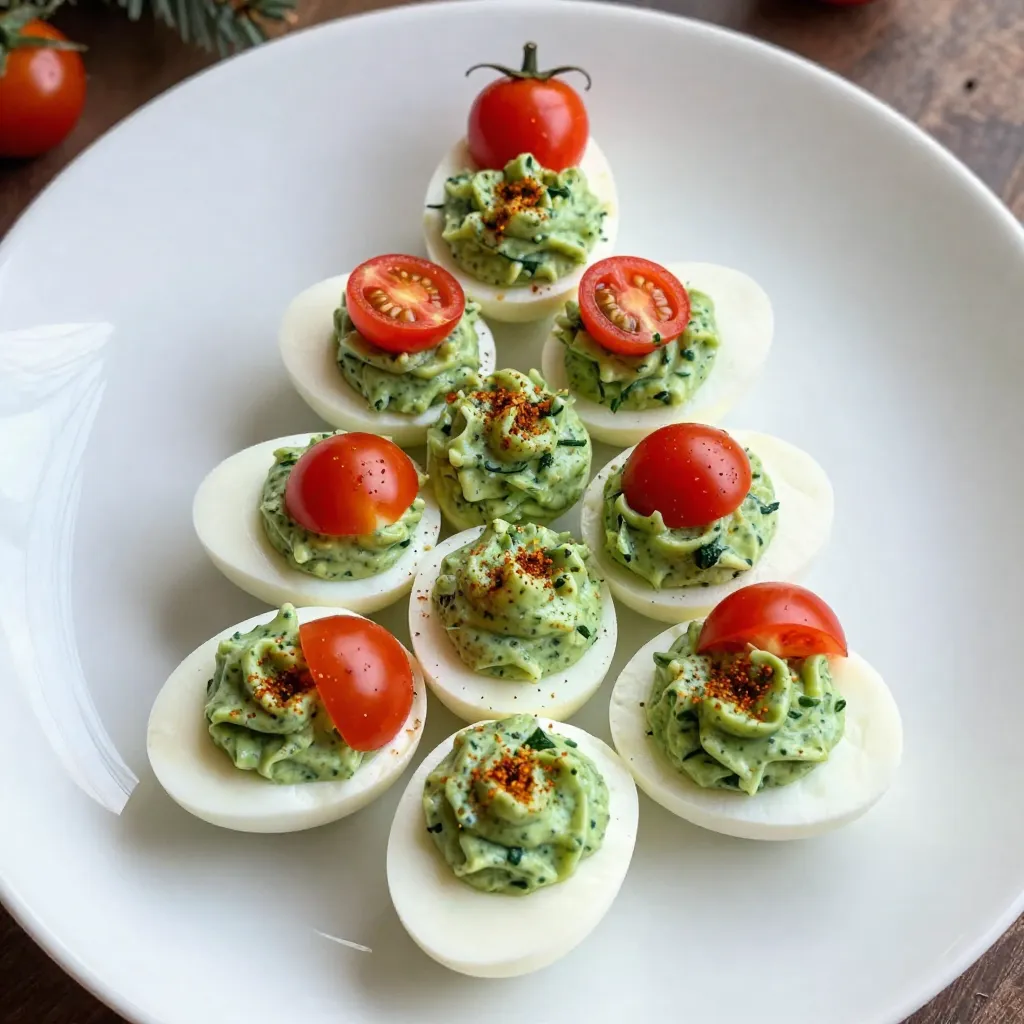
Assemble the Christmas Tree
Place the filled egg halves on a festive platter. Try to arrange them in a triangular shape to look like a Christmas tree. For fun, stack two layers of eggs, using fewer eggs on top for a tree effect.
Decorate and Serve
Top each egg half with a half of a mini cherry tomato to look like ornaments. Sprinkle smoked paprika around the edges for a festive touch. Use two small slices of bell pepper at the base for the tree trunk. Chill the decorated eggs for 15 minutes before serving. Enjoy these tasty treats cold!
Tips & Tricks
Perfecting the Hard-Boiling Technique
To get perfect hard-boiled eggs, start with cold water. Place the eggs in a pot and cover them with water. You want about an inch of water above the eggs. Heat the pot over medium-high heat until it boils. Once it boils, cover and remove it from heat. Let the eggs sit for 12 minutes. This method makes the eggs easy to peel. After 12 minutes, cool them down in an ice bath. This step helps the shells come off smoothly.
Variations for Flavor Enhancement
To add more flavor, try different spices. You can mix in garlic powder or onion powder. Consider adding fresh herbs like dill or chives for a fresh taste. If you want a kick, add a dash of hot sauce to the yolk mixture. For a creamier texture, use Greek yogurt instead of mayonnaise. These changes can make your Christmas Tree Deviled Eggs unique and tasty.
Creative Presentation Suggestions
How you present your deviled eggs matters. Arrange the eggs in a triangular shape on a bright green platter. This mimics a Christmas tree. Stack the eggs for height and a fun look. Use mini cherry tomatoes as ornaments on top. Lightly sprinkle smoked paprika around the eggs for color. Finally, place slices of bell pepper at the base to form the trunk. For extra flair, add a bed of parsley or arugula. This adds color and makes your dish pop!
Pro Tips
- Use Fresh Eggs: Fresh eggs are easier to peel after boiling, making your deviled eggs look more presentable.
- Customize the Filling: Feel free to add other herbs or spices to the yolk mixture for extra flavor, such as dill or chives.
- Experiment with Toppings: Try different toppings like crumbled bacon or olives for a unique twist on your Christmas tree deviled eggs.
- Chill Before Serving: Allow the filled eggs to chill in the refrigerator for at least 15 minutes to enhance the flavors and presentation.
Variations
Adding Different Herbs or Spices
You can make Christmas Tree Deviled Eggs even more fun by adding herbs. Try fresh dill, chives, or cilantro for a burst of flavor. These herbs give a fresh taste and enhance the look of your eggs. A sprinkle of garlic powder or onion powder can also add depth. Experiment with what you love best!
Alternative Fillings or Toppings
If you want to shake things up, think about using different fillings. You can mix the yolks with avocado instead of mayonnaise for a creamy twist. Another tasty option is adding crumbled bacon or shredded cheese for extra flavor. For toppings, consider using olives or pimentos to add color and interest.
Vegetarian Options
For a veggie twist, skip the egg yolk filling entirely. You can use mashed avocado or hummus as a base. This makes it rich and creamy without eggs. You can also add finely chopped cucumbers or radishes for crunch. These options keep your deviled eggs bright and festive while being meat-free.
Storage Info
Best Practices for Storing Deviled Eggs
I suggest placing your Christmas Tree Deviled Eggs in an airtight container. This keeps them fresh and moist. You can stack them carefully to save space. Always use plastic wrap to cover the eggs if you do not have a container. This extra layer helps to keep them from drying out.
How Long Can They Be Kept?
You can store deviled eggs in the fridge for up to two days. However, they taste best within the first 24 hours. If they sit too long, the egg whites can get watery. Always check for any off smells or changes in texture before eating.
Reheating Tips (if applicable)
These deviled eggs are best served cold, so reheating is not needed. If you do prefer them warm, try putting them in the oven at a low heat. Cover them with foil to prevent drying out. Heat for about 10 minutes, then serve. Enjoy your festive treat!
FAQs
Can I Make Christmas Tree Deviled Eggs Ahead of Time?
Yes, you can make these deviled eggs ahead of time. Prepare them a day before your event. Just store them in the fridge. Cover them well to keep them fresh.
What Can I Use Instead of Mayonnaise?
If you want a mayo swap, try Greek yogurt. It adds creaminess and tang. You can also use avocado for a rich flavor. Both options keep your eggs tasty and healthy.
How Do I Prevent Eggs from Cracking While Boiling?
To avoid cracks, start with cold water. Gently place the eggs in the pot. Add an inch of water over them. Bring the water to a boil slowly. This method keeps the eggs safe.
Can I Customize the Vegetable Decorations?
Absolutely! You can use any colorful veggies. Try mini bell peppers or olives. Carrots or cucumber slices work too. Let your creativity shine with fun shapes and colors.
This blog post covered how to make festive Christmas Tree Deviled Eggs. We explored essential ingredients, step-by-step instructions, and tips for perfecting the recipe. I shared ways to personalize your dish and storage guidelines to keep them fresh.
These deviled eggs are not only fun to make but also delightfully festive for any gathering. Remember to get creative with your decorations and flavors. Enjoy making this tasty trea

Christmas Tree Deviled Eggs
Ingredients
- 6 large eggs
- 3 tablespoons mayonnaise
- 1 teaspoon Dijon mustard
- 1 teaspoon white vinegar
- to taste Salt and pepper
- 0.25 teaspoon smoked paprika (for garnish)
- 0.25 cup finely chopped fresh spinach
- 0.25 cup mini cherry tomatoes (halved)
- 2 small slices bell pepper
Instructions
- Hard Boil the Eggs: Gently place the eggs in a large pot and cover them with cold water, ensuring there's about an inch of water above the eggs. Bring the water to a boil over medium-high heat. Once boiling, cover the pot with a lid, remove it from the heat, and let the eggs sit for 12 minutes. Afterward, transfer the eggs to an ice bath to cool completely.
- Prepare the Filling: Once the eggs have cooled, carefully tap each egg on a hard surface and peel the shells under running water if needed. Slice each egg in half lengthwise and gently remove the yolks, placing them in a mixing bowl.
- Make the Mixture: Using a fork, mash the egg yolks until crumbly. Then add the mayonnaise, Dijon mustard, white vinegar, salt, and pepper. Mix everything together until the mixture is smooth and creamy. Finally, fold in the finely chopped fresh spinach.
- Pipe the Filling: Transfer the yolk mixture to a piping bag. Carefully pipe the creamy filling back into the hollowed egg whites, creating a generous mound.
- Create the Christmas Trees: Arrange the filled egg halves on a festive serving platter in a triangular shape, mimicking the look of a Christmas tree.
- Decorate: Place a mini cherry tomato half on top of each filled egg half to serve as a colorful ornament. Lightly sprinkle smoked paprika around the edges of the eggs. Use the small slices of bell pepper at the base of your egg display to create the trunk of your Christmas tree.
- Serve: Chill the decorated eggs in the refrigerator for about 15 minutes to let them set before serving.


![- 1 lb lobster tails, halved lengthwise - 1 lb fresh sea scallops - 4 tablespoons unsalted butter, divided - 4 cloves garlic, finely minced - 1 lemon, juiced (about 2 tablespoons) - 2 tablespoons fresh parsley, finely chopped - Salt and freshly ground black pepper, to taste - Lemon wedges, for serving When I prepare Easy Garlic Butter Lobster Scallops, I love how fresh ingredients shine. The lobster tails and scallops are the stars of this dish. Using fresh seafood makes all the difference. Each bite bursts with flavor. Butter brings richness to the dish. I use unsalted butter to control the saltiness. Garlic adds a lovely aroma and taste. It’s important to finely mince the garlic. This helps to spread its flavor evenly. I always squeeze fresh lemon juice for brightness. The juice balances the rich butter. Chopped parsley adds a nice touch. It gives the dish a pop of color and freshness. Don’t forget about seasoning! Salt and black pepper enhance the seafood’s natural flavor. I like to season both the lobster and scallops well before cooking. Lastly, lemon wedges are a must. They add a fresh hit of citrus when served. I find that a squeeze of lemon elevates the whole meal. For the full recipe, check out the details above. Enjoy creating this flavorful delight! First, take the lobster tails and scallops out of the package. Gently pat them dry with a paper towel. This step is key for a nice sear later. Next, season them with salt and black pepper. Make sure to cover all sides for even flavor. Now, let’s get cooking! In a large skillet, melt 2 tablespoons of unsalted butter over medium heat. Once the butter is melted and bubbly, add the minced garlic. Sauté the garlic for about one minute until it is fragrant. Be careful not to let it burn. Next, add the lobster tails to the skillet. Place them cut-side down first. Sear the tails for about 3-4 minutes until they turn golden brown. Then, carefully flip them over and cook for another 2-3 minutes. They should look opaque and fully cooked. Remove them and set aside. Now, it’s time for the scallops. Add them to the same skillet, making sure not to overcrowd them. Sear each side for about 2-3 minutes until they get a beautiful golden crust. Once done, remove the scallops and place them with the lobster. Return the cooked lobster to the skillet. Squeeze in the fresh lemon juice and sprinkle the chopped parsley over everything. Gently toss the lobster and scallops in the garlic butter sauce. This will help all the flavors blend nicely. Finally, serve the lobster and scallops on a large platter. Drizzle any remaining garlic butter sauce over the seafood. Garnish with more parsley and add lemon wedges on the side. For the full recipe, check the detailed instructions above. Enjoy your tasty dish! To make your lobster and scallops shine, start with good searing. Searing gives seafood a nice crust. Heat your skillet until it's hot. Add butter and let it melt before placing the seafood in. This helps lock in flavors and moisture. Drying your seafood before cooking is very important. Use paper towels to pat the lobster tails and scallops dry. Removing excess moisture helps achieve that perfect golden sear. Wet seafood will steam instead of sear. Adding herbs and spices can elevate your dish. Fresh thyme or basil can add great flavor. A pinch of red pepper flakes can give it a nice kick. Don't be afraid to experiment with flavors you love. For sauces, consider making a light citrus sauce. A mix of lemon juice and olive oil works well. You can also add a splash of white wine for depth. These additions can enhance the overall taste of your seafood. Presentation matters when serving seafood. Arrange the lobster tails and scallops on a large platter. Place them in a way that looks inviting. You can stack the scallops for a layered look. Garnishing makes your dish pop. Use chopped parsley for a fresh touch. Lemon wedges add color and a burst of flavor. A well-presented dish makes a great impression, so take your time with this step. Want to try this delicious dish? Check out the [Full Recipe]. {{image_4}} If you cannot find lobster or scallops, you have options. You can use shrimp instead of lobster. Shrimp cooks fast and adds great flavor. For scallops, try using firm fish like cod or halibut. Both will work well in this dish. For dairy-free butter, consider using olive oil or coconut oil. Both options will give a nice taste. You can also find plant-based butter in stores. Just make sure it melts well for your sauce. You can cook your seafood in different ways. Grilling is a fun option. It gives a smoky flavor that pairs well with garlic. Just brush the lobster and scallops with butter before grilling. Sautéing is great for a quick meal. It lets the garlic and butter shine through. Broiling is another method to try. It cooks the seafood from above. This method creates a crispy top while keeping the inside juicy. You will get a different flavor profile that is equally delicious. For side dishes, consider a fresh salad or garlic bread. A light pasta with lemon pairs well, too. These sides will balance the rich flavors of the seafood. As for drinks, a crisp white wine like Sauvignon Blanc is perfect. It cuts through the richness of the butter. If you prefer non-alcoholic drinks, try sparkling water with lemon. It refreshes the palate nicely. For the full recipe, check the Easy Garlic Butter Lobster Scallops 🦞🧄 section. To keep your Easy Garlic Butter Lobster Scallops fresh, place them in an airtight container. This helps avoid any unwanted smells in your fridge. Make sure to refrigerate them within two hours of cooking. They can last up to three days in the fridge. If you notice any off smell or discoloration, it's best to toss them out. When you want to enjoy your leftovers, the best way to reheat is on the stove. Use low heat to warm them gently. This keeps the seafood tender. You can also use the microwave, but do it in short bursts to avoid overcooking. Cover the dish with a damp paper towel to keep moisture in. Remember, seafood can dry out quickly. Yes, you can freeze lobster scallops! However, freezing may change their texture. To freeze, place them in a freezer-safe bag or container. Remove as much air as possible before sealing. They can stay frozen for up to three months. When you're ready to use them, thaw in the fridge overnight. Avoid thawing at room temperature to keep them safe. If you're looking for the full recipe, check out the Easy Garlic Butter Lobster Scallops recipe above! You can tell when scallops are done by their color and texture. They should be opaque and firm. A golden crust on the outside shows they are well-seared. Avoid cooking them too long. Overcooked scallops become rubbery and tough. Common mistakes include overcrowding the pan and not drying them well. Always dry scallops with paper towels. This helps them sear nicely and not steam. Yes, you can use frozen lobster tails and scallops. Just make sure to choose high-quality seafood. Look for ones that are flash-frozen for best taste. To thaw, place them in the fridge overnight. If you're in a hurry, seal them in a bag and submerge in cold water for about 30 minutes. Cook them right after thawing for the best flavor. Pair your dish with light sides. A fresh salad with lemon vinaigrette works well. Roasted asparagus or green beans add great color and flavor. For a complete meal, serve with garlic bread and a glass of white wine. This combination enhances the rich flavors of the lobster and scallops. You can find the full recipe for Easy Garlic Butter Lobster Scallops and create a delightful feast! This blog post highlighted key ingredients for an easy garlic butter lobster and scallops dish. I walked you through preparation, cooking, tips for perfect seafood, and variations to keep meals exciting. You now have practical storage info and answers to common questions. No matter how you serve this dish, it promises flavor. Enjoy crafting a meal that impresses everyone at your table. Happy cooking!](https://fastmealmate.com/wp-content/uploads/2025/06/dfec37c8-f7d2-4a99-9114-2c33cea5f0b3-768x768.webp)

![Fresh strawberries are the star of this drink. They give a sweet and tart flavor. Choose ripe, bright red strawberries. They should smell sweet and feel firm. Slice them into small pieces for easy mixing. You will need 2 cups of fresh strawberries, hulled and sliced. Dried apricots add depth to the tea. They bring a chewy texture and a rich sweetness. Make sure to pick soft, bright apricots for the best taste. Chop them into small pieces to help them blend with the strawberries. You will need 1 cup of dried apricots, chopped into small pieces. These flavor enhancers boost the tea's taste. Black tea gives a strong base. Use either 2 tablespoons of loose black tea or 4 tea bags. Honey adds sweetness, so adjust to your taste. You will need 2 tablespoons of honey. Fresh lemon juice brightens the flavors and balances the sweetness. Squeeze juice from 1 lemon into the mix. Finally, fresh mint leaves provide a refreshing touch for garnish. For the full recipe, check the details above. Start by gathering your ingredients. You need fresh strawberries and dried apricots. - 2 cups fresh strawberries, hulled and sliced - 1 cup dried apricots, chopped into small pieces In a large heatproof bowl or pitcher, combine the sliced strawberries and chopped apricots. This mix brings together sweet and tart flavors. Pour 4 cups of boiling water over the fruit. Make sure all the fruit is under the water. Let it steep for about 10 minutes. This waiting time helps the flavors blend nicely. Next, we add the tea. You can use either loose black tea or tea bags. - 2 tablespoons loose black tea or 4 individual black tea bags Add the tea to the fruit mixture after the first steep. Let it sit for an extra 5 minutes. This step mixes the bold tea taste with the fruity flavor. After steeping, remove the tea bags or strain it through a fine mesh sieve. Press the fruit gently with a spoon to get all the good flavors out. While the tea is still warm, it’s time to add sweetness and zest. - 2 tablespoons honey (adjust according to your sweetness preference) - Juice of 1 fresh lemon Stir in the honey and lemon juice. Mix well until the honey dissolves. Let the tea cool at room temperature for about 10-15 minutes. Then, chill it in the fridge for at least 30 minutes. This chilling time enhances the taste. Serve the tea over ice in glasses. For a nice touch, add fresh mint leaves on top. This drink is a colorful and tasty way to enjoy a sunny day. For the full recipe, check out the [Full Recipe]. Using fresh and high-quality ingredients makes your tea stand out. Choose ripe strawberries with bright red color. Avoid any that look dull or have brown spots. For apricots, select dried ones that feel soft and moist, not hard or dry. These choices help create a sweet and fruity taste in your drink. When using tea, opt for loose black tea for a richer flavor. Sweetness is key to balancing flavors. If you like it sweeter, add more honey. Start with two tablespoons, then taste. You can always add more if needed. For a different twist, try using agave syrup or maple syrup. They both add a unique flavor. Always mix well until the sweetener dissolves, ensuring a smooth blend. Leftover strawberries and apricots can be stored. Place them in an airtight container in the fridge. They last for about three days. You can use leftover fruit in smoothies or yogurt. For leftover tea, store it in a sealed jar. Keep it in the fridge for up to a week. Enjoy it cold or heat it up for a warm drink. {{image_4}} You can swap strawberries and apricots for other fruits. Try peaches, raspberries, or mangoes. Each fruit will give a new twist to the tea. Peaches add a sweet, juicy taste, while raspberries bring a tart kick. Mangoes offer a tropical flair. Use what you love or what’s in season. I enjoy both iced and hot Strawberry Apricot Sunrise Tea. Serve it hot for a cozy feel. It warms you up on chilly days. For a refreshing treat, serve it iced. Pour the tea over ice and add mint leaves. This makes a perfect summer drink. You can enjoy it any time of year. Honey is great, but you can use other sweeteners too. Maple syrup adds a unique flavor. Agave nectar is another option, as it dissolves easily. For a sugar-free choice, try stevia. Adjust the amount to suit your taste buds. Sweetness can change the whole drink. You can store Strawberry Apricot Sunrise Tea in the fridge for up to three days. Use a clean, airtight container. This keeps the tea fresh and tasty. If you have leftovers, pour them into a pitcher. Seal it well, and place it in the fridge. Cold tea is perfect for hot days. If you want to keep the tea longer, freeze it. Pour the cooled tea into ice cube trays. Once frozen, pop the cubes into a freezer bag. This way, you can enjoy the tea later. Just remember, frozen tea is best used within three months. To serve chilled tea, just pour it over ice. If you want warm tea, heat it gently. Use a pot on low heat. Avoid boiling, as this can change the flavor. Stir in fresh mint for extra taste when serving. Enjoy the refreshing flavor of Strawberry Apricot Sunrise Tea! Strawberry Apricot Sunrise Tea is not just tasty; it also offers many health benefits. Strawberries are high in vitamin C, which boosts your immune system. They also have antioxidants that can help fight inflammation. Apricots provide vitamin A, which is great for your skin and eyes. Plus, they add natural sweetness without too much sugar. Black tea can improve heart health and boost focus. When you mix all these ingredients, you create a drink that is both delicious and good for you. Yes, you can use different types of tea! While black tea is the main choice here, you have options. Green tea adds a lighter flavor and more antioxidants. Herbal teas, such as chamomile or hibiscus, can offer unique tastes. If you prefer caffeine-free, herbal blends are perfect. Just adjust steeping times based on the type of tea you choose. Each tea will change the flavor and health benefits, so feel free to experiment. To make this tea more refreshing in summer, try a few simple tricks. First, serve it over ice, as it cools you down quickly. You can also add more lemon juice for a zesty kick. Fresh mint leaves not only add flavor but also a cooling effect. For a fruity twist, toss in additional fresh fruit slices, like peaches or citrus. Lastly, consider blending the tea with ice for a slushy drink. These tips will elevate your Strawberry Apricot Sunrise Tea to a perfect summer drink. This blog post covered how to make Strawberry Apricot Sunrise Tea. You learned about fresh strawberries, dried apricots, and flavor enhancers. We looked at preparing the fruit, steeping the tea, and tips for best quality. You now know variations, storage methods, and answers to common questions. Enjoy making this tasty tea. Experiment with different fruits and flavors. Treat yourself to a drink that's both fun and healthy. Enjoy every sip!](https://fastmealmate.com/wp-content/uploads/2025/06/c3c6e810-3cfa-4a88-aebb-572649891222-768x768.webp)

