
Looking to impress your guests this holiday season? My Christmas Stuffed Mushrooms are both festive and packed with flavor. These delicious treats are easy to make and perfect for any gathering. Whether you’re a seasoned chef or a kitchen newbie, I’ll guide you through every step. Get ready to delight your taste buds and make your celebrations even more special with this tasty dish!
Why I Love This Recipe
- Delicious Flavor Combination: The creamy filling combined with the earthy mushrooms creates a delightful taste experience that’s hard to resist.
- Easy to Prepare: This recipe is simple and quick, making it perfect for busy holiday gatherings when you want to impress your guests without a lot of fuss.
- Customizable Ingredients: You can easily adapt the filling with your favorite herbs, nuts, or cheeses to suit your personal taste or dietary needs.
- Perfect for Any Occasion: These stuffed mushrooms are not just for the holidays; they make a fantastic appetizer for any party or gathering throughout the year.
Ingredients
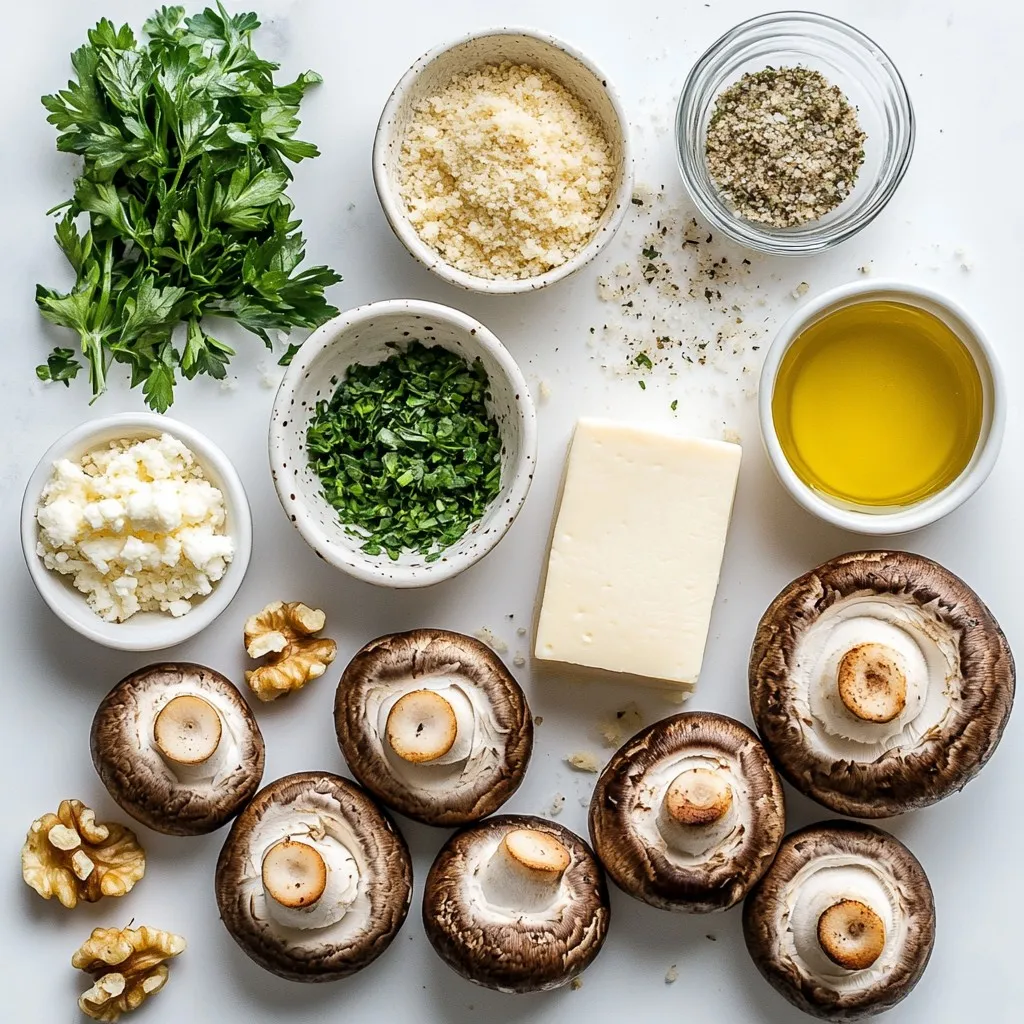
List of Ingredients
– 20 large cremini or button mushrooms, carefully stems removed
– 1 cup cream cheese, softened to room temperature
– 1/2 cup freshly grated Parmesan cheese
– 1/4 cup seasoned breadcrumbs
– 1/4 cup fresh parsley, finely chopped
– 2 cloves garlic, minced
– 1 teaspoon dried thyme
– 1/2 teaspoon coarse salt
– 1/4 teaspoon freshly cracked black pepper
– 1/4 cup walnuts, chopped (optional)
– Extra virgin olive oil for drizzling
Description of Key Ingredients
The main star of this dish is the mushroom. I like using large cremini or button mushrooms. They are meaty and hold up well when baked. The cream cheese makes the filling creamy and rich. Freshly grated Parmesan cheese adds a lovely salty flavor. Seasoned breadcrumbs give texture and enhance the taste. Fresh parsley brightens the dish with color and flavor. Garlic and thyme add depth, while walnuts offer a nice crunch if you choose to include them. Extra virgin olive oil helps keep everything moist and adds flavor.
Option for Substitutions
If you can’t find cremini or button mushrooms, you can use portobello mushrooms. They are larger and can hold even more filling. For a lighter option, swap cream cheese with ricotta cheese. You can replace Parmesan with any hard cheese you like, such as pecorino. If you want to skip the breadcrumbs, use crushed nuts or oats for a gluten-free version. If you don’t like walnuts, try pecans or skip them altogether.
Step-by-Step Instructions
Prepping the Mushrooms
Start by washing the mushrooms under cold water. Next, remove the stems gently. You want the caps intact for stuffing. Place the caps upside down on a plate. This helps them hold the filling later.
Making the Filling
In a bowl, mix the softened cream cheese and Parmesan cheese. Add the seasoned breadcrumbs, parsley, garlic, thyme, salt, and pepper. If you like walnuts, chop them and add to the mix. Stir until it’s smooth and creamy. This mixture is the heart of your stuffed mushrooms.
Stuffing the Mushrooms
Grab a small spoon or piping bag for ease. Fill each mushroom cap with the cheese mixture. Make sure to overfill them a bit for a lovely look. Press the filling down slightly, so it stays put while baking.
Baking Instructions
Preheat your oven to 375°F (190°C). Grease a baking sheet lightly or use parchment paper. Place the stuffed mushrooms on the sheet, leaving space between them. Drizzle olive oil on top of each mushroom. Bake for 20-25 minutes. You want the mushrooms tender and the filling golden. When done, let them cool for a few minutes before serving. Enjoy your festive treat!
Tips & Tricks
Perfecting the Filling Texture
To get the best filling, mix cream cheese and Parmesan well. This keeps the texture smooth and creamy. The seasoned breadcrumbs help with structure, so don’t skip them. If you want crunch, add chopped walnuts. They give a nice bite and a fun twist.
Ensuring Even Cooking
For even cooking, space the mushrooms apart on the baking sheet. This helps hot air flow around them. Drizzling olive oil on top keeps them moist. Bake until they are soft and golden. It usually takes about 20-25 minutes. You can check with a fork; it should go in easily.
Presentation Tips
To impress your guests, use a nice platter. Arrange the stuffed mushrooms in a circle or line. Sprinkle fresh parsley on top for color. You can place them on greens for a festive touch. This makes them look even more inviting and delicious!
Pro Tips
- Use Fresh Herbs: Fresh herbs like thyme and parsley enhance the flavor significantly compared to dried spices. Always opt for fresh whenever possible!
- Choose the Right Mushrooms: Cremini mushrooms offer a deeper flavor than button mushrooms. Experiment with different varieties for unique tastes!
- Make Ahead: Prepare the filling a day in advance and refrigerate it. Just fill the mushrooms and bake them right before serving for a fresher taste.
- Don’t Overcrowd the Pan: Ensure mushrooms are spaced on the baking sheet to allow even cooking and browning. This helps them retain their moisture and flavor.
Variations
Vegetarian-Friendly Options
You can make these stuffed mushrooms vegetarian by using plant-based cream cheese. This type of cheese keeps the creamy texture. You can also add spinach or artichokes to the filling. Both add great flavor and nutrients. Consider using nuts instead of cheese for a nutty taste.
Different Cheese Combinations
Feel free to mix it up with different cheeses. Feta cheese gives a tangy twist. Goat cheese adds a creamy, rich flavor. If you love blue cheese, it brings a bold taste. Each cheese adds its own special flavor to the mushrooms.
Seasonal Ingredient Twists
Using seasonal ingredients can elevate your stuffed mushrooms. In fall, try adding roasted butternut squash or cranberries for a sweet touch. In spring, fresh peas or asparagus can brighten the dish. Experimenting with seasonal flavors can make your mushrooms even more festive and fun!
Storage Info
How to Store Leftovers
To keep your leftover stuffed mushrooms fresh, place them in an airtight container. Store them in the fridge for up to three days. Make sure they cool down to room temperature before sealing them. This helps lock in the flavor and moisture.
Reheating Instructions
When you’re ready to enjoy your leftovers, preheat your oven to 350°F (175°C). Place the mushrooms on a baking sheet. Heat them for about 10-15 minutes or until warm. This method keeps them crispy and tasty. You can also use a microwave, but they may lose some texture.
Freezing Tips
If you want to save some stuffed mushrooms for later, freezing works well. First, let them cool completely. Then, arrange them in a single layer on a baking sheet and freeze. After they are frozen solid, transfer them to a freezer bag or container. They can last up to three months. When you’re ready to eat them, thaw in the fridge overnight before reheating.
FAQs
Can I make stuffed mushrooms ahead of time?
Yes, you can make stuffed mushrooms ahead of time. Prepare the filling and stuff the mushrooms a day before the event. Store them in the fridge in a covered container. When you are ready to bake, just pop them in the oven. Bake them for about 25-30 minutes. This allows the flavors to meld well and makes your meal prep easier.
What are some good dips or sauces to serve with stuffed mushrooms?
Stuffed mushrooms are great on their own, but dips can add fun flavors. Here are some ideas:
– Garlic aioli: Creamy and rich, it pairs well with the mushrooms.
– Marinara sauce: A classic choice that adds a tangy kick.
– Ranch dressing: A cool and creamy option for those who enjoy a dip.
– Pesto: Bright and herby, it can elevate the dish more.
How can I make stuffed mushrooms healthier?
You can make stuffed mushrooms healthier with a few easy swaps. Try these tips:
– Use low-fat cream cheese instead of regular.
– Substitute whole grain breadcrumbs for seasoned ones.
– Add more vegetables to the filling, like spinach or bell peppers.
– Skip the oil drizzle or use a light spray instead.
These changes keep the flavor while making the dish a bit lighter.
Stuffed mushrooms are a tasty dish you can easily make at home. We covered the key ingredients and their roles in creating flavor. The step-by-step guide makes it simple to prepare, stuff, and bake your mushrooms. Remember the tips to perfect the filling and ensure even cooking for the best results. You can explore variations and storage tips to keep your dish fresh. Now, you have everything needed to impress your family and friends with delicious stuffed mushrooms. Enjoy making this dish your ow


